In today’s fast-paced digital landscape, virtual machines (VMs) have become indispensable tools for developers, IT professionals, businesses, and even casual users. They offer unparalleled flexibility for testing software, running different operating systems, developing in isolated environments, and ensuring business continuity. However, merely creating a VM is just the first step. To truly unlock its full potential, transforming a clunky, unresponsive virtual environment into a smooth, integrated powerhouse, you need to install a critical suite of utilities known as VMware Tools.
This guide will delve deep into what VMware Tools are, why they are essential, and provide detailed, step-by-step instructions for their installation across popular guest operating systems. Beyond the technical specifics, we’ll also explore how optimizing your virtual environments with these tools translates into tangible benefits, touching upon productivity gains, enhanced security, and even the strategic implications for your professional brand and financial efficiency.

Understanding VMware Tools: The Essential Virtualization Companion
Many users, especially those new to virtualization, might wonder why their brand-new virtual machine feels sluggish, has poor display resolution, or lacks basic functionalities like drag-and-drop file sharing. The answer lies in the absence of specialized drivers and utilities designed to facilitate seamless communication between the guest operating system (the OS running inside the VM) and the host operating system (the OS running VMware itself). This is precisely the gap that VMware Tools fills.
What Are VMware Tools and Why Do You Need Them?
VMware Tools is a suite of utilities that enhances the performance of the virtual machine’s guest operating system and improves the management of the VM. Essentially, they act as the bridge, providing crucial drivers and services that replace generic ones provided by the guest OS itself, which are not optimized for a virtualized environment.
Without VMware Tools, a VM operates at a significant disadvantage. Imagine trying to drive a high-performance sports car with bicycle tires – it might move, but it won’t perform anywhere near its designed capability. VMware Tools provides the specialized “tires” and “engine tuning” necessary for peak virtual machine performance.
The Tangible Benefits for Your Virtual Machines
The installation of VMware Tools brings a host of immediate and significant improvements, impacting virtually every aspect of your VM experience. These benefits are not just about convenience; they directly contribute to efficiency, stability, and a more professional user experience.
- Enhanced Graphics Performance: One of the most noticeable improvements is often in the display. VMware Tools installs optimized video drivers, enabling higher screen resolutions, better color depth, and smoother graphical rendering. This is crucial for applications that demand visual fidelity or for simply avoiding the frustration of a cramped, low-resolution screen.
- Seamless Mouse Integration: Without VMware Tools, your mouse cursor often gets “trapped” within the VM window, requiring you to press a specific key combination (like Ctrl+Alt) to release it. With the tools installed, the mouse moves freely and smoothly between the host and guest operating systems, providing a much more natural and fluid user experience.
- Improved Network Performance: VMware Tools includes optimized network drivers (such as VMXNet3) that significantly boost network throughput and reduce latency, crucial for web servers, development environments, or any VM requiring fast and reliable network access.
- Shared Folders and Drag-and-Drop Functionality: This is a productivity game-changer. VMware Tools enables shared folders, allowing you to easily access files on your host machine directly from your VM. Furthermore, the ability to drag and drop files and folders between the host and guest operating systems, and even copy-paste text, images, or files across them, streamlines workflows immensely, saving time and reducing friction.
- Time Synchronization: Your virtual machine’s clock can sometimes drift out of sync with your host machine or network time. VMware Tools ensures that the guest OS time is accurately synchronized with the host, preventing issues with logs, timestamps, and applications that rely on precise timekeeping.
- Virtual Machine Management: The tools provide the guest OS with the ability to communicate with the host hypervisor, enabling features like graceful shutdown/restart commands, automatic power-off operations, and the ability to take consistent snapshots (memory-state snapshots) without data corruption. This is vital for maintaining system integrity and automating management tasks.
- Clipboard Sharing: Copying text from your host to your guest, or vice-versa, becomes a simple Ctrl+C / Ctrl+V operation, eliminating the need for cumbersome workarounds.
These improvements cumulatively transform a basic VM into a highly functional, responsive, and easy-to-manage virtual environment, essential for any serious user.
Preparing for Installation: Essential Prerequisites and Considerations
Before you embark on the installation process, a brief moment of preparation can save you considerable time and potential headaches down the line. Ensuring your virtual environment is in an optimal state minimizes the chances of encountering issues and ensures a smooth setup.
Verifying Your Virtual Machine Setup
First, confirm that your virtual machine is powered on and that the guest operating system is fully booted and stable. You should be logged into the guest OS with administrative privileges, as the installation process typically requires elevated permissions to install drivers and system services.
Ensure you have sufficient free disk space within your virtual machine for the VMware Tools installation files and the necessary drivers. While the tools themselves are not excessively large, a crowded disk can sometimes impede installation.
Snapshots and System State: A Safety Net
For any critical virtual machine or before undertaking significant system changes, including driver installations, it is highly recommended to create a snapshot of your VM. A snapshot captures the entire state of your virtual machine at a specific moment in time. If anything goes wrong during the VMware Tools installation (though rare), you can easily revert to the previous working state, preventing data loss or system corruption. This “safety net” is a best practice in virtualization, aligning with robust digital security and backup protocols. It protects your investment in time and data, reinforcing a responsible approach to IT management, which also reflects positively on your professional brand.
Step-by-Step Installation Guides
The method for installing VMware Tools varies slightly depending on the guest operating system running inside your virtual machine. However, the overarching principle remains the same: the VMware hypervisor provides an ISO image or package containing the tools, which is then accessed and installed within the guest OS.
Installing VMware Tools on Windows Guest OS
This is generally the most straightforward installation process due to Windows’ user-friendly graphical interface.
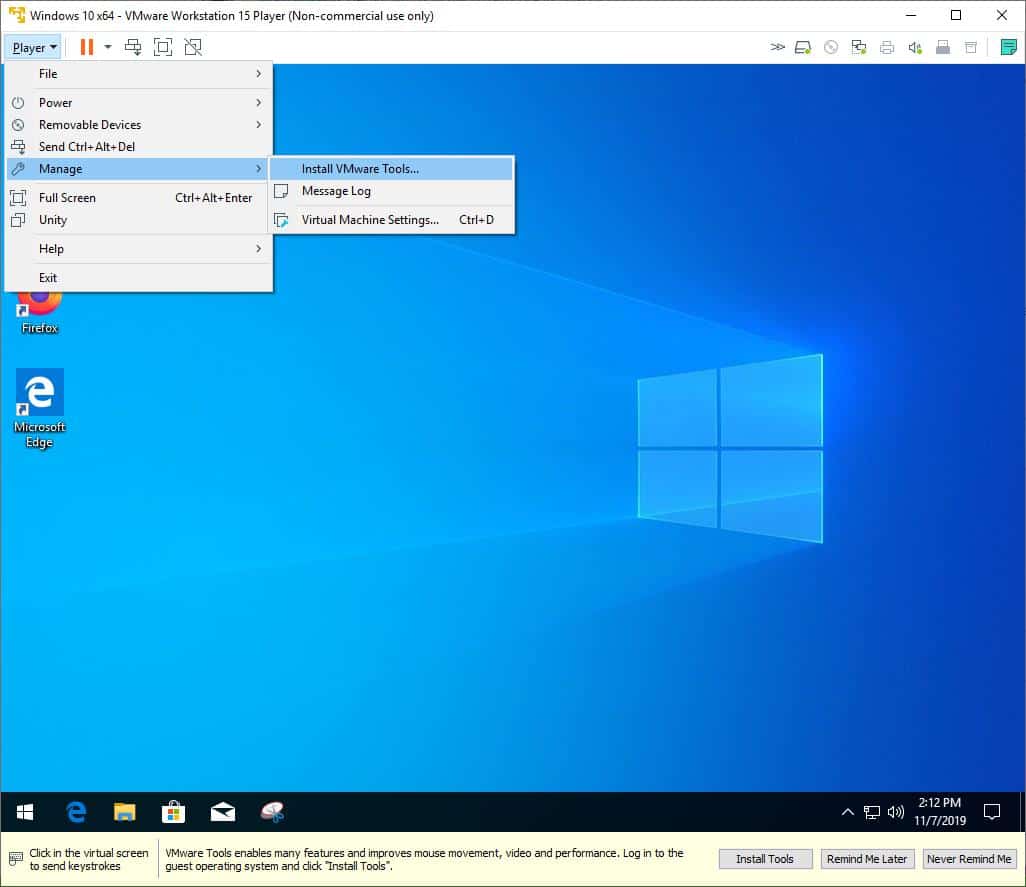
- Start the Installation Process: With your Windows VM powered on and logged in, navigate to the VMware product menu.
- VMware Workstation/Player: Go to
VM->Install VMware Tools...(orReinstall VMware Tools...if an older version is detected). - VMware vSphere Client/vCenter: Right-click on the VM in the inventory, then select
Guest OS->Install VMware Tools.
VMware will virtually mount the VMware Tools ISO image as a CD-ROM drive within your Windows guest OS.
- VMware Workstation/Player: Go to
- Run the Installer:
- In most modern Windows versions (Windows 10/11, Server 2016/2019/2022), an AutoPlay notification will pop up. Click on it and select
Run setup.exeorInstall VMware Tools. - If AutoPlay doesn’t appear, open
File Explorer, navigate to “This PC,” and double-click on the virtual CD/DVD drive (which will often be labeled “VMware Tools”). Then, double-clicksetup.exe(for 32-bit systems) orsetup64.exe(for 64-bit systems).
- In most modern Windows versions (Windows 10/11, Server 2016/2019/2022), an AutoPlay notification will pop up. Click on it and select
- Follow the Installation Wizard: The VMware Tools Setup Wizard will launch.
- Click
Nexton the welcome screen. - Choose a setup type: “Typical” is usually sufficient for most users and is recommended. “Complete” installs all components, while “Custom” allows you to select specific features.
- Click
Next, thenInstall. - The wizard will copy files and install the necessary drivers and services. You may see screen flickering as the display drivers are installed.
- Click
- Complete and Reboot: Once the installation is complete, click
Finish. The wizard will prompt you to restart your virtual machine to apply all changes. ClickYesto restart immediately. - Verify: After the VM reboots, you should immediately notice improved display resolution, seamless mouse movement, and enabled features like drag-and-drop. You can also verify the installation by going back to the
VMmenu in VMware Workstation/Player; the option should now sayReinstall VMware Tools...orUpgrade VMware Tools...(if an update is available) instead ofInstall VMware Tools....
Installing VMware Tools on Linux Guest OS

Linux installations can take two primary paths: using open-vm-tools via the distribution’s package manager (recommended for most modern distributions) or installing the official VMware Tools bundle.
Using open-vm-tools (Recommended for Modern Linux)
Most modern Linux distributions include open-vm-tools in their official repositories. This open-source implementation provides almost all the functionality of VMware’s proprietary tools and is generally easier to maintain through the system’s package manager.
- Update Package List: Open a terminal in your Linux VM and update your package lists:
- Debian/Ubuntu-based:
sudo apt update - Red Hat/Fedora-based:
sudo yum check-updateorsudo dnf check-update
- Debian/Ubuntu-based:
- Install
open-vm-tools:- For command-line/server installations:
- Debian/Ubuntu:
sudo apt install open-vm-tools - Red Hat/Fedora/CentOS:
sudo yum install open-vm-toolsorsudo dnf install open-vm-tools
- Debian/Ubuntu:
- For desktop environments (provides GUI integration like drag-and-drop):
- Debian/Ubuntu:
sudo apt install open-vm-tools-desktop - Red Hat/Fedora/CentOS:
sudo yum install open-vm-tools-desktoporsudo dnf install open-vm-tools-desktop
- Debian/Ubuntu:
- For command-line/server installations:
- Reboot: After installation, reboot your VM:
sudo reboot. - Verify: Check for improved display, mouse integration, and shared folder functionality.
Installing VMware Tools via VMware’s Official Bundle (If open-vm-tools isn’t an option or for specific needs)
- Start Installation: In your Linux VM, go to the VMware product menu and select
VM->Install VMware Tools...This will mount the VMware Tools ISO. - Mount the ISO: If the ISO doesn’t auto-mount, you’ll need to mount it manually. First, create a mount point:
sudo mkdir /mnt/cdrom
Then, mount the ISO:
sudo mount /dev/cdrom /mnt/cdrom(or/dev/sr0on some systems) - Extract the Installer: Navigate to the mounted directory and copy the installer to a temporary location (e.g., your home directory).
cd /mnt/cdrom
tar -zxf VMwareTools-*.tar.gz -C /tmp/ - Run the Installer Script: Navigate to the extracted directory and run the installation script:
cd /tmp/vmware-tools-distrib
sudo ./vmware-install.pl
Follow the prompts. PressEnterto accept most default options, unless you have specific reasons to change them. - Unmount and Clean Up: After installation, unmount the ISO and clean up the temporary files:
sudo umount /mnt/cdrom
rm -rf /tmp/vmware-tools-distrib - Reboot: Restart your Linux VM:
sudo reboot. - Verify: Confirm improved performance and features.
Installing VMware Tools on macOS Guest OS
While less common, installing macOS in a VM (often for development or testing specific Mac applications) also benefits from VMware Tools.
- Start Installation: In your macOS VM, go to the VMware product menu and select
VM->Install VMware Tools...This will mount a virtual CD/DVD containing the VMware ToolsDMGfile. - Run the Installer: On the macOS desktop, a “VMware Tools” drive icon should appear. Double-click it to open.
Inside, you’ll find a package installer (usuallyInstall VMware Tools.pkg). Double-click this to launch the installer. - Follow the Installation Wizard: The installer will guide you through the process.
- Click
ContinueandInstall. - You will be prompted for your macOS administrator password.
- During the installation, you may encounter security prompts regarding “System Extension Blocked” or requiring you to allow specific software from “VMware, Inc.” in
System Settings(orSystem Preferenceson older macOS versions) ->Privacy & Security->General. If prompted, clickOpen Security & PrivacyandAllow. You may need to click the lock icon to make changes.
- Click
- Restart: Once the installation finishes, you will be prompted to restart your macOS VM. Click
Restart. - Verify: After rebooting, check for optimal display resolution, smooth mouse tracking, and clipboard sharing.
Post-Installation and Troubleshooting Common Issues
Successfully installing VMware Tools is usually straightforward, but occasional hiccups can occur. Knowing how to verify the installation and troubleshoot common problems ensures your virtual environment remains optimized.
Verifying Installation and Functionality
After restarting your VM, the immediate visual cues are often the best indicators:
- Resolution: Your VM’s display resolution should automatically adjust to fit the window size or be set to a higher, optimal resolution.
- Mouse: The mouse pointer should move seamlessly between the host and guest without needing to press Ctrl+Alt.
- Shared Folders/Clipboard: Test shared folders (if configured) and clipboard sharing by copying text between host and guest.
- VMware Status: In VMware Workstation/Player, the
VMmenu option should now readReinstall VMware Tools...orUpgrade VMware Tools...instead ofInstall VMware Tools.... In vSphere, the VM summary will typically show “VMware Tools: Running (Current)” or similar.
Addressing Common Installation Hurdles
- “Install VMware Tools” Option is Grayed Out:
- Already Installed: The tools might already be installed. Check the VM status as described above.
- Guest OS Not Running: Ensure the VM is powered on and the guest OS is fully booted.
- ISO Not Available: In rare cases, the VMware Tools ISO might not be accessible. Try repairing your VMware Workstation/Player installation or check the vCenter server’s configuration.
- Installation Fails or Rolls Back (Windows):
- Antivirus/Firewall: Temporarily disable security software that might interfere.
- Corrupted Download: If using a separate download, ensure the installer isn’t corrupted.
- Conflicting Drivers: Old or problematic video/network drivers in the guest OS can conflict. Try booting into Safe Mode (if possible) or removing existing problematic drivers before installation.
- Linux Installation Errors:
- Missing Kernel Headers: The official VMware Tools bundle requires kernel headers to compile some modules. Ensure they are installed:
sudo apt install build-essential linux-headers-$(uname -r)(Ubuntu/Debian) orsudo yum install kernel-devel(RHEL/CentOS/Fedora) before runningvmware-install.pl. - Permission Issues: Ensure you’re running the installer with
sudo. - Incorrect
open-vm-tools: Verify you installed the correct package (open-vm-tools-desktopfor GUI,open-vm-toolsfor server).
- Missing Kernel Headers: The official VMware Tools bundle requires kernel headers to compile some modules. Ensure they are installed:
- No Mouse/Keyboard after Installation: This is rare but can occur due to driver conflicts. Rebooting the VM (even a hard reset if necessary) often resolves it. If not, revert to a snapshot and try again.
Advanced Configuration and Optimization Tips
Once installed, VMware Tools operate largely in the background. However, for specific use cases, you might delve into advanced settings:
- Time Synchronization: You can configure the frequency and source of time synchronization through the VMware Tools control panel (Windows) or configuration files (Linux).
- Shared Folders: Configure which host folders are shared with the guest OS and set permissions.
- Scripting: VMware Tools enables guest OS scripting to run commands during power-on, power-off, suspend, or resume events, automating tasks and integrating VMs into larger automation workflows.
Beyond Installation: Leveraging VMware Tools for Productivity and Security
Installing VMware Tools is more than just a technical chore; it’s a strategic move that fundamentally enhances your virtual environment, leading to tangible benefits that touch upon productivity, security, and even the strategic perception of your digital operations.
Enhancing Workflow Efficiency and Collaboration
For individuals, the seamless mouse, drag-and-drop, and shared clipboard functionalities directly translate into reduced friction and faster task completion. For teams, especially in development or testing environments, this efficiency is multiplied. Developers can quickly transfer code or assets, QA teams can easily grab screenshots or log files, and IT administrators can perform maintenance tasks with greater agility. This streamlined workflow saves precious time, allowing resources to be focused on core business objectives rather than battling with a clunky virtual interface. In essence, it boosts your “Tech” productivity, directly impacting your “Money” through saved labor hours.
Security Implications and Best Practices
While VMware Tools primarily focuses on performance, it also plays a role in security. By providing optimized and updated drivers, it can reduce the attack surface that generic, potentially outdated, drivers might present. Furthermore, the ability to take consistent snapshots is a powerful security feature, allowing safe experimentation and quick recovery from malicious activity or system failures. Regular updates to VMware Tools are also crucial, as they often include bug fixes and security patches that keep your virtual environments robust. Implementing these practices demonstrates a commitment to “Digital Security,” a critical aspect of protecting your “Brand” and financial assets.
The ROI of Optimized Virtual Environments
Considering the marginal effort required to install VMware Tools, the return on investment (ROI) is exceptionally high. An optimized VM reduces user frustration, minimizes troubleshooting time, and accelerates development and testing cycles. For a business, this means faster time-to-market for new products, more efficient IT operations, and ultimately, a more productive workforce. The modest investment of time to properly configure your VMs pays dividends in sustained performance and reliability, directly contributing to “Online Income” and overall financial health by maximizing the utility of your virtual infrastructure. A professionally configured and optimized virtual environment also projects a strong, capable “Brand” image, reflecting competence and attention to detail in your technological endeavors.
In conclusion, installing VMware Tools is not an optional extra but a fundamental step towards creating a robust, efficient, and secure virtual environment. Whether you’re a professional managing complex server infrastructures, a developer building next-gen applications, or a student experimenting with new operating systems, leveraging these tools is key to unlocking the full power of virtualization and ensuring your digital endeavors are as smooth and productive as possible.
aViewFromTheCave is a participant in the Amazon Services LLC Associates Program, an affiliate advertising program designed to provide a means for sites to earn advertising fees by advertising and linking to Amazon.com. Amazon, the Amazon logo, AmazonSupply, and the AmazonSupply logo are trademarks of Amazon.com, Inc. or its affiliates. As an Amazon Associate we earn affiliate commissions from qualifying purchases.