The motherboard, often referred to as the “backbone” or “nervous system” of a computer, is arguably the most critical component in any PC build. It’s the central hub that allows all other hardware—from the CPU and RAM to the graphics card and storage drives—to communicate and function as a cohesive system. For tech enthusiasts, gamers, and professionals alike, understanding how to properly install a motherboard isn’t just a technical skill; it’s a foundational rite of passage into the world of PC building. This comprehensive guide will walk you through every step of the process, ensuring a smooth and successful installation, whether you’re building your first rig or upgrading an existing one.
Embarking on a DIY PC build offers a unique blend of satisfaction, cost savings, and unparalleled customization. Beyond the immediate financial benefits of avoiding pre-built system markups, it’s an invaluable learning experience that demystifies the intricate workings of modern computing. This hands-on approach allows you to select each component based on your specific needs, budget, and desired performance, giving you complete control over your machine’s capabilities. Furthermore, mastering fundamental skills like motherboard installation enhances your tech literacy, making you more self-reliant for future upgrades, troubleshooting, and maintenance. It’s not just about assembling parts; it’s about building knowledge, confidence, and a truly personalized computing experience.
Pre-Installation Essentials: Gathering Your Tools and Knowledge
Before you even think about opening your PC case, thorough preparation is paramount. This initial phase is crucial for preventing common pitfalls, protecting delicate components, and ensuring a streamlined installation process. Think of it as laying the groundwork for a successful project; the more meticulous you are here, the smoother the rest of the build will be. This section covers everything from the essential tools you’ll need to understanding the intricate components you’re about to integrate, setting you up for success.
Required Tools and Workspace Preparation
A clean, organized, and static-free workspace is non-negotiable when dealing with sensitive electronic components. Static electricity, while often imperceptible, can cause irreparable damage to your hardware. Start by clearing a spacious, well-lit area, preferably on a non-carpeted floor. Gather the following essential tools:
- Phillips Head Screwdrivers: You’ll primarily need a #2 size for most case and motherboard screws, and occasionally a #1 for smaller components like M.2 SSDs. Magnetic tips can be helpful, but be cautious around sensitive areas.
- Anti-Static Wrist Strap or Mat: This is your primary defense against electrostatic discharge (ESD). The wrist strap should be comfortably worn and clipped to an unpainted metal surface of your PC case or power supply once it’s plugged into the wall (but switched off).
- Zip Ties or Velcro Cable Straps: Essential for neat cable management, which improves airflow and aesthetics.
- Thermal Paste: If your CPU cooler doesn’t come with pre-applied thermal paste (or you’re using an aftermarket cooler), you’ll need a small tube of high-quality thermal compound. This ensures efficient heat transfer from the CPU to the cooler.
- Flashlight: Invaluable for illuminating tight spaces and hidden connectors inside the case.
- User Manuals: Keep the manuals for your motherboard, CPU cooler, and PC case close at hand. They contain critical information regarding specific connector locations, standoff placements, and troubleshooting codes.
By investing a little time in preparation, you’re not just organizing; you’re safeguarding your significant financial investment in these components and setting the stage for a professional-looking and high-performing system.
Understanding Your Components
Familiarity with your hardware is key to a confident installation. Each component plays a specific role, and knowing their general characteristics will help you understand their placement and connectivity:
- Motherboard Form Factors: Motherboards come in various sizes, most commonly ATX, Micro-ATX, and Mini-ITX. Ensure your chosen motherboard’s form factor is compatible with your PC case. The form factor dictates the number of expansion slots, RAM slots, and overall size.
- CPU Socket Types: The central processing unit (CPU) socket is unique to Intel (e.g., LGA1700, LGA1200) or AMD (e.g., AM5, AM4) processors. Verify that your CPU and motherboard socket types are perfectly matched. Forcing an incompatible CPU can permanently damage both components.
- RAM Slots: Motherboards typically have two or four RAM (Random Access Memory) slots. Understanding whether your board supports DDR4 or DDR5 memory and which slots to populate for optimal dual-channel or quad-channel performance (refer to your motherboard manual) is crucial.
- PCIe Slots: These are the long slots designed for expansion cards, most notably your graphics card (GPU) which usually occupies the top, reinforced PCIe x16 slot. Other slots are for sound cards, network cards, or NVMe SSD adapter cards.
- M.2 Slots: Many modern motherboards feature one or more M.2 slots for compact, high-speed NVMe Solid State Drives. These often come with heatsinks to manage thermals.
- SATA Ports: Used for traditional SATA SSDs and Hard Disk Drives (HDDs).
- Front Panel Connectors: These tiny, often frustrating connectors link your case’s power button, reset button, USB ports, and audio jacks to the motherboard. Their precise orientation is vital and detailed in your motherboard manual.
A brief review of each component’s manual before you begin will clarify any uncertainties and highlight specific installation nuances, empowering you to proceed with confidence. This foundational knowledge not only aids in the current build but also serves as a strong basis for future upgrades and troubleshooting, aligning perfectly with the “Tech” focus of acquiring deep, practical understanding.
Step-by-Step Motherboard Installation Process
With your tools ready and components understood, it’s time to begin the physical installation. This section details the sequence of events, from preparing your case to securing the motherboard and making the initial vital connections. Each step is designed to be followed carefully to ensure component integrity and proper system functionality.
Initial Preparations and Case Setup
Your PC case is the home for all your components, and preparing it correctly is the first physical step.
- Unbox the Case and Remove Side Panels: Carefully unbox your PC case. Most cases have two side panels that can be removed, usually by unscrewing thumb screws at the rear and sliding them off. Set them aside in a safe place.
- Install the I/O Shield (if not pre-attached): Many modern, higher-end motherboards come with an integrated I/O shield, but if yours doesn’t, this thin metal plate needs to be snapped into the back of your PC case before the motherboard. Locate the opening at the rear of your case and firmly press the shield into place from the inside, ensuring it’s flush. Be mindful of any sharp edges.
- Install Motherboard Standoffs: Standoffs are small metal risers that prevent your motherboard from shorting out against the metal case tray. Your case will likely have some pre-installed, but you might need to add or remove others to match your motherboard’s screw hole pattern. Gently place your motherboard inside the case (without screwing it in) to identify which standoff locations align with its screw holes. Use a screwdriver or a special standoff tool (often included with the case) to install any missing standoffs. Ensure they are tightened but not overtightened.
Taking your time with these initial steps ensures a proper foundation and prevents potential electrical issues later on.
Mounting the CPU and CPU Cooler
The CPU and its cooler are critical for your PC’s performance and thermal management. This is a delicate process, so proceed with extreme care.
- Open the CPU Socket Lever: On the motherboard, locate the CPU socket and its small metal retention arm. Push the arm down and away from the socket to release the cover. Remove the plastic CPU socket protector (if present) and set it aside; do not touch the gold pins/pads inside the socket.
- Align and Install the CPU: Examine your CPU and the socket for alignment indicators. Intel CPUs typically have two notches on the sides, while AMD CPUs usually have a golden triangle on one corner. Match these indicators precisely with those on the socket. Gently lower the CPU straight down into the socket. Do not force it. If it doesn’t drop in easily, re-check alignment.
- Close the Socket Lever: Once the CPU is seated, lower the metal retention arm back into its locked position. This will secure the CPU. You might feel some resistance, which is normal.
- Apply Thermal Paste (if necessary): If your CPU cooler doesn’t have thermal paste pre-applied, apply a pea-sized dot of thermal paste to the center of the CPU’s integrated heat spreader (IHS). This small amount is sufficient; spreading it manually is often unnecessary and can introduce air bubbles.
- Install the CPU Cooler: Follow your cooler’s specific instructions. This usually involves mounting a backplate (if required) on the rear of the motherboard, then carefully positioning the cooler over the CPU and securing it with screws or clips. Ensure even pressure distribution. For air coolers, orient the fan(s) to push air towards the rear or top exhaust of the case. For AIO liquid coolers, mount the pump block to the CPU and secure the radiator to an appropriate fan mount in your case.
- Connect the CPU Fan Header: Locate the “CPUFAN” header on your motherboard (refer to the manual) and connect the CPU cooler’s fan cable to it. If you have an AIO pump, connect its power cable to a “PUMPFAN” or “AIO_PUMP” header if available, or a standard fan header if not.
Installing RAM Modules
Random Access Memory (RAM) is crucial for multitasking and application performance. Installing it is relatively straightforward.
- Open RAM Slot Clips: On each end of the RAM slots you intend to use, push the small clips outwards until they click open.
- Align and Install RAM Sticks: Examine your RAM sticks for a notch along the bottom edge. This notch must align with the corresponding raised section in the RAM slot. If you have two RAM sticks, consult your motherboard manual for the recommended dual-channel configuration (e.g., slots A2 and B2, often indicated by color coding).
- Press Firmly: With the notch aligned, place the RAM stick into the slot and press down firmly and evenly on both ends until the clips snap back into place, securing the stick. You should hear a satisfying click. If the clips don’t automatically close, gently push them in.
Securing the Motherboard into the Case
Now, it’s time to permanently mount the motherboard.
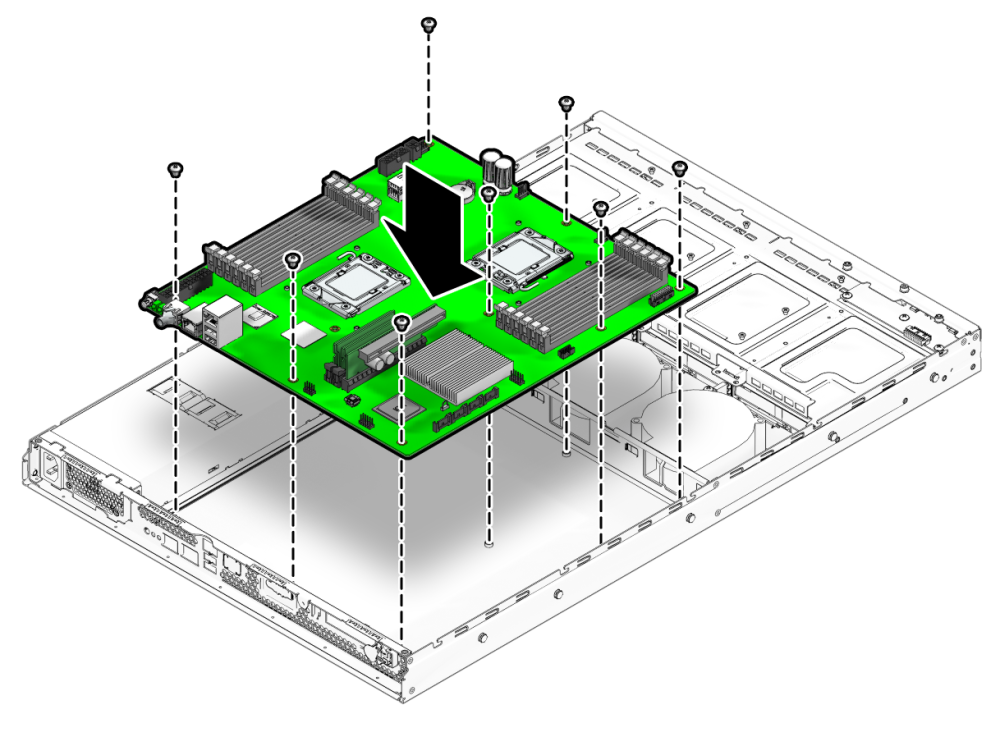
- Carefully Lower the Motherboard: Holding the motherboard by its edges, gently lower it into the case. Guide the I/O ports through the I/O shield opening at the back of the case and align the motherboard’s screw holes with the standoffs you installed earlier. Ensure no cables or other components are trapped underneath.
- Screw the Motherboard: Once aligned, use your Phillips #2 screwdriver to screw the motherboard into the standoffs. Start with a central screw to stabilize the board, then proceed to the others. Tighten them snugly, but do not overtighten, as this can strip the screws or damage the motherboard. Usually, 6 to 9 screws are required, depending on the motherboard size.
Connecting Essential Cables
With the motherboard physically installed, the next crucial step is connecting all the necessary power and data cables. This powers the board and allows it to communicate with the case’s front panel controls.
- 24-pin ATX Power Connector: This is the largest connector from your power supply (PSU). Locate the corresponding port on your motherboard (usually on the right edge) and firmly push the connector in until it clicks. Ensure the clip latches securely.
- 8-pin (or 4+4-pin) CPU Power Connector: This connector, also from your PSU, provides dedicated power to the CPU. It’s usually located near the top-left corner of the motherboard. Plug it in firmly. Some high-end motherboards might have an additional 4-pin or even an extra 8-pin connector for extreme overclocking.
- Front Panel Connectors: These are the smallest and often most fiddly connectors, linking your case’s power button, reset button, HDD LED, and Power LED to the motherboard. Refer extensively to your motherboard manual for their exact placement and polarity (positive/negative). Incorrect placement won’t damage anything but might prevent your power button from working or LEDs from lighting up. Typically, they are located at the bottom-right edge of the motherboard.
- USB Headers: Connect your case’s front panel USB 2.0 (usually a 9-pin block) and USB 3.0/3.2 (a larger, blue block) headers to their respective ports on the motherboard. These are usually polarized and only fit one way.
- Front Panel Audio Header: Connect the HD Audio cable from your case’s front panel to the corresponding header on the motherboard, usually found along the bottom edge.
Careful attention to these connections ensures your system receives power and responds to your case’s controls. This systematic approach not only facilitates a smooth build but also significantly reduces the chances of errors, protecting your investment and ensuring your new technology functions as intended.
Post-Installation & Troubleshooting
Once the motherboard is securely in place and essential cables are connected, you’re on the home stretch. This phase involves integrating other critical components, managing your cables for optimal performance and aesthetics, and preparing for the momentous “first boot.” It also includes crucial advice on what to do if things don’t go perfectly, saving you time and potential frustration.
Installing Other Components
With the motherboard as your foundation, you can now add the remaining pieces of your PC puzzle:
- Graphics Card (GPU):
- Locate the primary PCIe x16 slot, typically the top-most and reinforced one.
- Remove the corresponding expansion slot cover(s) from your case.
- Open the retention clip at the end of the PCIe slot.
- Align your GPU with the slot and press down firmly until it clicks into place and the retention clip closes. You might need to wiggle it slightly.
- Secure the GPU to the case with the screw(s) or latch mechanism.
- Connect any necessary PCIe power cables from your PSU to the GPU (usually 6-pin, 8-pin, or 12-pin connectors).
- Storage Drives (SSDs/HDDs):
- NVMe M.2 SSDs: If you have an M.2 SSD, locate the M.2 slot(s) on your motherboard. Remove the small screw or standoff. Insert the M.2 SSD at a slight angle into the slot, then gently push it down and secure it with the screw or retention clip. Many motherboards include M.2 heatsinks; remove the protective film from the thermal pad and install the heatsink over the SSD.
- SATA SSDs/HDDs: Mount your 2.5-inch SSDs or 3.5-inch HDDs into the appropriate drive bays/trays in your case. Secure them with screws.
- Connect one SATA data cable from each drive to a SATA port on your motherboard.
- Connect one SATA power cable from your PSU to each drive.
Cable Management
Cable management isn’t just about aesthetics; it significantly impacts airflow, which is vital for component longevity and stable performance. Poor cable management can obstruct airflow, leading to higher temperatures and potentially reduced system performance.
- Route Cables: Utilize the cutouts and channels in your PC case, typically located behind the motherboard tray, to route cables. This keeps them out of the main airflow path.
- Secure with Ties: Use zip ties or Velcro straps to bundle cables neatly and secure them to tie-down points on the case. Aim for clean, direct runs.
- Prioritize Airflow: Ensure that no cables are obstructing fan intakes or exhausts.
A well-managed cable system not only makes your PC look professional but also contributes to better thermal efficiency, protecting your high-tech investments over time and perhaps even enhancing the “brand” appeal of your custom build.
First Boot and Basic Troubleshooting
The moment of truth: powering on your newly built PC.
- Double-Check All Connections: Before powering on, take one last, thorough look. Are all power cables securely plugged in? Are RAM sticks fully seated? Is the CPU cooler fan spinning freely and connected? Are front panel connectors in the correct orientation?
- Connect Peripherals: Plug in your monitor, keyboard, and mouse.
- Power On: Flip the PSU switch to the ‘on’ position, then press your case’s power button.
- Observe:
- Do the fans spin?
- Do any LEDs light up?
- Does anything appear on your monitor (even just a BIOS splash screen)?
- Do you hear any beeping sounds? (Beep codes often indicate specific errors; refer to your motherboard manual.)
- Basic Troubleshooting Steps (If No POST/Display):
- No Power: Ensure the PSU is switched on and both the 24-pin and CPU power connectors are firmly seated.
- No Display/Beep Codes:
- Reseat RAM: The most common culprit. Remove and firmly reseat each RAM stick, ensuring the clips engage. Try booting with just one stick in the recommended primary slot.
- Reseat GPU: Ensure the graphics card is fully seated in its PCIe slot and any required power cables are connected. Try connecting your monitor to the motherboard’s integrated graphics output (if your CPU supports it) to rule out a GPU issue.
- Check CPU Cooler: Ensure the cooler is properly mounted and the CPU_FAN header is connected. Some motherboards won’t POST if they don’t detect a CPU fan.
- Clear CMOS: If you suspect an incorrect BIOS setting, find the CMOS clear jumper or button on your motherboard (refer to manual) and reset the BIOS to default settings.
- Front Panel Connectors: If the power button isn’t working, double-check these tiny connections against your manual. You can also try shorting the power pins with a screwdriver to bypass the button.
Systematic troubleshooting, patience, and referencing your manuals are your best allies here. Successfully navigating these initial steps demonstrates not only your technical prowess but also the robustness of your decision to invest time and effort in a DIY build.
Elevating Your Build: Beyond the Basics
Congratulations on successfully installing your motherboard and assembling your PC! While the hardware installation is a significant achievement, the journey doesn’t end there. To truly unlock the potential of your new machine and ensure its longevity, there are several crucial post-build steps and ongoing maintenance considerations. These aspects transform a collection of components into a fully functional, optimized, and enduring computing solution.
Software and Driver Installation
A PC without software is just a fancy paperweight. This phase brings your hardware to life.
- Operating System Installation: Your first major step is installing your chosen operating system (e.g., Windows, Linux). You’ll typically create a bootable USB drive using another computer, then boot from it on your new PC to begin the installation process. Follow the on-screen prompts.
- Motherboard Drivers: Once the OS is installed, you’ll need to install essential motherboard drivers. These include:
- Chipset Drivers: Crucial for allowing your CPU and motherboard to communicate effectively with other components.
- LAN/Wi-Fi Drivers: Necessary to get internet access. Often, these are the first drivers you’ll install so you can download the rest.
- Audio Drivers: For sound output.
- USB Drivers: To ensure all USB ports function correctly.
You can typically find these on your motherboard manufacturer’s website or on a driver CD/USB that came with your motherboard. Always prefer downloading the latest versions from the official website.
- Graphics Card Drivers: Your GPU requires its own specialized drivers for optimal performance, especially for gaming and demanding applications. Download these directly from NVIDIA (GeForce) or AMD (Radeon) websites, ensuring you select the correct driver for your specific card and OS version.
- Other Peripheral Drivers: Install drivers for any other specialized peripherals like printers, webcams, or gaming accessories.
Keeping your drivers up-to-date is a continuous process that ensures peak performance, stability, and security for your system.
Maintenance and Longevity
Building a PC is an investment, both in terms of money and time. Protecting that investment requires ongoing care and attention to detail.
- Dust Control: Dust is the enemy of electronics. It acts as an insulator, trapping heat and impeding airflow, which can lead to overheating and component failure. Regularly (every 3-6 months) clean the inside of your PC using compressed air to remove dust from fans, heatsinks, and vents. Ensure your case has good dust filters.
- Thermal Monitoring: Use software like HWMonitor, HWiNFO64, or your motherboard’s utility software to keep an eye on CPU and GPU temperatures. Unusually high temperatures can indicate issues with cooling, fan speed, or dust buildup. Understanding normal operating temperatures helps you catch problems early.
- BIOS/UEFI Updates: Motherboard manufacturers periodically release BIOS/UEFI updates that can improve stability, add support for new hardware (like newer CPUs), or fix bugs. Consult your motherboard manual for the proper update procedure, as incorrect updates can render your board inoperable. Only update if there’s a specific reason or benefit.
- Cable Management Check: Periodically inspect your cable management. Over time, cables can shift or come loose. Re-securing them ensures continued good airflow.
- Future Upgrades: A DIY PC offers unparalleled upgradeability. As technology evolves, you can selectively upgrade components like RAM, storage, or the graphics card, extending the life of your system and saving money compared to buying a whole new pre-built PC. Keep abreast of technology trends and component compatibility.
By diligently performing these maintenance tasks, you’re not just preserving your hardware; you’re maximizing its performance, extending its lifespan, and reaffirming the wise “Money” decision to build your own system.
Conclusion
Installing a motherboard and building your own PC is a profoundly rewarding experience. It’s a journey that takes you from a collection of disparate parts to a fully functional, high-performance machine tailored precisely to your needs. This guide has aimed to demystify the process, providing clear, step-by-step instructions and practical advice to empower you, regardless of your prior experience.
Beyond the immediate satisfaction of seeing your creation come to life, building a PC imbues you with a deeper understanding of technology – a crucial skill in our increasingly digital world. It fosters problem-solving abilities, meticulous attention to detail, and a sense of ownership over your digital tools. This hands-on expertise not only saves you money on labor and allows for better component value, but it also builds your personal “Brand” as a capable tech enthusiast. You gain the confidence to troubleshoot issues, perform upgrades, and truly understand the intricacies beneath the sleek exterior of modern computing.
As you enjoy your custom-built machine, remember that this is just the beginning. The world of tech is constantly evolving, and your journey as a builder is a continuous process of learning, optimizing, and refining. Embrace the possibilities, stay curious, and continue to explore the endless potential of your own technology.
aViewFromTheCave is a participant in the Amazon Services LLC Associates Program, an affiliate advertising program designed to provide a means for sites to earn advertising fees by advertising and linking to Amazon.com. Amazon, the Amazon logo, AmazonSupply, and the AmazonSupply logo are trademarks of Amazon.com, Inc. or its affiliates. As an Amazon Associate we earn affiliate commissions from qualifying purchases.