
In an age where digital demands are constantly escalating, from juggling multiple browser tabs and sophisticated applications to engaging in high-fidelity gaming and intricate content creation, a laptop’s performance is paramount. Often, users find their once-snappy machine struggling, plagued by slowdowns, frustrating freezes, and a general lack of responsiveness. While many factors can contribute to a sluggish system, one of the most impactful and surprisingly straightforward upgrades you can undertake is enhancing your laptop’s Random Access Memory, or RAM.
This comprehensive guide will walk you through the entire process of installing new RAM into your laptop, transforming it from a frustrating bottleneck to a smooth, efficient powerhouse. Whether you’re a casual user tired of lag or a professional seeking every ounce of performance, upgrading your RAM is an investment in your productivity and digital experience. By demystifying the process, we aim to empower you with the knowledge and confidence to perform this crucial hardware upgrade yourself, saving money and gaining a deeper understanding of your device.
Why Upgrade Your Laptop’s RAM? The Performance Edge
Before diving into the mechanics of installation, it’s vital to understand why a RAM upgrade is so beneficial and how it contributes to your laptop’s overall performance. Often misunderstood, RAM plays a critical role in your system’s day-to-day operations.
Understanding RAM: Your Laptop’s Short-Term Memory
Think of RAM as your laptop’s short-term memory or its active workspace. When you open an application, load a webpage, or work on a document, the data needed for those tasks is temporarily stored in RAM. Unlike your hard drive (which is long-term storage), RAM allows the CPU to access this information almost instantaneously. The more RAM you have, the larger this “workspace” becomes, enabling your laptop to handle more tasks simultaneously and switch between them more smoothly without having to constantly fetch data from the slower long-term storage.
For instance, if you have 8GB of RAM, your system has 8 gigabytes of ultra-fast storage dedicated to active tasks. If you open a demanding application that needs 4GB, and then another that needs 3GB, you’re already using 7GB. Add a dozen browser tabs, and your RAM can quickly fill up. When RAM is maxed out, your operating system starts using a portion of your much slower hard drive (or SSD) as “virtual memory.” This process, known as “swapping,” is significantly slower than accessing physical RAM, leading to the noticeable performance drops and delays that signify a struggling system.
Signs You Need a RAM Upgrade
Identifying the need for a RAM upgrade is often intuitive once you understand its function. Here are some common indicators that your laptop could benefit from more memory:
- Frequent Stuttering and Freezing: Your laptop often pauses or locks up for several seconds, especially when switching between applications or opening new ones.
- Slow Application Loading: Programs take an unusually long time to launch, even simple ones.
- Poor Multitasking Performance: You struggle to run several applications simultaneously without a significant drop in speed. Switching between browser tabs or different software becomes a chore.
- Excessive Disk Activity: Even when not actively saving files, you notice your hard drive light constantly flickering, and you hear disk activity (if you have an HDD). This often indicates the system is heavily relying on virtual memory.
- Browser Tab Reloads: If your web browser frequently reloads tabs when you switch back to them, it’s a classic sign of insufficient RAM forcing the browser to free up memory.
- Poor Gaming or Editing Performance: Demanding tasks like modern gaming, video editing, or graphic design software require substantial RAM. If these tasks are consistently slow, choppy, or crash, more RAM is a likely solution.
- “Out of Memory” Errors: While less common on modern systems unless extremely taxed, explicit “out of memory” warnings are a clear sign.
The Benefits of More RAM
Upgrading your laptop’s RAM can yield a multitude of immediate and tangible benefits:
- Snappier Multitasking: Run more applications, browser tabs, and background processes concurrently without performance degradation.
- Faster Application Loading and Switching: Programs will launch quicker and transitions between them will be seamless.
- Smoother User Experience: Overall system responsiveness will improve dramatically, making your laptop feel faster and more enjoyable to use.
- Enhanced Productivity: Spend less time waiting for your computer and more time accomplishing tasks.
- Improved Gaming and Content Creation: Experience higher frame rates in games and smoother performance in resource-intensive applications like Photoshop, Premiere Pro, or AutoCAD.
- Future-Proofing: As software evolves and demands more resources, additional RAM can extend the usable life of your laptop.
- Cost-Effective Upgrade: Compared to buying a new laptop, a RAM upgrade is often a significantly more affordable way to breathe new life into an older machine.
Essential Preparations: Getting Ready for Your RAM Upgrade
A successful RAM installation hinges on thorough preparation. This stage is crucial for ensuring compatibility, gathering the right tools, and, most importantly, prioritizing your safety and the longevity of your laptop.
Identifying Compatible RAM for Your Laptop
This is arguably the most critical step. Installing the wrong type of RAM can range from simply not working to potentially damaging your system. Here’s what you need to consider:
- Form Factor (SODIMM): Laptops use smaller memory modules called SODIMM (Small Outline Dual In-line Memory Module), which are physically shorter than the DIMM modules used in desktop PCs. Ensure you purchase SODIMM RAM.
- DDR Generation (DDR3, DDR4, DDR5): RAM comes in different generations: DDR3, DDR4, and the latest DDR5. These generations are not cross-compatible due to different pin configurations and operating voltages. You cannot install DDR4 RAM into a DDR3 slot or vice-versa.
- How to Check:
- System Information (Windows): Press
Win + R, typemsinfo32, and hit Enter. Look for “System Type” and then browse categories for “Memory.” This might give you clues, but for definitive answers, specialized tools are better. - Task Manager (Windows 10/11): Press
Ctrl + Shift + Escto open Task Manager. Go to the “Performance” tab, then click on “Memory.” Here you’ll see your current RAM capacity, speed (e.g., 2400MHz), and generation (e.g., DDR4). - About This Mac (macOS): Click the Apple menu in the top-left corner, then “About This Mac.” Click “Memory” for details on installed RAM.
- Third-Party Tools (Recommended): Software like CPU-Z provides detailed information about your current RAM, including its type (DDR generation), speed, voltage, and the number of slots used.
- Manufacturer’s Specifications: The most reliable method is to check your laptop’s exact model number on the manufacturer’s website (e.g., Dell, HP, Lenovo, Acer, Asus, Apple). They will list the supported RAM type, maximum capacity, and number of slots.
- System Information (Windows): Press
- How to Check:
- Speed (MHz): RAM speed is measured in megahertz (MHz), e.g., 2400MHz, 3200MHz. Ideally, match the speed of your existing RAM if you’re adding to it, or purchase modules at the highest speed supported by your laptop’s motherboard. Faster RAM will generally downclock to match the slowest module installed or the maximum speed supported by your CPU/motherboard.
- Capacity (GB): Determine how much RAM you need and what your laptop can support. Most modern laptops support 16GB or 32GB, with some high-end models supporting 64GB. Check your manufacturer’s specs for the maximum supported RAM. Consider whether you want to replace existing modules or add new ones to empty slots.
- Voltage: While less common to manually check, DDR3 typically uses 1.5V or 1.35V (DDR3L), DDR4 uses 1.2V, and DDR5 uses 1.1V. Ensuring the correct DDR generation usually takes care of voltage compatibility.
- Dual Channel: For optimal performance, it’s often best to install RAM in matching pairs (e.g., two 8GB modules instead of one 16GB module) to enable “dual-channel mode,” which effectively doubles the memory bandwidth.
Once you have all this information, you can confidently purchase the correct RAM modules. Leading brands like Crucial, Kingston, Samsung, and G.Skill are reliable choices.
Gathering Your Tools
You won’t need an elaborate toolkit for this upgrade. The essentials include:
- Small Phillips Head Screwdriver: Most laptops use small Phillips head screws (PH0 or PH00). Ensure you have a magnetic tip to prevent losing tiny screws.
- Anti-Static Wrist Strap (Highly Recommended): This is crucial for protecting sensitive electronic components from electrostatic discharge (ESD), which can permanently damage your new RAM or other internal parts. If you don’t have one, regularly touch a grounded metal object (like an unpainted metal pipe or the metal casing of a desktop PC power supply) to discharge any static buildup.
- Plastic Spudger or Prying Tool (Optional but Helpful): Some laptop bottom panels are held by clips in addition to screws. A plastic spudger helps gently pry these open without scratching the casing.
- Clean, Well-Lit Workspace: Ensure you have enough space, good lighting, and a clutter-free surface to work on. Avoid carpets if possible, as they generate static electricity.
- Container for Screws: A small bowl or magnetic mat to keep track of the tiny screws.
Safety First: Power Down and Static Discharge
Before you open your laptop, safety is paramount. Follow these steps meticulously:
- Save All Work and Close Applications: Ensure all your open documents are saved, and all applications are closed.
- Shut Down Your Laptop Completely: Don’t just close the lid or put it to sleep. Perform a full shutdown from the operating system.
- Disconnect All Peripherals: Unplug the power adapter, mouse, keyboard, external monitors, USB drives, and any other connected devices.
- Remove the Battery (If External/Removable): For older laptops with externally removable batteries, take it out. For most modern laptops, the battery is internal, and you’ll typically need to disconnect it internally as one of the first steps after opening the case (refer to your laptop’s service manual if unsure).
- Discharge Residual Power: Press and hold the power button for 15-20 seconds. This helps drain any residual electricity stored in the capacitors, further reducing the risk of static discharge.
- Ground Yourself: Put on your anti-static wrist strap and connect it to a grounded metal object. If you don’t have a strap, frequently touch an unpainted metal part of a grounded appliance or pipe. This prevents static electricity from your body from transferring to the sensitive internal components of your laptop.
Step-by-Step Installation: A Seamless Process
With your preparations complete and safety precautions in place, you’re ready to perform the actual RAM installation. Take your time, be gentle, and follow these steps carefully.
Accessing Your Laptop’s RAM Slots
The method to access your RAM slots varies depending on your laptop model.
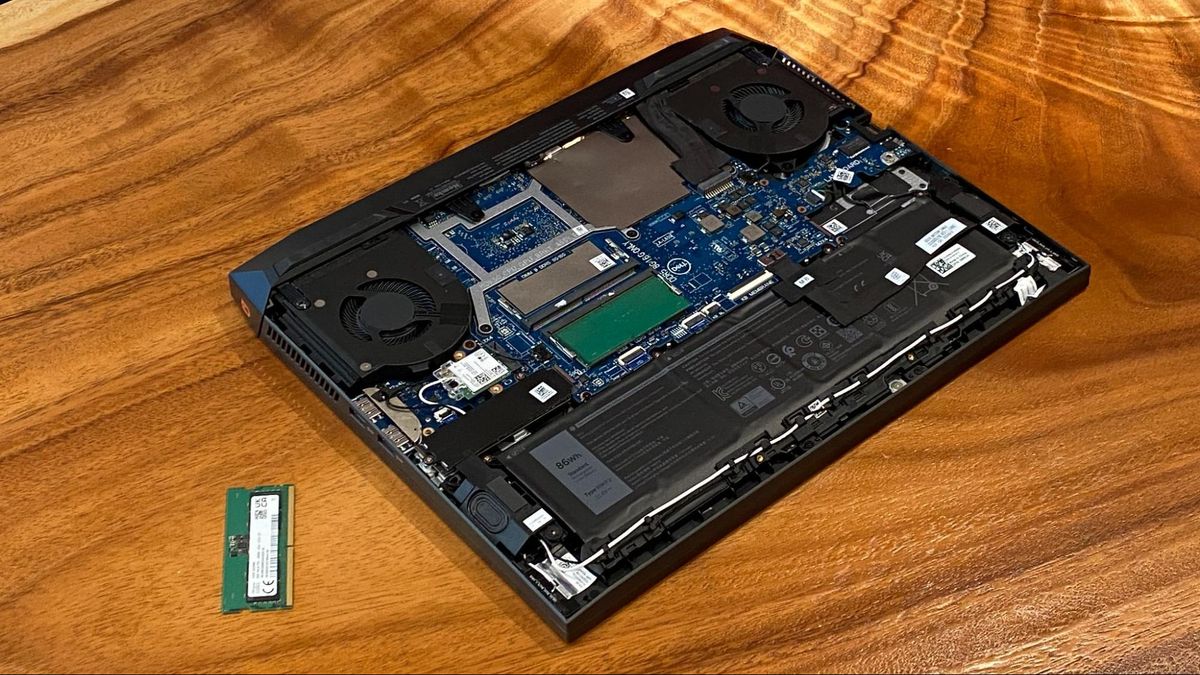
- Flip Your Laptop Over: Carefully place your laptop upside down on your clean, well-lit, and static-free workspace. Use a soft cloth or mat to protect the screen and casing.
- Locate the Access Panel (Older Laptops): Many older or budget-friendly laptops have a dedicated small panel on the bottom, usually secured by 1-2 screws, specifically for RAM and/or storage access. Unscrew these, and gently pry the panel open with your fingernail or plastic spudger.
- Remove the Entire Bottom Case (Most Modern Laptops): The majority of modern, slim laptops require removing the entire bottom panel to access internal components.
- Unscrew All Visible Screws: Carefully remove all screws from the bottom case. Pay attention to screw lengths; sometimes, screws of different lengths are used in different locations. It’s helpful to draw a diagram or use a magnetic mat to keep them organized according to their position.
- Gently Pry Open the Case: Once all screws are removed, the bottom panel will likely still be held by plastic clips. Starting from one corner, use your plastic spudger or a thin guitar pick to gently work your way around the seam of the laptop, carefully releasing these clips. Don’t force anything; if it’s resistant, double-check for any missed screws.
- Disconnect Internal Battery (Crucial): Once the bottom panel is off, before touching any other components, locate the battery connector and carefully disconnect it. This completely isolates the laptop from power and is a vital safety step.
Removing Old RAM (If Applicable)
If you’re replacing existing RAM modules rather than just adding new ones to empty slots, you’ll need to remove the old ones first.
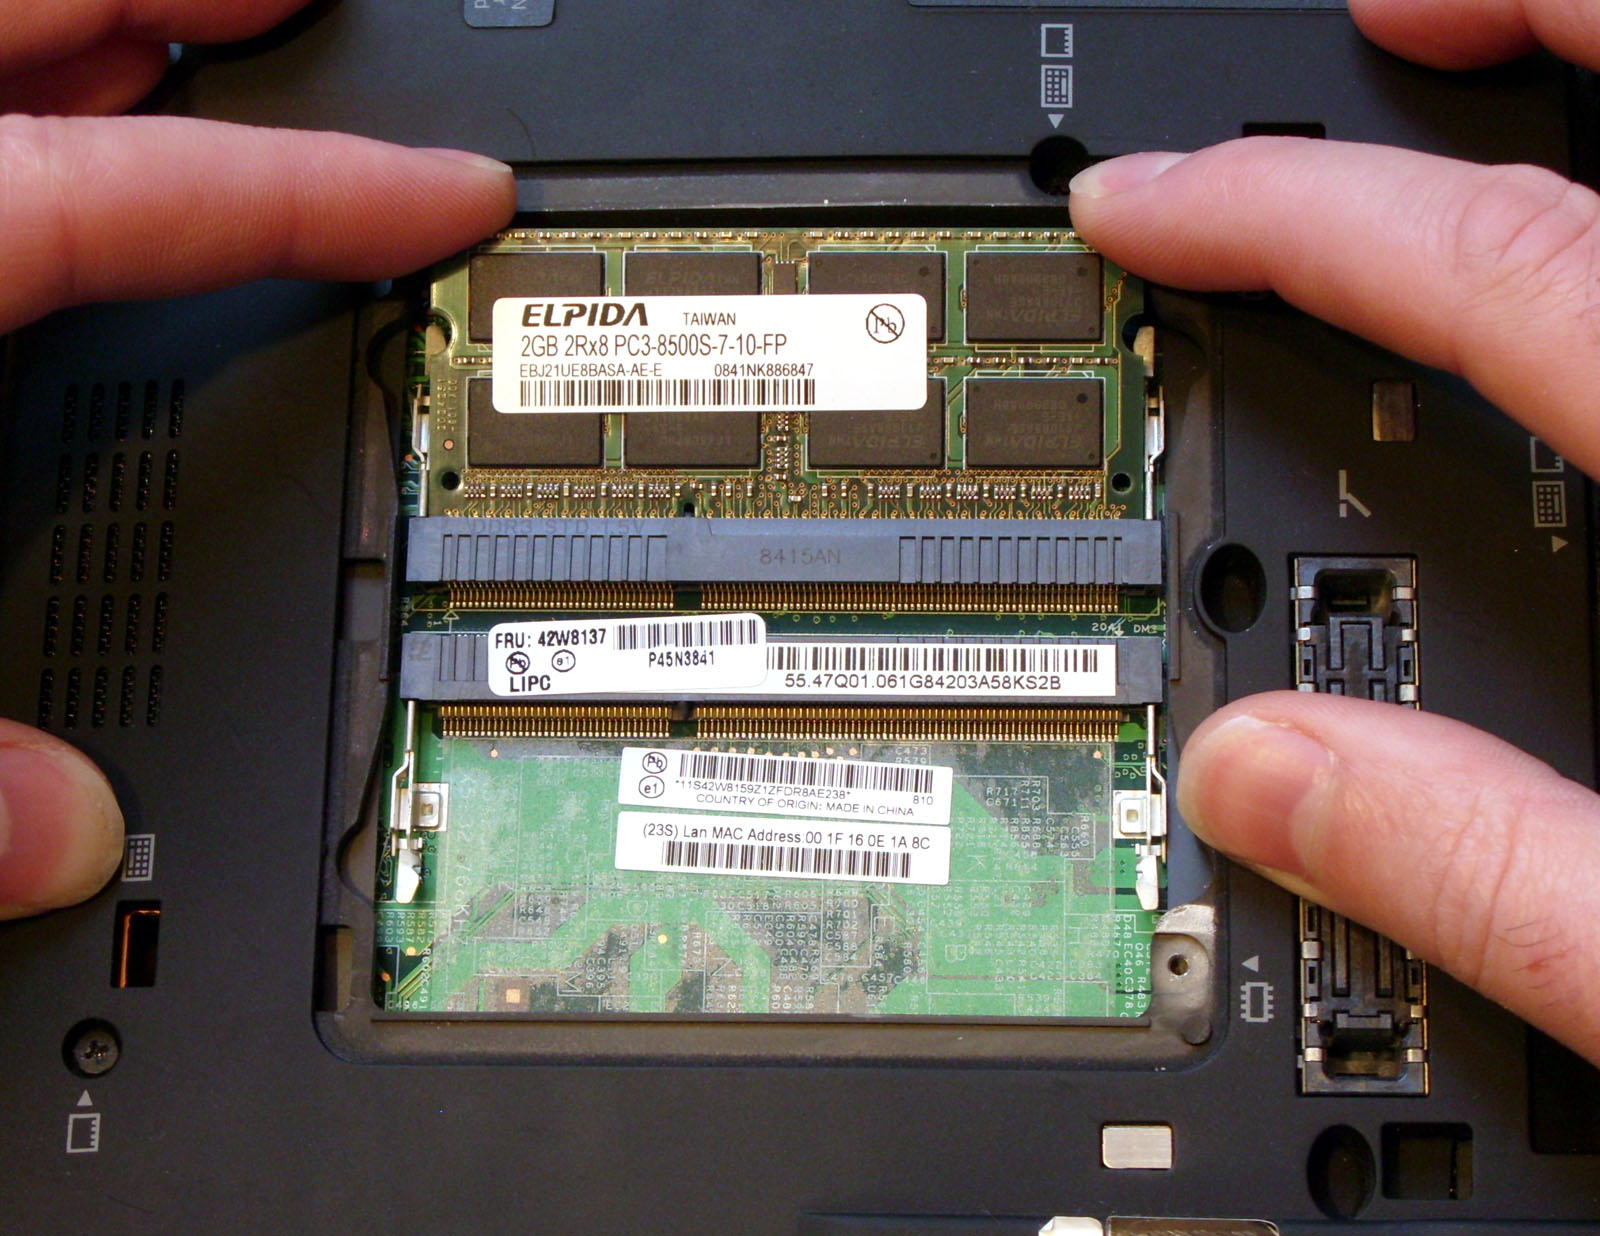
- Locate the RAM Modules: The SODIMM modules will be clearly visible, typically in slots that hold them horizontally or at a slight angle. There are usually two metal clips on either side of each module.
- Release the Clips: Gently push the two metal retention clips outwards from the module. The RAM module should pop up slightly at an angle.
- Remove the Module: Once the module is angled, you can gently pull it straight out of the slot. Avoid touching the gold contacts on the bottom of the module. Place removed modules in an anti-static bag if you plan to keep them.
Installing New RAM Modules
This is the moment of truth for your upgrade. Handle the new RAM modules carefully by their edges, avoiding the gold contacts or the small chips on the module itself.
- Align the Notch: Look at your new RAM module. You’ll notice a small notch or cutout in the gold contacts. This notch needs to align with a corresponding key in the RAM slot. This ensures the module is inserted in the correct orientation.
- Insert at an Angle: With the notch aligned, gently push the RAM module into the slot at approximately a 30-45-degree angle. You should feel it slide firmly into place.
- Push Down to Lock: Once fully seated at an angle, gently but firmly push the module downwards until the two metal retention clips on either side snap into place and secure the module horizontally. You should hear a soft click.
- Verify Seating: Double-check that both clips are fully engaged and the module is level and secure in its slot. If you’re installing two modules, repeat the process for the second slot.
Reassembling Your Laptop
Once the new RAM is securely installed, it’s time to put your laptop back together.
- Reconnect the Battery: If you disconnected the internal battery, carefully re-connect its cable to the motherboard. Ensure it’s firmly seated.
- Replace the Bottom Case/Access Panel:
- For full bottom case removal: Carefully align the bottom panel with the laptop chassis. Start by pressing along the edges to re-engage the plastic clips. Once the panel is mostly seated, replace all the screws in their original positions. Do not overtighten the screws.
- For access panel removal: Align the small access panel and press it into place. Replace its securing screws.
- Reconnect Peripherals: Reconnect your power adapter and any other peripherals you use.
Post-Installation Checks and Troubleshooting
After successfully reassembling your laptop, the final steps involve verifying the upgrade and knowing how to troubleshoot any potential issues.
Verifying the New RAM
- Power On: Turn on your laptop. The first boot might take a little longer than usual as the system initializes the new hardware.
- Check System Information:
- Windows: Once logged in, open Task Manager (
Ctrl + Shift + Esc), go to the “Performance” tab, and click on “Memory.” You should see the total installed RAM capacity (e.g., 16GB, 32GB) reflected there. Alternatively, go to “Settings” > “System” > “About” (Windows 11) or “Control Panel” > “System and Security” > “System” (Windows 10/7) to see the “Installed RAM” amount. - macOS: Click the Apple menu > “About This Mac.” The overview tab will display the total memory.
- Windows: Once logged in, open Task Manager (
- Run a Memory Diagnostic (Optional but Recommended):
- Windows Memory Diagnostic: Search for “Windows Memory Diagnostic” in the Start menu. You can choose to restart and run the test immediately or schedule it for the next restart. This tool checks for errors in your RAM.
- MemTest86: For a more thorough test, consider a third-party tool like MemTest86, which boots from a USB drive and performs extensive memory checks.
If the system recognizes the new RAM and passes any diagnostic tests, congratulations! You’ve successfully upgraded your laptop’s memory.
Common Issues and Solutions
Even with careful execution, sometimes issues can arise. Here are some common problems and their solutions:
- Laptop Doesn’t Boot or Shows a Black Screen:
- Solution: This is the most common issue and usually indicates that the RAM module(s) are not seated correctly.
- Shut down the laptop, disconnect power, and remove the bottom case again.
- Carefully remove and re-seat each RAM module. Ensure they are fully pushed into the slot at an angle and then firmly clicked down by the retention clips.
- Reconnect the battery (if disconnected) and reassemble.
- Solution 2 (Compatibility): If re-seating doesn’t work, verify that the RAM you purchased is 100% compatible with your laptop model (DDR generation, speed, SODIMM form factor). A mismatch will prevent booting.
- Solution 3 (Faulty Module): If you installed two modules and still no boot, try booting with only one new module at a time to identify if one of them is faulty.
- Solution: This is the most common issue and usually indicates that the RAM module(s) are not seated correctly.
- Laptop Boots, But Only Part of the RAM is Recognized:
- Solution: This typically means one of the installed modules isn’t properly seated or is faulty, or your system’s motherboard or operating system might have a limitation.
- Check seating of both modules as described above.
- Verify your operating system (e.g., 32-bit Windows can only use up to ~3.5GB of RAM, regardless of how much is installed; 64-bit Windows is required for more).
- Check your laptop’s maximum supported RAM on the manufacturer’s website.
- Try running with only one module at a time to isolate the issue.
- Solution: This typically means one of the installed modules isn’t properly seated or is faulty, or your system’s motherboard or operating system might have a limitation.
- System Is Still Slow:
- Solution: While RAM is a significant factor, it’s not the only one.
- Check Storage: If your laptop still uses an HDD (Hard Disk Drive), upgrading to an SSD (Solid State Drive) is arguably the most impactful performance upgrade.
- CPU Limitations: An older, less powerful CPU might still be a bottleneck, even with ample RAM.
- Software Issues: Your operating system might be bogged down by bloatware, viruses, or too many startup programs. Consider a fresh OS install or optimizing your software.
- Thermals: Overheating can cause throttling. Ensure your laptop’s fans are clean and cooling properly.
- Solution: While RAM is a significant factor, it’s not the only one.
Maximizing Your Laptop’s Potential Beyond RAM
Upgrading your RAM is a fantastic step towards revitalizing your laptop, but it’s often just one piece of a larger performance puzzle. To truly maximize your device’s potential, especially aligning with broader “Tech” interests, consider these additional avenues:
Software Optimization and Maintenance
Even with ample RAM, a cluttered and unoptimized operating system can hinder performance. Regularly:
- Clean Up Startup Programs: Use Task Manager (Windows) or System Preferences (macOS) to disable unnecessary programs from launching with your system.
- Uninstall Unused Software: Remove applications you no longer use to free up storage space and reduce background processes.
- Run Disk Cleanup/Optimization Tools: Keep your drives tidy. For SSDs, ensure TRIM is enabled. For HDDs, occasionally defragment.
- Keep Drivers Updated: Graphics drivers, chipset drivers, and others can impact performance.
- Scan for Malware: Regular virus and malware scans are crucial for system health and security.
- Consider a Fresh OS Install: Periodically, performing a clean installation of your operating system can provide a “like-new” performance boost by removing years of accumulated digital clutter.

Considering Other Hardware Upgrades
While RAM is excellent for multitasking and application responsiveness, other hardware components contribute significantly to the overall user experience:
- Solid State Drive (SSD) Upgrade: If your laptop still uses a traditional Hard Disk Drive (HDD), upgrading to an SSD is often the single most impactful performance upgrade you can make. SSDs dramatically reduce boot times, application loading times, and file transfer speeds, making your entire system feel incredibly snappier. This upgrade often complements RAM, as a faster drive reduces the performance penalty when the system has to use virtual memory.
- Thermal Paste Replacement: For older laptops experiencing overheating or performance throttling, replacing the thermal paste on the CPU and GPU can significantly improve cooling efficiency. This is a more advanced task but can extend the life and performance of your system.
- Wi-Fi Card Upgrade: For older laptops with outdated Wi-Fi standards (e.g., Wi-Fi 4), upgrading to a newer Wi-Fi 6 or 6E card can provide significantly faster and more reliable wireless connectivity, enhancing your online experience.
By combining a RAM upgrade with smart software maintenance and potentially other hardware enhancements, you can ensure your laptop remains a highly capable and enjoyable tool for years to come, keeping pace with the ever-evolving demands of technology. This DIY approach not only saves money but also fosters a deeper connection and understanding of the technology that powers our digital lives.
aViewFromTheCave is a participant in the Amazon Services LLC Associates Program, an affiliate advertising program designed to provide a means for sites to earn advertising fees by advertising and linking to Amazon.com. Amazon, the Amazon logo, AmazonSupply, and the AmazonSupply logo are trademarks of Amazon.com, Inc. or its affiliates. As an Amazon Associate we earn affiliate commissions from qualifying purchases.