
In an increasingly digital world, the need for physical documents remains surprisingly persistent. Whether you’re a student printing essays, a professional handling contracts, or a home user archiving photos, a reliable printer is an indispensable tool. For Windows 10 users, installing a printer can seem like a daunting task, fraught with driver issues, connectivity quirks, and obscure error messages. However, with the right guidance, it’s a straightforward process that can significantly enhance your productivity and streamline your workflow.
This comprehensive guide will demystify printer installation on Windows 10, walking you through various connection methods, driver management, and essential troubleshooting tips. We’ll empower you to connect your printer with confidence, ensuring that your tech setup supports your personal and professional needs efficiently. Getting your printer up and running smoothly isn’t just about convenience; it’s about minimizing downtime, maximizing output, and ensuring your digital environment perfectly complements your physical one. By understanding these core principles, you can avoid common pitfalls and maintain a reliable printing ecosystem, crucial for both personal finance management (think printed bills or receipts) and professional branding (crisp, clear documents).
Understanding Printer Installation Methods on Windows 10
Windows 10 offers several ways to connect a printer, each suited to different types of devices and network configurations. Understanding these methods is the first step to a successful installation. Whether your printer is a classic USB workhorse, a modern Wi-Fi enabled device, or a lesser-used Bluetooth option, Windows 10 has a pathway for you. Choosing the correct method from the outset can save you significant time and effort, contributing directly to your overall digital productivity.
Method 1: Connecting a Local (USB Wired) Printer
The USB connection remains the simplest and often the most reliable way to connect a printer directly to your computer. This method is ideal for desktop setups where the printer is in close proximity to the PC and doesn’t need to be shared across a network.
Steps for USB Installation:
- Physical Connection: Begin by ensuring your printer is turned off. Connect one end of the USB cable to the printer and the other end to an available USB port on your Windows 10 computer.
- Power On: Turn on your printer.
- Automatic Detection (Plug-and-Play): Windows 10 is designed to detect new hardware automatically. In many cases, it will immediately recognize the printer and attempt to install the necessary drivers. You might see a notification in the bottom-right corner of your screen indicating “Device driver software installed successfully” or “Setting up a device.”
- Manual Addition (If Not Detected Automatically): If Windows 10 doesn’t automatically detect your printer, or if the installation fails, you can add it manually:
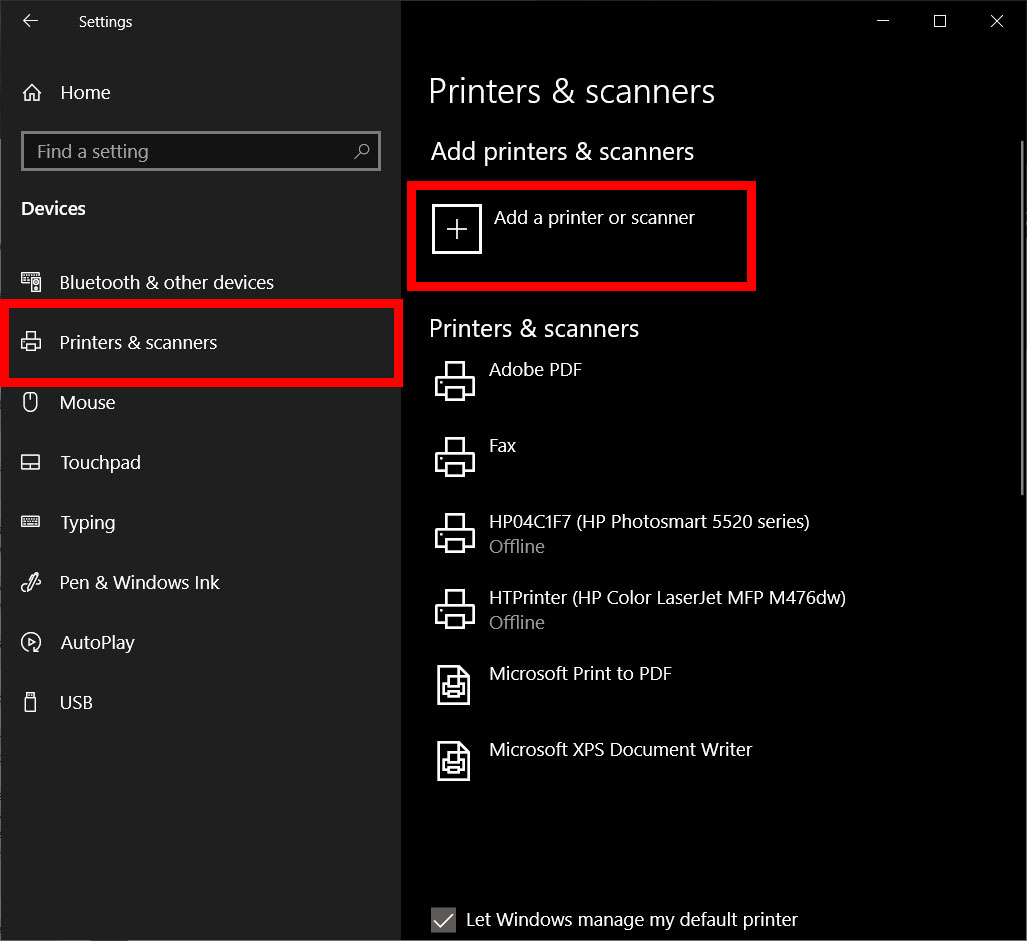
- Go to Start Menu > Settings > Devices > Printers & scanners.
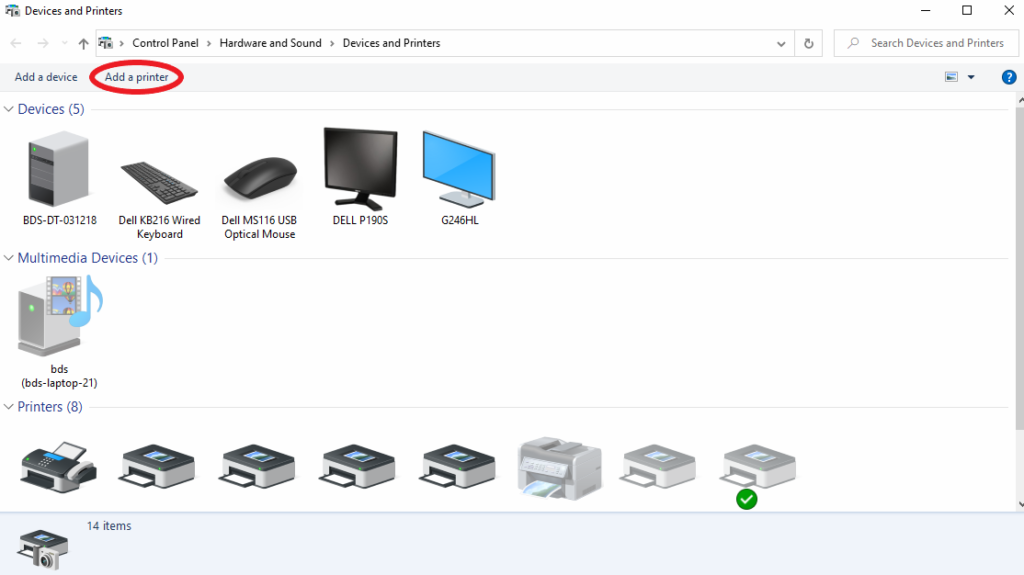
- Click on “Add a printer or scanner.”
- Windows will search for available printers. If your printer appears in the list, select it and click “Add device.”
- If your printer still doesn’t appear, click on “The printer that I want isn’t listed.” This will open a wizard with several options. Choose “Add a local printer or network printer with manual settings.”
- On the next screen, select “Use an existing port” and choose the appropriate USB port (e.g., “USB001” or “DOT4_001”).
- Then, you’ll be prompted to select your printer’s manufacturer and model from a list. If your printer isn’t listed, or if you have a driver disk/downloaded driver, click “Have Disk…” and browse to the location of your driver file (usually an
.inffile). - Follow the on-screen prompts to name your printer and optionally share it on the network.
- Test Print: Once installed, it’s always a good idea to perform a test print to confirm everything is working correctly. You can usually do this from the printer’s properties window (right-click the printer in “Printers & scanners” and choose “Printer properties,” then click “Print Test Page”).
Method 2: Integrating a Wireless or Network Printer
Wireless and network printers offer incredible flexibility, allowing multiple devices (computers, smartphones, tablets) to print from anywhere within your network’s range. This method is highly recommended for office environments or households with multiple users, significantly boosting collaborative productivity.
Steps for Wireless/Network Installation:
- Connect Printer to Network: The first and most crucial step is to connect your printer to your Wi-Fi network. This process varies by printer brand and model:
- Control Panel Menu: Many printers have an LCD screen and navigation buttons. Go into the printer’s settings or network setup menu, select “Wireless Setup Wizard” or similar, and follow the prompts to select your Wi-Fi network (SSID) and enter its password (WPA2 key).
- WPS Button: If your router and printer both support Wi-Fi Protected Setup (WPS), you can press the WPS button on your router, then quickly press the WPS button on your printer. They should connect automatically.
- Manufacturer’s Software: Some manufacturers provide PC-based software or mobile apps that guide you through connecting the printer to your network via a temporary USB connection or Bluetooth.
- Ethernet Cable: For wired network printers, simply connect an Ethernet cable from the printer to a free port on your router or network switch.
- Add Printer in Windows 10: Once your printer is connected to the network:
- Go to Start Menu > Settings > Devices > Printers & scanners.
- Click on “Add a printer or scanner.”
- Windows 10 will search for printers connected to your network. Your wireless or network printer should appear in the list. Select it and click “Add device.” Windows will then attempt to install the appropriate drivers.
- If Not Detected: If your printer doesn’t appear, click on “The printer that I want isn’t listed.”
- Choose “Add a Bluetooth, wireless or network discoverable printer” and let Windows search again.
- Alternatively, if you know the printer’s IP address or hostname (you can usually find this in the printer’s network settings menu or by printing a network configuration page from the printer), select “Add a printer using a TCP/IP address or hostname.” Enter the IP address, and Windows will attempt to detect and install the printer.
- Driver Installation: Windows 10 will often find and install the correct drivers automatically. If it doesn’t, you may be prompted to select a driver from a list or use a driver from a disk/downloaded file (see “Navigating Printer Drivers” section below).
- Test Print: As with a USB printer, always perform a test print to ensure full functionality.
Method 3: Setting Up a Bluetooth Printer
Bluetooth printers are less common than USB or Wi-Fi printers but offer a convenient, cable-free solution for short-range printing, particularly useful for mobile setups or specific niche applications. However, both your computer and printer must have Bluetooth capabilities.
Steps for Bluetooth Installation:
- Enable Bluetooth: Ensure Bluetooth is enabled on both your printer and your Windows 10 computer.
- On Windows 10: Go to Start Menu > Settings > Devices > Bluetooth & other devices. Toggle the Bluetooth switch to “On.”
- On your printer: Consult your printer’s manual to find out how to enable Bluetooth and put it into pairing mode.
- Pair the Devices:
- On your Windows 10 PC, in the “Bluetooth & other devices” settings, click “Add Bluetooth or other device.”
- Select “Bluetooth” from the options.
- Your PC will scan for nearby Bluetooth devices. When your printer appears in the list, select it and follow any on-screen prompts or enter a pairing code if required (often 0000 or 1234, check your printer manual).
- Add as a Printer: Once paired, your printer should theoretically be discoverable as a printing device.
- Go to Start Menu > Settings > Devices > Printers & scanners.
- Click on “Add a printer or scanner.”
- If your printer appears, select it and click “Add device.” Windows will attempt to install drivers.
- If Not Found: If it doesn’t appear in the printer list despite being paired, you might need to go to “The printer that I want isn’t listed” and select “Add a Bluetooth, wireless or network discoverable printer.”
- Install Drivers: Windows 10 usually handles Bluetooth printer drivers automatically. If not, manual intervention as described in the next section may be necessary.
- Test Print: Verify functionality with a test print.
Navigating Printer Drivers: The Heart of Functionality
Drivers are crucial software components that allow your operating system (Windows 10) to communicate effectively with your printer hardware. Without the correct drivers, your printer is essentially a paperweight. Understanding how to manage drivers, whether through automatic detection or manual installation, is key to a hassle-free printing experience and ensuring compatibility. Sourcing drivers from official channels is also a critical digital security practice, preventing malware or corrupted software.
Automatic Driver Installation: The Plug-and-Play Approach
For most modern printers, Windows 10’s plug-and-play functionality and its extensive driver database handle driver installation automatically. This is the ideal scenario, designed for user convenience.
- Windows Update: When you connect a new printer, Windows 10 often checks its internal driver repository and, if needed, downloads the latest compatible driver through Windows Update. This process usually happens in the background.
- Built-in Drivers: Many popular printer models have drivers pre-installed or readily available in Windows 10’s driver database, making the installation process almost instantaneous.
- Benefits: This method is quick, requires minimal user intervention, and often provides the most stable and up-to-date drivers, as Microsoft works with printer manufacturers to include them.
Manual Driver Installation: When You Need More Control
There are times when automatic driver installation isn’t enough. This typically occurs with older printer models, less common brands, or when you encounter specific compatibility issues. Manual driver installation gives you direct control over which driver is used.
When to Install Drivers Manually:
- Windows Fails to Detect: Your printer isn’t recognized or Windows installs a generic driver that lacks full functionality.
- Older Printers: Drivers for very old models might not be in Windows Update.
- Specific Features: You need advanced features only available with the manufacturer’s full software suite.
- Troubleshooting: As a troubleshooting step, reinstalling a fresh driver can resolve errors.
Steps for Manual Driver Installation:
- Identify Printer Model: Know your printer’s exact manufacturer and model number. This is crucial for finding the correct driver.
- Download Drivers:
- Manufacturer’s Website (Recommended): This is the safest and most reliable source. Go to the official website of your printer manufacturer (e.g., HP, Canon, Epson, Brother, Lexmark). Navigate to their “Support” or “Drivers & Downloads” section.
- Enter your printer’s model number.
- Select “Windows 10” as your operating system (and specify 64-bit or 32-bit if prompted – most modern systems are 64-bit).
- Download the latest full feature software package or the basic driver, depending on your needs.
- Driver CD: If your printer came with an installation CD, you can use that, though the drivers on it might be outdated.
- Run the Installer (if executable): Many downloaded driver packages come as an
.exefile. Double-click it and follow the on-screen instructions. These installers often guide you through connecting the printer and installing the software. - “Have Disk” Method (if drivers are extracted or .inf file): If you downloaded a
.zipfile containing driver files (usually ending in.inf,.sys, or.dll), or if the executable installer extracted files to a known location:- Go to Start Menu > Settings > Devices > Printers & scanners.
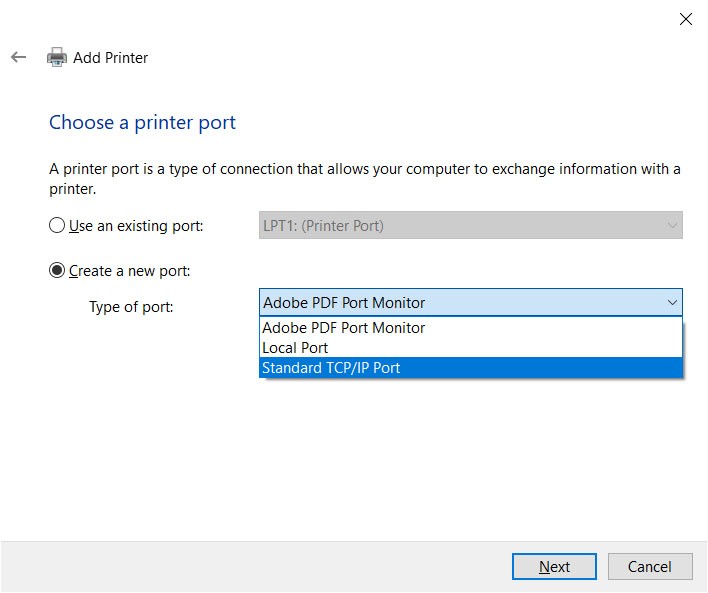
- Click “Add a printer or scanner” and then “The printer that I want isn’t listed.”
- Choose “Add a local printer or network printer with manual settings.”
- Select the appropriate port (e.g., USB001 for USB, or “Standard TCP/IP Port” if you know the IP).
- When prompted to select a manufacturer and model, click “Have Disk…”
- Browse to the folder where you extracted or downloaded the driver files. Select the
.inffile (it might be the only visible file type in the browser). - Continue following the on-screen instructions to complete the installation.
Important Note on Drivers: Always download drivers from the official manufacturer’s website. Using drivers from unofficial third-party sites can expose your system to malware or install incorrect software, compromising your digital security and potentially leading to compatibility issues. This practice is essential for maintaining a secure and reliable tech environment.
Troubleshooting Common Printer Installation Issues
Even with the best intentions, printer installations can sometimes hit snags. Understanding common issues and their solutions can save you immense frustration and downtime, directly impacting your productivity. From connectivity problems to mysterious “offline” statuses, we’ve got you covered.
Resolving Connectivity Problems
Connectivity is the foundation of any printer setup. Issues here can prevent your printer from being recognized or communicating with your PC.
- Check Physical Connections:
- USB: Ensure the USB cable is securely plugged into both the printer and the computer. Try a different USB port on your PC.
- Network (Ethernet): Make sure the Ethernet cable is firmly connected to the printer and a working port on your router/switch. Check the indicator lights on both ends.
- Wireless: Verify your printer is connected to the correct Wi-Fi network. Check the printer’s control panel for its Wi-Fi status. Ensure your PC is on the same network.
- Restart Everything: A classic IT solution that often works wonders.
- Turn off your printer, computer, and router (if wireless).
- Wait about 30 seconds.
- Turn on the router first, wait for it to fully boot up (all indicator lights stable).
- Then turn on the printer.
- Finally, turn on your computer.
- Router & Firewall Settings:
- Ensure your router isn’t blocking printer connections or devices on the network.
- Temporarily disable your Windows Firewall or any third-party antivirus/firewall software to see if it’s interfering. If it resolves the issue, you’ll need to add an exception for your printer or its port.
- Printer IP Address: For network printers, if you’re installing via TCP/IP, ensure the IP address you’re entering is correct and hasn’t changed. You can often print a network configuration page from the printer’s menu to find its current IP.
Tackling Driver-Related Headaches
Incorrect, corrupted, or missing drivers are a frequent cause of printer woes.
- Update Drivers: Even if a driver installed, it might not be the latest or most compatible. Always check the manufacturer’s website for the most recent drivers.
- Reinstall Drivers: If you suspect a corrupted driver, completely uninstall the existing printer driver from Settings > Devices > Printers & scanners (select the printer, click “Remove device”), and then reinstall it, preferably with the latest version from the manufacturer. You might also want to check Device Manager (right-click Start, select Device Manager, expand “Print queues,” right-click your printer, and select “Uninstall device” – check the box to “Delete the driver software for this device” if available).
- Driver Compatibility: Ensure you’ve downloaded the driver specifically for Windows 10 (and the correct 64-bit or 32-bit version). Drivers for older Windows versions might not work correctly.
- Windows Compatibility Mode: For very old printers, try installing the driver in compatibility mode. Right-click the driver installer
.exefile, select “Properties,” go to the “Compatibility” tab, and try running it in compatibility mode for an older Windows version.
Addressing Printer Spooler and “Printer Offline” Errors
These are two of the most common and perplexing printer issues.
- Printer Spooler Service: The print spooler is a Windows service that manages print jobs. If it’s stuck or crashed, printing won’t happen.
- To restart it: Search for “Services” in the Windows search bar and open the Services app. Scroll down to “Print Spooler,” right-click it, and select “Restart.” If it’s already stopped, select “Start.”
- Sometimes, corrupt print jobs can jam the spooler. Clear the spooler by stopping the “Print Spooler” service, then navigate to
C:WindowsSystem32spoolPRINTERSand delete all files in that folder. Then restart the “Print Spooler” service.
- “Printer Offline” Error: This error often means your PC can’t communicate with the printer, even if it’s powered on.
- Check Printer Status: Is the printer actually on? Are there any error lights or messages on its display?
- “Use Printer Offline” Setting: In Settings > Devices > Printers & scanners, right-click your printer, choose “Open queue,” then go to “Printer” in the menu bar. Make sure “Use Printer Offline” is unchecked.
- Connectivity: Revisit the physical/wireless connectivity checks mentioned above. A temporary network glitch or loose cable can cause this.
- Power Cycle: Turn off the printer, unplug it from the power outlet for 30 seconds, then plug it back in and turn it on.
- Default Printer: Ensure your desired printer is set as the default printer. Right-click it in “Printers & scanners” and select “Set as default.”
Optimizing Your Printing Experience and Productivity
Successfully installing your printer is a significant step towards a more productive digital environment. But the journey doesn’t end there. By adopting best practices, you can ensure your printing experience remains smooth, reliable, and contributes positively to your overall efficiency, whether for tech-related projects, brand consistency in documents, or managing personal finances through printed records.
Regular Maintenance and Updates:
- Keep Drivers Updated: Periodically check your printer manufacturer’s website for updated drivers and software. These updates often include bug fixes, performance improvements, and security patches.
- Windows Updates: Ensure your Windows 10 operating system is always up-to-date. Microsoft often rolls out updates that improve hardware compatibility and system stability, directly impacting your printer’s performance.
- Printer Firmware: Many modern printers also have firmware that can be updated. Check your printer’s support page for firmware updates, as these can resolve hardware-specific issues and enhance features.
Best Practices for Seamless Operation:
- Quality Consumables: Use genuine or high-quality compatible ink/toner cartridges and paper. Low-quality consumables can lead to poor print quality, frequent jams, and even damage to your printer, costing you more in the long run. Investing in quality here is a smart financial decision.
- Network Stability: For wireless printers, ensure your Wi-Fi network is stable and strong where the printer is located. A weak signal can lead to dropped connections and failed print jobs.
- Dedicated IP Address (for Network Printers): Consider assigning a static IP address to your network printer from your router’s settings. This prevents the printer’s IP from changing, which can cause connection issues.
- Security: Always download printer drivers and software from the official manufacturer’s website. Be wary of third-party driver sites, as they can be sources of malware, compromising your digital security. This is a crucial aspect of overall tech hygiene.
- Print Management: Familiarize yourself with your printer’s software suite. Many manufacturers provide utility tools for monitoring ink levels, performing cleaning cycles, and configuring advanced settings, which can save you money by optimizing ink usage and extending the printer’s lifespan.
By diligently following these installation steps and adopting the recommended best practices, you can transform a potentially frustrating task into a seamless integration of technology into your daily routine. A properly installed and maintained printer is not just a device; it’s a valuable asset that empowers you to bridge the gap between your digital world and the tangible, ensuring your documents are always ready when you need them, enhancing both your personal productivity and the professional presentation of your brand.
aViewFromTheCave is a participant in the Amazon Services LLC Associates Program, an affiliate advertising program designed to provide a means for sites to earn advertising fees by advertising and linking to Amazon.com. Amazon, the Amazon logo, AmazonSupply, and the AmazonSupply logo are trademarks of Amazon.com, Inc. or its affiliates. As an Amazon Associate we earn affiliate commissions from qualifying purchases.