
Node.js has revolutionized the landscape of web development, empowering developers to build scalable network applications using JavaScript on the server-side. For Windows users, getting Node.js up and running is a straightforward process, yet understanding the various installation methods and their implications can significantly enhance your development workflow. This comprehensive guide will walk you through everything you need to know, from selecting the right installation method to troubleshooting common issues and taking your first steps with Node.js.
Why Node.js Matters: Understanding its Impact on Modern Development
Before diving into the technicalities of installation, it’s crucial to understand why Node.js has become such a cornerstone in the modern development ecosystem. Its unique architecture and capabilities have made it indispensable for a wide range of applications.

What is Node.js? A Quick Overview
At its core, Node.js is an open-source, cross-platform JavaScript runtime environment that executes JavaScript code outside of a web browser. Built on Chrome’s V8 JavaScript engine, Node.js is designed for building fast, scalable network applications. It uses an event-driven, non-blocking I/O model, making it lightweight and efficient—perfect for data-intensive real-time applications that run across distributed devices.
Unlike traditional server-side environments where each request creates a new thread, Node.js operates on a single-threaded event loop. This allows it to handle thousands of concurrent connections with minimal overhead, making it incredibly efficient for tasks that involve heavy I/O operations, such as handling API requests, streaming data, and real-time communication.
Key Advantages and Use Cases for Developers
Node.js’s versatility extends across numerous applications, making it a favorite among full-stack developers. Here are some of its key advantages and common use cases:
- Unified Language: By using JavaScript for both frontend and backend development, Node.js eliminates the context-switching overhead that comes with different languages. This simplifies development, fosters code reuse, and streamlines the hiring process for teams.
- Performance and Scalability: Its non-blocking, event-driven architecture makes Node.js incredibly fast and capable of handling a high volume of concurrent requests with low latency. This is ideal for applications requiring real-time updates and high throughput.
- Rich Ecosystem (npm): The Node Package Manager (npm) is the largest software registry in the world, offering an enormous collection of open-source libraries and tools. This vast ecosystem accelerates development by providing pre-built solutions for almost any challenge, from database connectors to utility functions and frameworks.
- Microservices and APIs: Node.js is an excellent choice for building lightweight and efficient microservices, which can then be composed into larger applications. Its ability to handle many requests quickly makes it perfect for RESTful APIs and GraphQL servers.
- Real-time Applications: Thanks to its event-driven nature, Node.js excels in real-time applications like chat applications, online gaming, collaboration tools, and live dashboards, where immediate data updates are critical.
- Server-Side Rendering (SSR): Frameworks like Next.js enable server-side rendering with Node.js, improving initial load times and SEO for single-page applications.
- Developer Tooling: Many popular build tools, bundlers, and task runners (e.g., Webpack, Babel, Gulp, Grunt) are built with Node.js, making it an essential part of any modern web development toolkit.
Given these powerful capabilities, installing Node.js on your Windows machine is a foundational step for anyone looking to build modern web applications, automate tasks, or explore the vast JavaScript ecosystem.
Preparing for Installation: Essential Prerequisites
Before you begin the Node.js installation process, a few preliminary checks and decisions can ensure a smooth experience.
System Requirements and Administrative Privileges
Node.js is compatible with most modern versions of Windows. Generally, if your Windows operating system is actively supported by Microsoft (Windows 7 and later, including Windows 10 and 11, along with server versions), you should have no issues. Ensure your system meets the basic requirements for running desktop applications.
Crucially, you will need administrative privileges on your Windows machine to install Node.js. This is because the installation process typically involves writing files to system directories and modifying environment variables, actions that require elevated permissions. If you are on a managed corporate machine, you might need to consult your IT department.
Choosing Your Preferred Installation Method
There are several ways to install Node.js on Windows, each with its own advantages. The “best” method often depends on your specific needs and comfort level:
- Official Node.js MSI Installer (Recommended for Beginners): This is the easiest and most straightforward method. You download an executable file from the official Node.js website and run it like any other Windows application. It handles all necessary configurations, including setting up
npmand adding Node.js to your system’sPATH. - Node Version Manager (NVM for Windows): If you anticipate working on multiple projects that require different versions of Node.js (e.g., an older project needs Node.js 14, while a new one uses Node.js 18), NVM is an invaluable tool. It allows you to easily install, switch between, and manage multiple Node.js versions on the same machine.
- Chocolatey (Windows Package Manager): For users who prefer managing their software through a command-line package manager, Chocolatey offers a convenient way to install Node.js with a single command. This method is particularly popular among developers who use Chocolatey for other software installations.
We will cover each of these methods in detail, helping you choose and execute the one that best fits your development style.
Method 1: The Official Node.js MSI Installer (Recommended for Beginners)
For most users, especially those new to Node.js or those who don’t need to switch between multiple Node.js versions frequently, the official Windows installer is the simplest and most reliable option.
Step-by-Step Guide to Using the Installer
- Visit the Official Node.js Website: Open your web browser and navigate to https://nodejs.org/en.
- Download the Recommended Version: You’ll see two prominent download options:
- LTS (Long Term Support) Version: This is the recommended version for most users. LTS releases are stable, extensively tested, and maintained for a longer period, making them suitable for production environments.
- Current Version: This includes the latest features and improvements but might be less stable than the LTS release. It’s often chosen by early adopters or those testing cutting-edge functionalities.
For typical development, always opt for the LTS version. Click the “Windows Installer” link (usually a.msifile) corresponding to the LTS release.
- Run the Installer: Once the download is complete, locate the
.msifile in your downloads folder and double-click it to start the installation wizard. - Follow the Installation Wizard:
- Welcome Screen: Click “Next.”
- End-User License Agreement: Read the license agreement, check “I accept the terms in the License Agreement,” and click “Next.”
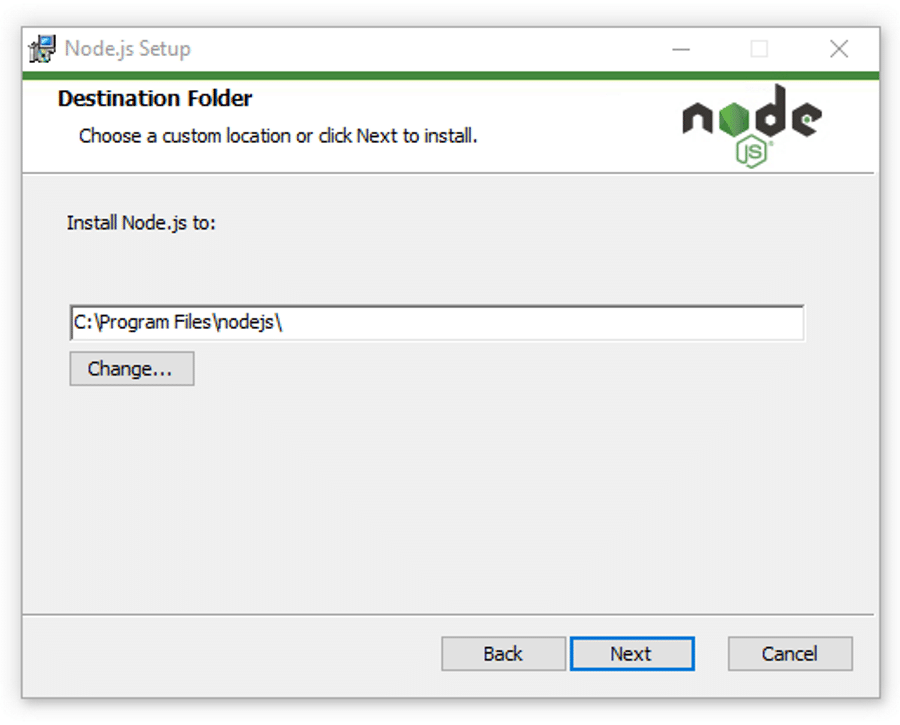
- Destination Folder: You can choose the installation directory or accept the default (e.g.,
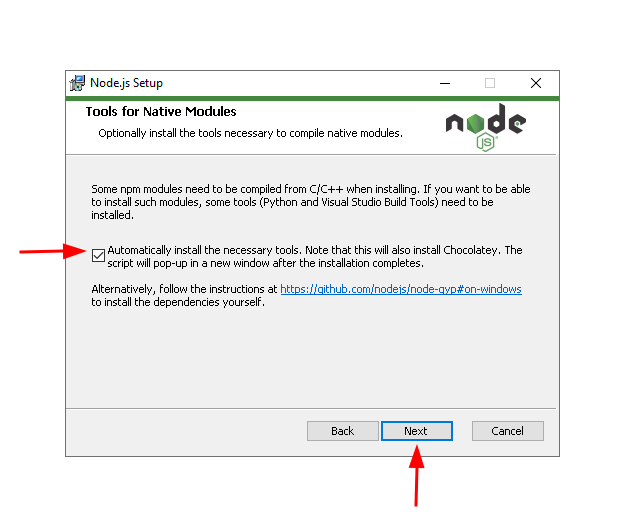
C:Program Filesnodejs). Click “Next.” - Custom Setup: This is an important step. By default, the installer selects “Node.js runtime,” “npm package manager,” and “Add to PATH.” Ensure “Add to PATH” is selected, as this makes Node.js and npm commands accessible from any directory in your command line. You might also see an option to “Automatically install the necessary tools. Chocolately, Node.js Native Modules, Python, VS Build Tools.” While helpful for compiling native add-ons, you can skip this for a basic installation and install these later if needed. For now, we’ll assume you proceed without checking this optional component. Click “Next.”
- Ready to install Node.js: Click “Install” to begin the installation.
- User Account Control: You may be prompted by Windows User Account Control (UAC) to allow the installer to make changes to your device. Click “Yes.”
- Installation Progress: The installer will copy files and configure your system.
- Completed: Once the installation is finished, click “Finish.”
Verifying Your Node.js and npm Installation
After the installation is complete, it’s crucial to verify that Node.js and npm (Node Package Manager) have been installed correctly and are accessible from your command line.
- Open Command Prompt or PowerShell:
- Press
Win + R, typecmd, and press Enter. - Alternatively, search for “Command Prompt” or “PowerShell” in the Start menu and open it.
- Important: Close and reopen any existing command prompt or PowerShell windows you might have had open before the installation. This ensures that the system’s
PATHenvironment variable (which the installer modified) is properly refreshed.
- Press
- Check Node.js Version: In the command prompt, type:
bash

node -v
Press Enter. You should see the installed Node.js version number (e.g.,v18.17.1). - Check npm Version: Next, type:
bash

npm -v
Press Enter. You should see the installed npm version number (e.g.,9.6.7).
If both commands return version numbers without errors, congratulations! You have successfully installed Node.js and npm on your Windows machine.
Method 2: Harnessing Node Version Manager (NVM for Windows) for Flexibility
For developers who work on multiple projects, some of which might require specific or older versions of Node.js, managing different installations can become a headache. This is where Node Version Manager (NVM for Windows) comes in handy.
Why Use NVM? Managing Multiple Node.js Versions
NVM for Windows is a command-line utility that allows you to easily install, manage, and switch between different versions of Node.js on a single machine. Its primary benefits include:
- Project Compatibility: Different projects might be built with different Node.js versions. NVM allows you to switch to the required version for each project without conflicts.
- Testing: You can easily test your applications against various Node.js versions to ensure compatibility.
- Experimentation: Try out new Node.js versions without affecting your stable development environment.
Installing NVM for Windows
Before installing NVM, it’s highly recommended to uninstall any existing Node.js installations (especially those installed via the MSI installer) to prevent conflicts. Go to “Add or remove programs” in Windows settings and uninstall “Node.js.”
-
Download NVM for Windows:
- Go to the official NVM for Windows GitHub repository releases page: https://github.com/coreybutler/nvm-windows/releases
- Scroll down to the “Assets” section of the latest stable release.
- Download the
nvm-setup.zipfile.
-
Run the Installer:
- Extract the contents of
nvm-setup.zip. - Double-click
nvm-setup.exeto launch the installation wizard.
- Extract the contents of
-
Follow the NVM Installation Wizard:
- License Agreement: Accept the terms and click “Next.”
- NVM Installation Path: Choose where NVM itself will be installed. The default is usually fine (e.g.,
C:Users<YourUsername>AppDataRoamingnvm). Click “Next.” - Node.js Installation Path: This is where the different versions of Node.js that NVM manages will be stored. The default (e.g.,
C:Program Filesnodejs) is typically acceptable. Click “Next.” - Ready to Install: Click “Install.”
- User Account Control: Grant administrative privileges if prompted.
- Finished: Click “Finish.”
-
Verify NVM Installation: Open a new Command Prompt or PowerShell window (important for
PATHvariable refresh). Type:
bash

nvm -v
You should see the NVM for Windows version number. If you get an error, ensure yourPATHenvironment variables are correctly set (NVM usually handles this, but manual checks might be needed for unusual configurations).
Managing Node.js Versions with NVM Commands
Now that NVM is installed, you can start managing your Node.js versions.
-
Install a Specific Node.js Version:
To install the latest LTS version:nvm install ltsTo install the latest stable version:
nvm install latestTo install a specific version (e.g., Node.js 18.17.1):
nvm install 18.17.1NVM will download and install Node.js along with its corresponding npm version.
-
List Installed Node.js Versions:
To see all Node.js versions you’ve installed with NVM:
bash

nvm list
The output will show your installed versions and indicate which one is currently active (e.g.,* 18.17.1 (Currently using 64-bit)).
-
Switch Between Node.js Versions:
To use a specific installed version:nvm use 18.17.1You’ll see a message confirming the switch.
-
Set a Default Node.js Version:
To automatically use a specific version whenever you open a new command prompt:nvm alias default 18.17.1 -
Uninstall a Node.js Version:
If you no longer need a specific version:nvm uninstall 18.17.1 -
Verify Active Node.js and npm: After using
nvm use, always verify the active Node.js and npm versions:
bash

node -v

npm -v
These should reflect the version you just activated.
NVM provides immense flexibility for developers, ensuring your environment is always perfectly configured for your current project’s needs.
Method 3: Streamlining Installation with Chocolatey (The Windows Package Manager)
For those who embrace a command-line-driven workflow and already use or plan to use package managers, Chocolatey offers an elegant way to install Node.js and many other software packages on Windows.
What is Chocolatey and How It Simplifies Software Management
Chocolatey is a free, open-source package manager for Windows. It functions much like apt on Debian/Ubuntu or brew on macOS, allowing you to install, uninstall, and update software applications from the command line with simple commands. This significantly streamlines the software installation process, making it consistent and scriptable.
If you don’t have Chocolatey installed, you’ll need to install it first:
- Install Chocolatey (if not already installed):
- Open PowerShell as an Administrator.
- Execute the following command:
powershell

Set-ExecutionPolicy Bypass -Scope Process -Force; [System.Net.ServicePointManager]::SecurityProtocol = [System.Net.ServicePointManager]::SecurityProtocol -bor 3072; iex ((New-Object System.Net.WebClient).DownloadString('https://community.chocolatey.org/install.ps1'))
- Follow any prompts and wait for the installation to complete.
- Verify Chocolatey installation by typing
chocoin a new PowerShell window; you should see its version information.
Installing Node.js via Chocolatey
Once Chocolatey is installed, installing Node.js is incredibly simple:
- Open PowerShell as an Administrator.
- Install Node.js (Latest Stable):
To install the latest stable version of Node.js:
bash

choco install nodejs
- Install Node.js (LTS Version):
To install the Long Term Support (LTS) version, which is recommended for most users:
bash

choco install nodejs-lts
Chocolatey will download and install Node.js, along with its bundled npm. It will also handle adding Node.js to your system’sPATH. - Verify Installation:
Open a new Command Prompt or PowerShell window and run:
bash

node -v

npm -v
You should see the installed Node.js and npm version numbers.
Chocolatey is an excellent choice for developers who prefer a streamlined, command-line-centric approach to managing their development tools.
Troubleshooting Common Node.js Installation Issues
Despite careful installation, you might occasionally encounter issues. Here are some common problems and their solutions:
Resolving PATH Environment Variable Problems
The most frequent issue is Node.js or npm commands not being recognized (e.g., “node is not recognized as an internal or external command”). This almost always points to an issue with the system’s PATH environment variable.
- Symptom:
node -vornpm -vreturns an error saying the command is not found. - Cause: The directory containing
node.exeandnpm.cmdis not included in your system’sPATH. - Solution:
- Reboot: Sometimes, a simple reboot is enough to refresh the
PATHvariable after installation. - Check PATH Manually:
- Search for “Environment Variables” in the Windows Start menu and select “Edit the system environment variables.”
- Click “Environment Variables…”
- Under “System variables,” find the “Path” variable and click “Edit.”
- Ensure that the path to your Node.js installation (e.g.,
C:Program Filesnodejsor the NVM symlink directory likeC:Program Filesnodejs) is listed. - If it’s missing, click “New,” add the correct path, and click “OK” on all windows.
- Important: Open a new Command Prompt or PowerShell window after making changes. Existing windows won’t pick up the changes.
- NVM Specific: If using NVM, ensure
nvm use <version>was run and that NVM’s own paths are in thePATHvariable. The NVM installer usually handles this by adding entries likeC:Users<YourUsername>AppDataRoamingnvmandC:Program Filesnodejs(for the symlink).
- Reboot: Sometimes, a simple reboot is enough to refresh the
Dealing with Permission Errors and Conflicting Installations
Permission issues or conflicts between different Node.js installations can also disrupt your workflow.
- Symptom:
EACCES: permission deniederrors during global package installations (npm install -g <package>) or duringnvm use. - Cause: You might not have the necessary write permissions to the installation directory or global npm packages folder.
- Solution:
- Run as Administrator: Always run your Command Prompt or PowerShell as an Administrator when installing or making system-wide changes, especially with
npm install -g. - Change npm’s Default Directory: If you frequently encounter permission errors with global packages, you can configure npm to install global packages in a user-specific directory where you have full permissions.
- Create a directory for global packages, e.g.,
C:Users<YourUsername>npm-global. - In your command prompt, run:
bash

npm config set prefix "C:Users<YourUsername>npm-global"
- Add this new directory to your system’s
PATHenvironment variable manually (if it’s not already added).
- Create a directory for global packages, e.g.,
- Conflicting Installations: If you’ve tried multiple installation methods (e.g., MSI and NVM), they can conflict.
- Solution: Uninstall all existing Node.js installations from “Add or remove programs.” Then, restart your machine and perform a clean installation using only one method (preferably NVM if you need version management, or the MSI installer for simplicity).
- Run as Administrator: Always run your Command Prompt or PowerShell as an Administrator when installing or making system-wide changes, especially with
These troubleshooting steps should resolve most common installation woes, getting you back on track to developing with Node.js.
Post-Installation: Taking Your Next Steps with Node.js
With Node.js and npm successfully installed, you’re ready to explore its vast ecosystem. Here are a few essential next steps.
Updating npm and Installing Global Packages
Node.js comes bundled with npm, but npm itself is updated more frequently than Node.js. It’s a good practice to keep npm updated to its latest version for new features, bug fixes, and performance improvements.
- Update npm:
Open your command prompt (as administrator if you’re not using a custom global npm prefix) and run:
bash

npm install -g npm@latest
This command tells npm to install itself globally (-g) to the latest version.
Once npm is updated, you might want to install some globally accessible packages that provide useful command-line tools. Some popular examples include:
- Yarn (alternative package manager):
npm install -g yarn - create-react-app (React project initializer):
npm install -g create-react-app - Nest CLI (NestJS framework CLI):
npm install -g @nestjs/cli - nodemon (automatically restarts Node.js app on file changes):
npm install -g nodemon
Diving into Your First Node.js Project
The best way to solidify your Node.js installation is to start building something.
-
Create a New Project Directory:
bash

mkdir my-first-node-app

cd my-first-node-app
-
Initialize a Node.js Project:
bash

npm init -y
This command creates apackage.jsonfile, which manages your project’s metadata and dependencies. The-yflag answers “yes” to all prompts, creating a defaultpackage.json. -
Create a Simple Node.js File:
Create a file namedapp.js(orindex.js) in your project directory and add some basic JavaScript code, for example, a simple “Hello, World!” web server:// app.js const http = require('http'); const hostname = '127.0.0.1'; const port = 3000; const server = http.createServer((req, res) => { res.statusCode = 200; res.setHeader('Content-Type', 'text/plain'); res.end('Hello, Node.js on Windows!n'); }); server.listen(port, hostname, () => { console.log(`Server running at http://${hostname}:${port}/`); }); -
Run Your Node.js Application:
In your project’s directory in the command prompt, run:
bash

node app.js
You should see the messageServer running at http://127.0.0.1:3000/.
Open your web browser and navigate tohttp://127.0.0.1:3000/. You should see “Hello, Node.js on Windows!” displayed. To stop the server, pressCtrl + Cin the command prompt.
This simple exercise confirms that your Node.js environment is fully functional and ready for more complex development.
Conclusion: Empowering Your Development Workflow
Installing Node.js on Windows is the gateway to a powerful and dynamic world of JavaScript development beyond the browser. Whether you choose the simplicity of the official MSI installer, the flexibility of NVM for managing multiple versions, or the command-line convenience of Chocolatey, the process is designed to be user-friendly.
By understanding Node.js’s significance, meticulously following the installation steps, and knowing how to troubleshoot potential issues, you’ve equipped your Windows machine with a vital tool for modern software development. Now, with your environment ready, the only limit is your imagination. Dive into the vast npm ecosystem, explore frameworks like Express.js, React, Angular, or Vue.js, and start building the next generation of scalable and high-performance applications. Happy coding!
aViewFromTheCave is a participant in the Amazon Services LLC Associates Program, an affiliate advertising program designed to provide a means for sites to earn advertising fees by advertising and linking to Amazon.com. Amazon, the Amazon logo, AmazonSupply, and the AmazonSupply logo are trademarks of Amazon.com, Inc. or its affiliates. As an Amazon Associate we earn affiliate commissions from qualifying purchases.