In today’s fast-paced digital world, a sluggish laptop can be a major productivity killer. Whether you’re a gamer battling lag, a creative professional struggling with large design files, or simply someone who juggles multiple applications, a lack of Random Access Memory (RAM) can bring your workflow to a grinding halt. Fortunately, upgrading your laptop’s RAM is one of the most effective and often the most affordable ways to breathe new life into your aging machine, significantly boosting its speed and responsiveness. This guide will walk you through everything you need to know, from understanding what RAM is and why it matters, to selecting the right modules and performing the installation yourself.
Understanding RAM: The Unsung Hero of Laptop Performance
Before diving into the installation process, it’s crucial to understand what RAM is and its role in your laptop’s performance. Think of RAM as your laptop’s short-term memory or its “workbench.” When you open an application, such as a web browser, word processor, or game, the necessary data is loaded from your hard drive (or SSD, which is much faster) into RAM. The more RAM you have, the larger and more complex the workbench becomes, allowing your processor to access and manipulate data much faster.
When your laptop runs out of available RAM, it has to resort to using a portion of your storage drive as “virtual memory.” This process, known as swapping or paging, is significantly slower than accessing data directly from RAM. This is why you experience slowdowns, unresponsiveness, and even crashes when your system is overloaded.
Why Upgrading RAM Makes a Difference
The benefits of increasing your laptop’s RAM are numerous and directly impact your daily computing experience:
- Faster Application Loading: Programs will open more quickly, and switching between them will become seamless.
- Improved Multitasking: You’ll be able to run more applications simultaneously without experiencing performance degradation. This is particularly beneficial for those who keep numerous browser tabs open or run background processes.
- Smoother Performance for Demanding Tasks: Video editing, graphic design, 3D rendering, and gaming all heavily rely on ample RAM. An upgrade can drastically reduce lag and improve the overall experience.
- Extended Laptop Lifespan: Instead of replacing your entire laptop due to performance issues, a RAM upgrade can often extend its usable life by several years, making it a cost-effective solution.
- Better System Responsiveness: General tasks, like booting up your laptop or navigating your operating system, will feel snappier and more fluid.
Step-by-Step Guide to Upgrading Your Laptop’s RAM
While the exact procedure can vary slightly depending on your laptop’s make and model, the general steps for upgrading RAM are consistent.
1. Assess Your Current RAM and Determine Your Needs
The first and most critical step is to understand your laptop’s current RAM configuration and what would be an optimal upgrade.
Identifying Your Current RAM
There are several ways to check your current RAM:
- Windows:
- Right-click on the Start button and select System. In the “About” section, you’ll see “Installed RAM.”
- Alternatively, open Task Manager (Ctrl+Shift+Esc), go to the Performance tab, and click on Memory. This will show you the total amount of RAM and how many slots are occupied.
- macOS:
- Click the Apple menu in the top-left corner and select About This Mac. The “Memory” section will display the total RAM and details about its configuration.
Determining Optimal RAM Capacity
The “right” amount of RAM depends on your usage:
- 4GB: Sufficient for very basic tasks like web browsing, email, and light document editing. However, it will struggle with modern operating systems and multiple applications.
- 8GB: The sweet spot for most general users. This is ideal for everyday tasks, multitasking with several applications, and even light photo editing.
- 16GB: Recommended for power users, gamers, students, and those who regularly use more demanding software like video editors, graphic design tools, or virtual machines.
- 32GB or More: Necessary for professionals working with extremely large datasets, high-resolution video editing, complex 3D modeling, or extensive virtual machine usage.
Checking Maximum Supported RAM and RAM Type
Not all laptops can accommodate unlimited RAM, and they also use specific types of RAM.
- Maximum Supported RAM: Your laptop’s motherboard has a limit on the total RAM it can recognize and utilize. This information can usually be found in your laptop’s user manual or on the manufacturer’s support website. Searching for your specific laptop model followed by “specifications” or “RAM upgrade” is often effective.
- RAM Type (DDR Generation): Laptops use different generations of DDR (Double Data Rate) SDRAM: DDR2, DDR3, DDR4, and DDR5 are the most common. You cannot mix RAM types; a DDR4 slot will only accept DDR4 modules. The same applies to speed ratings (measured in MHz). Your motherboard will only support specific DDR generations and often has a maximum speed it can handle. Your system information tools (mentioned above) will usually indicate the current RAM type.
- Form Factor: Laptop RAM modules are typically SO-DIMM (Small Outline Dual In-line Memory Module), which are smaller than their desktop counterparts.
2. Purchasing the Correct RAM Modules
Once you know what you need, it’s time to buy.
Finding Compatible RAM

- Manufacturer’s Website: The most reliable source is your laptop manufacturer’s support page. They will list compatible RAM upgrades for your specific model.
- Third-Party RAM Retailers: Reputable online retailers specializing in computer components (like Crucial, Kingston, G.Skill) often have “memory configurators” where you enter your laptop model, and they show you compatible RAM.
- System Information Tools: Tools like CPU-Z (for Windows) can provide detailed information about your current RAM, including its type, size, speed, and timings, which can help you match it.
Key Specifications to Match:
- Capacity: The amount of RAM per module (e.g., 4GB, 8GB, 16GB).
- Type: DDR generation (DDR3, DDR4, DDR5).
- Speed: Measured in MHz (e.g., 2666MHz, 3200MHz). While you can often install faster RAM than your system supports, it will run at the motherboard’s maximum supported speed. It’s generally best to match the speed for optimal compatibility, or at least ensure the new RAM is not slower than your existing modules if you plan to keep them.
- Latency (Timings): Usually represented by a series of numbers (e.g., CL16-18-18-38). Lower numbers indicate lower latency and better performance. Ideally, match these as closely as possible, but it’s less critical than type and speed.
- Voltage: Most modern DDR4 and DDR5 RAM operates at standard voltages, but it’s good to be aware of this if you’re dealing with older systems.
Buying in Pairs (Dual-Channel)
For optimal performance, it’s highly recommended to install RAM in pairs of identical modules. This enables “dual-channel” mode, where the memory controller can access two RAM modules simultaneously, effectively doubling the memory bandwidth. This can lead to a noticeable performance improvement, especially in graphics-intensive applications and gaming. If you have two RAM slots, installing two 8GB modules for a total of 16GB will generally perform better than a single 16GB module.
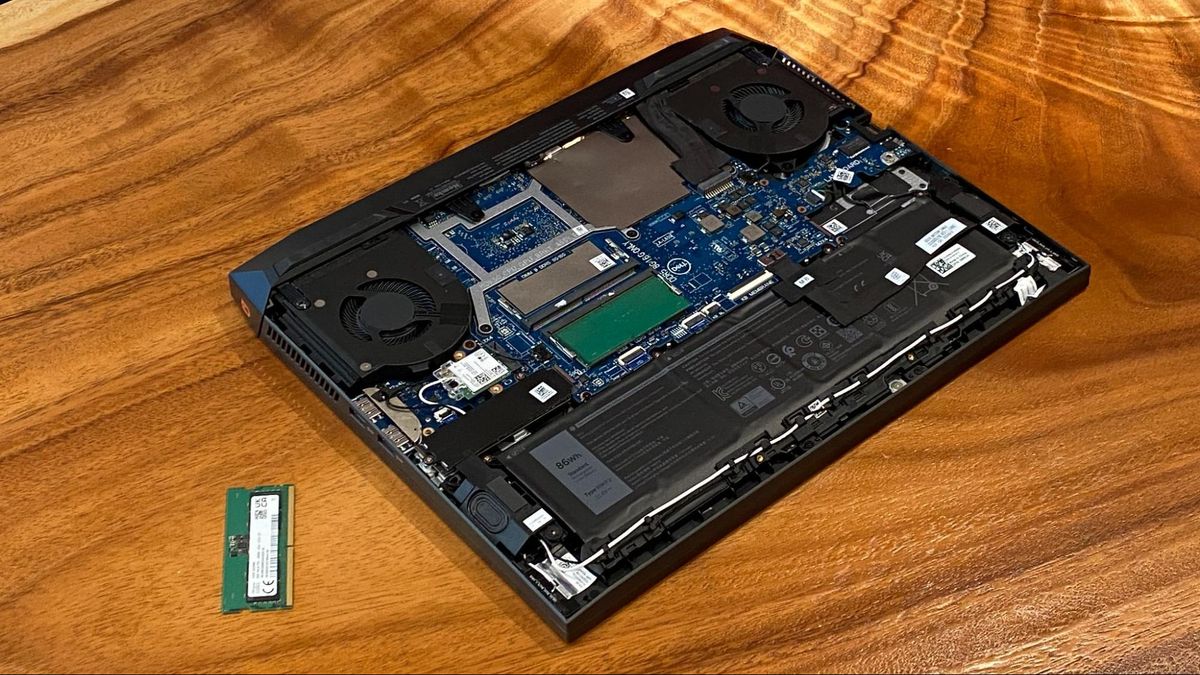
3. The Installation Process: A Hands-On Approach
With your new RAM modules in hand, it’s time for the physical upgrade.
Safety First!
- Power Down Completely: Shut down your laptop entirely, not just put it to sleep.
- Unplug the Power Adapter: Disconnect the AC adapter.
- Remove the Battery (if possible): If your laptop has a removable battery, take it out. For non-removable batteries, be extra cautious.
- Ground Yourself: Static electricity can damage sensitive computer components. Touch a grounded metal object (like a metal desk leg or the unpainted metal casing of a plugged-in desktop computer) before handling the RAM modules. You can also use an anti-static wrist strap.
Accessing the RAM Slots
The location of the RAM slots varies by laptop model.
- Most Common: Many laptops have a dedicated access panel on the bottom of the chassis secured by a few screws. This is the easiest scenario.
- Under the Keyboard: Some ultra-thin laptops require you to remove the keyboard deck to access the RAM slots. This is a more involved process and requires careful manipulation of clips and cables.
- Entire Bottom Panel: In some cases, you might need to remove the entire bottom panel of the laptop.
Consult your laptop’s user manual or a reliable online tutorial specific to your model before proceeding. Searching for “[Your Laptop Model] RAM upgrade” on YouTube or iFixit.com can provide excellent visual guides.
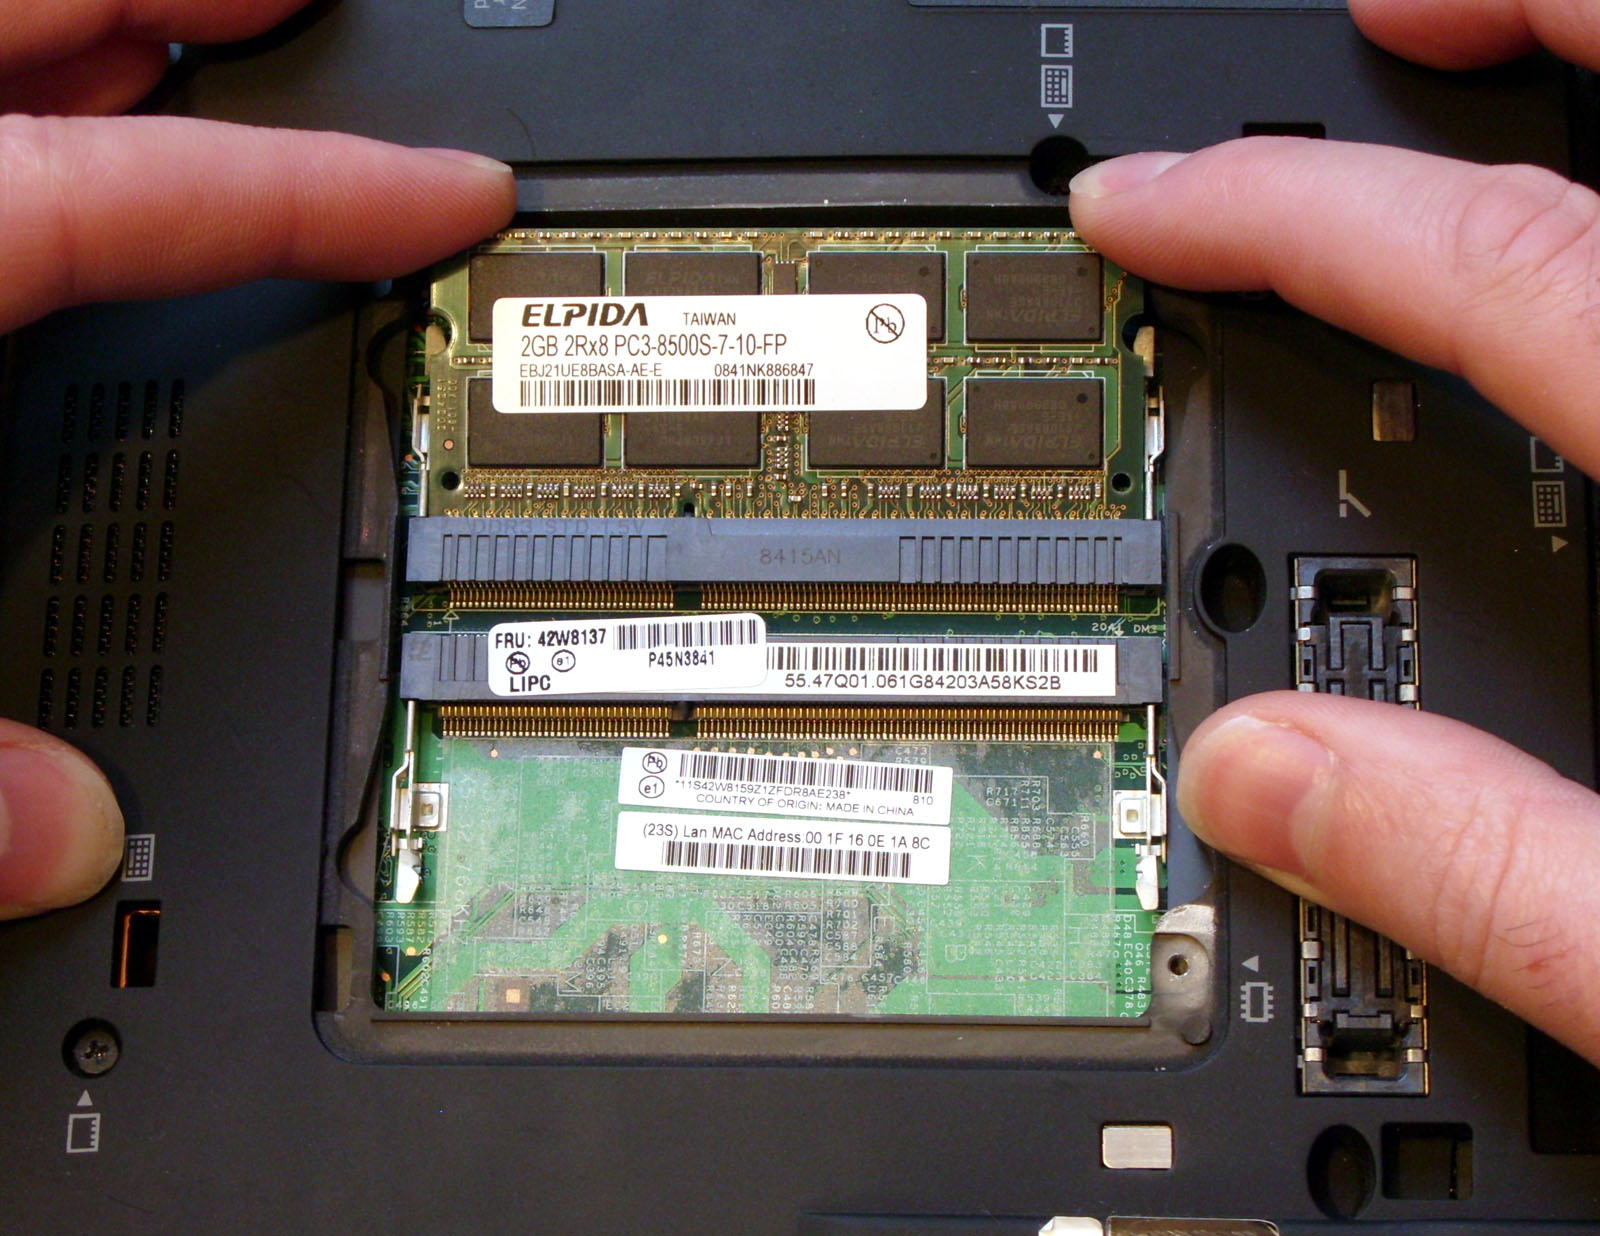
Removing Old RAM (if applicable)
If you’re replacing existing RAM, you’ll need to remove the old modules.
- Locate the RAM Modules: They are usually long, thin sticks.
- Release the Retention Clips: Each RAM module is held in place by two small metal clips on either side. Gently push these clips outward.
- The Module will Pop Up: Once the clips are released, the RAM module will tilt upwards at an angle.
- Gently Pull Out: Carefully pull the module out of its slot at that angle.
Installing New RAM
- Align the Notch: Each RAM module has a notch in its connector. This notch needs to align with the corresponding key in the RAM slot. You can only insert the module in one direction.
- Insert at an Angle: Hold the new RAM module by its edges and insert it into the slot at approximately a 30-45 degree angle, ensuring the notch is aligned.
- Push Down: Once the module is seated firmly in the slot, gently push it down until it lies flat and the retention clips on either side snap into place, securing the module. You should hear a faint click.
- Repeat for Second Module (if applicable): If you have a second module to install, repeat the process in the adjacent slot.
Reassembly and Testing
- Replace the Access Panel/Keyboard/Bottom Cover: Secure all screws and ensure everything is reassembled correctly.
- Reconnect Battery and Power: If you removed the battery, reinsert it. Plug in the power adapter.
- Boot Up Your Laptop: Turn on your laptop. It may take a little longer for the first boot as the system recognizes the new RAM.
- Verify the Upgrade: Once your operating system loads, check your system information (as described in Step 1) to confirm that the new total amount of RAM is recognized. You should also notice a significant improvement in speed and responsiveness.
Troubleshooting Common Issues
- Laptop Won’t Boot: This is often caused by improperly seated RAM. Power down, unplug, and reseat the modules. Ensure they are fully clicked into place.
- System Recognizes Only Some RAM: This could indicate a faulty module, an incompatible module, or a motherboard limitation. Try booting with just one module at a time to isolate the issue.
- Performance Not Improved: Double-check that you purchased the correct RAM type and speed. Also, ensure dual-channel mode is active if you installed in pairs. Sometimes, a clean installation of your operating system after a major hardware upgrade can further optimize performance.
Conclusion: A Smart Investment for Enhanced Computing
Upgrading your laptop’s RAM is a remarkably effective way to boost its performance, extend its lifespan, and improve your overall computing experience. By understanding your system’s requirements, carefully selecting compatible RAM modules, and following these step-by-step instructions, you can successfully perform this upgrade yourself, saving money and gaining a significantly more powerful and responsive machine. Whether for work, play, or study, more RAM is almost always a good thing, and this DIY approach makes it an accessible and rewarding endeavor.
aViewFromTheCave is a participant in the Amazon Services LLC Associates Program, an affiliate advertising program designed to provide a means for sites to earn advertising fees by advertising and linking to Amazon.com. Amazon, the Amazon logo, AmazonSupply, and the AmazonSupply logo are trademarks of Amazon.com, Inc. or its affiliates. As an Amazon Associate we earn affiliate commissions from qualifying purchases.