
In the rapidly evolving landscape of technology, efficiency and interactive analysis are paramount. For anyone delving into data science, machine learning, research, or even advanced computational tasks, Jupyter stands out as an indispensable tool. It’s more than just a code editor; it’s an interactive computing environment that blends code, output, visualizations, and narrative text into a single, cohesive document. This guide will walk you through the process of installing Jupyter, demystifying the setup, and empowering you to harness its full potential for your projects, be they for personal growth, academic pursuits, or professional endeavors.

Jupyter’s utility extends across various domains, making it a cornerstone for anyone looking to articulate their computational thought process clearly. From quickly prototyping machine learning models to generating shareable reports that combine dynamic charts with explanatory text, Jupyter enhances productivity and collaboration. For professionals, this translates into quicker insights, better decision-making, and a more compelling way to present findings to stakeholders, thereby contributing to both personal branding and financial success through improved project outcomes.
Understanding Jupyter: Why It’s Indispensable for Modern Data Science and Beyond
Before diving into the installation process, it’s crucial to grasp what Jupyter is and why it has become a de facto standard in numerous technical fields. Its design philosophy centers around making computational workflows more transparent, reproducible, and engaging.
What Exactly is Jupyter?
The “Jupyter” name itself is a portmanteau of Julia, Python, and R, signifying its language-agnostic nature. While initially heavily associated with Python, the Jupyter Project supports over 100 programming languages (or “kernels”). At its core, the Jupyter ecosystem comprises several key components:
- Jupyter Notebook: This is the original web-based application that allows you to create and share documents containing live code, equations, visualizations, and narrative text. It’s what most people refer to when they talk about “Jupyter.” Each document, known as a notebook, is stored in a
.ipynbfile format. - JupyterLab: The next-generation user interface for Project Jupyter. JupyterLab offers a more flexible, integrated, and powerful environment than the classic Jupyter Notebook. It provides a full-featured IDE-like experience, allowing you to work with multiple notebooks, text editors, terminals, and custom components in a tabbed, drag-and-drop workspace.
- Jupyter Kernels: These are separate processes responsible for running the code in a specific language (Python, R, Julia, etc.) and returning the output to the Jupyter application. When you create a new notebook, you select a kernel, which then executes the code cells.
The beauty of Jupyter lies in its interactivity. You can run code cell by cell, inspect variables, modify code, and see results immediately. This iterative approach is particularly beneficial for data exploration, debugging, and teaching.
The Power and Versatility of Jupyter
The applications of Jupyter are vast, touching upon many of the core themes our tech-focused website explores:
- Interactive Computing and Data Exploration: Jupyter’s cell-by-cell execution model is perfect for exploring datasets. You can load data, clean it, transform it, and visualize intermediate results iteratively, making the data analysis process highly intuitive. This directly impacts data-driven decision-making, a crucial aspect of tech trends and productivity.
- Data Visualization: With robust libraries like Matplotlib, Seaborn, Plotly, and Altair, Jupyter notebooks transform raw data into insightful charts and graphs. These visualizations can be embedded directly into the notebook, creating rich, dynamic reports that are easy to understand and share.
- Machine Learning and AI Development: Jupyter is a preferred environment for developing and experimenting with machine learning models. Data scientists use it to preprocess data, train models, evaluate performance, and demonstrate results, integrating seamlessly with AI tools like TensorFlow, PyTorch, and scikit-learn.
- Reproducible Research and Documentation: By combining code, output, and explanatory text (using Markdown), Jupyter notebooks facilitate reproducible research. Others can easily rerun your code, verify your findings, and understand your methodology. This also serves as excellent technical documentation, bolstering one’s professional brand.
- Education and Training: Its interactive nature makes Jupyter an excellent tool for teaching programming, data science, and mathematics. Students can execute code, experiment, and learn concepts directly within the provided materials.
- Presentations and Storytelling: Notebooks can be converted into interactive slideshows or static HTML files, making them powerful tools for presenting findings. This ability to tell a data story effectively is a significant asset for personal branding and influencing business decisions.
Understanding these benefits underscores why installing Jupyter is not just about setting up a tool, but about equipping yourself with an advanced platform that can significantly boost your productivity, enhance your analytical capabilities, and improve the clarity and impact of your technical communications.
Method 1: The Easiest Path – Installing Jupyter with Anaconda
For newcomers to data science, Python, or even general programming, installing Jupyter via Anaconda is overwhelmingly the recommended approach. Anaconda simplifies environment management and comes bundled with a vast collection of essential data science packages.
Why Anaconda for Jupyter Installation?
Anaconda is a free and open-source distribution of Python and R programming languages for scientific computing (data science, machine learning applications, large-scale data processing, predictive analytics, etc.). It includes:
- Python (and R): A pre-configured Python interpreter.
- Conda: A powerful package and environment management system.
- Hundreds of Pre-installed Packages: Many of the libraries crucial for data science, such as NumPy, Pandas, Matplotlib, scikit-learn, and of course, Jupyter itself, are included out-of-the-box. This eliminates the often-frustrating process of installing dependencies one by one.
- Anaconda Navigator: A desktop graphical user interface (GUI) that allows you to launch applications (like Jupyter Notebook, JupyterLab, Spyder, VS Code), manage conda environments, and install/update packages without using the command line.
By bundling everything, Anaconda dramatically reduces the setup time and minimizes the chances of encountering dependency conflicts, making it a robust choice for getting started quickly and efficiently. This aligns perfectly with the goal of productivity for individuals and businesses.
Step-by-Step Anaconda Installation
Installing Anaconda is a straightforward process across Windows, macOS, and Linux.
-
Download the Anaconda Installer:
- Navigate to the official Anaconda Distribution website: https://www.anaconda.com/download
- Choose the appropriate installer for your operating system (Windows, macOS, or Linux).
- Select the Python 3.x version (as Python 2.x is deprecated). The 64-bit graphical installer is generally recommended.
-
Run the Installer:
- Windows: Double-click the
.exefile you downloaded. Follow the prompts: “Next,” “I Agree” to the license terms.- Installation Type: Choose “Just Me” (recommended) unless you have administrative needs for all users on a shared machine.
- Installation Location: Accept the default path unless you have a specific reason to change it.
- Advanced Options:
- Add Anaconda to my PATH environment variable: Do NOT check this box. Anaconda recommends using Anaconda Navigator or Anaconda Prompt to open applications. Adding it to PATH can interfere with other Python installations.
- Register Anaconda as my default Python 3.x: Check this box. This ensures that Anaconda’s Python is recognized as your primary Python interpreter.
- macOS: Double-click the
.pkgfile. Follow the prompts: “Continue,” “Agree,” “Install.” You might be asked for your administrator password. - Linux: Open a terminal and navigate to the directory where you downloaded the
.shfile. Run the command:bash Anaconda3-*-Linux-x86_64.sh(replace*with the version number). Follow the prompts, pressing Enter to read the license, typingyesto agree, and accepting the default installation location. When prompted to initialize Anaconda, typeyes.
- Windows: Double-click the
-
Verify the Installation:
- Windows: Open the “Anaconda Prompt” from your Start Menu.
- macOS/Linux: Open your regular terminal.
- Type
conda listand press Enter. You should see a long list of installed packages, indicating a successful installation. You can also typejupyter notebook --versionto confirm Jupyter is installed.
Launching Jupyter Notebook and JupyterLab via Anaconda Navigator
Anaconda Navigator provides a user-friendly graphical interface to launch Jupyter applications.
- Open Anaconda Navigator:
- Windows: Search for “Anaconda Navigator” in your Start Menu and click to open.
- macOS: Search for “Anaconda Navigator” in Spotlight (Cmd + Space) or find it in your Applications folder.
- Linux: Open a terminal and type
anaconda-navigator.
- Launch Jupyter: Once Navigator loads, you will see a dashboard with various applications.
- Click “Launch” under Jupyter Notebook to open the classic interface in your default web browser.
- Click “Launch” under JupyterLab to open the next-generation interface in your default web browser.
Launching Jupyter via Command Line (Anaconda Prompt/Terminal)
For those who prefer the command line or need more control, launching Jupyter is simple.
- Open the appropriate terminal:
- Windows: Search for “Anaconda Prompt” in your Start Menu.
- macOS/Linux: Open your regular terminal application.
- Activate your base environment (if not already active):
conda activate base(usually activated by default when you open Anaconda Prompt/Terminal).
- Launch Jupyter Notebook:
- Type
jupyter notebookand press Enter. This will start the Jupyter server and open a new tab in your default web browser displaying the Jupyter Notebook dashboard.
- Type
- Launch JupyterLab:
- Type
jupyter laband press Enter. This will start the Jupyter server and open a new tab in your default web browser displaying the JupyterLab interface.
- Type
When you’re done, simply close the browser tab. In the terminal where you launched Jupyter, you can press Ctrl + C twice to shut down the server.
Method 2: For Python Enthusiasts – Installing Jupyter with Pip
If you already have a Python installation and prefer a more minimal setup without the full Anaconda suite, installing Jupyter directly using Python’s package installer, pip, is a viable option. This method gives you more control over your Python environments and installed packages, appealing to those who prioritize lean systems and customized configurations.
Prerequisites: Ensuring Python is Ready
Before using pip to install Jupyter, you must have Python correctly installed on your system.
- Install Python: If you don’t have Python, download the latest stable version (Python 3.x) from the official Python website: https://www.python.org/downloads/. During installation, especially on Windows, ensure you check the box that says “Add Python to PATH” or “Install launcher for all users.” This makes Python and
pipcommands accessible from any terminal. - Verify Python and Pip Installation:
- Open your terminal or command prompt.
- Type
python --version(orpython3 --versionon some systems) and press Enter. You should see the installed Python version. - Type
pip --version(orpip3 --version) and press Enter. You should see the installed pip version. If pip is not found, you might need to reinstall Python and ensure it’s added to your PATH, or manually install pip if your Python installation didn’t include it.
- Consider Virtual Environments (Highly Recommended): For managing project dependencies and avoiding conflicts between different projects, using Python virtual environments is a best practice. This is a crucial aspect of good software engineering and productivity.
- To create a virtual environment:
python -m venv my_jupyter_env(replacemy_jupyter_envwith your desired name). - To activate it:
- Windows:
.my_jupyter_envScriptsactivate - macOS/Linux:
source my_jupyter_env/bin/activate
- Windows:
- Once activated, your terminal prompt will typically show the environment’s name, e.g.,
(my_jupyter_env). All packages installed viapipnow will reside only within this environment.
- To create a virtual environment:
Installing Jupyter Notebook with Pip
With your Python environment ready and active (if using a virtual environment), you can install Jupyter Notebook.
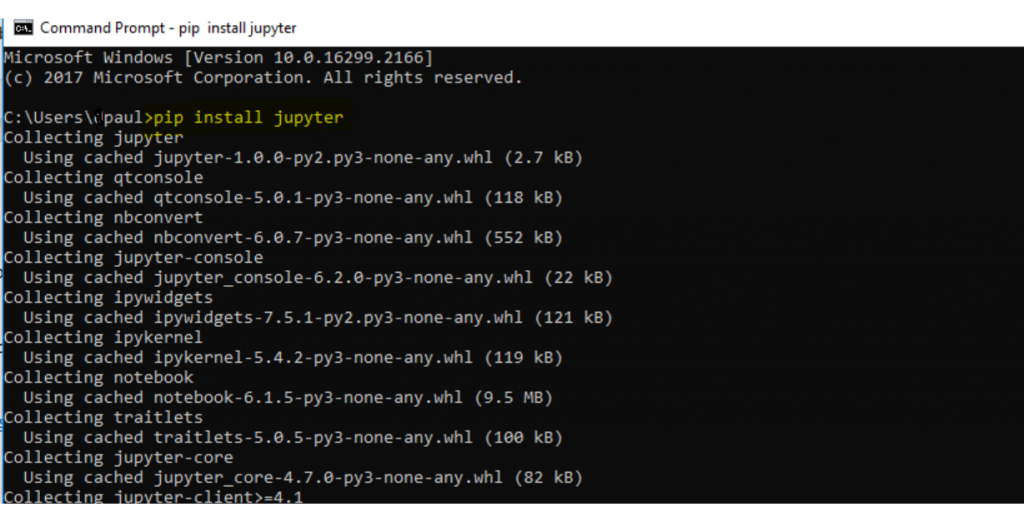
- Install Jupyter Notebook:
- In your activated virtual environment or global Python environment, run the command:
bash

pip install notebook
- This command will download and install the Jupyter Notebook package along with all its necessary dependencies.
- In your activated virtual environment or global Python environment, run the command:
Installing JupyterLab with Pip (Optional but Recommended)
For a more modern and feature-rich experience, it’s highly recommended to install JupyterLab in addition to, or instead of, Jupyter Notebook. JupyterLab builds upon the Notebook, offering a more powerful interface.
- Install JupyterLab:
- In the same active environment, run:
bash

pip install jupyterlab
- This will install JupyterLab and its dependencies. If you’ve already installed
notebook,jupyterlabwill leverage existing components.
- In the same active environment, run:
Launching Jupyter Notebook and JupyterLab via Terminal
Launching from the command line is straightforward after a pip installation.
- Ensure your environment is active: If you installed Jupyter in a virtual environment, make sure it’s activated before launching.
- Launch Jupyter Notebook:
- Type
jupyter notebookand press Enter. - This will start the Jupyter server, and your default web browser will open to the Jupyter Notebook dashboard.
- Type
- Launch JupyterLab:
- Type
jupyter laband press Enter. - This will start the Jupyter server, and your default web browser will open to the JupyterLab interface.
- Type
Remember to shut down the server by pressing Ctrl + C twice in the terminal when you are finished. Deactivating your virtual environment (by typing deactivate on Windows or conda deactivate / deactivate on macOS/Linux) is also a good practice when you’re done with your session.
Essential Post-Installation Steps and Best Practices
Once Jupyter is successfully installed, taking a few additional steps can significantly enhance your workflow, productivity, and the overall quality of your work.
Creating Your First Jupyter Notebook
Let’s get hands-on and create a new notebook.
- Launch Jupyter (Notebook or Lab): Use either the Anaconda Navigator or the command line (
jupyter notebookorjupyter lab). - Navigate to a working directory: The Jupyter dashboard shows your file system. Navigate to a folder where you want to store your project notebooks.
- Create a New Notebook:
- Jupyter Notebook: Click the “New” button (top right) and select “Python 3” (or whichever kernel you intend to use).
- JupyterLab: Click “File” -> “New” -> “Notebook” and select your kernel, or click the “Notebook” icon in the Launcher.
- Start Coding: A new tab will open with an empty notebook. You’ll see an input cell. Type some Python code (e.g.,
print("Hello, Jupyter!")) and pressShift + Enterto run it. The output will appear directly below the cell. - Save Your Notebook: Click the save icon (floppy disk) or go to “File” -> “Save and Checkpoint.” Your notebook will be saved as a
.ipynbfile.
Managing Kernels and Environments
Jupyter’s flexibility comes from its ability to connect to different “kernels” (language interpreters) and manage separate Python environments.
- Installing New Kernels: If you want to use Jupyter with R, Julia, or another Python environment (e.g., a virtual environment created with
venvorcondathat wasn’t the one you installed Jupyter in), you need to install a kernel spec for it.- For a new Python virtual environment:
- Activate the environment:
conda activate my_new_envorsource my_new_env/bin/activate - Install
ipykernel:pip install ipykernel - Install the kernel spec:
python -m ipykernel install --user --name=my_new_env --display-name "Python (my_new_env)"
Now, when you launch Jupyter, “Python (mynewenv)” will appear as an option under “New” -> “Notebook.”
- Activate the environment:
- For a new Python virtual environment:
- Switching Kernels: Within an open notebook, you can switch the kernel via the “Kernel” menu. This is useful if you realize you need a different environment or language for your analysis.
Proper environment management is crucial for maintaining a clean and reproducible workflow, especially when juggling multiple projects with differing dependencies. This also ties into digital security and avoiding conflicts, which are key aspects of tech best practices.
Enhancing Your Workflow with Jupyter Extensions
Jupyter’s functionality can be extended significantly through various extensions, improving productivity and customization.
- Jupyter Notebook Extensions (nbextensions): These add features like table of contents generation, code folding, spell checking, and more.
- Install:
pip install jupyter_contrib_nbextensions && jupyter contrib nbextension install --user - Enable:
jupyter nbextension enable hinterland/hinterland(example) - You can manage them through a dedicated tab on the Jupyter Notebook dashboard.
- Install:
- JupyterLab Extensions: JupyterLab has its own extension system. You can browse and install extensions directly from the Extensions Manager in the left sidebar (looks like a puzzle piece). Popular extensions include Git integration, themes, and various data viewers.
- Install:
jupyter labextension install @jupyterlab/git(example for Git) - These extensions can transform JupyterLab into an even more powerful IDE, enhancing your digital security through version control and boosting productivity.
- Install:
Investing time in setting up these extensions can streamline your work, making your notebooks more readable, functional, and reflective of a professional standard – an indirect boost to personal branding.
Tips for Collaboration and Sharing Your Work
One of Jupyter’s greatest strengths is its ability to facilitate sharing and collaboration.
- Exporting Notebooks: Jupyter notebooks can be exported into various formats, including HTML, PDF, Markdown, and Python scripts, via “File” -> “Download as.” HTML exports are excellent for sharing static, interactive reports online.
- Version Control with Git: Treat your notebooks like any other code. Integrate them with Git and GitHub to track changes, collaborate with teams, and manage different versions. JupyterLab has built-in Git integration, or you can use
nbdimefor more sophisticated diffing of.ipynbfiles. - nbviewer: Share your public notebooks online via https://nbviewer.jupyter.org/. Just paste the URL to your raw
.ipynbfile (e.g., from GitHub), and nbviewer will render it beautifully, making it easily accessible to others without them needing Jupyter installed. This is a powerful tool for showcasing your work and building your brand. - Cloud-based Jupyter Environments: Services like Google Colab, Kaggle Kernels, and Azure Notebooks offer free, cloud-hosted Jupyter environments, often with GPU access. These are fantastic for sharing and collaboration, allowing others to run your code directly in their browser without any local setup.
Troubleshooting Common Installation and Launch Issues
Even with the most detailed instructions, you might encounter issues. Here are solutions to some common problems.
“Command Not Found” or Path Issues
- Symptom: When you type
python,pip,jupyter notebook, orcondain your terminal, you get an error like “command not found” or “is not recognized as an internal or external command.” - Solution:
- Anaconda: Ensure you’re using the “Anaconda Prompt” (Windows) or that your shell has been initialized for Conda (macOS/Linux:
conda init <shell_name>). If you installed Anaconda and didn’t check “Add Anaconda to my PATH,” this is expected; always use Anaconda Prompt. - Pip: This usually means Python or Pip isn’t in your system’s PATH environment variable. Reinstall Python, making sure to check “Add Python to PATH” during installation. On macOS/Linux, check your
.bashrcor.zshrcfile to ensure Python’s bin directory is included.
- Anaconda: Ensure you’re using the “Anaconda Prompt” (Windows) or that your shell has been initialized for Conda (macOS/Linux:
Port Already in Use
- Symptom: When launching Jupyter, it might display an error indicating that the port (usually 8888) is already in use.
- Solution: Jupyter automatically tries the next available port (e.g., 8889, 8890). You can either wait for it to find one or manually specify a port:
jupyter notebook --port 8889- You can also try to identify and kill the process using the port, but changing the port is usually simpler.
Kernel Connection Issues
- Symptom: After opening a notebook, the kernel status (often in the top right) shows “Connecting” indefinitely or “No Kernel.”
- Solution:
- Check Kernel Installation: Ensure
ipykernelis installed in the specific Python environment you’re using. If you created a new virtual environment, you need to installipykernelthere:pip install ipykernel. - Install Kernel Spec: Make sure Jupyter knows about your kernel:
python -m ipykernel install --user --name=my_env_name --display-name "Python (my_env_name)". - Restart Kernel: In the notebook, go to “Kernel” -> “Restart” or “Kernel” -> “Restart & Clear Output.”
- Check Python Version: Ensure the Python version your kernel is trying to use is correctly installed and accessible.
- Check Kernel Installation: Ensure
Package Conflicts and Dependency Management
- Symptom: When trying to install a new package, you encounter errors about conflicting dependencies, or an existing package stops working after installing another.
- Solution:
- Virtual Environments: This is why virtual environments (Anaconda environments or Python’s
venv) are crucial. They isolate project dependencies, preventing conflicts. If you haven’t been using them, start now. - Conda Update: If using Anaconda,
conda update --allcan sometimes resolve conflicts by updating all packages in the current environment. - Pip Upgrade:
pip install --upgrade problematic-packagecan sometimes fix issues with a specific package. - Recreate Environment: In severe cases, it might be easiest to delete and recreate a fresh virtual environment, installing only the necessary packages.
- Virtual Environments: This is why virtual environments (Anaconda environments or Python’s
Conclusion: Empowering Your Data Journey with Jupyter
Installing Jupyter is the first significant step into a world of interactive computing, data exploration, and scientific research. Whether you choose the comprehensive Anaconda distribution for its ease of use and bundled libraries or prefer the minimalist pip installation for greater control, the reward is a powerful environment ready to amplify your productivity and analytical capabilities.
By following this guide, you’ve equipped yourself with a tool that goes beyond mere code execution. Jupyter empowers you to tell compelling data stories, develop robust machine learning models, and conduct reproducible research, all within an engaging and interactive framework. These capabilities are not just technical achievements; they translate directly into tangible benefits for your career, enabling you to excel in the tech landscape, build a strong professional brand through clear communication, and potentially unlock new financial opportunities through advanced data skills.
Now that Jupyter is at your fingertips, the real journey begins. Explore its features, experiment with different libraries, and leverage its interactive nature to deepen your understanding and accelerate your projects. The world of data awaits your insights, and Jupyter is your trusted companion on that exciting path.
aViewFromTheCave is a participant in the Amazon Services LLC Associates Program, an affiliate advertising program designed to provide a means for sites to earn advertising fees by advertising and linking to Amazon.com. Amazon, the Amazon logo, AmazonSupply, and the AmazonSupply logo are trademarks of Amazon.com, Inc. or its affiliates. As an Amazon Associate we earn affiliate commissions from qualifying purchases.