Java stands as a cornerstone in the world of software development, powering everything from enterprise-grade applications and cloud services to mobile apps and large-scale data processing. Its enduring relevance is a testament to its robust ecosystem, strong community support, and continuous evolution. Among its many iterations, Java 17 holds particular significance as a Long-Term Support (LTS) release. For developers and organizations alike, choosing an LTS version means committing to a stable, secure, and well-maintained platform for years to come, minimizing the need for frequent upgrades and ensuring application longevity.
This guide is designed to walk you through the process of installing Java 17 (specifically the Java Development Kit or JDK) on various operating systems. Whether you’re setting up a new development environment, upgrading an existing one, or simply curious about the latest LTS release, this comprehensive tutorial will ensure you have Java 17 up and running smoothly. By the end, you’ll not only have a functional Java 17 environment but also an understanding of why this particular version is a critical asset in your technological toolkit, driving productivity and future-proofing your development efforts.
Understanding Java 17 and Why It’s Your Next Essential Tool
In the rapidly evolving landscape of technology, stability and long-term vision are paramount, especially for foundational tools like Java. Oracle, the steward of Java, has adopted a six-month release cadence, meaning a new version of Java is released every half-year. While this provides rapid access to new features and improvements, it also introduces a need for “Long-Term Support” (LTS) releases. Java 17 is one such LTS release, following Java 11, and it represents a stable benchmark that developers and enterprises can confidently build upon for several years.
The significance of an LTS version like Java 17 cannot be overstated. For individual developers, it means working with a version that will receive regular security updates and bug fixes, providing a reliable foundation for personal projects and skill development. For businesses, especially those with large-scale applications or complex IT infrastructures, adopting Java 17 LTS translates into substantial benefits. It ensures that critical systems remain stable and secure without the disruption of frequent version migrations. This commitment to stability directly impacts the operational efficiency and digital security posture of an organization, reducing maintenance overheads and freeing up resources for innovation.
Java 17 brings with it a host of enhancements and new language features that streamline development and improve application performance. While not all features are groundbreaking individually, their cumulative effect contributes to a more modern, efficient, and secure development experience. These include crucial updates to the garbage collector, further enhancements to the Java Flight Recorder for profiling, sealed classes for more expressive type hierarchies, pattern matching for switch expressions for cleaner code, and improvements to the Foreign Function & Memory API for better interaction with native code. These advancements collectively empower developers to write more robust, maintainable, and high-performing applications.
From a broader “Tech” perspective, leveraging an LTS release like Java 17 positions organizations to stay competitive. It provides a platform that is not only robust today but also adaptable for future technological trends, including advancements in AI, machine learning, and cloud-native development. Moreover, for brands, aligning with stable and well-supported technology stacks demonstrates a commitment to quality and reliability, fostering trust among customers and attracting top-tier talent. The investment in adopting Java 17 LTS ultimately contributes to long-term financial savings by minimizing technical debt and maximizing the lifespan of software assets, making it a wise choice for any forward-thinking entity.
Pre-Installation Preparations: Setting the Stage for Success
Before diving into the actual installation process, a few preparatory steps are essential to ensure a smooth and conflict-free setup of Java 17. This initial phase involves understanding your options for the Java Development Kit (JDK) and checking your system’s readiness.
Choosing Your Java Development Kit (JDK) Distribution
Historically, the Oracle JDK was the de facto standard. However, with changes in Oracle’s licensing model post-Java 8, a vibrant ecosystem of OpenJDK distributions has emerged. Understanding these options is crucial for making an informed choice, especially for commercial use.
- Oracle JDK: While Oracle still provides its JDK, its licensing for commercial use has become more restrictive. For development and personal use, it might still be free, but for production environments, a subscription might be required. It comes with Oracle’s specific commercial support and features.
- OpenJDK Distributions: These are open-source, free-to-use, and often preferred for most development and production environments due to their permissive licenses. They are built from the same OpenJDK source code and are typically functionally equivalent to the Oracle JDK, differing primarily in their support models and branding. Popular distributions include:
- Adoptium (formerly AdoptOpenJDK) / Temurin: This is one of the most popular and recommended choices. It provides high-quality, free, open-source builds of OpenJDK for various platforms, backed by the Eclipse Foundation. It’s an excellent choice for general development and enterprise deployment.
- Amazon Corretto: Amazon’s no-cost, multiplatform, production-ready distribution of OpenJDK. It’s specifically optimized for AWS environments but can be used anywhere.
- Azul Zulu: Another well-regarded OpenJDK distribution, available with both free and commercial support options.
- Red Hat OpenJDK: Often included with enterprise Linux distributions, offering Red Hat’s support.
For the vast majority of users, especially those seeking a free and open-source solution with broad community backing, Adoptium’s Temurin builds of OpenJDK 17 are highly recommended. They offer robust performance, regular updates, and are completely free for all uses.
System Requirements:
Ensure your system meets the basic requirements for installing Java 17:
- Operating System: Java 17 supports Windows 10/11, macOS (Intel and Apple Silicon), and various Linux distributions (e.g., Ubuntu, Debian, Fedora, CentOS, RHEL).
- Disk Space: You’ll typically need around 300-500 MB of free disk space for the JDK installation.
- RAM: While Java itself is efficient, having at least 4GB of RAM is recommended for comfortable development, especially when running an IDE.
Checking for Existing Java Installations:
It’s a good practice to check if you have older Java versions installed. While Java 17 can coexist with other versions, understanding your current setup helps in managing environment variables later.
Open your terminal or command prompt and type:
java -version
This will show you any currently active Java version. Note it down for reference.
Choosing the right distribution not only affects your technical setup but can also have “Money” implications for businesses, as some commercial JDKs come with licensing costs, whereas OpenJDK distributions offer a free alternative, potentially saving significant expenditure on software licenses.
Step-by-Step Installation Across Major Operating Systems
With your preparations complete, let’s proceed with the actual installation of Java 17. We’ll focus on the recommended Adoptium Temurin distribution for its ease of use and open-source nature.
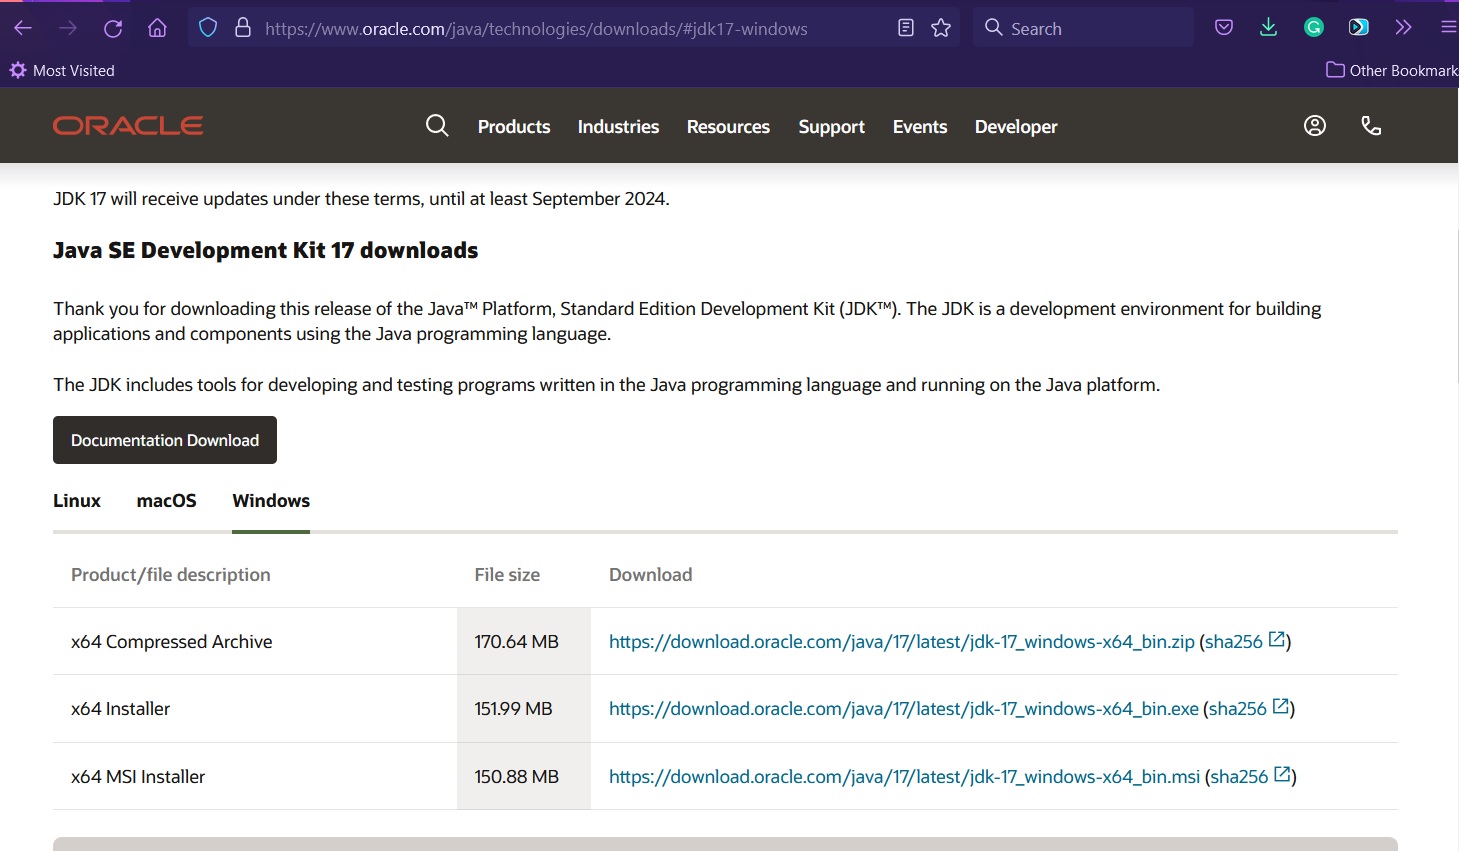
Installing Java 17 on Windows
-
Download the Installer:
- Go to the Adoptium website:
https://adoptium.net/ - Locate the “Temurin 17 (LTS)” download section.
- Ensure “Windows” is selected for your operating system and download the
.msiinstaller. Choose the x64 version for most modern systems.
- Go to the Adoptium website:
-
Run the Installer:
- Once downloaded, double-click the
.msifile to start the installation wizard. - Click “Next” on the welcome screen.
- Accept the license agreement and click “Next.”
- Custom Setup (Important): On the “Custom Setup” screen, you’ll see options for “Java Development Kit,” “JRE,” and “Set JAVAHOME environment variable.” Make sure “Set JAVAHOME environment variable” is selected (usually marked with a red X initially, click it and select “Will be installed on local hard drive”). This step is crucial for many Java applications and IDEs.
- Click “Next.”
- Click “Install” to begin the installation.
- If prompted by User Account Control (UAC), click “Yes.”
- Click “Finish” once the installation is complete.
- Once downloaded, double-click the
Installing Java 17 on macOS
-
Download the Installer:
- Go to the Adoptium website:
https://adoptium.net/ - Locate the “Temurin 17 (LTS)” download section.
- Ensure “macOS” is selected for your operating system. Download the
.pkginstaller appropriate for your chip architecture (x64 for Intel Macs, AArch64 for Apple Silicon M1/M2/M3 Macs).
- Go to the Adoptium website:
-
Run the Installer:
- Double-click the downloaded
.pkgfile. - The macOS installer wizard will launch. Click “Continue” through the introduction.
- Agree to the software license agreement.
- Click “Install.” You may be prompted for your administrator password.
- Once the installation is complete, click “Close.”
- By default, Java will be installed in
/Library/Java/JavaVirtualMachines/temurin-17.jdk.
- Double-click the downloaded
-
Optional: Using Homebrew:
- For those familiar with Homebrew, an alternative is to install via the command line:
bash

brew install --cask temurin17
- Homebrew handles the download and installation, often setting up necessary links.
- For those familiar with Homebrew, an alternative is to install via the command line:
Installing Java 17 on Linux
Installation on Linux can vary depending on your distribution and preference (package manager vs. manual).
Using Package Managers (Recommended for ease of updates)
For Debian/Ubuntu-based distributions:
-
Add Adoptium Repository (if not already present):
sudo apt update
sudo apt install -y wget apt-transport-https
wget -qO - https://adoptium.github.io/adoptium.key | sudo gpg --dearmor | sudo tee /etc/apt/trusted.gpg.d/adoptium.gpg > /dev/null
echo "deb https://packages.adoptium.net/artifactory/deb $(awk -F= '/VERSION_CODENAME/{print $2}' /etc/os-release) main" | sudo tee /etc/apt/sources.list.d/adoptium.list
(Note: The
VERSION_CODENAMEpart ensures the correct distribution name is used, e.g., focal for Ubuntu 20.04, jammy for Ubuntu 22.04) -
Update and Install:
bash

sudo apt update

sudo apt install temurin-17-jdk
For RHEL/CentOS/Fedora-based distributions:
-
Add Adoptium Repository (if not already present):
sudo rpm --import https://adoptium.github.io/adoptium.key sudo wget -O /etc/yum.repos.d/adoptium.repo https://adoptium.github.io/adoptium.repo -
Install:
bash

sudo dnf install temurin-17-jdk  # For Fedora 22+ / CentOS 8+

# OR

sudo yum install temurin-17-jdk  # For older CentOS/RHEL versions
Manual Installation (for any Linux distribution)
- Download the Archive:
- Go to the Adoptium website:
https://adoptium.net/ - Locate the “Temurin 17 (LTS)” download section.
- Ensure “Linux” is selected and download the
.tar.gzarchive (x64).
- Go to the Adoptium website:
-
Extract the Archive:
- Open a terminal and navigate to your Downloads directory.
- Extract the contents:
bash

tar -xvf OpenJDK17U-jdk_x64_linux_hotspot_17.0.x_y.tar.gz
(ReplaceOpenJDK17U-jdk_x64_linux_hotspot_17.0.x_y.tar.gzwith the actual filename).
-
Move to a System Location:
- It’s common practice to move the extracted JDK folder to
/opt/javaor/usr/local/java. - First, create the directory if it doesn’t exist:
bash

sudo mkdir -p /opt/java
- Then, move the extracted folder:
bash

sudo mv jdk-17.x.x /opt/java/temurin-17
(Replacejdk-17.x.xwith the actual folder name after extraction).
- It’s common practice to move the extracted JDK folder to
Regardless of your chosen operating system, careful execution of these steps ensures Java 17 is correctly installed on your system, setting the stage for the crucial configuration of environment variables.
Configuring Environment Variables for Seamless Development
After installing Java 17, the next critical step is to configure your system’s environment variables. This tells your operating system and various development tools (like IDEs, build systems, and command-line utilities) where to find the Java executable and other necessary components. Without proper configuration, your Java installation might not be recognized, leading to frustrating “command not found” errors or compilation failures.
Setting JAVA_HOME and Updating PATH
Two primary environment variables are important for Java: JAVA_HOME and PATH.
JAVA_HOME: This variable points to the root directory of your JDK installation. Many Java-based applications, build tools (like Maven or Gradle), and IDEs rely onJAVA_HOMEto locate the correct Java version. Setting this explicitly provides a consistent reference point.PATH: This variable is a list of directories where your operating system searches for executable programs. By adding thebindirectory of your Java installation to thePATH, you enable command-line access to Java tools likejava,javac,jar, etc., from any directory without specifying their full path.
Proper configuration of these variables is a cornerstone of a robust “Tech” development environment, directly impacting developer “Productivity” by streamlining workflows and reducing configuration headaches.
For Windows
-
Find your Java Installation Path:
- By default, Adoptium Temurin 17 might be installed in a path similar to
C:Program FilesEclipse Adoptiumjdk-17.0.x.y-hotspot. Copy this path.
- By default, Adoptium Temurin 17 might be installed in a path similar to
-
Open Environment Variables:
- Press
Win + R, typesysdm.cpl, and press Enter. - Go to the “Advanced” tab and click “Environment Variables…”
- Press
-
Set
JAVA_HOME:- Under “System variables,” click “New…”.
- For “Variable name,” enter
JAVA_HOME. - For “Variable value,” paste the Java installation path you copied (e.g.,
C:Program FilesEclipse Adoptiumjdk-17.0.x.y-hotspot). - Click “OK.”
-
Update
Path:- Under “System variables,” find the
Pathvariable and select it. - Click “Edit…”.
- Click “New” and add
%JAVA_HOME%bin. Make sure this entry is near the top of the list to prioritize it over other potential Java installations. - Click “OK” on all open windows to save the changes.
- Under “System variables,” find the
-
Restart Command Prompt/PowerShell:
- Open a new Command Prompt or PowerShell window for the changes to take effect.
For macOS and Linux
The process is similar for both macOS and Linux, involving editing your shell’s configuration file. The most common files are .bashrc, .zshrc, or .profile in your home directory (~).
-
Find your Java Installation Path:
- For macOS, if installed via
.pkg, it’s typically/Library/Java/JavaVirtualMachines/temurin-17.jdk/Contents/Home. - For Linux, if installed manually, it’s where you moved it, e.g.,
/opt/java/temurin-17. - If installed via package manager, it might be in
/usr/lib/jvm/temurin-17-jdk-amd64or similar. You can often find it usingreadlink -f $(which java)which points to the current Java executable.
- For macOS, if installed via
-
Edit your Shell Configuration File:
- Open your preferred text editor (e.g.,
nano,vim, orcode) to edit the file relevant to your shell. For Zsh (default on modern macOS) use.zshrc; for Bash (common on Linux), use.bashrcor.profile. bash
nano ~/.zshrc # for Zsh
# OR
nano ~/.bashrc # for Bash
- Open your preferred text editor (e.g.,
-
Add
JAVA_HOMEandPATH:- Add the following lines to the end of the file. Replace
/path/to/your/jdk-17with the actual path you found in step 1.
bash

export JAVA_HOME="/path/to/your/jdk-17"

export PATH="$JAVA_HOME/bin:$PATH"
- Add the following lines to the end of the file. Replace
-
Save and Exit:
- Save the file (e.g.,
Ctrl+X,Y, Enter for nano).
- Save the file (e.g.,
-
Reload Shell Configuration:
- Apply the changes by sourcing the file or opening a new terminal window:
bash

source ~/.zshrc   # or source ~/.bashrc
- Apply the changes by sourcing the file or opening a new terminal window:
With these environment variables correctly set, your system is now fully aware of your Java 17 installation, making it accessible for all your development needs.
Verifying Your Java 17 Installation and Next Steps
Once you’ve completed the installation and configuration of environment variables, the final step is to verify that Java 17 is correctly recognized by your system. This simple check confirms that all previous steps were successful and that you’re ready to start developing.
Confirming Successful Setup
-
Open a New Terminal/Command Prompt:
- It’s crucial to open a new terminal or command prompt window after making changes to environment variables. Existing windows might not reflect the updated settings.
-
Check Java Version:
- Type the following command and press Enter:
bash

java --version
- You should see output similar to this, indicating Java 17 is active:
openjdk 17.0.x yyyy-mm-dd

OpenJDK Runtime Environment Temurin-17.0.x+y (build 17.0.x+y)

OpenJDK 64-Bit Server VM Temurin-17.0.x+y (build 17.0.x+y, mixed mode, sharing)
(Thexandywill correspond to the specific build number).
- Type the following command and press Enter:
-
Check Java Compiler Version:
- To verify the Java Development Kit (JDK) components, check the compiler version:
bash

javac --version
- You should see:
javac 17.0.x
- To verify the Java Development Kit (JDK) components, check the compiler version:
-
Check
JAVA_HOME(Optional, but good for troubleshooting):- On Windows:
cmd

echo %JAVA_HOME%
- On macOS/Linux:
bash

echo $JAVA_HOME
- This should display the path to your Java 17 JDK installation, confirming the
JAVA_HOMEvariable is correctly set.
- On Windows:
Troubleshooting Tip: If java --version or javac --version returns an older Java version, a “command not found” error, or an incorrect path for JAVA_HOME, revisit the environment variable configuration step. Ensure your PATH variable lists the Java 17 bin directory before any other Java installations, and that JAVA_HOME points directly to the Java 17 JDK root. Restarting your computer can sometimes resolve stubborn environment variable issues, especially on Windows.

Leveraging Java 17: Next Steps for Developers
With Java 17 successfully installed and configured, you’ve laid a robust foundation for your development journey. Here are some immediate next steps to maximize your new environment:
-
Install an Integrated Development Environment (IDE):
- IntelliJ IDEA: Highly recommended for Java development, with excellent support for modern Java features. Both the free Community Edition and the powerful Ultimate Edition are available.
- Eclipse IDE: Another popular and free IDE, widely used in enterprise environments.
- VS Code: While not a dedicated Java IDE, with the Java Extension Pack, it offers a lightweight yet powerful environment for many Java tasks.
-
Start a New Java 17 Project:
- Use your IDE to create a new Java project and ensure it’s configured to use JDK 17. Experiment with new Java 17 features like Sealed Classes or Pattern Matching for Switch.
-
Explore Build Tools:
- Familiarize yourself with build automation tools like Maven or Gradle. These tools simplify project management, dependency handling, and compilation.
By correctly installing and configuring Java 17, you’ve not only set up a crucial “Tech” tool but also significantly enhanced your “Productivity” as a developer. This LTS release provides a stable platform that will serve you well for years to come, enabling you to build high-quality, secure, and performant applications that can power the next generation of digital solutions.
In conclusion, installing Java 17 LTS is a strategic move for any developer or organization committed to building robust and future-proof applications. Its long-term support, coupled with performance enhancements and language features, makes it an indispensable tool in today’s dynamic technology landscape. By following this guide, you’ve successfully equipped yourself with the power of Java 17, ready to embark on your next coding adventure with confidence.
aViewFromTheCave is a participant in the Amazon Services LLC Associates Program, an affiliate advertising program designed to provide a means for sites to earn advertising fees by advertising and linking to Amazon.com. Amazon, the Amazon logo, AmazonSupply, and the AmazonSupply logo are trademarks of Amazon.com, Inc. or its affiliates. As an Amazon Associate we earn affiliate commissions from qualifying purchases.