
In the landscape of modern software development, Git has emerged as the undisputed champion for version control. Its robust capabilities for tracking changes in code, managing branches, and facilitating collaborative work have revolutionized how teams build and maintain projects. However, Git, by design, excels at handling text-based files where changes can be efficiently recorded as diffs. It struggles significantly when confronted with large binary files – assets like high-resolution images, audio files, video clips, 3D models, large datasets, or pre-compiled binaries. Storing these directly in a Git repository can lead to massive repository bloat, painfully slow clone times, and an overall sluggish development experience that severely impacts productivity.
This is where Git LFS, or Git Large File Storage, steps in as an indispensable extension. Git LFS is a free, open-source command-line extension that replaces large files in your Git repository with small text pointers. The actual file contents are stored on a remote server (often integrated with your Git hosting provider like GitHub, GitLab, or Bitbucket) and only downloaded when needed. This ingenious approach keeps your main Git repository lean and fast, allowing you to manage all your project assets, both code and binaries, under a single version control system without compromising performance. For developers working on game development, multimedia projects, data science initiatives, or any project rich in large digital assets, mastering Git LFS is not just a convenience; it’s a necessity for maintaining an efficient and collaborative workflow.
This comprehensive guide will walk you through the process of installing and configuring Git LFS on various operating systems, ensuring you can seamlessly integrate large file management into your development practices. We’ll cover everything from understanding why Git LFS is crucial to step-by-step installation instructions and essential configuration tips.
Understanding Git LFS: Why You Need It
Before diving into the mechanics of installation, it’s vital to grasp the fundamental problem Git LFS solves and how its unique approach benefits your development process. By understanding the “why,” you’ll appreciate the “how” even more.
The Challenge of Large Files in Git
Git’s power lies in its directed acyclic graph (DAG) structure, which efficiently stores snapshots of your project. When you commit changes to a text file, Git records only the differences (deltas) between versions, making repository sizes manageable. This model, however, breaks down for large binary files:
- No Efficient Diffing: Binary files, such as a Photoshop
.psdfile or a compiled.exe, don’t have easily discernible text-based differences. When a binary file changes, even slightly, Git typically has to store the entire new version of the file. - Repository Bloat: Over time, with multiple versions of large binaries, your
.gitdirectory rapidly swells to gigabytes, consuming vast amounts of disk space. This is a significant concern for disk-intensive projects and CI/CD pipelines. - Performance Degradation: Every
git clone,git pull,git fetch, or evengit checkoutcommand involves downloading the entire history of these large files. This leads to excruciatingly slow network operations, especially for distributed teams, severely impacting developer productivity and adding unnecessary time costs to projects. - History Rewriting Difficulties: Cleaning up a bloated Git repository by removing large files from its history is a complex and risky operation that often requires tools like
git filter-branchorBFG Repo-Cleaner, making it a task to be avoided if possible.
These issues make traditional Git unsuitable for projects heavily reliant on large binary assets, forcing teams to resort to less integrated solutions like cloud storage or external asset management systems, which complicate version control and collaboration.
How Git LFS Solves the Problem
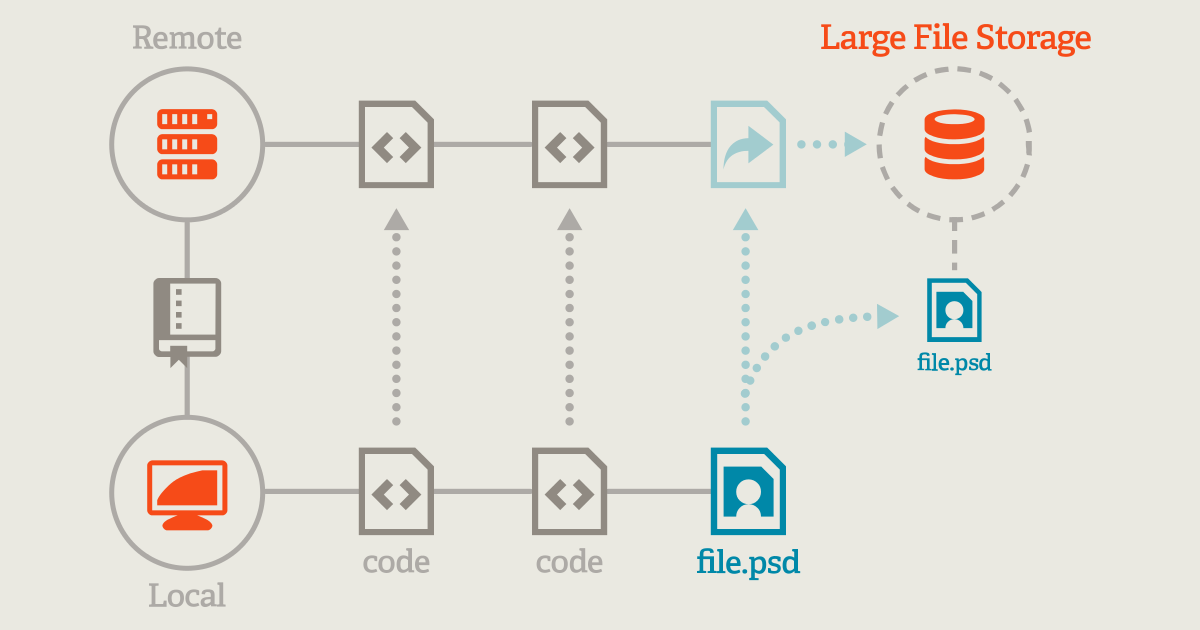
Git LFS addresses these challenges by cleverly abstracting the large files from the core Git repository. Instead of storing the large file directly within Git’s object database, Git LFS performs the following:
- Pointer Files: When you tell Git LFS to track a specific file type (e.g., all
.psdfiles), Git LFS replaces the actual binary file in your Git repository with a small text “pointer” file. This pointer file contains metadata about the large file, such as its OID (Object ID, essentially a hash of its content) and size. - Separate Storage: The actual large binary content is pushed to a separate Git LFS server. This server functions much like a standard file storage service, specifically designed to serve these large files efficiently. Most popular Git hosting services (GitHub, GitLab, Bitbucket) offer integrated Git LFS hosting.
- Seamless Integration: For the developer, the workflow remains largely unchanged. You
git add,git commit, andgit pushas usual. Git LFS works behind the scenes, using Git hooks to intercept operations. When you clone a repository, Git checks out a branch, or pull changes, Git LFS automatically downloads the necessary large files corresponding to the pointer files. - Lean Repositories: The core Git repository remains small and fast, as it only contains code and small pointer files. This drastically improves
git cloneandgit pulltimes, enhances overall performance, and allows Git to be the single source of truth for all project assets.
By decoupling the storage of large binaries from Git’s core object database, Git LFS extends Git’s capabilities to domains where it previously struggled, ensuring that your team can maintain efficiency, reduce frustration, and leverage the full power of version control for diverse project types. This contributes directly to a more productive tech environment, optimizing both developer time and, by extension, project costs associated with inefficient workflows.
Prerequisites for Git LFS Installation
Git LFS is an extension to Git, not a standalone application. Therefore, the most critical prerequisite for installing Git LFS is ensuring that Git itself is already installed and properly configured on your system.
Ensuring Git is Already Installed
Before proceeding with Git LFS installation, take a moment to confirm that Git is present on your machine.
- Open your terminal or command prompt.
- Type the following command and press Enter:
bash

git --version
- Verify the Output:
- If Git is installed, you will see output similar to
git version 2.37.0(the version number may vary). This indicates that Git is ready. - If you receive an error message like
git: command not foundor similar, then Git is not installed. You will need to install Git first before proceeding with Git LFS.
- If Git is installed, you will see output similar to
How to Install Git (if not already installed):
- Official Website: The recommended way to install Git is by visiting the official Git website: https://git-scm.com/downloads. Here, you’ll find installers for Windows, macOS, and instructions for various Linux distributions.
- Package Managers:
- macOS (Homebrew):
brew install git - Linux (Debian/Ubuntu):
sudo apt update && sudo apt install git - Linux (Fedora):
sudo dnf install git - Windows (Chocolatey):
choco install git(if Chocolatey is installed)
- macOS (Homebrew):
Ensure you have a reasonably recent version of Git (generally 2.x or later is recommended for full compatibility with LFS features). Once Git is confirmed to be installed, you are ready to proceed with installing Git LFS.
Step-by-Step Git LFS Installation Guide
Installing Git LFS is straightforward and typically involves using your operating system’s package manager, downloading an official installer, or compiling from source. We’ll focus on the most common and recommended methods for Windows, macOS, and Linux.
Installing Git LFS on macOS
For macOS users, Homebrew is the de-facto package manager and the easiest way to install Git LFS.
- Ensure Homebrew is installed: If you don’t have Homebrew, you can install it by running the following command in your terminal:
bash

/bin/bash -c "$(curl -fsSL https://raw.githubusercontent.com/Homebrew/install/HEAD/install.sh)"
(Follow the on-screen instructions if prompted.) - Install Git LFS using Homebrew:
bash

brew install git-lfs
- Initialize Git LFS: After installation, you need to run a command to set up Git LFS globally for your user. This command installs necessary Git hooks.
bash

git lfs install
You should see a message likeGit LFS initialized.
Installing Git LFS on Linux
Installation on Linux distributions typically involves using the respective package manager.
Debian/Ubuntu-based Distributions
- Update package lists:
bash

sudo apt update
- Install Git LFS:
bash

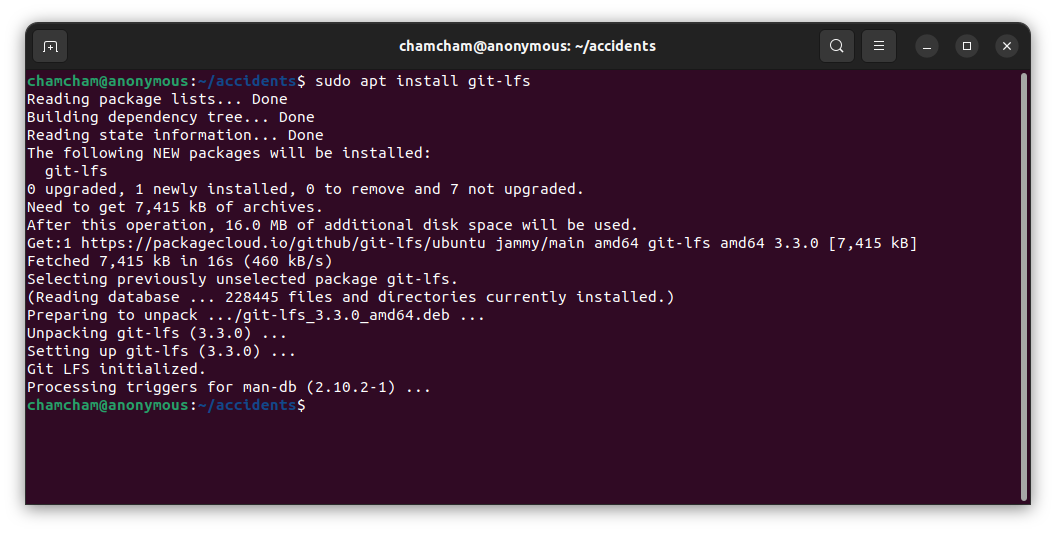
sudo apt install git-lfs
- Initialize Git LFS:
bash

git lfs install
You should see a message likeGit LFS initialized.
Fedora/CentOS/RHEL-based Distributions
- Install Git LFS using dnf (or yum for older versions):
bash

sudo dnf install git-lfs
- Initialize Git LFS:
bash

git lfs install
You should see a message likeGit LFS initialized.
For other Linux distributions, check your distribution’s official package repositories for git-lfs or refer to the official Git LFS website for direct download instructions.
Installing Git LFS on Windows
Windows users have several convenient options for installing Git LFS.
Using Chocolatey (Recommended for package management)
If you have Chocolatey (a popular package manager for Windows) installed:
- Open PowerShell as an Administrator.
- Install Git LFS:
powershell

choco install git-lfs
- Initialize Git LFS:
powershell

git lfs install
You should see a message likeGit LFS initialized.

Using Winget (Windows Package Manager)
Winget is Microsoft’s native package manager for Windows 10 and 11.
- Open PowerShell or Command Prompt.
- Install Git LFS:
powershell

winget install Git.GitLFS
- Initialize Git LFS:
powershell

git lfs install
You should see a message likeGit LFS initialized.
Using the Official Installer
You can also download and run the official Git LFS installer:
- Download the installer: Visit the official Git LFS website: https://git-lfs.github.com/ and download the appropriate installer for your Windows version (e.g.,
git-lfs-windows-vX.Y.Z.exe). - Run the installer: Double-click the downloaded
.exefile and follow the on-screen prompts. The installer will guide you through the process, which is similar to any other Windows application installation. - Initialize Git LFS: After the installer completes, open your Git Bash, PowerShell, or Command Prompt and run:
bash

git lfs install
You should see a message likeGit LFS initialized.
Verifying Your Git LFS Installation
After completing the installation steps for your operating system, it’s crucial to verify that Git LFS has been installed correctly and is accessible through your command-line interface.
- Open your terminal or command prompt.
- Run the following command:
bash

git lfs --version
- Check the Output: If Git LFS is installed correctly, you should see output similar to
git-lfs/3.2.0 (GitHub; linux amd64; go 1.18.2). The version number and other details may vary, but the presence of this output confirms successful installation.
Additionally, the git lfs install command (which you should run after the initial package installation) also provides a confirmation message. If you receive any errors during these verification steps, double-check your installation process and ensure your system’s PATH variable includes the directory where Git LFS was installed.
Configuring Git LFS for Your Projects
Installing Git LFS is merely the first step. To effectively manage large files within your Git repositories, you need to configure Git LFS for each project where you intend to use it. This involves two key actions: initializing LFS within the repository and telling LFS which specific file patterns to track.
Initializing Git LFS in Your Repository (git lfs install)
While you ran git lfs install globally after installation, it’s a good practice (and often necessary) to run it inside each Git repository where you plan to use LFS. This command sets up the necessary Git hooks for that specific repository.
- Navigate to your Git repository:
bash

cd /path/to/your/git/repository
- Initialize Git LFS for the repository:
bash

git lfs install
This command ensures that the Git hooks (pre-push,post-checkout, etc.) are properly configured for this particular repository. These hooks are essential for Git LFS to intercept Git commands and handle the pointer files and actual large file uploads/downloads transparently. It modifies your repository’s.git/configfile to include Git LFS specific configurations.
Tracking Large Files (git lfs track)
The core of Git LFS configuration lies in telling it which files or file patterns it should manage. You do this using the git lfs track command. This command doesn’t move files; it merely creates or updates a special .gitattributes file that tells Git how to handle files matching specific patterns.
- Track specific file types:
To tell Git LFS to track all.psd(Photoshop Document) files:
bash

git lfs track "*.psd"
To track all.mp4(MPEG-4 video) files within anassetsdirectory:
bash

git lfs track "assets/*.mp4"
You can specify multiple patterns as needed. - Verify tracked patterns:
To see which patterns Git LFS is currently tracking in your repository:
bash

git lfs track
This will display a list of all tracked patterns and their corresponding.gitattributesentries. - Commit
.gitattributes:
This step is absolutely critical. The.gitattributesfile, which is created or modified bygit lfs track, must be committed to your repository.
bash

git add .gitattributes

git commit -m "Configure Git LFS to track large files"
By committing.gitattributes, you ensure that all collaborators on the project will automatically use Git LFS correctly for the specified file types when they clone or pull updates. This ensures consistency across your team and prevents issues where large files are accidentally committed directly to Git. It’s a key best practice for maintaining a healthy and collaborative codebase.
Committing and Pushing LFS-Managed Files
Once Git LFS is installed, initialized, and configured to track specific file types, your workflow for committing and pushing files remains largely the same, but with the added benefits of LFS working silently in the background.
- Add your files:
bash

git add path/to/your/large_file.psd

git add another_large_file.mp4
You can alsogit add .to stage all changes. - Commit your changes:
bash

git commit -m "Added new large assets with LFS"
When you commit, Git will store the small pointer files in its repository. - Push to your remote repository:
bash

git push origin main
During thegit pushoperation, Git LFS’spre-pushhook intercepts the process. It will automatically detect any LFS-tracked files that have changed, upload their actual content to the Git LFS server associated with your remote, and then push the Git pointers to your regular Git remote. You’ll typically see messages indicating the LFS uploads happening.
For team members pulling these changes, Git LFS’s post-checkout or post-merge hooks will automatically download the corresponding large files from the LFS server when they check out a branch or merge changes that include LFS pointers. This seamless integration makes working with large files feel almost identical to working with regular code files, drastically improving team productivity and simplifying asset management.
Best Practices and Advanced Usage
While installing and basic configuration of Git LFS are straightforward, understanding best practices and some advanced scenarios can further optimize your workflow, manage repository health, and enhance team collaboration.
When to Use Git LFS (and When Not To)
Git LFS is a powerful tool, but it’s not a silver bullet for all file types. Knowing when and when not to use it is crucial for optimal repository performance and manageability.
- Use Git LFS for:
- Large Binary Files: High-resolution images (PSD, TIFF, JPG), audio files (WAV, MP3), video files (MP4, MOV), 3D models (FBX, OBJ), compiled executables (EXE, DLL), archives (ZIP, RAR), virtual machine images, large datasets (CSV, XLSX, HDF5), game assets (textures, models, scenes).
- Files that change frequently and are large: If a 100MB video file is updated daily, LFS will save your Git repo from rapidly bloating.
- Files that are inherently large and non-textual: Git LFS shines here.
- Avoid Git LFS for:
- Source Code: Text-based code (e.g.,
.js,.py,.java,.cpp,.html,.css,.md). Git is highly optimized for these, and LFS would add unnecessary overhead. - Small Binary Files: If a binary file is just a few kilobytes and rarely changes, the overhead of LFS might not be worth it.
- Configuration Files: JSON, YAML, XML config files are best kept in regular Git for easy diffing and merging.
- Source Code: Text-based code (e.g.,
Overusing LFS can introduce its own complexities, such as increased reliance on the LFS server and potential storage costs from your Git hosting provider (which touches on the “Money” aspect for enterprise-level usage). A thoughtful approach to LFS tracking contributes to a more efficient “Tech” stack.
Managing Existing Large Files with Git LFS
What if you’ve already committed large files directly to your Git history before setting up LFS, and your repository is already bloated? Git LFS provides migration tools to retrospectively convert existing Git objects into LFS pointers. This is an advanced operation and should be performed with caution, ideally on a fresh repository or with explicit team coordination, as it rewrites history.
The primary command for this is git lfs migrate import. For example, to migrate all .psd files throughout your repository’s entire history:
git lfs migrate import --everything --include="*.psd"
This command will rewrite your history, replacing all instances of .psd files with LFS pointers. After migration, you would need to force push the rewritten history (git push --force origin main), which should only be done if you fully understand the implications and have communicated with your team. This tool can be incredibly useful for “brand” reputation by cleaning up legacy technical debt and improving developer experience on older projects.
Performance Considerations and Team Collaboration
Even with Git LFS, there are considerations for maintaining peak performance and ensuring smooth collaboration:
- Network Speed: While Git LFS keeps the Git repository lean, the actual large files still need to be transferred over the network. Faster internet connections will always improve the experience.
- LFS Cache: Git LFS caches downloaded files locally, so if you switch branches or repeatedly check out the same files, they are retrieved from your local cache rather than re-downloaded from the LFS server, saving time.
- All Team Members Need LFS: It’s critical that every developer working on an LFS-enabled repository has Git LFS installed and configured. If a team member doesn’t have LFS, they will download the pointer files but won’t be able to access the actual content, leading to broken builds and files. This is a crucial element of team “productivity” and “brand” consistency in development practices.
- LFS Server Capacity and Cost: Be aware of any storage or bandwidth limits imposed by your Git hosting provider for LFS files. Exceeding these limits can incur additional costs, which is a direct “Money” consideration for projects with very large asset libraries.
By understanding and adhering to these best practices, teams can fully leverage Git LFS to streamline their development workflows, maintain a healthy and performant version control system, and ensure that Git truly serves as the central hub for all project assets, regardless of size or type.
Conclusion
Git LFS is an indispensable tool in the modern developer’s toolkit, bridging the gap between Git’s text-optimized version control and the demands of projects rich in large binary assets. By intelligently replacing large files with pointers and storing the actual content on dedicated LFS servers, it effectively eliminates repository bloat and drastically improves the performance of common Git operations. This translates directly into enhanced developer productivity, reduced waiting times, and a more streamlined collaborative experience for teams working on everything from game development to multimedia production and data science.
We’ve covered the essential steps to get Git LFS up and running, from installation on various operating systems like macOS, Linux, and Windows, to configuring it within your projects and understanding crucial best practices. With Git LFS properly installed and configured, you can harness the full power of Git for all your project files, maintaining a lean, fast, and efficient version control system. Integrate Git LFS into your workflow today and unlock a new level of efficiency and collaboration in your development journey.
aViewFromTheCave is a participant in the Amazon Services LLC Associates Program, an affiliate advertising program designed to provide a means for sites to earn advertising fees by advertising and linking to Amazon.com. Amazon, the Amazon logo, AmazonSupply, and the AmazonSupply logo are trademarks of Amazon.com, Inc. or its affiliates. As an Amazon Associate we earn affiliate commissions from qualifying purchases.