In the fast-evolving world of technology, having sufficient and speedy storage is no longer a luxury but a necessity. Whether you’re a gamer battling for every frame, a creative professional managing colossal files, or simply an everyday user looking to breathe new life into an aging machine, upgrading or adding a hard drive is one of the most impactful DIY enhancements you can make to your PC. This guide will walk you through the entire process, from selecting the right drive to the final software setup, ensuring a smooth and successful installation. Embrace the power of personal tech mastery and significant cost savings by performing this upgrade yourself.
Preparing for Your Hard Drive Installation: Knowledge is Power
Before you even think about opening your PC case, thorough preparation is key. Understanding your options, gathering the right tools, and taking essential safety precautions will lay the groundwork for a seamless installation. This preparatory phase not only ensures compatibility and efficiency but also safeguards your existing data and hardware.
Understanding Your Storage Options: HDD vs. SSD
The first crucial decision revolves around the type of drive you intend to install. The market primarily offers two main categories: Hard Disk Drives (HDDs) and Solid State Drives (SSDs). Each comes with its own set of advantages and price points, impacting both performance and budget.
- Hard Disk Drives (HDDs): These are traditional storage devices that use spinning platters and read/write heads to access data.
- Pros: Significantly cheaper per gigabyte, making them ideal for mass storage (e.g., large media libraries, backups). They offer capacities that often dwarf consumer-grade SSDs at a fraction of the cost.
- Cons: Slower boot times and application loading compared to SSDs, mechanical components make them more susceptible to physical shock and wear over time, and they generate more heat and noise.
- Best Use: Secondary storage for files that don’t require high-speed access, such as documents, photos, and video archives. For individuals on a tight budget, a large HDD can provide ample storage without breaking the bank.
- Solid State Drives (SSDs): These drives utilize flash memory to store data, similar to a USB drive or smartphone storage, but on a much larger and faster scale.
- Pros: Blazing-fast read/write speeds, leading to dramatically quicker boot times, application launches, and file transfers. They are also more durable due to the absence of moving parts, silent, and consume less power.
- Cons: More expensive per gigabyte than HDDs, though prices have steadily decreased. While they offer superior performance, the cost can be a factor for very high capacities.
- Best Use: Primary drive for your operating system (OS), frequently used applications, and games. An SSD is the single best upgrade for improving overall system responsiveness and user experience. Investing in a good brand of SSD can significantly boost your productivity.
For many users, a hybrid approach – an SSD for the OS and critical applications, paired with a high-capacity HDD for bulk storage – offers the best balance of performance and cost-effectiveness.
Choosing the Right Interface: SATA vs. NVMe
Once you’ve decided between an HDD and an SSD, you’ll need to consider the interface type. This determines how the drive connects to your motherboard and, consequently, its maximum potential speed.
- SATA (Serial ATA): This is the most common interface for both HDDs and 2.5-inch SSDs. SATA 3.0 offers theoretical transfer speeds of up to 600 MB/s. Most modern motherboards have multiple SATA ports, making compatibility widespread. It’s a reliable and established standard, perfect for most storage needs, especially for HDDs and budget-friendly SSDs.
- NVMe (Non-Volatile Memory Express): A newer protocol specifically designed for SSDs that connects directly to the motherboard via a PCI Express (PCIe) slot, typically in an M.2 form factor. NVMe drives can achieve speeds several times faster than SATA SSDs, often exceeding 3,500 MB/s.
- Pros: Superior performance, making them ideal for demanding applications, professional workstations, and high-end gaming.
- Cons: More expensive than SATA SSDs and require a compatible M.2 slot on your motherboard that supports NVMe. Ensure your motherboard has the correct M.2 slot (Key M usually) and PCIe lanes available.
- Brand Consideration: For NVMe drives, trusted brands often signify better controllers and NAND flash quality, leading to greater reliability and sustained performance, which can be crucial for digital security and data integrity.
Always check your motherboard’s specifications to confirm which interfaces it supports before purchasing a new drive.
Essential Tools and Safety Precautions
Before you lay hands on your PC, gather the necessary tools and prioritize safety to protect both yourself and your hardware.
- Tools You’ll Need:
- Phillips Head Screwdriver: The most crucial tool for opening the case and mounting drives. Invest in a good quality screwdriver; a magnetic tip can be incredibly helpful for tiny screws.
- Anti-Static Wrist Strap: Highly recommended! This prevents electrostatic discharge (ESD) from damaging sensitive components. ESD can be invisible but lethal to electronics.
- Flashlight: Useful for illuminating cramped or dark areas inside the PC case.
- Zip Ties or Velcro Straps: For neat cable management, which improves airflow and makes future upgrades easier.
- Small Pouch or Container: To keep track of screws, as they are often small and easily lost.
- Safety First:
- Power Down and Unplug: Always turn off your PC completely and unplug it from the wall outlet. Press the power button a few times after unplugging to drain any residual power.
- Anti-Static Measures: Wear your anti-static wrist strap, attaching it to an unpainted metal part of your PC case. Alternatively, frequently touch a grounded metal object before touching internal components. Work on a non-carpeted, clean, and dry surface.
- Handle with Care: Always hold components by their edges, avoiding contact with sensitive connectors or circuit boards.
Taking these precautions seriously is not just about protecting your investment but also about ensuring a safe and successful DIY experience.
Backup Your Data (If Replacing/Migrating OS)
This step is paramount if you are replacing your primary drive or migrating your operating system to the new drive. Data loss is a real and often irreversible consequence of neglecting backups.
- Why Backup? To safeguard all your important files, documents, photos, videos, and application data. Even if you don’t plan to format your old drive, accidents happen.
- Backup Methods:
- External Hard Drive: Copy all critical files to an external drive.
- Cloud Storage: Utilize services like Google Drive, OneDrive, or Dropbox for important files.
- Cloning Software: If you’re migrating your OS, specialized software (often provided by drive manufacturers like Samsung Data Migration or Acronis True Image for Crucial drives) can create an exact copy of your old drive onto the new one. This saves you the hassle of reinstalling Windows and all your applications.
Never skip this step. A comprehensive backup provides peace of mind and is a cornerstone of good digital security practices.
Step-by-Step Installation Process: From Case to Connection
With preparations complete, it’s time to physically install the new hard drive into your PC. This section details the practical steps involved in opening your case, mounting the drive, and connecting it properly.
Opening Your PC Case
Most PC cases are designed for relatively easy access.
- Locate Side Panel Screws: Typically, two thumb screws or Phillips head screws secure the main side panel (the one usually opposite the motherboard tray).
- Remove the Panel: Unscrew them and gently slide the panel backward, then lift it away. Some cases might have a latch mechanism.
- Familiarize Yourself: Take a moment to observe the internal layout. Identify your existing hard drives, the power supply unit (PSU), and the motherboard.
Locating an Available Drive Bay
Where you install your new drive depends on its form factor and type.
- For 3.5-inch HDDs: Look for larger drive bays, usually located at the front or bottom of the case. These often have sliding trays or require screws to secure the drive.
- For 2.5-inch SSDs/HDDs: Many cases have dedicated 2.5-inch mounting points, sometimes on the back of the motherboard tray, under the GPU shroud, or within 3.5-inch trays (requiring an adapter).
- For NVMe M.2 SSDs: Locate the M.2 slot directly on your motherboard. It’s a small horizontal slot, usually marked “M.2,” and often has a small screw post nearby. Some motherboards have multiple M.2 slots, often under a heatsink. If it’s under a heatsink, you’ll need to remove the heatsink first.
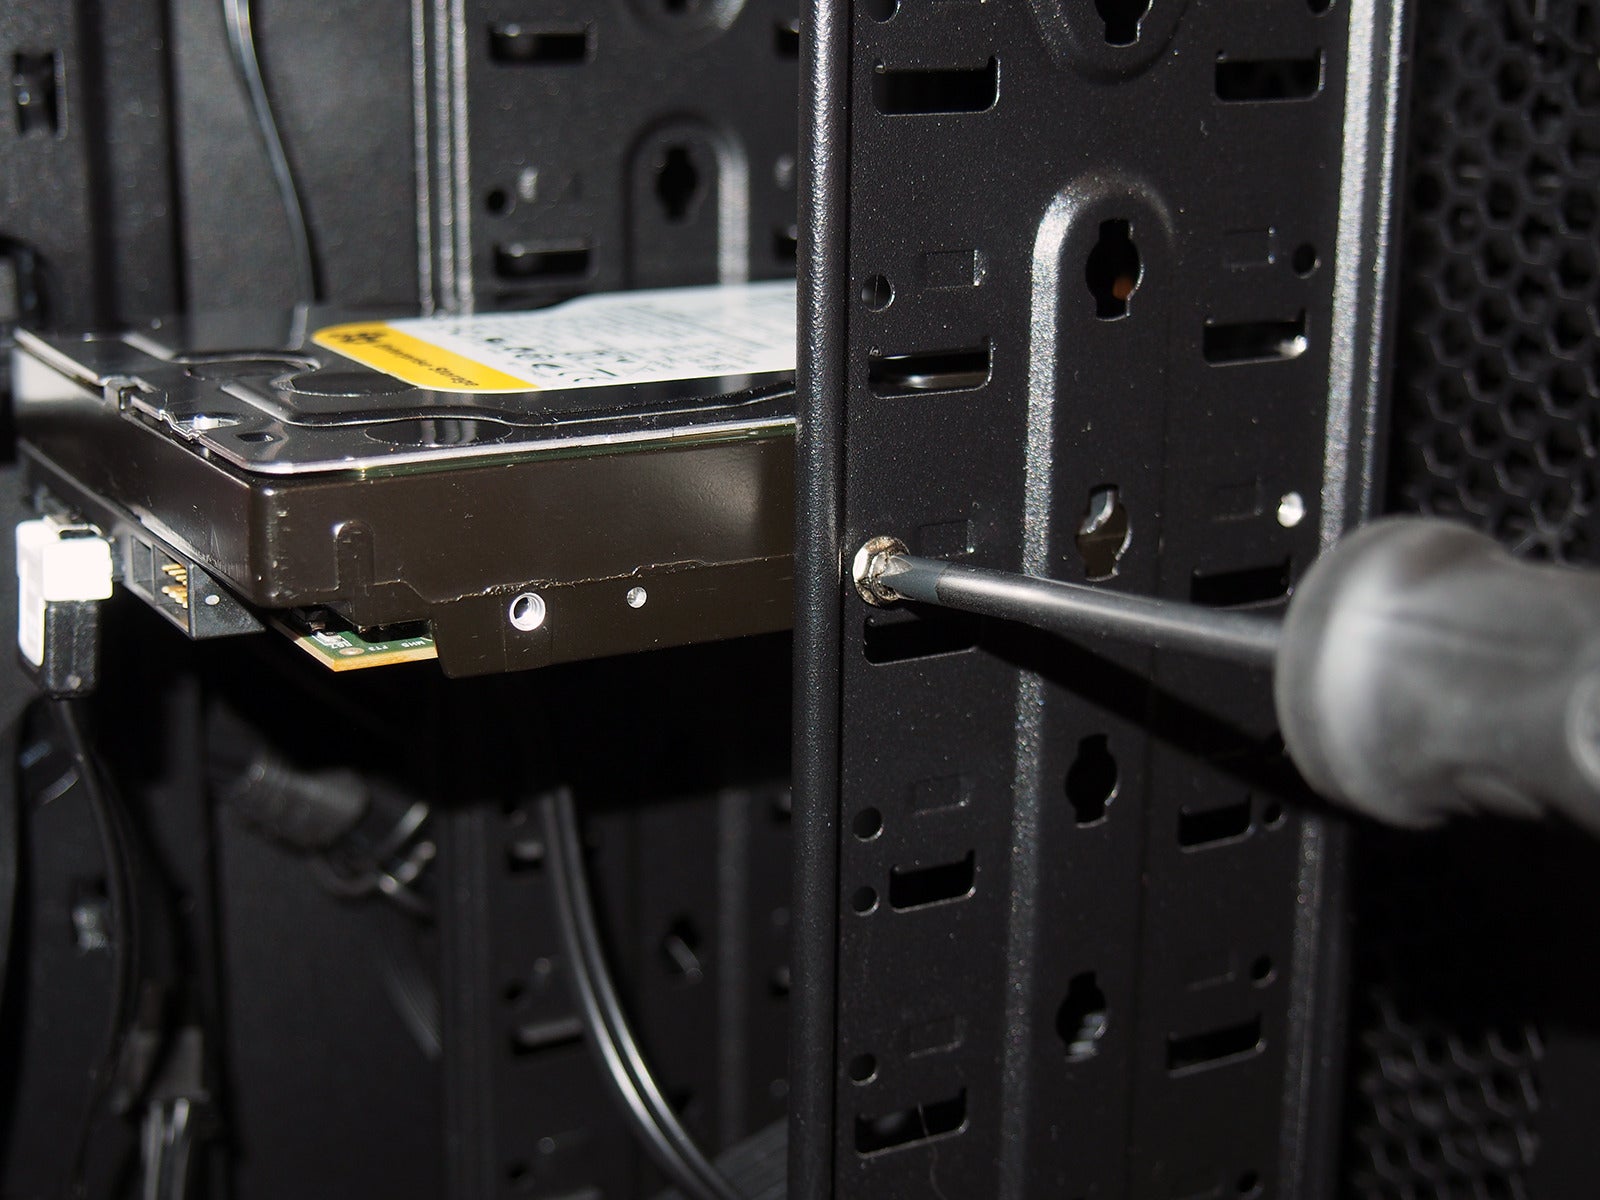
Mounting the New Hard Drive
Securely mounting the drive prevents vibration and potential damage.
- For 3.5-inch HDDs: Slide the drive into an available 3.5-inch bay. Many modern cases use tool-less sleds or trays that snap into place. Otherwise, align the screw holes on the drive with those on the bay and secure it with screws (usually 2 on each side).
- For 2.5-inch SSDs/HDDs: If using a 3.5-inch adapter, screw the 2.5-inch drive into the adapter first, then mount the adapter as you would a 3.5-inch drive. If your case has dedicated 2.5-inch mounts, simply screw the drive directly into place.
- For NVMe M.2 SSDs:
- Gently insert the M.2 drive into the slot at a slight angle.
- Push it down so it lies flat.
- Secure it with the small screw provided with your motherboard (or the M.2 drive itself) into the standoff. If your motherboard has an M.2 heatsink, reattach it now.
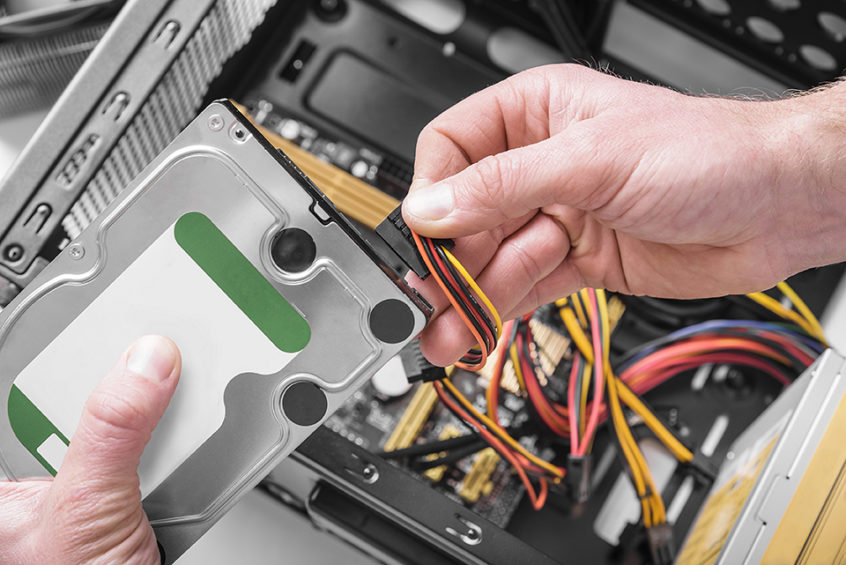
Connecting Data and Power Cables
This is where the drive truly connects to your system.
- For SATA Drives (HDDs and 2.5-inch SSDs):
- SATA Data Cable: Connect one end of the SATA data cable (usually a flat, L-shaped connector) to the back of your new drive. Connect the other end to an available SATA port on your motherboard. It’s often good practice to use the lowest numbered SATA port available (e.g., SATA 0 or SATA 1) if installing an OS on the drive.
- SATA Power Cable: Locate a SATA power cable from your power supply unit (PSU). This is a wider, L-shaped connector. Plug it firmly into the power port on your new drive. Ensure it clicks into place.
- For NVMe M.2 SSDs: These drives do not require separate data or power cables. They draw power and transfer data directly through the M.2 slot on the motherboard.
Double-check all connections to ensure they are snug and secure. Loose connections are a common cause of detection issues.
Cable Management and Closing the Case
A tidy interior isn’t just for aesthetics; it improves airflow and makes future maintenance easier.
- Cable Management: Route cables neatly behind the motherboard tray if your case allows. Use zip ties or Velcro straps to bundle cables together, keeping them away from fans and critical components. This helps maintain good airflow, which can prolong the life of your components and contribute to system stability.
- Close the Case: Carefully reattach the side panel(s), sliding them back into place and securing them with the screws or latches you removed earlier.
Post-Installation Setup and Optimization: Bringing Your Drive to Life
With the physical installation complete, the next phase involves configuring the drive within your operating system. This typically involves initialization, formatting, and potentially installing an OS or migrating data.
Initializing and Formatting the Drive in Windows
Your newly installed drive won’t immediately appear in “This PC” (My Computer) until it’s initialized and formatted.
- Boot Up Your PC: Power on your computer and let Windows load.
- Open Disk Management:
- Right-click the Start button (Windows logo) in the bottom-left corner.
- Select “Disk Management.”
- Initialize Disk: A pop-up window should appear asking you to initialize the new disk.
- Choose between MBR (Master Boot Record) and GPT (GUID Partition Table). For modern systems and drives larger than 2TB, GPT is recommended. For older systems or drives under 2TB, MBR is sufficient but GPT is still preferable for flexibility.
- Click “OK.”
- Create New Simple Volume:
- Locate your new disk in Disk Management (it will show as “Unallocated Space”).
- Right-click on the “Unallocated Space” and select “New Simple Volume.”
- Follow the New Simple Volume Wizard:
- Specify the volume size (usually the maximum available).
- Assign a drive letter (e.g., D:, E:).
- Choose a file system. For Windows, NTFS is the standard.
- You can assign a volume label (e.g., “Data Drive,” “Games SSD”).
- Perform a “Quick Format” (it’s faster and generally sufficient for new drives).
- Click “Next” and then “Finish.”
Your new drive should now appear in “This PC” and be ready for use. For Linux or macOS users, the process involves using utilities like GParted or Disk Utility, respectively, to partition and format the drive with their preferred file systems (e.g., ext4 for Linux, APFS for macOS).
Installing Operating System or Migrating Data
This step depends on whether you’re adding storage or replacing your primary boot drive.
- Clean OS Installation (Recommended for New Boot Drives):
- If your new drive is intended to be your primary boot drive, a clean installation of Windows (or your preferred OS) is often the best approach for optimal performance and stability.
- You’ll need a bootable USB drive containing your OS installer.
- Boot from the USB drive (you might need to adjust boot order in BIOS/UEFI).
- Follow the on-screen instructions to install the OS onto your new drive. Remember to select the correct drive to avoid overwriting your old OS.
- Cloning/Migrating Your OS (If Replacing Primary Drive):
- If you’ve used cloning software during the backup phase, this is where it pays off. Ensure both your old and new drives are connected.
- Boot into your cloning software or Windows, and initiate the cloning process from your old drive to your new one.
- Once cloning is complete, you might need to adjust the boot order in BIOS/UEFI to boot from the new drive.
- After successfully booting from the new drive, you can reformat your old drive for additional storage or remove it.
- Productivity Boost: Migrating to a faster SSD as your boot drive will dramatically enhance your daily computing experience, from startup to application loading times.
BIOS/UEFI Configuration (Optional but Recommended)
While often not strictly necessary for simple storage additions, checking your system’s firmware settings can confirm drive detection and optimize performance.
- Access BIOS/UEFI: Restart your PC and repeatedly press the designated key (commonly DEL, F2, F10, or F12) during startup to enter the BIOS/UEFI settings.
- Verify Drive Detection: Navigate to the “Storage,” “Boot,” or “Peripherals” section. You should see your new hard drive listed among the detected devices.
- Set Boot Order (If Installing OS): If you’re installing an OS on the new drive, ensure it’s prioritized in the boot order. If booting from a USB installer, set the USB drive as the first boot device.
- Enable AHCI Mode (For SATA SSDs): For SATA SSDs, ensure that your SATA controller is set to AHCI (Advanced Host Controller Interface) mode. This setting allows the SSD to utilize features like NCQ (Native Command Queuing) for improved performance. If your system was previously in IDE mode, changing to AHCI after Windows installation can cause boot issues unless specific registry edits are made first. Ideally, AHCI should be enabled before OS installation. Most modern systems default to AHCI.
Common Issues and Troubleshooting: Navigating Potential Hurdles
Even with meticulous preparation, you might encounter minor hiccups. Here are some common problems and their solutions.
Drive Not Detected
- Check Cables: The most frequent culprit. Ensure both the data and power cables (for SATA drives) are firmly connected at both ends (drive and motherboard/PSU). For M.2 drives, ensure it’s fully seated in the slot and the retaining screw is in place.
- Check BIOS/UEFI: Enter your system’s BIOS/UEFI settings to confirm if the drive is recognized there. If it’s not detected in BIOS, it’s a hardware connection issue.
- Disk Management: If detected in BIOS but not in Windows, go to Disk Management. It might be uninitialized or unformatted.
- Try Different Port/Cable: Test with a different SATA data cable or SATA power connector, or a different SATA port on the motherboard. Sometimes, a faulty cable or port can be the problem.
- Power Supply: Ensure your PSU has enough wattage to power all components, especially if you’ve added multiple drives.
Slow Performance
- Drive Type: Ensure you’re not expecting SSD speeds from an HDD. HDDs are inherently slower.
- SATA Port Speed: Verify that your SATA SSD is connected to a SATA 3.0 (6Gb/s) port on your motherboard for maximum speed. Connecting to an older SATA 2.0 (3Gb/s) port will bottleneck performance.
- AHCI Mode: Confirm AHCI mode is enabled in your BIOS/UEFI for SATA SSDs.
- NVMe PCIe Lanes: For NVMe drives, ensure it’s installed in a PCIe 3.0 x4 or PCIe 4.0 x4 slot to achieve its rated speeds. Some M.2 slots share bandwidth with other components (like SATA ports or other PCIe slots), which can reduce performance. Consult your motherboard manual.
- Drivers: Ensure your motherboard’s chipset drivers are up to date.
System Won’t Boot
- Boot Order: If you installed an OS on the new drive, check your BIOS/UEFI boot order to ensure the correct drive is selected as the primary boot device.
- OS Installation/Cloning Issue: If you performed a clean OS install or cloned your drive, there might have been an error in the process. You might need to attempt a re-installation or re-cloning.
- Corrupted Boot Record: If the boot record on your new drive is corrupted, you might need to use a Windows installation media to access repair options.
Conclusion: Empowering Your PC and Your Wallet
Successfully installing a hard drive in your PC is a rewarding endeavor that not only boosts your system’s capabilities but also strengthens your personal tech literacy. By taking the DIY route, you save money on professional installation fees, giving you more budget to invest in a higher-quality drive or other components.
Whether you opted for the blazing speed of an NVMe SSD for your operating system and favorite applications, or a high-capacity HDD for storing vast amounts of data, you’ve now enhanced your PC’s performance and longevity. This upgrade contributes to better digital security by providing reliable storage for your valuable files and increases your overall productivity through faster access times.
Remember, technology is constantly evolving. Staying informed about new gadgets, software, and hardware trends empowers you to make smart choices for your setup. Regularly back up your data, maintain good cable management, and keep an eye on your drive’s health for optimal performance. You’ve taken a significant step in mastering your machine – enjoy the fruits of your labor!
aViewFromTheCave is a participant in the Amazon Services LLC Associates Program, an affiliate advertising program designed to provide a means for sites to earn advertising fees by advertising and linking to Amazon.com. Amazon, the Amazon logo, AmazonSupply, and the AmazonSupply logo are trademarks of Amazon.com, Inc. or its affiliates. As an Amazon Associate we earn affiliate commissions from qualifying purchases.