
In the fast-evolving landscape of technology, the ability to efficiently manage and restore your operating system is a fundamental skill. Installing Windows from a USB drive has become the standard method, largely replacing optical discs due to its speed, portability, and convenience. Whether you’re building a new PC, performing a clean reinstallation to resolve performance issues, or rescuing a failing system, understanding this process is invaluable. This guide will walk you through every step, from preparing your USB drive to configuring your system and completing the Windows installation, ensuring a smooth and successful experience.

Why Choose a USB Drive for Windows Installation?
Before diving into the technicalities, it’s worth appreciating why USB installation has become the go-to method for modern operating system deployment. Its advantages extend beyond mere convenience, impacting speed, versatility, and system maintenance.
Speed and Efficiency
Compared to traditional DVDs or CDs, USB 3.0 and newer flash drives offer significantly faster data transfer rates. This translates directly into quicker boot times for the installation media and a much faster copy process for Windows files onto your hard drive or SSD. In an age where every second counts, shaving minutes off an installation process is a welcome improvement, especially for IT professionals or power users who perform these tasks regularly. Modern Solid State Drives (SSDs) further amplify this speed benefit, creating an almost instantaneous installation environment when combined with a fast USB drive.
Versatility and Portability
USB drives are compact, durable, and universally compatible with virtually all modern computers. This makes them incredibly portable—you can carry a bootable Windows installer in your pocket, ready to deploy or troubleshoot a system anywhere, anytime. Furthermore, a single USB drive can be formatted and reused countless times for different versions of Windows or other operating systems, offering greater flexibility than single-use optical media. This reusability aligns perfectly with sustainable tech practices, reducing digital waste.
Clean Installations and Troubleshooting
A clean installation of Windows from a USB drive is often the most effective solution for resolving deep-seated software issues, persistent viruses, or significant performance degradation. By wiping the previous operating system and installing a fresh copy, you eliminate accumulated clutter, corrupt files, and malware that might be slowing down your PC. Beyond fresh installations, a bootable USB drive can also serve as a powerful troubleshooting tool. Many Windows installers include recovery environments that can be used to repair startup problems, restore previous system states, or access advanced command-line tools, even when Windows fails to boot.
Essential Prerequisites Before You Begin
A successful Windows installation hinges on proper preparation. Gathering the necessary tools and understanding key concepts beforehand will save you time and prevent potential frustrations.
A Reliable USB Flash Drive
You will need a USB flash drive with at least 8GB of storage for Windows 10 or 11. For Windows 7 or 8.1, 4GB might suffice, but 8GB is a safer bet for all versions. It’s crucial that this drive is either empty or contains data you no longer need, as the process of creating bootable media will erase all existing data on the drive. Opt for a USB 3.0 or 3.1 drive if your computer supports it, as this will significantly speed up the creation and installation process. Always use a known good, reputable brand to minimize corruption risks.
A Stable Internet Connection and a Working PC
You’ll need a working computer with an internet connection to download the Windows ISO file or to use Microsoft’s Media Creation Tool. This is the machine you’ll use to create the bootable USB drive, not necessarily the one you’re installing Windows on. Ensure your internet connection is stable to avoid corrupted downloads, which can lead to installation failures.
Obtaining the Windows ISO File
The Windows ISO (International Organization for Standardization) file is a complete disk image of the Windows operating system. This is the source material that will be copied to your USB drive.
- For Windows 10/11: The easiest and most recommended method is to use the Microsoft Media Creation Tool. This tool downloads the latest version of Windows and directly creates the bootable USB for you, often skipping the need to download the raw ISO separately.
- For Windows 7/8.1, or specific versions of Windows 10/11: You might need to download the ISO directly from Microsoft’s website (if still available) or through legitimate academic/enterprise portals if you have a license key for older versions. Be extremely cautious about downloading ISOs from third-party websites, as they may contain malicious software.
Backup Your Data!
This is perhaps the most critical prerequisite. If you are reinstalling Windows on a computer that currently contains important files, you must back up all your data to an external hard drive, cloud storage (like OneDrive, Google Drive, Dropbox), or another computer. A clean installation will typically format the drive where Windows is installed, permanently deleting all personal files, documents, photos, and applications. Do not skip this step!
Understanding Your System’s BIOS/UEFI
To boot from your USB drive, you’ll need to configure your computer’s Basic Input/Output System (BIOS) or Unified Extensible Firmware Interface (UEFI). These are firmware interfaces that initialize hardware during the boot process. Modern computers generally use UEFI, which offers better security and faster boot times. Knowing how to access and navigate your system’s BIOS/UEFI settings is essential for changing the boot order. We’ll cover this in more detail later.
Creating Your Bootable Windows USB Drive
Once you have your USB drive and the Windows ISO (or a plan to use the Media Creation Tool), the next step is to prepare the USB drive. There are several reliable methods, each with its own advantages.
Method 1: Using the Windows Media Creation Tool (Recommended for Beginners)
This is the simplest and most recommended method for creating a bootable USB for Windows 10 or 11. It’s user-friendly and ensures you get the latest, most stable version of the OS.
- Download the Tool: Visit the official Microsoft Windows 10 Download page or Windows 11 Download page. Look for the “Create Windows 10/11 installation media” section and click “Download tool now.”
- Run the Tool: Once downloaded, run the
MediaCreationTool.exe. Accept the license terms. - Choose Your Action: Select “Create installation media (USB flash drive, DVD, or ISO file) for another PC” and click “Next.”
- Select Language, Edition, and Architecture: The tool will usually recommend options based on your current PC. You can uncheck “Use recommended options for this PC” if you need to create media for a different architecture (e.g., 32-bit vs. 64-bit) or language. Click “Next.”
- Choose Media Type: Select “USB flash drive” and click “Next.”
- Select USB Drive: From the list of available drives, choose your USB flash drive. Double-check that you’re selecting the correct drive, as all data on it will be erased. Click “Next.”
- Download and Create: The tool will now download the Windows files and write them to your USB drive. This process can take some time, depending on your internet speed and the USB drive’s performance.
- Finish: Once completed, you’ll see a “Your USB flash drive is ready” message. Click “Finish.” Your bootable USB is now ready!
Method 2: Using Rufus for Advanced Users
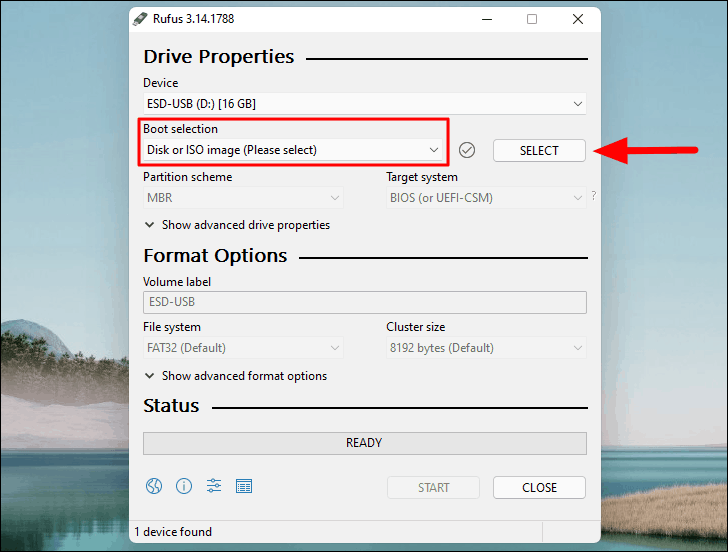
Rufus is a popular, open-source utility that allows for more granular control over the bootable USB creation process. It’s faster than the Media Creation Tool for writing ISOs and offers options for different partition schemes (MBR/GPT) and file systems. This method requires you to have the Windows ISO file already downloaded.
- Download Rufus: Go to the official Rufus website (
rufus.ie) and download the latest portable version. - Download Windows ISO: Ensure you have your desired Windows ISO file downloaded from Microsoft.
- Plug in USB: Insert your USB flash drive into your working PC.
- Run Rufus: Launch Rufus. It should automatically detect your USB drive under “Device.” If not, select it from the dropdown.
- Select ISO: Click the “SELECT” button next to “Boot selection” and browse to your downloaded Windows ISO file.
- Configure Options:
- Image option: Usually “Standard Windows installation.”
- Partition scheme: This is crucial. If your target PC uses UEFI, choose GPT. If it’s an older PC using legacy BIOS, choose MBR. (Most modern PCs use UEFI/GPT). If unsure, GPT is generally a good default for Windows 10/11 installations. Rufus will often intelligently suggest the correct scheme based on your selected ISO.
- Target system: Automatically set based on the partition scheme (e.g., “UEFI (non CSM)” for GPT).
- Volume label: You can change this to something descriptive like “WIN11_INSTALL.”
- File system: NTFS is the standard for Windows installation media.
- Cluster size: Leave as default.
- Start: Click the “START” button. Rufus will warn you that all data on the USB drive will be destroyed. Confirm to proceed.
- Wait: Rufus will create the bootable USB drive. This is generally a very fast process.
- Close: Once it says “READY,” you can close Rufus and remove your USB drive.
Method 3: Using Ventoy for Multi-Boot Options (Power User Choice)
Ventoy is a revolutionary tool that allows you to create a bootable USB drive onto which you can simply copy multiple ISO files (Windows, Linux, diagnostics tools, etc.). When you boot from the Ventoy USB, it presents a menu of all the ISOs you’ve copied, letting you choose which one to boot into. This is incredibly useful for technicians or users who frequently work with different operating systems.
- Download Ventoy: Go to the official Ventoy website (
ventoy.net) and download the Windows.zipfile. - Extract and Run: Extract the downloaded
.zipfile and runVentoy2Disk.exe. - Select USB Drive: From the “Device” dropdown, select your USB flash drive. Again, ensure you choose the correct drive.
- Install Ventoy: Click the “Install” button. Confirm the warnings that all data on the drive will be erased.
- Copy ISOs: Once Ventoy is installed on the USB drive, simply drag and drop your Windows ISO files (and any other ISOs you want) directly onto the Ventoy USB drive in File Explorer. You don’t need to do anything else with Ventoy itself.
- Ready to Boot: Your Ventoy USB drive is now ready. When you boot from it, you’ll see a menu to select which ISO to launch.
Configuring Your System’s BIOS/UEFI for USB Boot
With your bootable USB drive prepared, the next hurdle is to tell your computer to boot from it instead of its internal hard drive. This involves entering your system’s BIOS or UEFI settings.
Accessing BIOS/UEFI Settings
The method to access BIOS/UEFI varies by manufacturer, but common keys pressed during startup are:
- Delete (Del)
- F2
- F10
- F12
- Esc
- F1
As soon as you power on your computer, repeatedly press the designated key until you enter the BIOS/UEFI setup utility. Look for a message on the screen during startup, like “Press DEL to enter Setup” or “Press F2 for BIOS settings.” For some newer Windows 10/11 machines, you might need to access UEFI settings through Windows itself: Settings > Update & Security > Recovery > Advanced startup > Restart now > Troubleshoot > Advanced options > UEFI Firmware Settings.
Adjusting Boot Order
Once in BIOS/UEFI, navigate to the “Boot,” “Boot Options,” or “Startup” tab. Here, you’ll find a list of boot devices. You need to prioritize your USB drive so that the computer attempts to boot from it first.
- Move USB Drive to Top: Use the arrow keys or the specified function keys (often F5/F6) to move your USB drive (it might be listed as “USB HDD,” “Removable Device,” or by its brand name) to the very top of the boot order list.
- UEFI vs. Legacy/CSM: In UEFI settings, you might see options for “UEFI Boot” and “Legacy Boot” (or “CSM” – Compatibility Support Module). If you created your USB with GPT for UEFI, ensure UEFI boot is enabled. If you used MBR for legacy BIOS, ensure legacy boot is enabled. Often, you can choose “UEFI and Legacy” or disable CSM to force UEFI mode if needed.
Disabling Secure Boot (If Necessary)
Secure Boot is a UEFI feature designed to prevent unauthorized operating systems and software from loading during startup. While beneficial for security, it can sometimes interfere with booting from custom installation media. If you encounter issues, temporarily disabling Secure Boot might be necessary. You can usually find this option under “Security,” “Boot,” or “Authentication” settings within UEFI. Remember to re-enable it after the Windows installation is complete for enhanced security.
Saving Changes and Restarting
After making all necessary changes to the boot order and Secure Boot settings, navigate to the “Exit” tab and select “Save Changes and Exit” (or similar wording like “Exit Saving Changes”). Your computer will restart and, if configured correctly, should now boot from your USB drive, initiating the Windows installation process.
The Windows Installation Process: Step-by-Step
With your computer booting from the USB, the actual installation of Windows begins. This multi-stage process requires careful attention, especially during drive partitioning.
Booting from the USB Drive
Upon successful boot from the USB, you’ll see the Windows setup logo and a “Press any key to boot from CD or DVD” message. If you see this, press a key quickly. Soon after, the Windows Setup wizard will launch.
Initial Setup: Language, Time, Keyboard
The first screen will ask you to select your language, time and currency format, and keyboard or input method. Make your selections and click “Next.” On the subsequent screen, click “Install now.”
Entering Your Product Key (or Skipping)
You’ll be prompted to enter your Windows product key.
- If you have a digital license linked to your Microsoft account or if Windows was previously activated on this hardware, you can click “I don’t have a product key” to skip this step. Windows will automatically activate after installation once connected to the internet.
- If you have a physical product key, enter it here.
- If you skipped the key, you’ll likely be asked to choose the edition of Windows you want to install (e.g., Home, Pro). Make sure to select the edition corresponding to your license.
Choosing Installation Type: Upgrade vs. Custom
This is a critical choice:
- Upgrade: This option attempts to keep your files, settings, and applications while upgrading Windows. It’s only available if you boot into your existing Windows installation and run the setup from there, not when booting from USB.
- Custom: Install Windows only (advanced): This is the option you must choose when installing from a bootable USB drive for a clean installation. It allows you to manage partitions and install Windows onto a specific drive.
Select “Custom: Install Windows only (advanced).”
Partitioning Your Hard Drive
This is where you determine how your storage drive is organized.
- Identify Target Drive: You’ll see a list of drives and partitions. Carefully identify the drive where you want to install Windows. It’s crucial not to accidentally select a drive containing important data. Drives are usually labeled by “Drive 0,” “Drive 1,” etc., and show their total size.
- Delete Existing Partitions (for a clean install): If you want a truly clean installation, select each existing partition on the target drive (e.g., “System Reserved,” “Primary,” “Recovery”) and click “Delete.” This will convert the entire drive into “Unallocated Space.” Be absolutely sure you’re deleting partitions on the correct drive, as this action is irreversible.
- Create New Partitions:
- Select the “Unallocated Space” on your target drive.
- Click “New.” You can choose to allocate the entire space to one partition for Windows (the default), or create a smaller partition for Windows (e.g., 200GB) and leave the rest as unallocated space to create a separate “D:” drive later for data storage.
- If you create a new partition, Windows will typically create additional small system partitions (e.g., Recovery, EFI System, MSR) automatically. This is normal.
- Format (if needed): If you created a new partition or if you didn’t delete existing ones but just want to format them, select the primary partition where you want Windows to be installed and click “Format.”
- Select Installation Partition: Choose the primary partition (usually the largest one you created or formatted) where Windows will be installed, and click “Next.”
Copying Windows Files and Initial Reboots
Windows will now begin copying its files, expanding them, installing features, and applying updates. Your computer will reboot several times during this phase. Do not remove the USB drive until Windows indicates it’s safe to do so, or until you’re past the initial “Getting devices ready” screens and see the OOBE setup. If it boots back into the USB setup after a reboot, simply remove the USB drive and let it boot from the internal hard drive.
OOBE (Out-of-Box Experience) Setup
After the reboots, you’ll enter the Out-of-Box Experience (OOBE), where you’ll configure your personal settings:
- Region and Keyboard Layout: Confirm your country/region and keyboard layout.
- Network Connection: Connect to your Wi-Fi network (if applicable).
- Account Setup:
- Microsoft Account: Windows 10/11 typically steers you towards signing in with a Microsoft account. This offers benefits like cloud syncing and easier access to Microsoft services.
- Local Account: If you prefer not to use a Microsoft account (or if you don’t have internet access yet), you might find an option to create a “limited experience” or “offline account” which is a local user account. This option might be hidden in some Windows 11 versions unless you disconnect from the internet during setup.
- Privacy Settings: Review and adjust your privacy settings (location, diagnostic data, tailored experiences, etc.).
- Cortana/Voice Assistant: Decide whether to enable or disable the voice assistant.
- Other Settings: You might encounter screens for OneDrive setup, Windows Hello (biometrics), or other services.
- Welcome Screen: Finally, after a few more “Getting things ready” screens, you’ll be greeted by the Windows desktop.
Post-Installation Essentials and Optimization
The installation isn’t truly complete until you’ve performed a few crucial post-setup steps. These ensure your system is secure, performs optimally, and has all necessary functionalities.
Installing Drivers
Drivers are software components that allow your operating system to communicate with your hardware (graphics card, sound card, network adapter, chipset, etc.). While Windows often installs generic drivers, it’s vital to install manufacturer-specific drivers for optimal performance and stability.
- Check Device Manager: Open Device Manager (right-click the Start button > Device Manager) and look for any devices with yellow exclamation marks. These indicate missing or problematic drivers.
- Manufacturer Websites: Visit the support website of your computer’s manufacturer (Dell, HP, Lenovo, ASUS, Acer, MSI, etc.) or the individual component manufacturers (NVIDIA, AMD, Intel, Realtek). Download and install the latest drivers for your specific model, especially for:
- Chipset: Essential for motherboard functionality.
- Graphics Card: Crucial for display performance, especially for gaming or graphic design.
- Network Adapter (Wi-Fi/Ethernet): To ensure stable internet connectivity.
- Audio Drivers: For sound functionality.
- Other Peripherals: Webcam, card readers, etc.
- Driver Update Utilities: While some manufacturer tools exist, be cautious with generic “driver updater” software from unknown sources, as they can sometimes cause more problems than they solve.
Running Windows Updates
Once you have network drivers installed, immediately run Windows Update.
- Go to
Settings > Update & Security > Windows Update(Windows 10) orSettings > Windows Update(Windows 11). - Click “Check for updates” and install all available updates. This will patch security vulnerabilities, improve stability, and often install additional hardware drivers. Be prepared for multiple reboots during this process. Keeping your system updated is a cornerstone of digital security.
Installing Essential Software
Now is the time to install the applications you use daily:
- Web Browser: Chrome, Firefox, Edge, Brave, etc.
- Antivirus/Security Software: If you choose not to rely solely on Windows Defender, install your preferred antivirus.
- Productivity Suites: Microsoft Office, LibreOffice, Google Workspace apps.
- Communication Apps: Zoom, Discord, Slack, Microsoft Teams.
- Creative Tools: Photoshop, GIMP, Video Editors.
- Utilities: File archivers (7-Zip, WinRAR), media players (VLC), cloud storage clients (OneDrive, Google Drive).
System Optimization Tips
After installation, consider these steps to keep your system running smoothly:
- Disk Cleanup: Use the built-in Disk Cleanup tool to remove temporary files and system junk.
- Defragment and Optimize Drives (for HDDs): For traditional Hard Disk Drives (HDDs), periodically defragmenting can improve performance. This is generally not needed for SSDs, as Windows automatically optimizes them.
- Power Settings: Adjust your power plan in
Settings > System > Power & Sleep(Windows 10) orSettings > System > Power & battery(Windows 11) for balanced performance and energy efficiency. - Startup Apps: Disable unnecessary applications from launching at startup via
Task Manager > Startuptab, orSettings > Apps > Startup(Windows 11) to improve boot times. - Create a Restore Point: Once your system is stable and fully configured, create a system restore point. This provides a rollback option if future updates or software installations cause problems.
Common Issues and Troubleshooting
Even with careful preparation, you might encounter hiccups. Here are some common problems and their solutions.
USB Drive Not Detected in BIOS
- Check USB Port: Try a different USB port, preferably a USB 2.0 port if you’re having issues with a USB 3.0 port (some older BIOS have better compatibility with USB 2.0).
- Recreate USB: The bootable USB might be corrupted. Try recreating it using a different method (e.g., Rufus instead of Media Creation Tool) or a different USB drive.
- BIOS Settings: Ensure the USB boot option is enabled in BIOS/UEFI. Some BIOS versions require “USB Support” or “Legacy USB Support” to be enabled.
- UEFI/Legacy Mismatch: Ensure your USB’s partition scheme (MBR/GPT) matches the boot mode selected in BIOS/UEFI (Legacy/UEFI).
“Missing Media Driver” or “No Device Drivers Were Found” Errors
This error often occurs during installation, especially with newer hardware, when the Windows installer lacks the necessary drivers for your NVMe SSD or specific chipset.
- Download Drivers: On another PC, download the storage controller drivers (often Intel RST drivers) for your motherboard model from the manufacturer’s website.
- Load Drivers: Extract these drivers to a separate USB drive (or a different folder on your installation USB). During the Windows installation, when you see the “Load driver” option, browse to these drivers and install them.
Installation Fails with Error Codes
Windows installation errors can be cryptic. Note down the exact error code (e.g., 0x80070017, 0xC0000005) and search for it online.
- Bad ISO/USB: The Windows ISO might be corrupted, or the bootable USB wasn’t created properly. Try downloading the ISO again and recreating the USB.
- RAM/HDD Issues: Faulty RAM or a failing hard drive/SSD can cause installation errors. Run memory diagnostic tools (like MemTest86) or check your drive’s health.
- Overheating: Ensure your system is adequately cooled; overheating during installation can cause instability.
- BIOS/UEFI Settings: Resetting BIOS to optimized defaults or temporarily disabling features like XMP profiles for RAM can sometimes resolve issues.
Slow Installation or Freezing
- USB Port/Drive Speed: Ensure you’re using a fast USB 3.0/3.1 drive in a compatible USB 3.0/3.1 port. Using an older USB 2.0 port will be significantly slower.
- Target Drive Speed: Installing to an old, slow HDD will naturally take longer than installing to an SSD.
- Corrupted Media: A partially corrupted USB drive or ISO can lead to slowdowns or freezes. Recreate the bootable USB.
- Hardware Issues: As above, faulty RAM or a struggling CPU/motherboard can impede the installation process.
Secure Boot / UEFI Issues
- Disable Secure Boot: Temporarily disable Secure Boot in UEFI settings, perform the installation, and re-enable it afterward.
- CSM/Legacy Mode: If you’re struggling with UEFI boot, try enabling CSM (Compatibility Support Module) or “Legacy Mode” in your UEFI settings, especially if you created your USB with an MBR partition scheme. However, for Windows 10/11 on modern hardware, UEFI/GPT is generally preferred.
By meticulously following these steps and understanding the underlying concepts, you’ll be well-equipped to perform a clean and efficient Windows installation from a USB drive. This fundamental skill is an indispensable asset in navigating the modern digital landscape, offering control, performance, and peace of mind for your computing environment.
aViewFromTheCave is a participant in the Amazon Services LLC Associates Program, an affiliate advertising program designed to provide a means for sites to earn advertising fees by advertising and linking to Amazon.com. Amazon, the Amazon logo, AmazonSupply, and the AmazonSupply logo are trademarks of Amazon.com, Inc. or its affiliates. As an Amazon Associate we earn affiliate commissions from qualifying purchases.