Rust, a modern systems programming language renowned for its performance, memory safety, and concurrency, has seen a surge in popularity among developers. Whether you’re a seasoned programmer looking to explore a new language or a budding tech enthusiast aiming to build high-performance applications, understanding how to install Rust is your crucial first step. This guide, drawing from the core principles of technology, branding, and financial pragmatism, will walk you through the installation process, highlight its benefits, and offer insights into why Rust might be a valuable addition to your technical toolkit.
The technological landscape is constantly evolving, demanding languages that offer both power and reliability. Rust delivers precisely that, providing a robust foundation for everything from operating systems and game engines to web assembly and command-line tools. Its unique approach to memory management, achieved through its borrow checker, eliminates common bugs like null pointer dereferences and data races at compile time, a significant advantage over many other languages. This inherent safety translates to more stable and secure software, a critical factor in today’s digital world.
Beyond its technical prowess, adopting a new language like Rust can also be viewed through the lens of personal and professional branding. For developers, mastering Rust can elevate your profile, signaling a commitment to cutting-edge technologies and a dedication to writing high-quality, efficient code. In a competitive job market, demonstrating proficiency in a language like Rust can open doors to exciting opportunities and position you as a forward-thinking professional.
Furthermore, considering the financial implications of technology choices is always prudent. While the initial learning curve for any new language requires an investment of time, Rust’s long-term benefits can translate into significant financial advantages. By reducing debugging time and minimizing the risk of costly production errors, Rust can lead to faster development cycles and more robust applications, ultimately saving resources and potentially increasing revenue. This pragmatic approach to technology adoption aligns with smart financial planning for both individuals and businesses.
This article will provide a step-by-step guide to installing Rust, ensuring a smooth and efficient setup. We’ll cover the essential tools and configurations you’ll need, making the process accessible regardless of your operating system.
Getting Started: Installing the Rust Toolchain
The journey to using Rust begins with installing its core components, collectively known as the Rust toolchain. This is facilitated by rustup, a command-line toolchain installer that allows you to manage multiple Rust versions and associated tools with ease.
Downloading and Running rustup
The primary method for installing Rust is by using rustup. It’s designed to be simple and cross-platform, supporting Linux, macOS, and Windows.
For Linux and macOS Users:
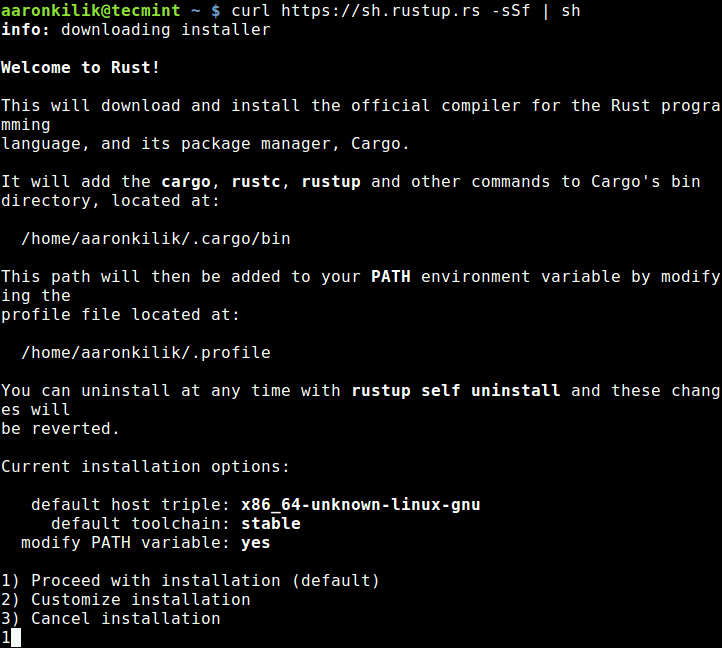
Open your terminal and execute the following command:
curl --proto '=https' --tlsv1.2 -sSF https://sh.rustup.rs | sh
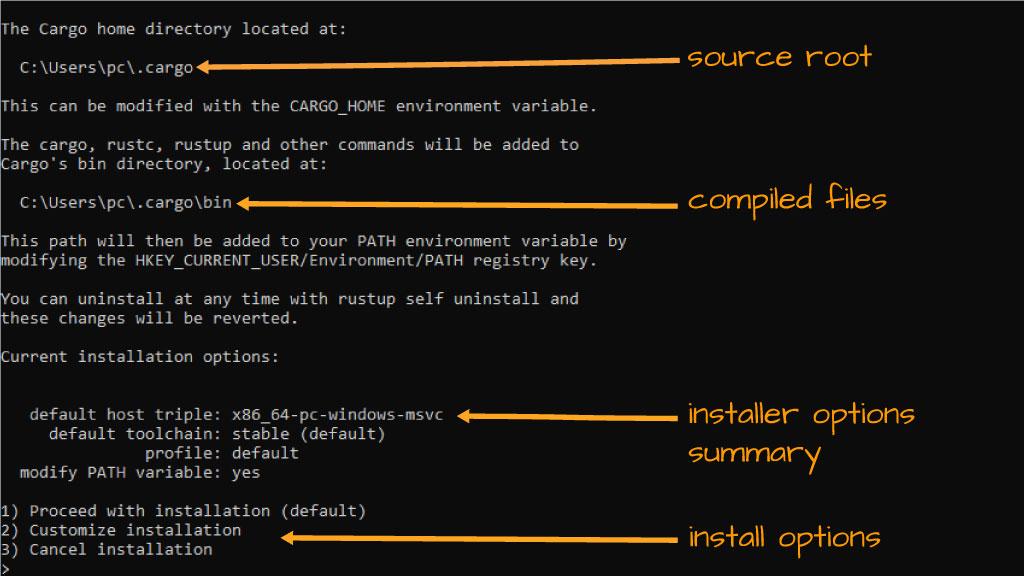
This command downloads a script from rustup.rs and pipes it directly to your shell for execution. The script will then prompt you to choose an installation option. For most users, the default installation is recommended, which includes the latest stable Rust compiler (rustc), the package manager and build tool (cargo), and the standard library documentation.
During the installation process, rustup will likely ask you to confirm the installation. It will also inform you about modifying your PATH environment variable to include Rust executables. It’s generally a good idea to allow this modification so that you can invoke Rust commands from any directory in your terminal.
Once the installation is complete, the script will instruct you to run the following command to ensure the PATH changes take effect in your current terminal session:
source $HOME/.cargo/env
For future terminal sessions, the PATH modification should be persistent.
For Windows Users:
For Windows, the process is slightly different. You’ll download an installer executable from the official Rust website.
- Visit the Official Rust Website: Navigate to https://www.rust-lang.org/tools/install.
- Download the Installer: You’ll find links to download the appropriate installer for your system (e.g.,
rustup-init.exefor 64-bit Windows). - Run the Installer: Execute the downloaded
.exefile. This will launch therustupinstaller. - Follow Prompts: Similar to Linux and macOS, the installer will guide you through the process. You’ll typically be presented with installation options. The default option is usually sufficient, installing the stable Rust toolchain.
- Environment Variables: The Windows installer will also handle updating your system’s
PATHenvironment variable. You might need to restart your command prompt or PowerShell window for these changes to take effect.
Verifying the Installation
After rustup has finished, it’s essential to verify that Rust has been installed correctly. Open a new terminal window or command prompt and run the following commands:
rustc --version
cargo --version
If the installation was successful, you should see the version numbers for the Rust compiler (rustc) and Cargo. For example:
rustc 1.70.0 (90c541806 2023-05-29)
cargo 1.70.0 (907070746 2023-05-09)
(The version numbers will reflect the latest stable release at the time of your installation.)
This confirmation signifies that your Rust environment is set up and ready for you to start coding.
Understanding the Rust Toolchain Components
The Rust toolchain consists of several key components that work together to facilitate development. rustup is the manager, but understanding what it installs is crucial.
rustc: The Rust Compiler
rustc is the compiler for the Rust programming language. It takes your Rust source code files (typically with a .rs extension) and translates them into executable machine code. One of Rust’s standout features is its compiler’s diagnostic capabilities. When you encounter errors, rustc provides remarkably clear and helpful error messages, often suggesting specific fixes. This drastically reduces the frustration often associated with compiling code in other languages.
The compiler’s strictness, particularly its enforcement of memory safety rules through the borrow checker, is what makes Rust so reliable. While it might seem daunting at first, learning to satisfy the compiler is a key part of becoming a proficient Rust developer. This emphasis on upfront correctness saves immense time and resources in the long run, a sentiment that resonates with any organization or individual focused on financial efficiency.
cargo: The Rust Build System and Package Manager
cargo is arguably the most important tool for any Rust developer after the compiler itself. It handles a multitude of tasks, making the development workflow seamless:
- Project Creation:
cargo new <project_name>creates a new Rust project with the standard directory structure. - Building:
cargo buildcompiles your project. It also handles dependencies and optimizations for different build profiles (e.g.,cargo build --releasefor optimized production builds). - Running:
cargo runcompiles and then executes your project. - Testing:
cargo testruns all the tests defined in your project. - Dependency Management:
cargomanages external libraries (called “crates” in Rust) by reading aCargo.tomlfile in your project’s root directory. You specify the crates you need, andcargoautomatically downloads and builds them. This is analogous to how package managers work in other ecosystems (like npm for Node.js or pip for Python), but with Rust’s characteristic focus on reliability and performance. - Publishing:
cargo publishallows you to share your own crates with the wider Rust community on crates.io, the official Rust package registry.
The efficiency and ease of use of cargo are significant contributors to Rust’s growing appeal. They streamline the development process, allowing developers to focus on writing code rather than managing build configurations and dependencies. This aligns perfectly with the “productivity” aspect of the tech category and the desire for efficient resource utilization in the “money” category.
The Rust Standard Library
The Rust standard library provides fundamental functionalities that most programs need. This includes data structures (like Vec for dynamic arrays and HashMap for hash maps), I/O operations, threading primitives, and much more. It’s a well-designed and comprehensive library that enables you to build complex applications without immediately needing external dependencies for basic tasks. Understanding and leveraging the standard library is key to writing idiomatic and efficient Rust code.
Managing Your Rust Installation with rustup
rustup is not just for installation; it’s your primary tool for managing your Rust environment over time. As Rust evolves, you’ll want to keep your toolchain updated.
Updating Rust
To update your installed Rust toolchain to the latest stable version, simply run:
rustup update
rustup will check for new versions of rustc, cargo, and other associated tools. If updates are available, it will download and install them automatically. This ensures you always have access to the latest features, performance improvements, and bug fixes.
Installing Different Toolchain Channels
Rust has three primary release channels:
- Stable: The officially released and most recommended version for production use.
- Beta: A pre-release version of the stable channel, giving you a preview of upcoming features.
- Nightly: The development version, containing the very latest features and experiments. It’s less stable and not recommended for production.
You can install and switch between these channels using rustup. For example, to install the beta channel:
rustup install beta
And to set it as your default toolchain:
rustup default beta
To switch back to stable:
rustup default stable
This flexibility allows you to experiment with new features or use specific versions for compatibility reasons. For businesses and developers focused on long-term stability, sticking to the stable channel is paramount. For those on the cutting edge of technology or contributing to Rust’s development, beta and nightly channels offer valuable insights.
Uninstalling Rust
If you ever need to remove Rust from your system, rustup makes it straightforward. In your terminal, run:
rustup self uninstall
This command will remove rustup and all installed Rust toolchains. It will also attempt to revert any changes made to your PATH environment variable.
Next Steps and Further Exploration
With Rust installed, you’re ready to embark on your journey into this powerful language.
Your First Rust Program
A common tradition when learning a new programming language is to write a “Hello, World!” program. Using cargo, this is incredibly simple:
- Create a New Project:
bash

cargo new hello_rust

cd hello_rust
- Inspect the Code: Open the
src/main.rsfile in your favorite text editor. You’ll find:
rust

fn main() {

    println!("Hello, world!");

}
- Build and Run: In your terminal, from within the
hello_rustdirectory, run:
bash

cargo run
You should see the output: Hello, world!
This simple exercise demonstrates the power of cargo in setting up and running a project.
Learning Resources and Community
The Rust ecosystem is rich with learning resources and a vibrant community:
- The Rust Programming Language Book (“The Book”): The official and most comprehensive guide to learning Rust. You can find it online at https://doc.rust-lang.org/book/.
- Rustlings: A set of small exercises designed to get you familiar with reading and writing Rust code. (https://github.com/rust-lang/rustlings)
- Rust Community: Engage with other Rust developers on forums like users.rust-lang.org, the official Rust Discord server, or Reddit’s r/rust subreddit.
The “brand” of Rust is one of safety, performance, and community. By learning Rust, you’re not just acquiring a new skill; you’re joining a growing community that values robust engineering and collaborative development.
Conclusion
Installing Rust is the first significant step towards harnessing its potential for building secure, performant, and reliable software. rustup simplifies this process, providing a robust management system for your toolchains. Whether your motivation stems from the technological advancements Rust offers, the desire to enhance your personal brand as a skilled developer, or a pragmatic approach to optimizing development resources for financial gain, the installation process is straightforward and accessible. With the toolchain set up, you are now equipped to explore the exciting possibilities that Rust unlocks, from low-level systems programming to high-level web applications. Happy coding!