In today’s hyper-connected world, a reliable internet connection is no longer a luxury; it’s a necessity. Whether you’re working from home, streaming your favorite shows, gaming online, or simply browsing the web, a robust Wi-Fi network is the backbone of your digital life. And at the heart of every home network lies the router. While the thought of setting up new tech might seem daunting to some, installing a router is a surprisingly straightforward process that, with a little guidance, anyone can master. This comprehensive guide will walk you through every step, ensuring you can get your new router up and running smoothly, unlocking the full potential of your internet service.
This guide is tailored for individuals looking to upgrade their existing home network or set up a new one, covering the essential steps from unboxing to final configuration. We’ll also touch upon considerations relevant to both technology enthusiasts and those focused on optimizing their digital environment for productivity and security, aligning with the broad scope of topics covered on this website.
Understanding Your Router and Internet Connection
Before we dive into the physical installation, it’s crucial to understand the role of your router and how it interacts with your internet service.
What is a Router?
A router is a networking device that directs data traffic between your home network and the internet. It acts as a traffic controller, managing the flow of information to and from all your connected devices. More importantly, in the context of home internet, it typically also includes a modem, or it connects to a separate modem.
Modem vs. Router: What’s the Difference?
- Modem: Your modem is the device that translates the signal from your Internet Service Provider (ISP) into a format your computer or router can understand. It’s the gateway to the internet itself. You usually get this device from your ISP.
- Router: Your router takes that internet connection from the modem and creates a local network (LAN) within your home. It then broadcasts a Wi-Fi signal (WLAN) that allows your devices to connect wirelessly, and it also provides Ethernet ports for wired connections.
Many modern devices are modem/router combos, provided by ISPs, which integrate both functionalities into a single unit. If you have a separate modem and router, your setup will involve connecting them. If you have a combo unit, the installation process will be even simpler.
Identifying Your Internet Connection Type
The type of internet connection you have will dictate the type of modem you use and how you connect your router. The most common types include:
- DSL (Digital Subscriber Line): Uses telephone lines. Modems for DSL typically have an RJ-11 phone jack.
- Cable: Uses coaxial cables (the same type used for cable TV). Modems for cable typically have an F-type coaxial connector.
- Fiber Optic: Uses fiber optic cables, offering the fastest speeds. You’ll usually have a separate Optical Network Terminal (ONT) provided by your ISP, which then connects to your router.
- Satellite: Uses a satellite dish. This is often used in rural areas where other options aren’t available.
- 5G Home Internet: Uses cellular technology to provide internet access. This usually involves a dedicated 5G gateway that acts as both modem and router.
Crucially, ensure you have an active internet service plan from your ISP before you begin. If you’re unsure about your connection type or require specific equipment, contact your ISP. They can guide you on the correct modem and any necessary activation steps.
Step-by-Step Router Installation Guide
Now that we have a foundational understanding, let’s get to the hands-on part of installing your new router.
1. Unboxing and Initial Setup
Once you have your new router, it’s time to get it out of the box.
What’s Inside the Box?
Typically, you’ll find:
- The router itself.
- A power adapter.
- An Ethernet cable (usually one or two).
- A quick start guide or user manual.
Inspect all components to ensure nothing is damaged. Keep the box and packaging materials handy, at least until you’ve confirmed the router is working correctly.
Choosing the Right Location for Your Router
The placement of your router significantly impacts Wi-Fi signal strength and coverage throughout your home.
- Central Location: Aim for a central location in your home, as close to the center of your living space as possible. This will help distribute the Wi-Fi signal more evenly.
- Elevated Position: Place the router on a shelf or table, rather than on the floor. Higher placement allows the signal to travel over obstacles more effectively.
- Open Area: Avoid placing your router in enclosed spaces like cabinets, closets, or behind large furniture. These can obstruct the signal.
- Away from Interference: Keep your router away from other electronic devices that can cause interference, such as microwaves, cordless phones, Bluetooth devices, and even some older baby monitors.
- Consider Aesthetics (Brand Aspect): While performance is key, consider how the router will blend into your home environment. Some routers are designed with modern aesthetics in mind, which can be a factor in their placement.
Connecting the Hardware
This is where the physical connections come into play.
Scenario A: Separate Modem and Router
- Power Down Everything: Unplug the power cords from both your modem and your existing router (if applicable).
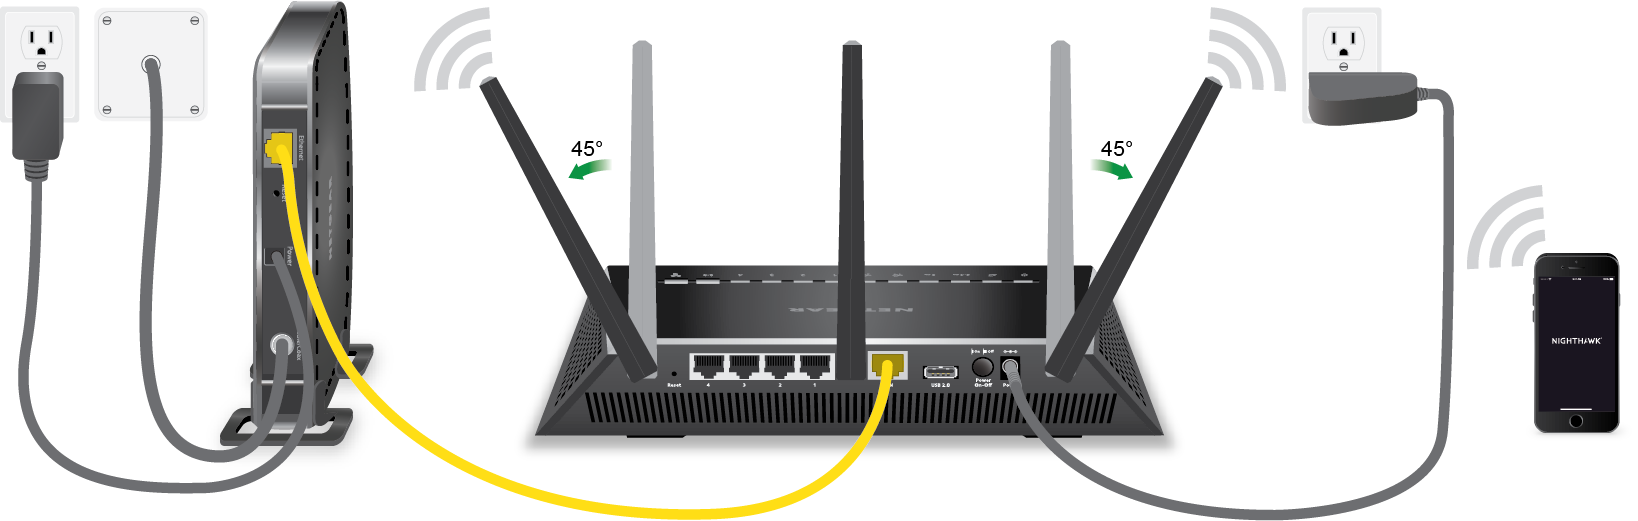
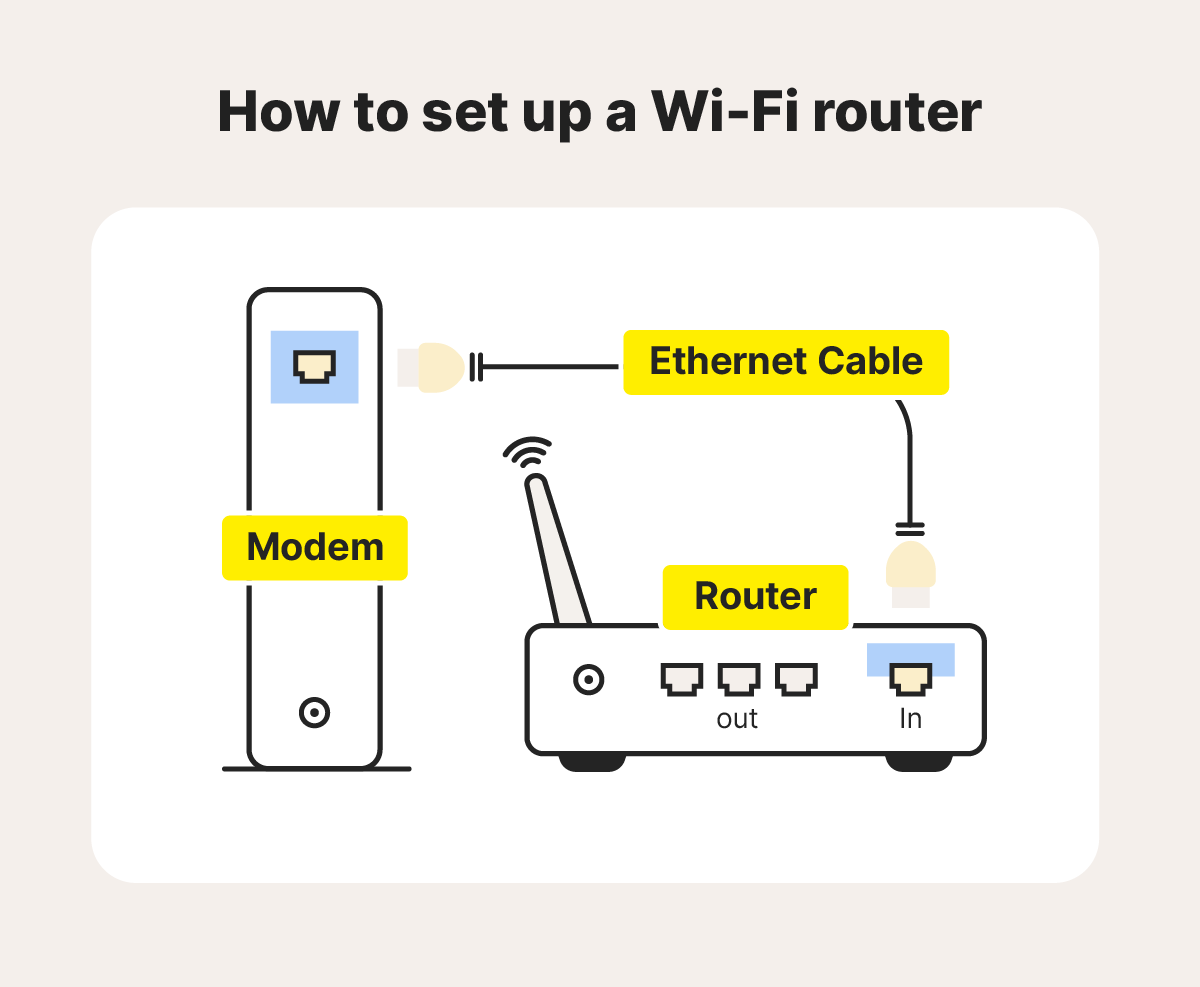
- Connect Modem to Router: Take the provided Ethernet cable and plug one end into the Ethernet port on your modem (often labeled “LAN” or with a network icon). Plug the other end into the “WAN” (Wide Area Network) or “Internet” port on your new router. This is usually a different color than the other Ethernet ports on the router.
- Power Up Sequence:
- Plug the power adapter into your modem and turn it on. Wait for the modem’s lights to stabilize, indicating it has a connection to your ISP. This can take a few minutes.
- Once the modem is fully operational, plug in your new router’s power adapter and turn it on. Wait for its lights to indicate it’s powered up and ready.
Scenario B: Modem/Router Combo Unit (or 5G Home Internet Gateway)
- Power Down: Unplug the power cord from your existing combo unit.
- Connect to ISP: Ensure the coaxial cable (for cable internet), phone line (for DSL), or fiber optic cable is securely connected to the unit.
- Power Up: Plug in the power adapter and turn on the combo unit. Wait for the lights to stabilize, indicating a connection to your ISP.
Scenario C: Replacing an Existing Router (with separate modem)
- Power Down Existing Router: Unplug the power adapter from your old router.
- Disconnect Ethernet: Disconnect the Ethernet cable from the WAN port of your old router.
- Connect New Router: Connect the Ethernet cable from your modem to the WAN port of your new router.
- Power Up New Router: Plug in the power adapter and turn on your new router.
2. Configuring Your New Router
Once the hardware is connected and powered on, it’s time to configure the software settings of your router. This is where you’ll set up your Wi-Fi network name (SSID) and password.
Accessing the Router’s Web Interface
Every router has a web-based interface that allows you to manage its settings.
-
Find the Default IP Address and Login Credentials: This information is crucial. You can usually find it:
- On a sticker on the router itself.
- In the router’s user manual or quick start guide.
- By searching online for your specific router model.
Common default IP addresses include192.168.1.1or192.168.0.1. Default usernames are oftenadminor blank, and default passwords can beadmin,password, or also blank.
-
Connect a Device: For the initial setup, it’s often best to connect a computer directly to the router using an Ethernet cable. Plug one end into one of the LAN ports on your router and the other into your computer’s Ethernet port. While Wi-Fi setup is possible, a wired connection is more stable for this initial configuration.
-
Open a Web Browser: Launch your preferred web browser (Chrome, Firefox, Safari, Edge, etc.).
-
Enter the IP Address: Type the router’s default IP address into the browser’s address bar and press Enter.
-
Log In: You should be prompted with a login screen. Enter the default username and password.
Initial Setup Wizard
Most modern routers will launch a setup wizard upon first login. This wizard will guide you through the essential steps:
- Internet Connection Type: The router may try to automatically detect your internet connection type. If not, you might need to select it from a dropdown menu (e.g., DHCP, PPPoE, Static IP). Your ISP can provide this information if needed. For most cable and DSL connections, “DHCP” is the default. PPPoE is common for DSL.
- Wireless Network Name (SSID): This is the name your Wi-Fi network will broadcast. Choose something unique but easy to remember. Avoid using personal information.
- Wi-Fi Password (Pre-Shared Key – PSK): This is the most important security setting. Choose a strong, unique password that is a mix of uppercase and lowercase letters, numbers, and symbols. A good password is at least 12 characters long.
- Admin Password: You will also be prompted to change the router’s administrative password. Do not skip this step! This is the password you use to log into the router’s settings interface. Change it from the default for security.
3. Securing Your Network and Optimizing Performance
With the basic setup complete, it’s time to enhance your network’s security and ensure optimal performance. This is where the “Tech” and “Digital Security” aspects come into play, ensuring your online activities are both efficient and protected.
Essential Security Settings
- Change Default Admin Password: As mentioned, this is critical. A weak admin password makes your router vulnerable to unauthorized access and configuration changes.
- Enable WPA3 Encryption (if available): WPA3 is the latest and most secure Wi-Fi encryption standard. If your router and devices support it, enable WPA3. If not, WPA2-AES is the next best option. Avoid WEP or WPA, as they are outdated and insecure.
- Update Router Firmware: Router manufacturers regularly release firmware updates to fix bugs, improve performance, and patch security vulnerabilities. Check for firmware updates in your router’s settings and install them. Some routers can be set to update automatically.
- Disable WPS (Wi-Fi Protected Setup): While WPS is designed for easy connection, it has known security vulnerabilities that can be exploited to gain access to your network. It’s generally recommended to disable it.
- Guest Network: Most routers allow you to create a separate “guest network.” This is ideal for visitors, providing them with internet access without giving them access to your main network and personal devices.
Optimizing Wi-Fi Performance
- Channel Selection: Wi-Fi signals operate on specific channels. If you live in a densely populated area, your neighbors’ Wi-Fi signals can interfere with yours. Most routers automatically select the best channel, but you can manually scan for less congested channels using Wi-Fi analyzer apps on your smartphone or computer.
- Band Steering (for Dual-Band/Tri-Band Routers): If you have a dual-band (2.4GHz and 5GHz) or tri-band router, enable band steering. This feature automatically connects your devices to the most optimal band based on their capabilities and signal strength, improving performance.
- Quality of Service (QoS): QoS settings allow you to prioritize certain types of traffic. For example, you can give streaming or gaming traffic higher priority than general browsing, ensuring a smoother experience for bandwidth-intensive applications. This is particularly relevant for productivity and entertainment.
- Router Placement Review: After initial setup, test your Wi-Fi signal strength in various areas of your home. If you find dead zones or weak spots, consider repositioning your router or using a Wi-Fi extender or mesh system.
4. Advanced Configuration and Troubleshooting
While the basic setup will get you online, there are more advanced settings and common issues you might encounter.
Understanding Router Settings
- DHCP Server: The router’s Dynamic Host Configuration Protocol (DHCP) server automatically assigns IP addresses to devices on your network. You usually don’t need to change these settings.
- Port Forwarding: This allows you to direct specific internet traffic to a particular device on your local network. It’s often used for online gaming, running servers, or accessing security cameras remotely.
- Static IP Address: If you have devices that need a consistent IP address (like a network printer or a server), you can assign them a static IP address within your router’s settings.
- DNS Settings: Domain Name System (DNS) servers translate website names (like
google.com) into IP addresses. You can sometimes improve browsing speed or access specific content by changing your DNS servers to custom ones (e.g., Google DNS, Cloudflare DNS).
Common Troubleshooting Steps
- No Internet Connection:
- Check Lights: Ensure the lights on your modem and router indicate a connection.
- Restart Devices: The classic “turn it off and on again” often works wonders. Reboot your modem, then your router, and then your computer or device.
- Check Cables: Ensure all Ethernet cables are securely plugged into the correct ports.
- Contact ISP: If modem lights indicate no connection, contact your Internet Service Provider.
- Slow Wi-Fi Speeds:
- Test Wired Connection: Connect a computer directly to the router with an Ethernet cable and run a speed test. If wired speeds are good but Wi-Fi is slow, the issue is likely with your Wi-Fi signal.
- Check Router Location: Ensure it’s not obstructed or near interference.
- Update Firmware: Outdated firmware can cause performance issues.
- Reduce Connected Devices: Too many devices can strain your router’s capacity.
- Consider an Upgrade: Older routers may not be able to handle modern internet speeds or the demands of multiple devices.
- Cannot Connect to Wi-Fi:
- Verify Password: Double-check that you’re entering the correct Wi-Fi password.
- Forget and Reconnect: On your device, “forget” the Wi-Fi network and try connecting again.
- Restart Router: A simple reboot can resolve many connectivity issues.

Conclusion: Empowering Your Digital World
Installing a router might seem like a technical hurdle, but it’s a fundamental step in establishing a functional and secure home network. By following these steps, you’ve not only learned how to physically connect your router but also how to configure it for optimal performance and robust security. A well-installed and configured router is the cornerstone of a productive home office, an immersive entertainment experience, and the peace of mind that comes with a protected digital presence.
The journey into a seamlessly connected home doesn’t end with the initial setup. Regularly checking for firmware updates, reviewing your security settings, and understanding basic troubleshooting can ensure your network remains efficient and secure. As technology evolves, so too will the capabilities of your router and the ways you can leverage its power. Embrace the control you have over your digital environment, and enjoy the benefits of a robust, reliable internet connection.
aViewFromTheCave is a participant in the Amazon Services LLC Associates Program, an affiliate advertising program designed to provide a means for sites to earn advertising fees by advertising and linking to Amazon.com. Amazon, the Amazon logo, AmazonSupply, and the AmazonSupply logo are trademarks of Amazon.com, Inc. or its affiliates. As an Amazon Associate we earn affiliate commissions from qualifying purchases.