Navigating the world of web development often involves mastering essential tools, and Node.js stands as a cornerstone for many modern applications. Whether you’re a seasoned developer looking to set up a new project, a student embarking on your coding journey, or a tech enthusiast curious about the engines powering the internet, understanding how to install Node.js on your Mac is a fundamental skill. This guide will walk you through the process, offering clear, step-by-step instructions and contextual information relevant to our broader focus on technology, branding, and even the financial implications of mastering these tools.
Node.js, a JavaScript runtime environment built on Chrome’s V8 JavaScript engine, has revolutionized server-side development. Its asynchronous, event-driven nature makes it highly efficient for building scalable network applications, APIs, and real-time services. For Mac users, the installation process is straightforward, and by the end of this article, you’ll be equipped to leverage this powerful technology. We’ll cover the most common and recommended installation methods, ensuring you can get up and running quickly and efficiently.
Our exploration will delve into the various ways to install Node.js, catering to different needs and preferences. We’ll start with the simplest method, ideal for beginners, and then move towards more advanced techniques that offer greater control and flexibility, especially for developers managing multiple projects with different Node.js version requirements. This approach aligns with our website’s commitment to providing comprehensive tutorials that cater to a wide audience, from those just starting out to those looking to optimize their workflows.
Beyond the installation itself, we’ll touch upon why mastering Node.js can be a significant step in your career, potentially impacting your earning potential (Money) and the personal brand you cultivate within the tech community (Brand). The ability to efficiently build and deploy applications using Node.js is a valuable asset, making you a more attractive candidate for employers and opening doors to freelance opportunities.
Understanding Node.js and Its Importance
Before diving into the installation, it’s crucial to grasp what Node.js is and why it’s become so indispensable in the tech landscape. At its core, Node.js allows you to run JavaScript code outside of a web browser. This capability unlocks a vast array of possibilities, transforming JavaScript from a client-side scripting language into a full-stack development solution.
The Rise of JavaScript Everywhere
Historically, JavaScript was confined to the browser, responsible for dynamic interactions and front-end enhancements. The advent of Node.js shattered this limitation, enabling developers to use JavaScript for back-end logic, server management, and even command-line tools. This “JavaScript everywhere” paradigm simplifies development by allowing teams to use a single language across the entire application stack, reducing context switching and streamlining the development process.
Key Features and Benefits
Node.js boasts several features that contribute to its popularity:
- Asynchronous and Event-Driven: Node.js handles operations non-blockingly. When a request is made (e.g., reading a file or querying a database), Node.js doesn’t wait for it to complete. Instead, it moves on to the next task and is notified when the operation is finished. This makes it incredibly efficient for I/O-bound operations, which are common in web applications.
- V8 JavaScript Engine: Built on Google’s V8 engine, Node.js benefits from its high performance and continuous optimization.
- NPM (Node Package Manager): NPM is the world’s largest software registry and comes bundled with Node.js. It provides a vast ecosystem of libraries and modules that can be easily installed and managed, significantly accelerating development.
- Cross-Platform Compatibility: Node.js runs on Windows, macOS, and Linux, ensuring that your applications can be developed and deployed across different operating systems.
The ability to efficiently build and deploy applications using Node.js is a valuable asset, making you a more attractive candidate for employers and opening doors to freelance opportunities. Mastering this technology can directly impact your earning potential within the tech industry.
Installing Node.js on Your Mac: The Recommended Methods
When it comes to installing Node.js on your Mac, you have several excellent options, each with its own advantages. For most users, especially those new to Node.js, the official installer is the most straightforward path. However, for developers who need to manage different versions of Node.js for various projects, a version manager is the preferred solution.
Method 1: Using the Official Node.js Installer (Recommended for Beginners)
The most direct way to get Node.js on your Mac is by downloading the official installer from the Node.js website. This method installs Node.js and its package manager, npm, with minimal fuss.
Step 1: Download the Installer
- Visit the Official Node.js Website: Open your web browser and navigate to https://nodejs.org/.
- Choose Your Download: You’ll see two download options prominently displayed:
- LTS (Long Term Support): This is the recommended version for most users. It’s stable, well-tested, and receives ongoing support.
- Current: This version features the latest capabilities and additions but may be less stable than the LTS version.
For general use and development, selecting the LTS version is the safest bet. Click on the appropriate download button for macOS.
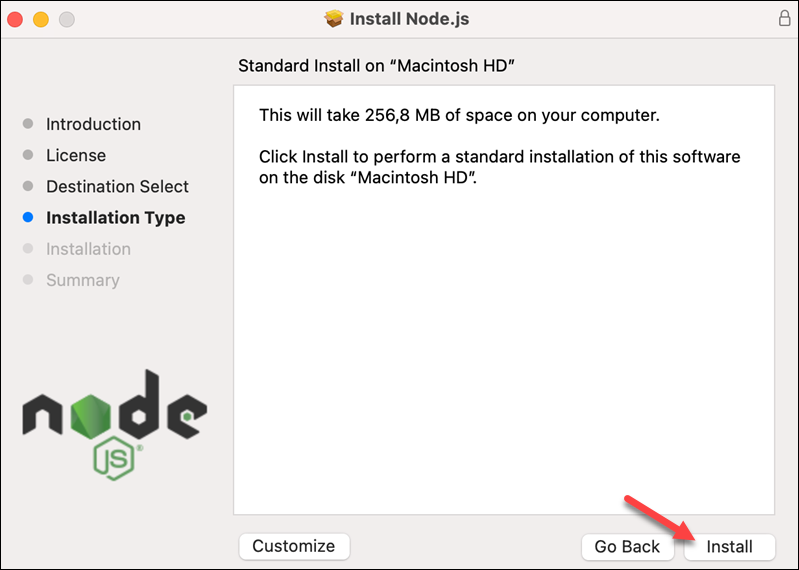
Step 2: Run the Installer
- Open the Downloaded File: Once the
.pkgfile has finished downloading, locate it in your Downloads folder and double-click it to start the installation process. - Follow the On-Screen Instructions: The installer is a standard macOS package installer. You’ll be prompted to agree to the license, choose an installation location (usually the default is fine), and enter your administrator password to authorize the installation.
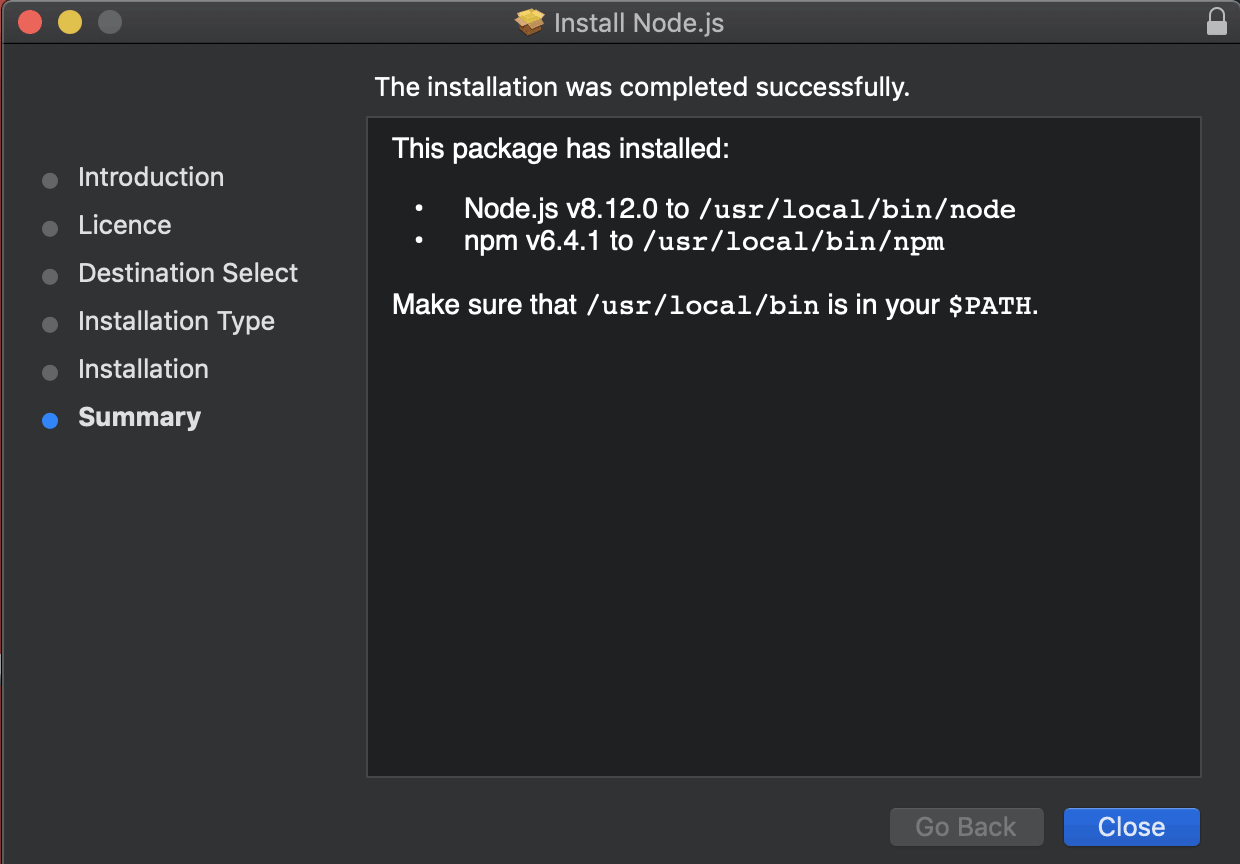
- Complete the Installation: The installer will copy the necessary files to your system. Once it’s finished, you’ll receive a confirmation message.
Step 3: Verify the Installation
After the installation is complete, it’s crucial to verify that Node.js and npm have been installed correctly.
- Open the Terminal: You can find the Terminal application in your
Applicationsfolder, underUtilities, or by searching for “Terminal” in Spotlight (Cmd + Space). - Check Node.js Version: Type the following command and press Enter:
bash

node -v
This command should output the version number of Node.js that you just installed (e.g.,v18.17.1). - Check npm Version: Similarly, type the following command and press Enter:
bash

npm -v
This should display the version of npm that comes bundled with your Node.js installation (e.g.,9.6.7).
If both commands return version numbers, you have successfully installed Node.js on your Mac! You’re now ready to start building applications.
This method is ideal for individuals or small teams just starting with Node.js, as it provides a single, stable environment for all their projects. It’s also a good starting point if you’re not yet sure about your project’s specific version requirements.
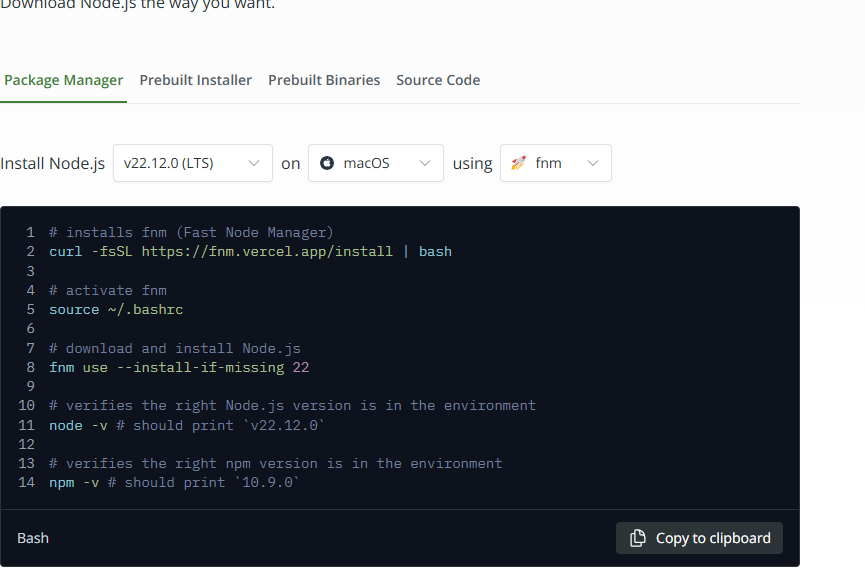
Method 2: Using a Node Version Manager (Recommended for Developers)
For developers who work on multiple projects, each potentially requiring a different version of Node.js, using a version manager is a game-changer. It allows you to easily install, switch between, and manage multiple Node.js versions on your system without conflicts. The most popular and widely recommended version manager for Node.js is nvm (Node Version Manager).
Step 1: Install nvm
nvm is typically installed via a script downloaded from its GitHub repository.
- Open the Terminal: Launch your Terminal application.
- Download and Run the nvm Installation Script: Execute the following command in your Terminal. This command fetches the latest version of the installation script and runs it. Always refer to the official nvm GitHub page for the most up-to-date installation command.
bash

curl -o- https://raw.githubusercontent.com/nvm-sh/nvm/v0.39.5/install.sh | bash
(Note:v0.39.5is an example version. Check the official nvm GitHub repository for the latest version and command.) - Source Your Shell Configuration: After the script runs, it will usually instruct you to close and reopen your Terminal or source your shell configuration file. This is necessary for nvm to be recognized as a command. You can typically do this by running:
bash

source ~/.zshrc   # If you use Zsh (default on newer macOS)

# OR

source ~/.bash_profile # If you use Bash
If you’re unsure which shell you’re using, you can typeecho $SHELLin the Terminal.
Step 2: Verify nvm Installation
- Check nvm Version: In a new Terminal window, type:
bash

nvm --version
If you see a version number, nvm is installed correctly.
Step 3: Install Node.js using nvm
Now that nvm is installed, you can use it to install Node.js.
- Install the Latest LTS Version: To install the latest Long Term Support version of Node.js:
bash

nvm install --lts
- Install a Specific Version: If you need a particular version (e.g., Node.js 16):
bash

nvm install 16
You can also install specific minor or patch versions, likenvm install 16.14.0. - List Available Versions: To see all available Node.js versions you can install:
bash

nvm ls-remote
Step 4: Use a Node.js Version
After installing one or more Node.js versions, you need to tell nvm which version to use.
- Use the Installed Version: To use the latest LTS version you just installed:
bash

nvm use --lts
Or to use a specific version (e.g., version 16):
bash

nvm use 16
- Set a Default Version: To make a specific version the default one that’s used whenever you open a new Terminal window:
bash

nvm alias default <version_number>
For example, to set the latest LTS as default:
bash

nvm alias default node # 'node' is a shortcut for the latest installed version
Step 5: Verify Node.js Installation with nvm
Once you’ve used a version, verify it as you did with the official installer:
node -v
npm -v
Using nvm provides immense flexibility, allowing you to seamlessly switch between environments for different projects. This is particularly valuable for developers who collaborate with others or contribute to open-source projects that might have specific Node.js version dependencies. This level of control is essential for maintaining code integrity and avoiding compatibility issues.
Managing and Maintaining Your Node.js Installation
Once Node.js is installed, whether directly or via nvm, understanding how to manage and update it is key to staying productive and secure. Regular updates ensure you have access to the latest features, performance improvements, and critical security patches.
Updating Node.js
The method for updating Node.js depends on how you initially installed it.
- Official Installer: If you used the official
.pkginstaller, the best way to update is to download the latest LTS version from nodejs.org and run the new installer. It will overwrite the previous installation. - nvm: If you’re using nvm, updating is as simple as installing a new version and switching to it. For example, to get the latest LTS:
bash

nvm install --lts

nvm use --lts

nvm alias default node # Optionally set the new version as default
You can then uninstall older versions you no longer need usingnvm uninstall <version_number>.
Understanding npm and Global Packages
npm (Node Package Manager) is your gateway to the vast Node.js ecosystem. You’ll use npm to install libraries, frameworks, and command-line tools.
- Installing Packages: To install a package for your current project, navigate to your project’s root directory in the Terminal and run:
bash

npm install <package-name>
This will install the package and add it to your project’snode_modulesfolder and update yourpackage.jsonfile. - Global Packages: Some tools, like linters, build tools, or CLI utilities, are often installed globally so they can be accessed from any directory on your system. To install a package globally:
bash

npm install -g <package-name>
When using nvm, global packages are installed per Node.js version. This means if you switch to a different Node.js version, you might need to reinstall your global packages for that new version. This isolation is a benefit of nvm, preventing version conflicts.
Best Practices for a Smooth Workflow
- Keep Node.js Updated: Regularly update your Node.js installation to benefit from new features and security patches.
- Use Version Managers for Projects: If you’re developing for multiple clients or working on diverse projects, nvm is almost indispensable. It prevents “dependency hell” and ensures project isolation.
- Understand
package.json: This file is the heart of your Node.js project, listing all its dependencies. Always commit yourpackage.jsonto version control. - Use
.nvmrcFiles: For projects managed by nvm, you can create a.nvmrcfile in the root of your project directory with the desired Node.js version (e.g.,18.17.1). When you navigate to that directory in the Terminal, nvm will automatically suggest or switch to that version if you’ve set it up to do so.
By following these guidelines, you can ensure your Node.js environment remains robust, secure, and tailored to your development needs. This technical proficiency not only enhances your productivity but also contributes to the strong personal brand you build as a capable and modern developer.
Node.js, Your Brand, and Your Financial Future
Mastering tools like Node.js isn’t just about the technical prowess; it has tangible benefits for your personal brand and financial well-being. In the competitive tech landscape, demonstrating proficiency in sought-after technologies can significantly enhance your career prospects and earning potential.
Building Your Personal Brand as a Node.js Developer
In the realm of personal and corporate branding, demonstrating expertise in modern technologies is crucial. Node.js is a cornerstone of contemporary web development, powering countless applications from startups to enterprise solutions.
- Demonstrating Modern Skills: Listing Node.js proficiency on your resume, LinkedIn profile, or personal website signals that you are up-to-date with industry trends. This is particularly important when targeting roles in web development, back-end engineering, or full-stack development.
- Contributing to Open Source: Many popular open-source projects are built with Node.js. Contributing to these projects not only sharpens your skills but also builds your reputation within the developer community. Your GitHub profile, showcasing your Node.js contributions, becomes a powerful testament to your abilities.
- Building a Portfolio: Developing personal projects using Node.js and deploying them allows you to create a tangible portfolio. This showcases your practical understanding of the technology and your ability to bring ideas to life. These projects can range from simple APIs to complex single-page applications.
- Sharing Knowledge: Writing blog posts, creating tutorials (like this one!), or speaking at meetups about your Node.js experiences helps establish you as an authority. This thought leadership is invaluable for personal branding and networking.
A strong personal brand can attract better job opportunities, freelance clients, and even investment for your own ventures. It’s about communicating your value effectively to the market.
The Financial Rewards of Node.js Expertise
The demand for skilled Node.js developers remains high, translating directly into attractive salary packages and lucrative freelance opportunities.
- High Demand, High Salaries: According to various tech job market reports, Node.js developers are consistently in demand. This scarcity of talent, coupled with the technology’s importance, drives competitive salaries. Developers proficient in Node.js often command higher compensation compared to those with more generic skill sets.
- Freelance and Consulting Opportunities: The flexibility of Node.js makes it ideal for building scalable APIs and microservices, services that many businesses require. This opens up a significant market for freelance developers and consultants who can offer specialized Node.js development services. Your ability to build robust back-ends efficiently can lead to well-paying contracts.
- Building Scalable Businesses: For entrepreneurs and business owners, understanding Node.js can be a strategic advantage. It allows for the efficient development of Minimum Viable Products (MVPs) and scalable applications, which are crucial for launching and growing tech-focused businesses. The ability to iterate quickly and cost-effectively can be the difference between success and failure.
- Side Hustles and Income Streams: Beyond full-time employment or freelancing, Node.js can be a tool to create passive income streams. This could involve building and selling Node.js-based SaaS products, developing plugins for popular platforms, or even creating and monetizing online courses about Node.js development.
By investing time in learning and mastering Node.js on your Mac, you’re not just acquiring a technical skill; you’re investing in your future. You’re enhancing your marketability, increasing your earning potential, and laying the groundwork for a successful and rewarding career in the ever-evolving world of technology. The journey from installation to becoming a proficient Node.js developer is a path filled with opportunities for growth, innovation, and financial prosperity.
aViewFromTheCave is a participant in the Amazon Services LLC Associates Program, an affiliate advertising program designed to provide a means for sites to earn advertising fees by advertising and linking to Amazon.com. Amazon, the Amazon logo, AmazonSupply, and the AmazonSupply logo are trademarks of Amazon.com, Inc. or its affiliates. As an Amazon Associate we earn affiliate commissions from qualifying purchases.