In the dynamic world of software development, efficiency and versatility are paramount. Node.js, an open-source, cross-platform JavaScript runtime environment, has emerged as a cornerstone technology, empowering developers to build scalable network applications with unprecedented speed. From robust web servers and real-time applications to command-line tools and microservices, Node.js leverages JavaScript’s ubiquity to offer a unified development experience across front-end and back-end ecosystems. For Mac users, who often champion productivity and cutting-edge tools, integrating Node.js into their development environment is a fundamental step toward unlocking a vast array of possibilities.
This comprehensive guide is designed to walk you through the various methods of installing Node.js on your macOS system, ensuring you can quickly get started with this powerful runtime. We’ll cover the most popular and recommended approaches, including using Homebrew – the beloved package manager for macOS, the straightforward official installer, and NVM (Node Version Manager) for handling multiple Node.js versions. By the end of this tutorial, you’ll not only have Node.js and its accompanying package manager, npm, up and running, but you’ll also understand the best practices for maintaining your installation, fitting perfectly into the “Tech” focus of our website, which emphasizes software tutorials, productivity, and digital security.
The Power of Node.js: Why It’s Indispensable for Mac Developers
Node.js isn’t just another programming tool; it’s a paradigm shift in how developers approach server-side applications and tooling. Built on Chrome’s V8 JavaScript engine, it’s renowned for its non-blocking, event-driven architecture, making it exceptionally fast and efficient for handling concurrent requests. This architecture is particularly beneficial for data-intensive real-time applications, such as chat applications, live video streaming services, and online gaming. For Mac users, Node.js offers a seamless integration into the Unix-like environment, allowing for powerful command-line tools and scripting capabilities that enhance overall development productivity.
Beyond its performance, Node.js boasts the largest ecosystem of open-source libraries in the world, thanks to npm (Node Package Manager). npm acts as both a command-line utility for interacting with the Node.js package repository and the repository itself. With millions of packages available, developers can quickly add complex functionalities to their projects without reinventing the wheel, covering everything from database drivers to front-end build tools. This vast ecosystem fuels innovation and accelerates development cycles, aligning perfectly with modern technology trends and best practices in software engineering. Whether you’re building a personal project, contributing to an open-source initiative, or working on a large-scale enterprise application, Node.js on your Mac provides a robust, flexible, and high-performance foundation.
Method 1: Installing Node.js with Homebrew – The Mac’s Package Manager
Homebrew is arguably the most popular and convenient package manager for macOS. It simplifies the installation of software packages and dependencies that Apple doesn’t officially provide. For developers, Homebrew is an indispensable tool, offering a clean, organized, and straightforward way to manage everything from programming languages to utility applications. Installing Node.js via Homebrew is often the preferred method due to its ease of use, automatic dependency management, and simple updating process.
Prerequisites: Installing Homebrew on Your Mac
Before you can use Homebrew to install Node.js, you need to ensure Homebrew itself is installed on your system. If you’re new to macOS development, or haven’t set up Homebrew yet, it’s a quick process.
Step 1: Open Terminal
Launch the Terminal application. You can find it in Applications/Utilities or by searching for “Terminal” using Spotlight (Cmd + Space).
Step 2: Check for Existing Homebrew Installation
At the Terminal prompt, type:
brew -v
If Homebrew is already installed, you’ll see its version number. If it’s not installed or not found, you’ll get a “command not found” error, indicating you need to proceed with the installation.
Step 3: Install Homebrew
If Homebrew isn’t installed, paste the following command into your Terminal and press Enter:
/bin/bash -c "$(curl -fsSL https://raw.githubusercontent.com/Homebrew/install/HEAD/install.sh)"
This command uses curl to download and execute the Homebrew installation script directly from GitHub. The script will guide you through the process, prompting for your administrator password when necessary. It will also explain what it’s going to install and where. Follow the on-screen instructions, which might include installing Xcode Command Line Tools if they are not already present. This step ensures all necessary build dependencies are met for various software installations, enhancing your overall Mac development environment.
Once the installation is complete, Homebrew will typically advise you to add it to your PATH environment variable. If it doesn’t do this automatically, or if you’re using a newer shell like Zsh, you might need to add the following lines to your shell configuration file (e.g., ~/.zshrc or ~/.bash_profile):
echo 'eval "$(/opt/homebrew/bin/brew shellenv)"' >> ~/.zshrc # For Zsh
# Or for Bash:
# echo 'eval "$(/usr/local/bin/brew shellenv)"' >> ~/.bash_profile
eval "$(/opt/homebrew/bin/brew shellenv)"
Then, reload your shell configuration:
source ~/.zshrc # Or source ~/.bash_profile
After installation, run brew doctor to check for any potential issues. It should report “Your system is ready to brew.”
Node.js Installation via Homebrew
With Homebrew successfully installed, installing Node.js is incredibly simple and efficient.
Step 1: Install Node.js
In your Terminal, execute the following command:
brew install node
Homebrew will download the latest stable version of Node.js and npm, along with any necessary dependencies, and install them on your system. This process might take a few minutes depending on your internet connection and system speed. Homebrew handles the compilation and linking, placing the Node.js binaries in a location that’s automatically included in your system’s PATH, making them globally accessible.
Verifying the Installation
After the installation completes, it’s crucial to verify that Node.js and npm have been correctly installed and are accessible from your Terminal.
Step 1: Check Node.js Version
Type the following command:
node -v
You should see the installed Node.js version number (e.g., v20.10.0).
Step 2: Check npm Version
Node.js installation via Homebrew also includes npm. Verify its installation with:
npm -v
You should see the installed npm version number (e.g., 10.2.3).
If both commands return version numbers without errors, congratulations! You have successfully installed Node.js and npm using Homebrew. This method ensures your Node.js installation is clean, manageable, and easy to update, significantly boosting your development productivity.
Method 2: Direct Installation Using the Official Node.js Installer
While Homebrew offers a streamlined approach, some users might prefer the traditional method of downloading and running an installer package directly from the source. The official Node.js website provides .pkg installer files for macOS, offering a familiar, GUI-driven installation experience similar to installing any other application. This method is straightforward and ensures you get the official build, which can be particularly reassuring for beginners or those who prefer minimal command-line interaction.
When to Use the Official Installer
The official installer is an excellent choice for:
- Users who are new to the command line or prefer a graphical installation process.
- Developers who need a specific version of Node.js and want direct control over the download.
- Environments where Homebrew might not be permitted or preferred.
Downloading the Package
Step 1: Visit the Official Node.js Website
Open your web browser and navigate to the official Node.js website: https://nodejs.org/.
Step 2: Choose Your Version
On the homepage, you’ll typically see two main download options:
- LTS (Long Term Support): This is the recommended version for most users and production environments due to its stability and extended support window. It’s thoroughly tested and less prone to breaking changes, ensuring digital security and stability for your projects.
- Current: This version includes the latest features and improvements but might be less stable than the LTS release. It’s often preferred by developers eager to explore the newest functionalities.
For most development purposes, especially if you’re just starting, the LTS version is the safest and most reliable choice. Click on the button corresponding to the LTS version for macOS. This will download a .pkg installer file to your Downloads folder.
Running the Installer
Once the .pkg file has finished downloading, follow these steps to install Node.js:
Step 1: Locate and Launch the Installer
Navigate to your Downloads folder (or wherever your browser saves downloaded files) and double-click the node-vX.X.X.pkg file (where X.X.X is the version number).
Step 2: Follow the Installation Wizard
The Node.js installer will launch, guiding you through a series of steps:
- Introduction: Click “Continue.”
- License: Read the license agreement and click “Continue,” then “Agree” to accept the terms.
- Destination Select: Choose the destination drive for the installation. For most users, the default selection is fine. Click “Continue.”
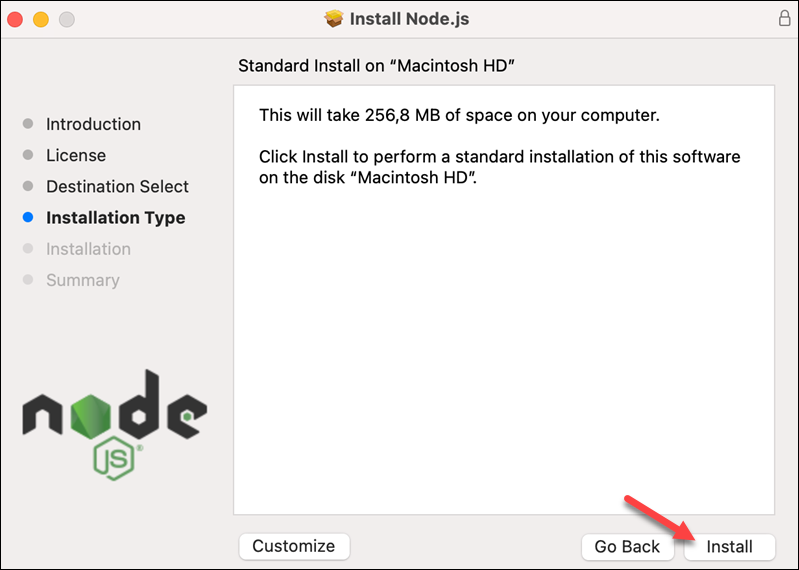
- Installation Type: The installer will show you how much space Node.js will take. Click “Install.”
- Administrator Password: You will be prompted to enter your macOS administrator password to authorize the installation. This is a standard security measure for installing system-level software.
- Installation Process: The installer will proceed with copying files and configuring your system. This might take a few moments.
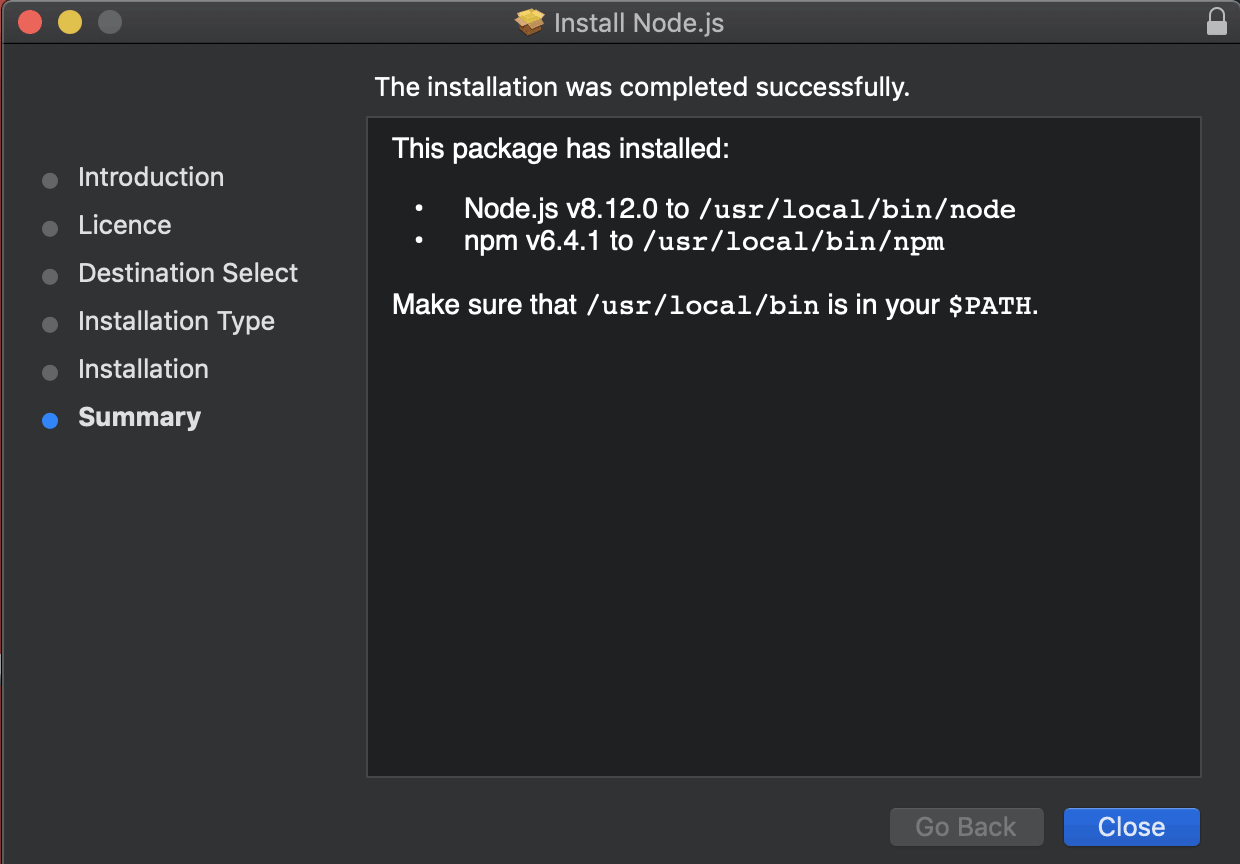
- Summary: Once completed, you’ll see a “Summary” screen indicating that the installation was successful. Click “Close.” You might be asked if you want to move the installer to the Trash; you can choose to do so.
Confirming the Installation
Just like with the Homebrew method, it’s essential to verify that Node.js and npm are correctly installed and accessible after using the official installer.
Step 1: Open Terminal
Launch the Terminal application.
Step 2: Check Node.js Version
Enter the command:
node -v
You should see the installed Node.js version number.
Step 3: Check npm Version
Enter the command:
npm -v
You should see the installed npm version number.
The official installer automatically sets up the necessary PATH variables, making Node.js and npm globally available in your Terminal. If you encounter any command not found errors, it might be necessary to close and reopen your Terminal application, or even restart your computer, to ensure the new PATH settings are fully applied. This method offers a straightforward path for those who prefer a graphical interface for their software installations while still ensuring a robust Node.js setup.
Method 3: Managing Multiple Node.js Versions with NVM (Node Version Manager)
For seasoned developers and those working on multiple projects, managing different Node.js versions becomes a necessity. Different projects might rely on specific Node.js versions, and switching between them manually can be cumbersome and error-prone. This is where NVM, the Node Version Manager, shines. NVM allows you to install, manage, and switch between multiple Node.js versions on your Mac effortlessly, greatly enhancing your productivity and flexibility across various development tasks.
The Need for NVM
Consider these scenarios where NVM is indispensable:
- Legacy Projects: Maintaining older applications that require an older Node.js version.
- New Projects: Starting new applications that leverage the latest Node.js features, which might not be compatible with older versions.
- Testing: Thoroughly testing your code across different Node.js environments.
- Collaboration: Ensuring your development environment matches that of other team members, regardless of their preferred Node.js version.
NVM provides an elegant solution to these challenges, enabling developers to seamlessly transition between versions with simple commands without conflicts or lengthy reinstallation processes.
Installing NVM on Your Mac
Installing NVM is a straightforward process, primarily involving a curl command and configuring your shell.
Step 1: Open Terminal
Launch the Terminal application.
Step 2: Install NVM
Use the following curl command to download and run the NVM installation script. It’s recommended to check the official NVM GitHub repository for the latest installation script to ensure digital security and up-to-date instructions. At the time of writing, the command is usually:
curl -o- https://raw.githubusercontent.com/nvm-sh/nvm/v0.39.5/install.sh | bash
(Note: Replace v0.39.5 with the latest version number found on the NVM GitHub page if different).
This script downloads NVM to your user directory (~/.nvm) and attempts to add the necessary lines to your shell’s profile file (e.g., ~/.bash_profile, ~/.zshrc, ~/.profile, or ~/.bashrc). These lines ensure that NVM is loaded every time you open a new Terminal session.
Step 3: Configure Your Shell Environment
After running the installation script, you might need to manually add or verify the NVM loading script in your shell configuration file. Open your shell’s configuration file (e.g., ~/.zshrc if you’re using Zsh, or ~/.bash_profile if you’re using Bash) using a text editor:
nano ~/.zshrc # For Zsh
# Or for Bash:
# nano ~/.bash_profile
Add the following lines at the end of the file if they’re not already there:
export NVM_DIR="$HOME/.nvm"
[ -s "$NVM_DIR/nvm.sh" ] && . "$NVM_DIR/nvm.sh" # This loads nvm
[ -s "$NVM_DIR/bash_completion" ] && . "$NVM_DIR/bash_completion" # This loads nvm bash_completion
Save the file and exit the editor (Ctrl+X, then Y, then Enter for nano).
Step 4: Reload Your Shell Configuration
For the changes to take effect, you need to reload your shell configuration. You can do this by closing and reopening your Terminal, or by running:
source ~/.zshrc # Or source ~/.bash_profile
Step 5: Verify NVM Installation
Once your shell is reloaded, verify NVM is installed correctly by typing:
nvm --version
You should see the installed NVM version number. If you get command not found, double-check the configuration steps and ensure the source command was executed correctly.
Installing Node.js Versions with NVM
With NVM successfully installed, you can now easily install multiple Node.js versions.
Step 1: Install a Specific Node.js Version
To install a particular version of Node.js, use the nvm install command followed by the version number:
nvm install 18 # Installs the latest 18.x.x version
nvm install 20.10.0 # Installs a specific patch version
nvm install node # Installs the latest stable version
NVM will download and compile the specified Node.js version, along with its corresponding npm, and make it available.
Step 2: List Installed Versions
To see all Node.js versions you have installed via NVM, use:
nvm ls
This command will list all installed versions, with an arrow (->) pointing to the currently active version.
Switching and Setting Default Versions
NVM’s real power lies in its ability to switch between Node.js versions and set default ones.
Step 1: Switch to a Different Version
To switch to a different Node.js version for your current Terminal session, use nvm use:
nvm use 18 # Switches to the latest 18.x.x version
The Terminal will confirm the switch, and node -v and npm -v will now reflect the newly activated version. This change is temporary for the current shell session.
Step 2: Set a Default Version
To set a specific Node.js version as the default for all new Terminal sessions, use nvm alias default:
nvm alias default 20 # Sets version 20 as the default
Now, whenever you open a new Terminal window, NVM will automatically load Node.js version 20.
Step 3: Uninstall a Version
If you no longer need a particular Node.js version, you can uninstall it with:
nvm uninstall 16 # Uninstalls the 16.x.x version
This keeps your system clean and organized, aligning with productivity best practices for software management. NVM is an invaluable tool for any Mac developer working with Node.js, offering unparalleled flexibility and control over your development environment.
Post-Installation Essentials and Troubleshooting
Once Node.js and npm are installed on your Mac, there are a few essential practices and common issues you should be aware of to ensure a smooth development workflow. These tips will help you maintain a healthy Node.js environment, optimize your productivity, and quickly resolve potential setbacks.
Verifying Node.js and npm Status
Regardless of the installation method, always confirm your setup.
- Check Node.js version:
node -v - Check npm version:
npm -v - Check npm’s global installation directory:
npm root -g(This shows where globally installed packages reside). - Check your PATH:
echo $PATH(Ensure your Node.js/npm binaries are in the path. For Homebrew, it’s typically/opt/homebrew/binor/usr/local/bin. For NVM, it manages the path dynamically).
Understanding npm (Node Package Manager)
npm is more than just an installer; it’s a powerful dependency management tool.
npm install <package-name>: Installs a package locally within your current project.npm install -g <package-name>: Installs a package globally, making it available as a command-line tool. Use this sparingly, as global packages can sometimes lead to version conflicts. NVM users can often avoid global installs by simply switching Node.js versions.package.json: Every Node.js project should have apackage.jsonfile. Usenpm initto create one, defining your project’s metadata, scripts, and dependencies.npm install(without arguments): Installs all dependencies listed in yourpackage.jsonfile.
Updating Node.js and npm
Keeping your Node.js and npm installations up-to-date is crucial for performance, security, and accessing the latest features.
Updating Node.js:
- Homebrew:
bash

brew update        # Update Homebrew itself

brew upgrade node  # Upgrade Node.js to the latest stable version
- Official Installer:
Download the latest.pkginstaller fromnodejs.organd run it. The installer will typically upgrade your existing installation. - NVM:
bash

nvm install node   # Installs the latest stable version

nvm use node       # Switches to the new version

nvm alias default node # Sets it as the default

nvm uninstall <old_version> # Optional: uninstall old versions you no longer need
Updating npm:
npm is often updated independently of Node.js.
npm install -g npm@latest
This command updates npm to its latest version globally.
Common Issues and Solutions
Even with careful installation, you might encounter issues. Here are some common ones:
-
node: command not foundornpm: command not found:- Cause: Your system’s
PATHenvironment variable isn’t correctly configured to include the directory where Node.js and npm executables are located. - Solution:
- For Homebrew/Official Installer: Close and reopen your Terminal. If that doesn’t work, ensure
/usr/local/binor/opt/homebrew/bin(for newer Homebrew on Apple Silicon) is in yourPATH. Check your~/.zshrcor~/.bash_profile. - For NVM: Ensure NVM is correctly sourced in your
~/.zshrcor~/.bash_profile. Runsource ~/.zshrcand thennvm use <version>to activate a Node.js version.
- For Homebrew/Official Installer: Close and reopen your Terminal. If that doesn’t work, ensure
- Cause: Your system’s
-
Permissions Errors (
EACCES: permission deniedwhen installing global packages):- Cause: npm is trying to install packages in a directory that your user account doesn’t have write permissions for, usually
/usr/local. - Solution:
- DO NOT use
sudo npm install -g ...as this can lead to larger permission issues and security vulnerabilities. - Correct method: Use NVM! NVM installs Node.js and npm in your user directory (
~/.nvm), which you always have write access to, eliminating permission issues. This is a key digital security benefit of using a version manager. - If not using NVM: Configure npm to use a different directory for global packages:
bash

mkdir ~/.npm-global

npm config set prefix '~/.npm-global'

echo 'export PATH="$HOME/.npm-global/bin:$PATH"' >> ~/.zshrc # Or ~/.bash_profile

source ~/.zshrc # Or ~/.bash_profile
- DO NOT use
- Cause: npm is trying to install packages in a directory that your user account doesn’t have write permissions for, usually
-
Node.js Versions Conflict (after manual or multiple installations):
- Cause: You might have installed Node.js using multiple methods (e.g., Homebrew and official installer), leading to conflicting binaries in your
PATH. - Solution: Prioritize one method, ideally NVM. Uninstall conflicting installations. If you decide to stick with Homebrew, ensure the official installer’s binaries are removed from
/usr/local/bin.
- Cause: You might have installed Node.js using multiple methods (e.g., Homebrew and official installer), leading to conflicting binaries in your
-
Caching Issues:
- Cause: Corrupted npm cache can lead to installation failures.
- Solution: Clean npm cache:
npm cache clean --force
Uninstalling Node.js
If you need to completely remove Node.js from your system:
- Homebrew:
bash

brew uninstall node

brew prune # Remove old versions and cleanup
- NVM:
bash

nvm uninstall <version> # Uninstall specific versions

rm -rf ~/.nvm         # Remove NVM and all installed Node.js versions

# Remove NVM loading lines from your .zshrc/.bash_profile
- Official Installer (Manual Removal): This is more involved. You’ll need to manually delete directories and files that the installer placed:
bash

sudo rm -rf /usr/local/lib/node_modules

sudo rm -rf /usr/local/bin/node

sudo rm -rf /usr/local/bin/npm

sudo rm -rf /usr/local/bin/npx # and any other global packages

sudo rm -rf /usr/local/include/node

# Also check /usr/local/share/man for man pages

# Check /etc/paths.d/ for any node-related paths
This method is generally not recommended unless you know exactly what you’re doing, as it’s prone to leaving residual files.
Embracing the Node.js Ecosystem: Next Steps for Mac Developers
With Node.js and npm now successfully installed on your Mac, you’ve laid the groundwork for an incredibly powerful and versatile development environment. This is more than just installing a piece of software; it’s opening the door to a world of modern web development and system tooling that can dramatically boost your productivity and expand your technical skill set.
Your next steps involve diving deeper into the vast Node.js ecosystem:
- Explore npm Packages: The npm registry is home to millions of packages. Begin by installing some popular global utilities like
create-react-appfor React development,vue-clifor Vue.js, ornodemonfor automatically restarting your Node.js application during development. - Learn Key Frameworks: Node.js is the backbone for numerous influential JavaScript frameworks. Consider exploring:
- Express.js: A minimalist web framework for building RESTful APIs and web applications.
- Next.js/Nuxt.js: Powerful frameworks for building server-rendered React and Vue applications, respectively, offering enhanced performance and SEO.
- NestJS: A progressive Node.js framework for building efficient, reliable and scalable server-side applications, often used for enterprise-grade solutions.
- Build Your First Project: The best way to learn is by doing. Start with a simple “Hello World” web server using Node.js and Express, or scaffold a new front-end project with your chosen framework. Experiment with interacting with APIs, databases, or even building a simple command-line tool.
- Understand Asynchronous Programming: Node.js heavily relies on asynchronous programming patterns (callbacks, Promises,
async/await). Mastering these concepts is fundamental to writing efficient and non-blocking Node.js applications. - Stay Updated with Technology Trends: The Node.js ecosystem evolves rapidly. Keep an eye on new Node.js releases, npm features, and emerging frameworks or best practices. Resources like the official Node.js blog, npm blog, and various tech communities are invaluable for staying current.
By embracing these next steps, you’ll not only hone your technical skills but also contribute to the vibrant developer community. Your Mac, powered by Node.js, is now a highly capable machine for building the next generation of web and software applications, truly embodying the spirit of innovation and productivity that defines modern technology trends.
aViewFromTheCave is a participant in the Amazon Services LLC Associates Program, an affiliate advertising program designed to provide a means for sites to earn advertising fees by advertising and linking to Amazon.com. Amazon, the Amazon logo, AmazonSupply, and the AmazonSupply logo are trademarks of Amazon.com, Inc. or its affiliates. As an Amazon Associate we earn affiliate commissions from qualifying purchases.