In the modern digital landscape, the Internet Protocol (IP) address serves as the fundamental cornerstone of connectivity. Whether you are troubleshooting a printer connection, setting up a gaming server, or enhancing your digital privacy, knowing how to identify and manage your IP address on a Mac is an essential skill. While macOS provides a user-friendly interface for most tasks, the intricacies of networking can sometimes feel opaque.
This guide provides a deep dive into the technical mechanics of IP addresses on macOS, offering step-by-step instructions for finding both your local and public addresses, understanding the differences between them, and managing your network security.
Understanding the Difference: Public vs. Local IP Addresses
Before diving into the “how-to,” it is crucial to understand what you are actually looking for. In a typical home or office environment, your Mac actually possesses two distinct IP addresses.
What is a Local (Private) IP Address?
Your local IP address, often referred to as a private IP, is the numerical label assigned to your Mac by your local network router. Think of your router as the “mailroom” of a large building. The router receives all the incoming data and needs to know which specific device (your Mac, an iPhone, or a smart TV) requested that information.
Local IP addresses usually fall within specific ranges, most commonly starting with 192.168.x.x or 10.0.x.x. These addresses are not visible to the outside world; they exist only to facilitate communication between devices connected to the same Wi-Fi or Ethernet network.
What is a Public IP Address?
Your public IP address is the face your entire network presents to the global internet. This address is assigned to your router by your Internet Service Provider (ISP). Every website you visit and every server you connect to sees this public IP. If the local IP is your “apartment number,” the public IP is the “street address” of the entire building.
Understanding this distinction is vital for tech troubleshooting. If you are trying to share a file with a colleague in the same room, you need your local IP. If you are trying to access your home computer from a coffee shop, you need to know your public IP.
How to Find Your Local IP Address on macOS
Apple has refined the macOS interface over the years, which means the steps to find your IP address can vary slightly depending on which version of the operating system you are running.
Using System Settings (macOS Ventura and Newer)
With the release of macOS Ventura, Apple redesigned the “System Preferences” into “System Settings,” mimicking the look of iOS.
- Click the Apple Menu () in the top-left corner of your screen and select System Settings.
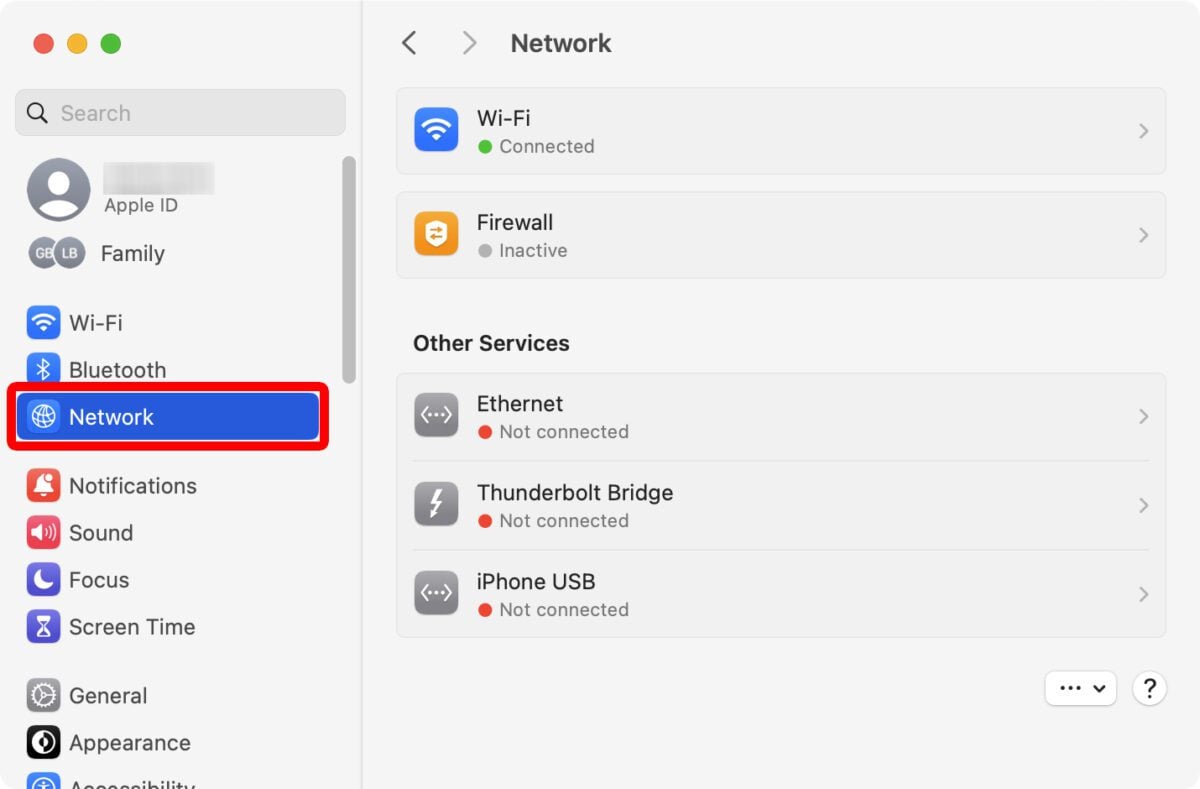
- In the sidebar, click on Network.
- You will see a list of your network interfaces (Wi-Fi, Ethernet, etc.). Look for the one with a green dot, indicating it is “Connected.”
- Click the Details… button next to your active connection.
- A window will pop up. Your local IP address will be listed clearly under the “IP address” field (e.g., 192.168.1.15).
Using System Preferences (macOS Monterey and Older)
If you are using an older Mac or haven’t updated your OS recently, the process is slightly different:
- Click the Apple Menu () and select System Preferences.
- Click on the Network icon.
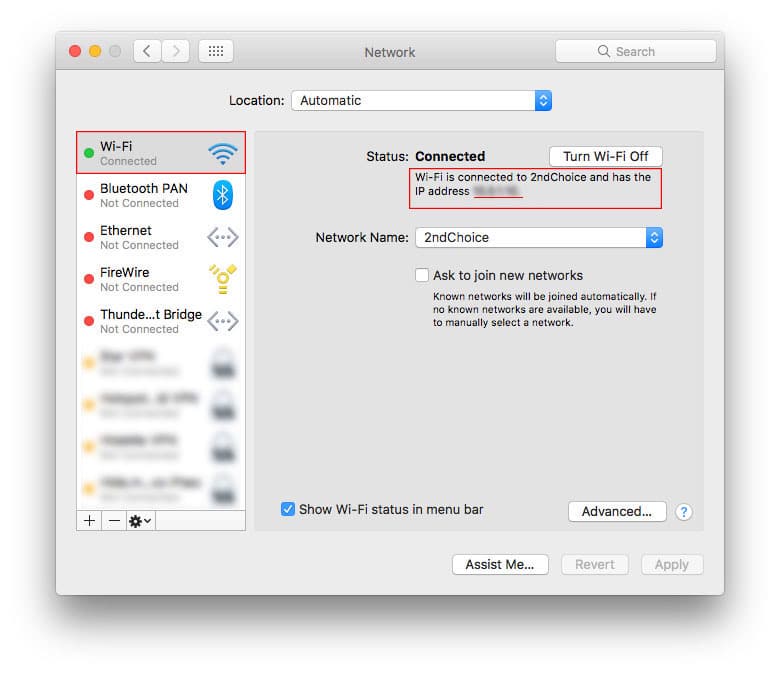
- Select your active connection from the left-hand column (usually Wi-Fi).
- On the right side, just below the “Status: Connected” message, you will see a sentence that says: “Wi-Fi is connected to [Network Name] and has the IP address 192.168.x.x.”
Finding Your IP via the macOS Terminal
For developers, system administrators, or tech enthusiasts who prefer a command-line interface, the Terminal offers a fast way to pull network data without clicking through menus.
- Open Terminal (found in /Applications/Utilities/ or via Spotlight search).
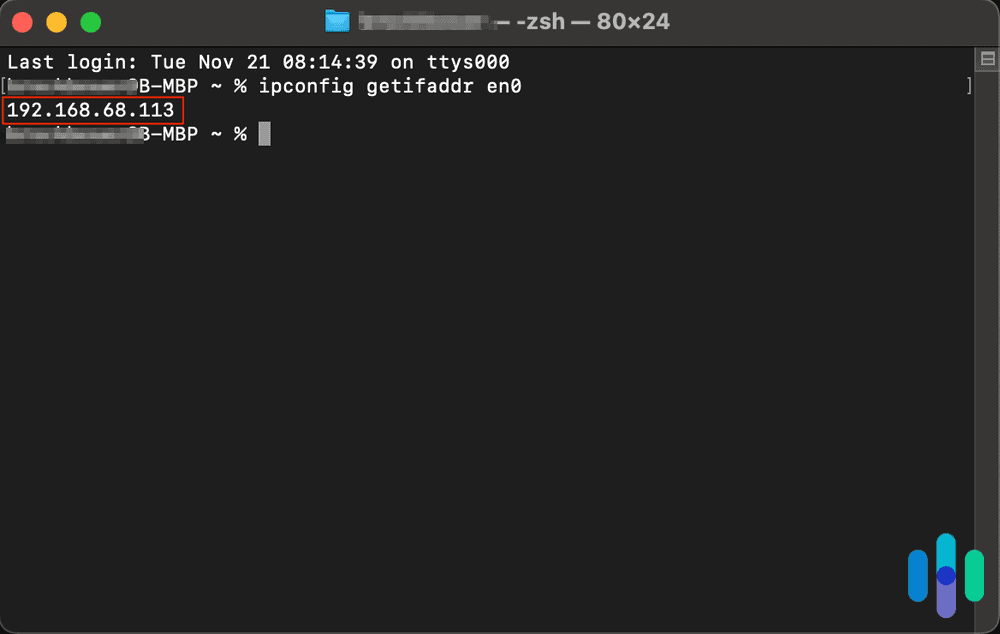
- To find your local IP for a wireless connection, type the following command and hit Enter:
ipconfig getifaddr en0 - If you are connected via Ethernet, the command is usually:
ipconfig getifaddr en1 - For a more comprehensive look at all network data, you can type
ifconfig. This will return a massive block of text. Look for the “inet” entry under the active interface (en0 or en1) to find your current internal IP.
How to Find Your Public IP Address
Since your public IP address is managed by your router and ISP, it isn’t explicitly stored in your Mac’s local System Settings. To find it, you have to “ask” the internet what it sees when you connect.
Using Search Engine Commands
The fastest way to find your public IP without visiting third-party websites is through a simple search.
- Open Safari, Chrome, or Firefox.
- Go to Google or DuckDuckGo.
- Type “What is my IP” into the search bar.
- The search engine will display your public IPv4 (and sometimes IPv6) address at the very top of the results page.
Using Online IP Checkers
If you need more detailed information, such as your ISP’s name, your approximate geographic location (based on the IP), or your ISP’s server information, you can use dedicated tools. Websites like WhatIsMyIP.com or IPChicken.com provide an immediate readout of your public-facing credentials. This is particularly useful when verifying if a VPN (Virtual Private Network) is working correctly.
Advanced Network Management: Beyond the Basic IP
Finding the IP is often just the first step. Advanced users may need to manage how that IP behaves or troubleshoot why it isn’t working correctly.
IPv4 vs. IPv6 on Your Mac
As you look for your IP, you might notice two different formats. IPv4 looks like 192.168.1.1 (four sets of numbers). Because the world ran out of these addresses years ago, IPv6 was introduced. An IPv6 address looks like a long string of hexadecimal characters: 2001:0db8:85a3:0000:0000:8a2e:0370:7334.
macOS supports both natively. Most modern routers will assign both. While IPv4 is still the standard for local networking, IPv6 is becoming increasingly common for global routing and provides better security and more efficient routing.
How to Renew Your DHCP Lease
Sometimes, your Mac might experience a “self-assigned IP” error (usually an address starting with 169.254.x.x), which prevents you from accessing the internet. This usually means your Mac and your router aren’t communicating properly. You can often fix this by “Renewing the DHCP Lease.”
- Go to System Settings > Network.
- Select your active connection and click Details.
- Navigate to the TCP/IP tab.
- Click the button labeled Renew DHCP Lease.
- Click Apply.
This forces your Mac to request a fresh IP address from the router, clearing out any old or conflicting data.
Enhancing Your Digital Privacy and Security
In an era of increasing digital surveillance and data harvesting, your IP address is a significant piece of identifying information. It can be used to track your browsing habits or pinpoint your approximate location.
The Role of VPNs in Masking Your IP
A Virtual Private Network (VPN) is the primary tool for tech-savvy Mac users to hide their public IP. When you use a VPN, your Mac creates an encrypted tunnel to a server owned by the VPN provider. When you access a website, the website sees the IP address of the VPN server, not your actual home or office IP. This is essential for maintaining anonymity and accessing geo-restricted content.
iCloud Private Relay: Apple’s Native Security Solution
For users subscribed to iCloud+, Apple offers a built-in feature called Private Relay. While not a full VPN, it works similarly for Safari browsing. It masks your IP address from websites and your ISP, ensuring that no single party can see both who you are and what sites you are visiting.
To enable this on your Mac:
- Go to System Settings.
- Click your Apple ID name at the top.
- Select iCloud and then Private Relay.
- Toggle the switch to On.
Conclusion
Knowing your IP address on a Mac is more than just a technical curiosity; it is a gateway to better network management and enhanced security. Whether you are using the graphical user interface of macOS Ventura, the legacy System Preferences, or the power of the Terminal, identifying your local and public IP addresses allows you to troubleshoot connectivity issues and take control of your digital footprint. As networking technology continues to evolve with IPv6 and increased encryption standards, understanding these fundamentals ensures you remain the master of your Mac’s connection to the world.
aViewFromTheCave is a participant in the Amazon Services LLC Associates Program, an affiliate advertising program designed to provide a means for sites to earn advertising fees by advertising and linking to Amazon.com. Amazon, the Amazon logo, AmazonSupply, and the AmazonSupply logo are trademarks of Amazon.com, Inc. or its affiliates. As an Amazon Associate we earn affiliate commissions from qualifying purchases.