Setting up a brand-new PC is an exciting experience, whether you’ve just unboxed a pre-built machine or meticulously assembled your custom rig. The sleek chassis, the vibrant display, the promise of cutting-edge performance – it’s all there. However, to truly unlock the full potential of your new hardware, one crucial step often overlooked by beginners is the proper installation of drivers. Without them, your powerful graphics card might perform like an integrated potato, your lightning-fast SSD could crawl, or your network card might not even connect to the internet. This comprehensive guide will walk you through everything you need to know about installing drivers on your new PC, ensuring a smooth, efficient, and fully functional computing experience right from the start.

Understanding Drivers: The Digital Bridge to Your Hardware
Before diving into the “how-to,” it’s essential to grasp “what” drivers are and “why” they are so critical. Think of drivers as the interpreters or translators between your operating system (like Windows) and your PC’s hardware components. Each piece of hardware – from your CPU and GPU to your keyboard and mouse – speaks its own unique “language.” Your operating system, on the other hand, understands a more universal language. Drivers bridge this communication gap, allowing the OS to send commands to the hardware and receive data back, ensuring everything works together seamlessly.
What Exactly Are Drivers and Why Are They Crucial?
In technical terms, a driver is a specific type of software program that enables interaction with hardware devices. Without the correct driver, your operating system wouldn’t know how to utilize a specific component. Imagine buying a high-end gaming keyboard, but without its driver, Windows might only recognize it as a generic input device, depriving you of programmable macros, custom lighting, and advanced features.
On a new PC, especially one you’ve assembled yourself or after a fresh operating system installation, many hardware components might only have generic drivers installed by default – or none at all. Generic drivers provide basic functionality, allowing the device to be recognized, but they often lack optimization, advanced features, and bug fixes that proprietary drivers offer. For instance, a generic display driver might let you see your desktop, but it won’t unleash the full resolution, refresh rate, or gaming performance of a dedicated graphics card. Similarly, without proper chipset drivers, your motherboard’s various controllers for USB, storage, and PCIe might operate inefficiently, leading to slowdowns or instability. Properly installed drivers are the foundation for a stable, high-performance PC.
When Do You Need to Install Drivers on a New PC?
There are several scenarios where driver installation becomes a paramount task on a new PC:
- Fresh Operating System Installation: This is the most common scenario. When you install Windows (or any other OS) from scratch, it will typically install some basic, generic drivers for essential components to get the system running. However, these are rarely the optimal, feature-rich drivers provided by the hardware manufacturers.
- Assembling a Custom PC: If you’re building your own PC, you’re starting with a collection of disparate hardware components. Once you’ve installed your operating system, you’ll need to manually install the specific drivers for your motherboard (chipset, audio, network), graphics card, and any other peripherals.
- After Upgrading Hardware: While not strictly a “new PC,” if you replace a major component like your graphics card or motherboard, you’ll almost certainly need to install new drivers for the updated hardware and potentially remove old ones to prevent conflicts.
- Experiencing Hardware Issues: Sometimes, even on an established PC, an old or corrupted driver can cause problems. A fresh installation of the correct driver can often resolve these issues.
For a truly “new PC,” the first two scenarios are most relevant. Getting it right from the beginning saves a lot of headaches down the line.
Essential Drivers and Their Installation Priority
When installing drivers on a new PC, especially after a fresh OS install, there’s a generally accepted order of priority. This order minimizes potential conflicts and ensures that foundational components are properly configured before more specialized ones.
Core System Drivers: Chipset and Storage
The very first drivers you should always install are those for your motherboard’s chipset. The chipset is the “brain” of your motherboard, managing communication between the CPU, RAM, storage devices, graphics card, and peripherals. Installing these drivers first ensures that your motherboard’s controllers for USB ports, PCIe lanes, SATA ports, and other integrated features are functioning correctly and optimally. Without up-to-date chipset drivers, subsequent driver installations might encounter issues, or your system might suffer from reduced performance and instability. You’ll find these on your motherboard manufacturer’s website (e.g., ASUS, MSI, Gigabyte, ASRock) under your specific model number.
Following chipset drivers, it’s wise to ensure your storage drivers are up-to-date. While Windows usually has generic NVMe or SATA drivers, dedicated drivers from SSD manufacturers or updated ones from your motherboard vendor can sometimes improve performance and compatibility, especially for cutting-edge NVMe drives or RAID configurations.
Graphics Drivers: Unleashing Visual Performance
Once your core system drivers are in place, your graphics card driver should be next in line. This is arguably the most critical driver for any PC user, especially gamers or creative professionals. As mentioned earlier, Windows will install a basic display driver that allows you to see your desktop, but it won’t unlock the full capabilities of your GPU. Dedicated graphics drivers from NVIDIA, AMD, or Intel (for integrated graphics) provide:
- Full Performance: Access to the GPU’s complete processing power for gaming, video editing, 3D rendering, and other intensive tasks.
- Feature Sets: Support for advanced technologies like DirectX, Vulkan, ray tracing, DLSS/FSR, and G-Sync/FreeSync.
- Stability and Bug Fixes: Regular updates often resolve performance issues, graphical glitches, and compatibility problems with new games or applications.
You should download these directly from NVIDIA, AMD, or Intel’s official websites, specifically for your exact graphics card model.
Network Drivers: Getting Connected
After graphics drivers, ensuring you have proper network drivers is vital. This includes drivers for your wired Ethernet port and/or wireless Wi-Fi adapter. It’s common for a fresh Windows installation to lack the correct network drivers, leaving you unable to connect to the internet. This can be a chicken-and-egg problem: you need internet to download drivers, but you need drivers to get internet!
For this reason, it’s often a good idea to download your network drivers before you even start installing Windows, saving them to a USB drive. If you find yourself offline, you can usually use another device (like a smartphone or another computer) to download the necessary Ethernet or Wi-Fi driver from your motherboard or Wi-Fi card manufacturer’s website and transfer it via USB. Once your network is up, the rest of the driver download process becomes much simpler.
Audio and Peripheral Drivers: Sound and Seamless Interaction
Finally, you’ll address audio drivers and drivers for other peripherals. While Windows often installs generic audio drivers that provide basic sound output, installing the specific high-definition audio drivers from your motherboard manufacturer (e.g., Realtek, ASUS Sonic Studio) can unlock better sound quality, specific audio features, and proper microphone input.
For other peripherals like printers, webcams, specialized keyboards/mice, or external storage devices, Windows might install generic drivers. However, for full functionality, specific drivers or utility software from the peripheral manufacturer are usually recommended. These might not be critical for initial system setup but are important for a complete user experience.
Step-by-Step Methods for Driver Installation
Now that we understand the types of drivers and their importance, let’s explore the practical methods for installing them on your new PC.
Leveraging Windows Update: The Easiest Path
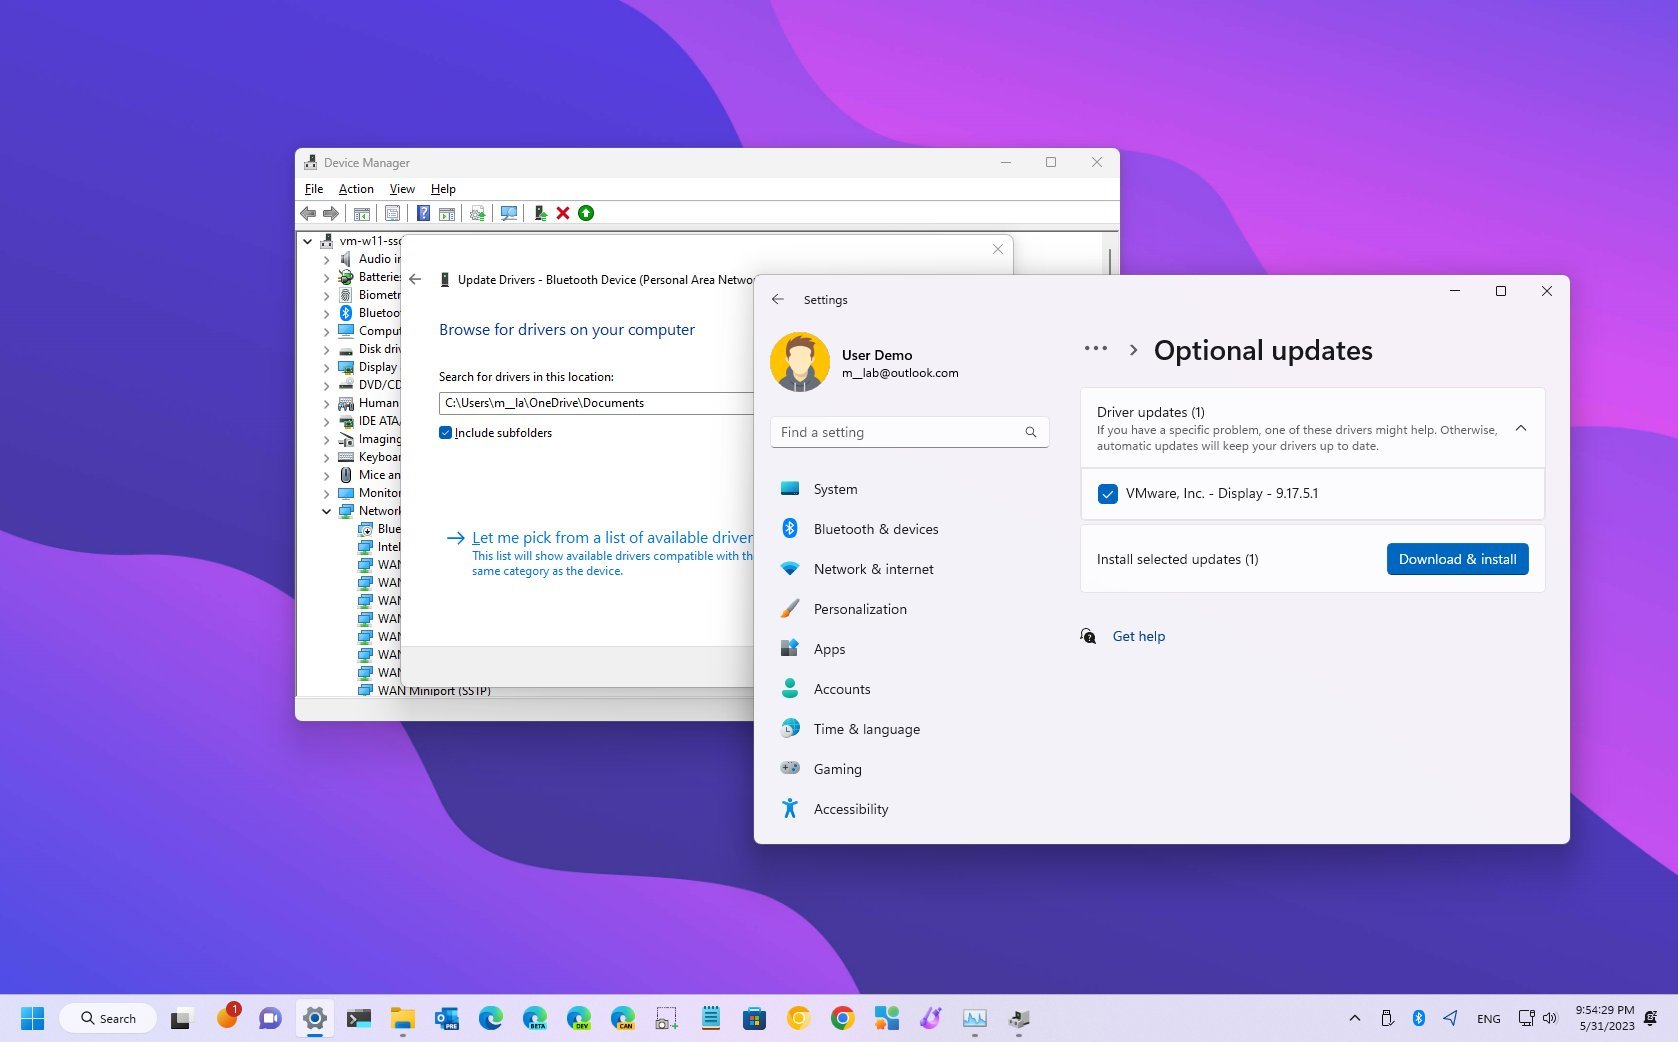
For many basic and even some advanced components, Windows Update can be an incredibly convenient way to get drivers. After connecting your new PC to the internet, navigate to Settings > Update & Security > Windows Update and click “Check for updates.” Windows will often automatically detect your hardware and download/install relevant drivers. It also frequently provides critical security updates and feature enhancements.
While Windows Update is excellent for convenience and providing a baseline of stable drivers, it might not always offer the absolute latest version, especially for graphics cards, or drivers with specific utility software. For optimal performance, especially in gaming or professional applications, manually downloading from manufacturer websites is usually preferred after Windows Update has laid the groundwork.
Official Manufacturer Websites: The Gold Standard
This is the most recommended and reliable method for installing drivers, ensuring you get the latest, most optimized versions directly from the source.
- Identify Your Hardware: You need to know the exact make and model of your components.
- Motherboard: Check the box, manual, or the board itself for the model number (e.g., ASUS ROG Strix Z690-F Gaming).
- Graphics Card: Check the card itself, its box, or use a tool like GPU-Z or Device Manager (though Device Manager might only show “Microsoft Basic Display Adapter” if no driver is installed).
- Network Card (if separate): Check the card’s model number. If integrated, it’s part of the motherboard drivers.
- Other Peripherals: Look for the model number on the device or its packaging.
- Navigate to the Manufacturer’s Website:
- For motherboard drivers: Go to your motherboard manufacturer’s website (e.g.,
asus.com,msi.com,gigabyte.com,asrock.com). Find the “Support” or “Downloads” section, then search for your specific motherboard model. - For graphics drivers: Go to
nvidia.com/drivers(for NVIDIA),amd.com/drivers(for AMD), orintel.com/drivers(for Intel integrated graphics). Use their driver detection tools or manually select your product. - For other components: Visit the respective manufacturer’s official support page.
- For motherboard drivers: Go to your motherboard manufacturer’s website (e.g.,
- Download the Correct Drivers: Ensure you download drivers compatible with your operating system (e.g., Windows 10 64-bit, Windows 11 64-bit). Always download the latest stable versions.
- Install the Drivers: Run the downloaded executable files. Follow the on-screen prompts. Most driver installers are straightforward, but some might require a system restart. Remember the installation priority: chipset first, then GPU, network, audio, and so on.
Using Driver Utility Software (With Caution)
Some hardware manufacturers provide their own utility software that can help manage and update drivers. For example, NVIDIA has GeForce Experience, and AMD has Radeon Software, both of which can detect your GPU and suggest driver updates. Similarly, some motherboard manufacturers offer utility suites that can update chipset, audio, and network drivers. These can be convenient.
However, be extremely cautious of third-party “driver updater” or “driver booster” software not directly from your hardware manufacturer. Many of these programs are notorious for installing incorrect, outdated, or even malicious drivers, often bundled with unwanted software. They can destabilize your system, create security vulnerabilities, or simply charge you for features that are freely available. Always prioritize official sources. If a manufacturer offers a trusted utility, that’s fine, but generic driver updaters should be avoided at all costs.
Legacy Methods: CD/DVD Installation
In the past, new motherboards and graphics cards often came with driver CDs or DVDs. While still included with some components, this method is largely outdated for a new PC. The drivers on these discs are almost certainly older than what’s available online and may not even be compatible with newer operating system versions. Most modern PCs also don’t even come with optical drives. This method should only be used as an absolute last resort if you have no internet access and cannot download network drivers via another device. Even then, you should update those drivers from official websites as soon as you get online.
Verifying Installation and Troubleshooting Common Issues
Once you’ve gone through the process of installing drivers, it’s crucial to verify that everything is working as expected.
Confirming Driver Status with Device Manager
The primary tool for checking driver status in Windows is the Device Manager. You can access it by right-clicking the Start button and selecting “Device Manager,” or by typing “Device Manager” into the Windows search bar.
In Device Manager:
- Look for yellow exclamation marks (!) or red “X” icons. These indicate a problem with the device, often a missing or faulty driver.
- Expand categories (e.g., “Display adapters,” “Network adapters,” “Sound, video and game controllers”). Right-click on a device, select “Properties,” and then go to the “Driver” tab. Here you can see the driver provider, date, and version. This helps confirm that the correct, updated driver is installed.
- If a driver isn’t working, you can right-click the device, select “Update driver,” and try to have Windows search for one, or “Uninstall device” and then restart your PC to allow Windows to attempt a fresh install or manually reinstall the driver you downloaded.
Common Driver-Related Problems and Solutions
Even with careful installation, you might encounter issues. Here are some common problems and their solutions:
- No Internet Connection: If your network drivers aren’t installed, you won’t get online. Use another device to download the Ethernet/Wi-Fi driver for your specific motherboard or network card and transfer it via USB.
- Low Resolution/Poor Graphics Performance: This is a clear sign that your graphics card driver isn’t installed or isn’t working correctly. Ensure you’ve downloaded and installed the latest driver directly from NVIDIA, AMD, or Intel.
- No Sound: Check your audio drivers in Device Manager. Reinstalling them from your motherboard manufacturer’s website usually resolves this.
- Peripheral Not Working Correctly: If a specific device (like a printer or gaming mouse) isn’t fully functional, visit its manufacturer’s website for dedicated drivers or utility software.
- System Instability/Crashes (BSODs): Sometimes, conflicting or corrupted drivers can cause blue screens of death (BSODs) or general system instability. Try to identify the problematic driver (BSOD error codes can sometimes point to them), uninstall it, and then reinstall a fresh version. System Restore Points (discussed below) can be invaluable here.
Best Practices for Driver Management
Effective driver management isn’t just a one-time setup; it’s an ongoing process to maintain optimal PC performance and stability.
Always Prioritize Official Sources
This cannot be stressed enough: always download drivers directly from the official websites of your hardware manufacturers. This includes your motherboard vendor, graphics card manufacturer (NVIDIA, AMD, Intel), and any peripheral manufacturers. Avoid generic driver download sites or unverified third-party “driver updater” tools, as they pose significant risks, including malware, outdated drivers, and system instability. While Windows Update is a good starting point, always cross-reference with official sites for major components.
Regular Updates and System Restore Points
Keeping your drivers reasonably up-to-date is good practice, especially for graphics drivers, which often receive performance enhancements and bug fixes for new games or software. However, there’s no need to update every single driver every week. A good cadence might be to check for major updates every few months or when experiencing issues with new software.
Crucially, before installing any major driver update (especially graphics drivers), create a System Restore Point. This allows you to revert your system to a previous working state if the new driver causes problems. You can find this feature by searching for “Create a restore point” in Windows. It’s a simple step that can save you hours of troubleshooting.
Avoiding Unnecessary Driver Bloat
While installing drivers is essential, resist the urge to install every single piece of optional software that comes with a driver package. For example, some motherboard driver packages might include utilities for overclocking, RGB control, or other features you may not need. Only install what is necessary or what you actively plan to use. Unnecessary software can consume system resources, potentially slowing down your PC.
In conclusion, installing drivers on a new PC might seem like a daunting task, but by understanding their role, prioritizing key components, and utilizing official sources, you can ensure your new machine runs flawlessly. Taking the time to properly set up your drivers from day one will lead to a more stable, performant, and enjoyable computing experience for years to come.
aViewFromTheCave is a participant in the Amazon Services LLC Associates Program, an affiliate advertising program designed to provide a means for sites to earn advertising fees by advertising and linking to Amazon.com. Amazon, the Amazon logo, AmazonSupply, and the AmazonSupply logo are trademarks of Amazon.com, Inc. or its affiliates. As an Amazon Associate we earn affiliate commissions from qualifying purchases.