In an increasingly interconnected world, the sanctity of our homes remains a paramount concern. Modern technology has gifted us with innovative solutions to bolster this security, and among the most practical and user-friendly advancements is the smart video doorbell. A front-runner in this domain, Blink, an Amazon company, offers a range of security cameras and doorbells designed for simplicity and effectiveness. For those seeking reliable, continuous power without the hassle of battery changes, the Blink Wired Doorbell presents an excellent choice. This guide will walk you through the entire installation process, ensuring your home’s first line of defense is not just smart, but flawlessly integrated.

This tutorial is crafted for anyone looking to enhance their home security, from tech-savvy enthusiasts to those taking their first steps into the smart home ecosystem. We’ll delve into the practical steps, essential tools, and critical considerations, all while keeping the broader context of digital security and smart home integration in mind. By the end, you’ll not only have a fully functional Blink Wired Doorbell but also a deeper understanding of how these gadgets contribute to a more secure and productive living environment.
Why Upgrade to a Blink Wired Doorbell? Enhancing Your Home’s First Line of Defense
Before diving into the nuts and bolts of installation, it’s worth understanding why a Blink Wired Doorbell is a smart investment for your home. In an era where package theft is on the rise and home security is a top priority, a smart doorbell offers peace of mind and tangible benefits that traditional doorbells simply cannot match. It’s more than just a bell; it’s a vigilant guardian, a communication portal, and an integral part of a modern, secure home.
The Advantages of a Wired Connection: Reliability Meets Convenience
One of the primary differentiators for the Blink Wired Doorbell, as its name suggests, is its reliance on your home’s existing doorbell wiring for continuous power. Unlike battery-operated alternatives, a wired connection eliminates the need for periodic battery replacements, ensuring uninterrupted operation. This translates to consistent performance, especially in high-traffic areas or during prolonged monitoring. You won’t miss a notification due to a drained battery, which is a significant advantage for digital security. This reliability is crucial for features like continuous video recording (if subscribed to a plan) and instant notifications, making it a more robust solution for sustained surveillance.
Furthermore, a wired connection often means a more stable power supply, which can contribute to better video quality and faster response times for two-way audio communication. For homeowners prioritizing uptime and minimal maintenance, the wired option is a compelling choice, aligning with the “Tech Trends” of low-maintenance smart gadgets. Investing in a wired doorbell is also a smart “Money” decision in the long run, as it avoids recurring costs of replacement batteries and offers consistent security, potentially even lowering insurance premiums by demonstrating proactive home protection.
Beyond the Doorbell: Integrating with Your Smart Home Ecosystem
The Blink Wired Doorbell isn’t a standalone gadget; it’s designed to seamlessly integrate with the broader Amazon Alexa ecosystem. This connectivity is where its true potential as a “Tech” device shines. Imagine receiving a notification on your smartphone when someone approaches your door, then being able to view live footage on an Echo Show or Fire TV, and even communicate with the visitor through two-way audio – all without opening the door. This level of integration transforms a simple doorbell into a powerful component of your smart home security setup.
For “Productivity,” this means fewer interruptions and more control. You can screen visitors, manage deliveries, and monitor your property from anywhere, whether you’re at work, on vacation, or simply in another room. The Blink app acts as your central command, allowing you to customize motion detection zones, set notification preferences, and review recorded clips (with a Blink Subscription Plan). This level of control and connectivity positions the Blink Wired Doorbell not just as a security device, but as a lifestyle enhancer, simplifying daily routines and bolstering overall home management. Its brand reputation is built on this ease of integration and user-friendly experience, making it a popular choice among consumers.
Preparation is Key: Tools, Safety, and Pre-Installation Checks
A successful installation hinges on thorough preparation. Before you even think about unscrewing your old doorbell, it’s crucial to gather the necessary tools, understand the safety protocols, and perform a quick assessment of your existing setup. This meticulous approach ensures a smooth, efficient, and above all, safe installation process, saving you time and potential frustration later on.
Gathering Your Arsenal: Essential Tools and Components
To facilitate a seamless installation of your Blink Wired Doorbell, having the right tools on hand is half the battle. You won’t need a professional’s toolkit, but a few basic items will make the job much easier:
- Phillips Head Screwdriver: For removing your old doorbell and mounting the new bracket.
- Drill (with appropriate drill bits): If you need to drill new pilot holes for the mounting bracket.
- Wire Strippers: In case your existing doorbell wires are too short or frayed and need to be re-stripped.
- Multimeter (optional but recommended): To test for voltage and ensure the power is off before handling wires. This is a best practice for “Digital Security” in terms of personal safety.
- Safety Glasses and Gloves: Always prioritize personal safety when working with electrical components.
- Small Level: To ensure your doorbell is mounted straight.
- Pencil: For marking drill holes.
- Blink Wired Doorbell Kit: This includes the doorbell unit, mounting bracket, screws, wall anchors, and a chime module (if needed for your existing chime).
- Your Smartphone with the Blink App Installed: Essential for the setup and configuration process.
- Strong Wi-Fi Connection: Your Blink doorbell relies on a stable 2.4 GHz Wi-Fi network for optimal performance. Ensure your router is within a reasonable range and provides good signal strength at your front door.
Prioritizing Safety: Powering Down for a Smooth Installation
Working with electricity always carries a degree of risk, which is why safety must be your absolute top priority. Before touching any wires or removing your old doorbell, you must cut power to your existing doorbell circuit.
- Locate Your Breaker Box: This is usually found in your basement, garage, utility closet, or outside your home.
- Identify the Correct Breaker: Look for a breaker labeled “Doorbell,” “Chime,” or potentially a general circuit that powers the area near your front door. If unsure, you may need to temporarily switch off the main power or a wider circuit, but always proceed with caution.
- Flip the Breaker to the OFF Position: Confirm that the power is indeed off. You can do this by having someone press your old doorbell button (it shouldn’t chime) or by using a non-contact voltage tester or multimeter to check the doorbell wires for power. This step is non-negotiable for your safety and to prevent damage to your new “Gadget.”
Understanding Your Existing Setup: A Quick Assessment
Before proceeding, take a moment to assess your current doorbell setup. Most wired doorbells operate on low voltage (typically 8-24 volts AC).
- Existing Doorbell Chime: Your Blink Wired Doorbell requires an existing doorbell chime (mechanical or digital) and a transformer that provides 16-24 VAC to function correctly. If you don’t have an existing chime or compatible transformer, you might need to install one separately or consider a battery-powered smart doorbell instead. The Blink Wired Doorbell kit usually includes a chime module designed to work with your existing indoor chime.
- Doorbell Wires: Observe the condition and length of your existing doorbell wires. They should be free from corrosion and long enough to connect comfortably to the new doorbell’s terminals.
- Mounting Surface: Determine if your existing doorbell is mounted on wood, stucco, brick, or siding. This will inform whether you need to use wall anchors and the type of drill bit required.
Step-by-Step Installation: From Old Chime to Smart Security
With your tools ready, power off, and a clear understanding of your setup, it’s time for the main event: installing your Blink Wired Doorbell. Follow these steps carefully to ensure a successful transition to enhanced smart home security. This section serves as your essential “Tutorial” for deploying a critical “Digital Security” device.
Disconnecting the Past: Removing Your Old Doorbell
- Remove the Old Doorbell Button: Most traditional doorbell buttons are secured by two small screws. Use your Phillips head screwdriver to carefully loosen and remove these screws.
- Disconnect the Wires: Gently pull the old doorbell unit away from the wall. You will see two wires connected to the back of it, typically wrapped around screw terminals. Carefully unscrew these terminals and disconnect the wires. Be mindful not to let the wires fall back into the wall cavity; if they are short, you might temporarily tape them to the wall.
- Inspect the Wiring: Once disconnected, inspect the wires. If they are frayed or heavily insulated, you may need to strip a small portion (about 3/8 inch) of the insulation to expose fresh copper using your wire strippers.
Mounting the Future: Securing the Blink Backplate
- Position the Mounting Bracket: The Blink Wired Doorbell comes with a mounting bracket. Hold this bracket up to the wall where your old doorbell was, aligning it so the existing doorbell wires pass through the central opening. Use your level to ensure it’s straight.
- Mark Drill Holes: Use a pencil to mark the locations for the mounting screws through the holes on the bracket.
- Drill Pilot Holes (if necessary): If you’re mounting into a hard surface (stucco, brick, masonry) or if your existing holes don’t align, you’ll need to drill new pilot holes. Choose a drill bit appropriate for your wall material and the provided wall anchors. Insert the wall anchors into the pilot holes if required.
- Secure the Mounting Bracket: Feed the existing doorbell wires through the opening in the mounting bracket. Use the provided screws to firmly attach the bracket to the wall. Do not overtighten.
The Electrical Connection: Wiring Your New Blink Doorbell
- Identify the Terminals: On the back of your Blink Wired Doorbell, you’ll find two screw terminals labeled “FRONT” and “REAR” (or similar, sometimes just “1” and “2”). These terminals are typically interchangeable, as doorbell circuits are not polarity-sensitive.
- Connect the Wires: Loosen the terminal screws on the back of the Blink doorbell. Take one of your existing doorbell wires and firmly wrap it clockwise around one of the terminal screws. Tighten the screw to secure the wire. Repeat this process for the second wire and the other terminal screw. Ensure the connections are snug and there’s no loose wire strands that could short circuit.
- Tuck Wires Safely: Gently push any excess wiring back into the wall cavity, ensuring no wires are pinched or exposed in a way that could create a hazard.
Integrating with Your Chime: The Sync Module Setup
This is a crucial step for ensuring your indoor chime works with your new smart doorbell. The Blink Wired Doorbell often requires a chime module to bypass or integrate with your existing mechanical or digital chime.
- Locate Your Indoor Chime: This is typically a box mounted on a wall inside your home, often near the front door, in a hallway, or in a utility area.
- Remove the Chime Cover: Most chimes have a cover that can be gently pried off or unscrewed.
- Identify Chime Terminals: Inside your chime, you will usually see screw terminals labeled “FRONT,” “TRANS” (transformer), and sometimes “REAR.”
- Install the Chime Module: The Blink chime module will have two wires. Connect one wire to the “FRONT” terminal and the other to the “TRANS” terminal of your existing chime. It doesn’t matter which wire goes to which terminal. Secure them firmly. The chime module ensures the correct power delivery to your Blink doorbell while allowing your existing chime to ring. Some chime modules also have a setting for mechanical vs. digital chimes – ensure it’s set correctly if applicable.
- Secure the Module: Tuck the chime module neatly inside your chime box and replace the cover.
Powering Up and Initial Configuration: The App-Guided Experience
Once the doorbell and chime module are physically installed, it’s time to bring your smart doorbell to life.
- Restore Power: Go back to your breaker box and flip the circuit breaker back to the “ON” position. Your Blink doorbell should power on. You might see a light ring or hear a chime indicating it’s receiving power.
- Download the Blink App: If you haven’t already, download the Blink Home Monitor app from your smartphone’s app store (iOS or Android).
- Create/Login to Account: Open the app and either create a new Blink account or log in with your existing Amazon credentials.
- Add Your Device: In the Blink app, tap the “+” icon to add a new device. Select “Blink Doorbell” and then choose “Wired Doorbell.”
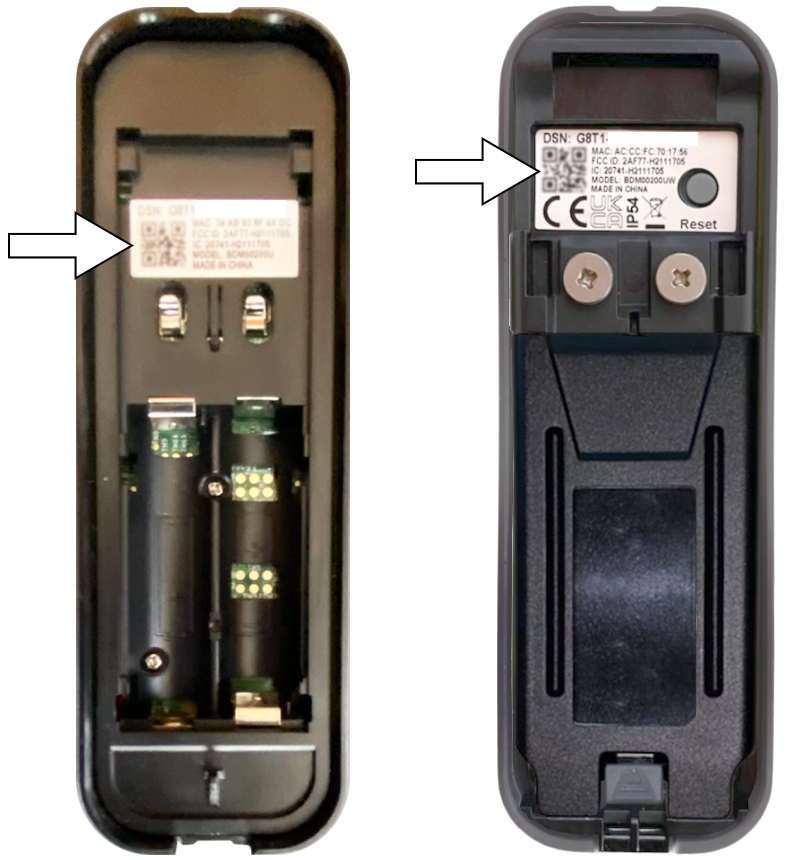
- Scan QR Code: The app will guide you to scan the QR code located on the back of your doorbell (you should have done this before mounting) or on its packaging. If you mounted it already, you can manually enter the serial number.
- Connect to Wi-Fi: Follow the on-screen prompts to connect your Blink Doorbell to your home’s 2.4 GHz Wi-Fi network. This involves entering your Wi-Fi password.
- Test and Configure: Once connected, the app will guide you through testing the doorbell (press the button to see if it chimes and sends a notification) and configuring initial settings like motion detection zones, notification preferences, and video quality. This is where you tailor the “Gadget” to your specific “Digital Security” needs.
Troubleshooting and Maximizing Your Blink Doorbell’s Potential
Even with careful preparation, minor hiccups can occur. This section addresses common issues and offers tips to get the most out of your new smart doorbell, ensuring it functions as a reliable part of your “Tech” ecosystem.
Addressing Common Installation Hurdles: A Quick Fix Guide
- No Power to the Doorbell:
- Check Breaker: Ensure the circuit breaker is firmly in the “ON” position.
- Verify Voltage: If you have a multimeter, re-check the voltage at the doorbell wires. It should be between 16-24 VAC. If not, there might be an issue with your transformer or wiring.
- Wire Connections: Double-check that the wires are securely fastened to the doorbell terminals and the chime module. Loose connections are a common culprit.
- Doorbell Doesn’t Chime Indoors:
- Chime Module Installation: Ensure the chime module is correctly installed within your indoor chime box, with its wires connected to the “FRONT” and “TRANS” terminals.
- Chime Type Setting: If your chime module has a switch for mechanical vs. digital, ensure it’s set correctly for your chime type.
- App Settings: Verify in the Blink app that the indoor chime option is enabled.
- Poor Wi-Fi Connectivity:
- Router Proximity: If your Wi-Fi signal is weak at the front door, consider moving your router closer or investing in a Wi-Fi extender.
- 2.4 GHz Network: Confirm your doorbell is connected to a 2.4 GHz Wi-Fi network, as 5 GHz networks often have shorter ranges and are not typically supported by smart doorbells.
- Motion Detection Issues:
- Sensitivity Settings: Adjust the motion detection sensitivity in the Blink app. Too high, and you’ll get false alerts; too low, and you might miss events.
- Activity Zones: Use the app to define specific activity zones to monitor, excluding high-traffic areas like sidewalks to reduce unnecessary notifications.
Optimizing Performance: Settings, Security, and Storage
Once your Blink Wired Doorbell is up and running, take time to explore its settings in the app to truly maximize its potential.
- Custom Activity Zones: This “Productivity” feature allows you to focus motion detection on critical areas (e.g., your porch) and ignore irrelevant ones (e.g., street traffic), reducing false alarms and conserving video storage.
- Sensitivity and Retrigger Time: Fine-tune these settings to capture the right amount of activity without overwhelming you with notifications.
- Video Quality: Adjust video resolution based on your internet speed and storage preferences. Higher quality consumes more bandwidth and storage.
- Cloud Storage (Blink Subscription Plan): Consider a Blink Subscription Plan for enhanced “Digital Security” features, including cloud video storage, longer recording clips, and person detection. This ensures your recordings are safely stored off-site and accessible anytime.
- Two-Way Audio: Practice using the two-way audio feature to communicate with visitors or delivery personnel, enhancing convenience and control.
Long-Term Care: Ensuring Durability and Functionality
While a wired doorbell requires less maintenance than its battery-powered counterparts, a few simple steps can ensure its longevity and consistent performance:
- Regular Cleaning: Periodically wipe down the doorbell’s lens and casing with a soft, damp cloth to remove dust, dirt, and smudges that could obscure the camera’s view.
- Firmware Updates: Ensure your Blink app and doorbell firmware are always up to date. These updates often include performance improvements, bug fixes, and new features, maintaining the “Tech Trends” aspect of your device.
- Monitor Wi-Fi Health: Occasionally check your Wi-Fi signal strength in the Blink app to ensure your doorbell maintains a robust connection.
- Environmental Considerations: While designed for outdoor use, extreme weather conditions can sometimes impact performance. Ensure the doorbell is not exposed to direct, heavy water spray if possible.
By following this comprehensive guide, you’ve not only successfully installed your Blink Wired Doorbell but also gained valuable insights into optimizing its features for enhanced home security and smart living. This investment in your home’s “Digital Security” offers unparalleled convenience, peace of mind, and a seamless integration into your smart home ecosystem, truly transforming your entryway into a secure and connected portal. Enjoy the enhanced control and awareness that your new smart doorbell brings!
aViewFromTheCave is a participant in the Amazon Services LLC Associates Program, an affiliate advertising program designed to provide a means for sites to earn advertising fees by advertising and linking to Amazon.com. Amazon, the Amazon logo, AmazonSupply, and the AmazonSupply logo are trademarks of Amazon.com, Inc. or its affiliates. As an Amazon Associate we earn affiliate commissions from qualifying purchases.