
Embarking on the journey with a brand-new personal computer is an exciting prospect, akin to receiving a blank canvas brimming with potential. However, before you can delve into gaming, creative work, or robust productivity, there’s a crucial first step: installing an Operating System (OS). The OS is the very soul of your machine, the master program that manages all hardware and software resources, allowing you to interact with the computer. Without it, your powerful new hardware is little more than a collection of inert components.
For enthusiasts building their first PC, or those who’ve purchased a system without a pre-installed OS to save on costs, this guide is your definitive roadmap. Mastering this process not only empowers you with fundamental tech knowledge but also ensures your system is set up optimally from day one, laying a strong foundation for performance, security, and stability. This tutorial aligns perfectly with our commitment to demystifying technology, helping you navigate complex tasks with confidence, and ultimately, get the most out of your digital investments.

The Foundation of Your Digital Journey: Why a Proper OS Installation Matters
A clean, correctly installed Operating System is the bedrock upon which your entire digital experience will rest. It dictates how your applications run, how quickly your files load, and how securely your data is protected. A sloppy installation can lead to a host of headaches down the line, from inexplicable crashes and driver conflicts to security vulnerabilities and sluggish performance. Conversely, a meticulous setup ensures a smooth, responsive, and reliable computing environment.
Think of your OS as the central nervous system of your PC. It handles memory management, process scheduling, device control, and file management, translating your commands into actions the hardware understands. When you power on a new PC without an OS, you’re met with a blank screen or a “No bootable device found” error because the computer doesn’t know what to do. Installing an OS breathes life into the machine, providing the interface and functionality necessary for it to become a productive tool, an entertainment hub, or a powerful workstation. For individuals and businesses alike, this initial setup is an investment in future efficiency and peace of mind. Doing it yourself can also be a savvy financial move, saving on professional installation fees while deepening your understanding of your own technology.
Essential Preparations: Gathering Your Tools and Knowledge
Before you even think about plugging in your new PC, careful preparation is key. This stage involves making informed decisions about your chosen OS and ensuring you have all the necessary components and information at hand. Skipping these steps can lead to delays and frustration, so take your time and follow this checklist.
Choosing Your Operating System
The choice of Operating System is perhaps the most critical decision you’ll make, as it largely dictates your software compatibility, user experience, and even your PC’s security posture. Each OS has its strengths, often catering to different user needs and preferences.
-
Windows: Undoubtedly the most popular desktop OS globally, Windows, particularly Windows 10 and 11, offers unparalleled software and hardware compatibility. It boasts a user-friendly interface, making it accessible for beginners, and a vast ecosystem of applications, from productivity suites to high-end gaming and professional design software. Most commercial software is designed with Windows in mind. However, a Windows license typically comes at a cost, which can vary depending on the edition (Home, Pro) and where you purchase it. For many, the familiarity and broad support make the financial investment worthwhile, aligning with brand needs for standardized operations or specific software requirements.
-
Linux: A powerful, open-source alternative, Linux comes in numerous distributions (distros) like Ubuntu, Fedora, Mint, and Debian. Linux is renowned for its stability, security, and customization options. Many distributions are completely free to download and use, offering a significant cost-saving benefit, particularly for small businesses or individuals on a budget. It’s highly favored by developers, system administrators, and privacy-conscious users. While its learning curve might be slightly steeper for those new to computing, the community support is vast and active. For those seeking maximum control, lower overhead costs, or a system tailored to niche tech applications, Linux is an excellent choice that supports a strong tech-centric brand identity.
-
macOS: While this guide primarily focuses on installing an OS on a generic “new PC” (implying hardware you might build or purchase without an OS), it’s worth a brief mention. macOS is Apple’s proprietary OS, famous for its elegant user interface, strong security, and integration with Apple’s hardware and ecosystem. It’s primarily designed for Apple’s own machines (MacBooks, iMacs, Mac Minis). While “Hackintosh” communities exist for installing macOS on non-Apple hardware, this is an advanced and often legally ambiguous process not typically recommended for a first-time OS installation on a general new PC, and not within the scope of this standard guide.
Consider your primary use cases, desired software, budget, and comfort level with different interfaces when making your choice.
What You’ll Need: A Pre-Installation Checklist
Once you’ve decided on your OS, gather the following essentials. Having everything ready beforehand will make the installation process significantly smoother.
- Your New PC Hardware: Ensure all components (motherboard, CPU, RAM, storage drive(s), GPU, power supply) are correctly installed and connected within the PC case.
- Operating System Installation Media: This is usually a USB flash drive (at least 8GB recommended for Windows, 4GB for most Linux distros) or, less commonly today, a DVD. This media will contain the OS installation files and needs to be bootable.
- A Stable Internet Connection: Essential for downloading the OS image, creating bootable media, and later for downloading drivers and updates on your new PC.
- Another Working Computer: You’ll need this to download the OS ISO file and create the bootable installation media. This is a critical step often overlooked.
- OS License Key (if applicable): For Windows, you’ll need your 25-character product key. For Linux, this is typically not required as most distributions are free. Keep it handy; you might enter it during installation or activate it later.
- Basic Peripherals: A keyboard, mouse, and monitor are obvious but vital. Ensure they are connected and functioning.
- Power Supply: A reliable power source for both your working computer and the new PC. Interrupting the installation process due to power loss can corrupt the drive and force you to restart.
Step-by-Step Guide: Installing Your Operating System
With your preparations complete, it’s time for the main event: getting your chosen OS onto your new machine. This process involves a few key stages, each requiring careful attention.
Creating Bootable Installation Media
This is the first practical step and requires your second, working computer. You’ll download the OS image and use a specialized tool to transfer it to your USB drive, making it “bootable.”
-
For Windows (using Media Creation Tool):
- Go to Microsoft’s official website (search “Windows 10/11 download” or “Media Creation Tool”).
- Download the Media Creation Tool.
- Run the tool. Accept the terms.
- Select “Create installation media (USB flash drive, DVD, or ISO file) for another PC.”
- Choose your language, edition, and architecture (64-bit is standard for new PCs).
- Select “USB flash drive” as the media type and pick your connected USB drive from the list.
- The tool will download the Windows ISO and create the bootable drive. This can take some time depending on your internet speed.
-
For Linux (using tools like Rufus or Etcher):
- Download the ISO file for your chosen Linux distribution (e.g., Ubuntu, Fedora Workstation) from its official website.
- Download a utility like Rufus (for Windows) or Etcher (cross-platform). These tools efficiently write ISO images to USB drives.
- Open Rufus/Etcher.
- Select your downloaded Linux ISO file.
- Select your USB drive. Double-check that you’re selecting the correct drive, as this process will erase all data on it.
- Click “Start” or “Flash” to begin creating the bootable drive.
Configuring BIOS/UEFI Settings
Your new PC needs to know where to look for the OS installation files. This is handled by the BIOS (Basic Input/Output System) or its modern successor, UEFI (Unified Extensible Firmware Interface).

- Connect Installation Media: Insert your newly created bootable USB drive into an available USB port on your new PC.
- Power On and Access BIOS/UEFI: Turn on your PC. As soon as it starts, repeatedly press the designated key to enter the BIOS/UEFI setup. Common keys include
Delete,F2,F10,F12, orEsc. The exact key often flashes briefly on the screen during startup. If you miss it, restart and try again. - Navigate to Boot Options: Once in BIOS/UEFI, use the arrow keys to navigate the menus. Look for a section labeled “Boot,” “Boot Order,” “Boot Priority,” or similar.
- Set Boot Order: Your goal is to make your USB drive the first boot device. Move your USB drive (it might be listed by brand, model, or as “USB HDD”) to the top of the boot order list.
- Disable Secure Boot (if necessary): Some older Linux distributions or specific hardware configurations might require disabling “Secure Boot” in the BIOS/UEFI settings, usually found under “Boot” or “Security” menus. Windows 10/11 typically work fine with Secure Boot enabled. Re-enable it after installation if you disabled it.
- Save and Exit: Locate the “Exit” menu, choose “Save Changes and Exit,” and confirm. Your PC will restart and attempt to boot from the USB drive.
The Installation Process
This is where the magic happens, and the OS officially begins to take root on your PC’s storage drive.
- Boot from Installation Media: If your BIOS/UEFI settings are correct, your PC will now boot from the USB drive, and you’ll see the OS installer load.
- Initial Setup (Language, Time, Keyboard): The installer will prompt you to select your preferred language, time and currency format, and keyboard layout. Make your selections and click “Next.”
- Install Now / Try (Linux):
- Windows: Click “Install now.” You may be asked for a product key. You can enter it now or choose “I don’t have a product key” and activate Windows later.
- Linux: You’ll often see options like “Try Ubuntu” (or your distro) and “Install Ubuntu.” Choosing “Try” lets you experience the OS without installing it, which can be useful for testing. Select “Install” to proceed.
- Installation Type (Windows):
- Windows: Choose “Custom: Install Windows only (advanced).” Do NOT select “Upgrade” on a new PC.
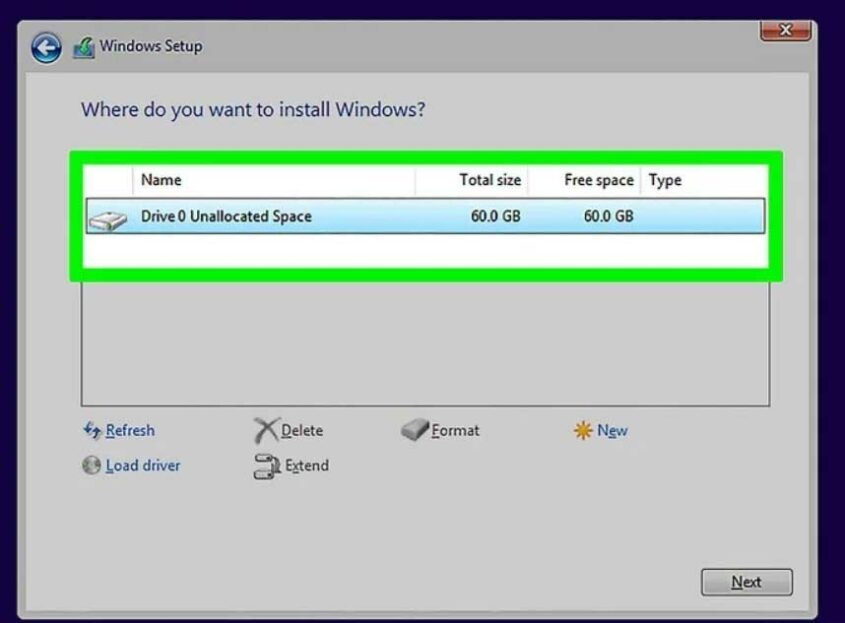
- Partitioning the Hard Drive: This is a crucial step for a new PC with an empty drive.
- You’ll see a list of available drives and partitions. On a new PC, you should see “Drive 0 Unallocated Space” or similar.
- Select the unallocated space and click “New.” The installer will usually suggest the maximum available size. Apply. It might create a few small system partitions (e.g., Recovery, EFI System, MSR) automatically; this is normal.
- Select the main partition (usually the largest one) where the OS will be installed (often named “Primary”).
- Click “Format” if prompted (especially for Linux, or if you had existing data you want to completely erase).
- Click “Next” or “Continue.”
- Copying Files and Initial Setup: The installer will now copy necessary files to your hard drive. This can take 15-30 minutes or more. Your PC may restart several times during this phase.
- User Account Creation and Basic Settings: After the files are copied, the OS will boot up for the first time. You’ll be guided through setting up your region, creating a username and password, privacy settings, and connecting to a network. For Windows, you might also be asked to sign in with a Microsoft account.
Congratulations! You’ve successfully installed an Operating System on your new PC.
Post-Installation Essentials: Optimizing Your New System
Installing the OS is a monumental first step, but it’s not the final one. To ensure your new PC runs at its peak and remains secure, you need to perform several crucial post-installation tasks. These steps are vital for optimizing performance, securing your data, and preparing your system for daily use.
Installing Drivers
Drivers are specialized software programs that allow your operating system to communicate with your hardware components. Without the correct drivers, your graphics card might not display high resolutions, your network adapter might not connect to the internet, or your sound card might remain silent. While modern operating systems often include generic drivers, dedicated drivers from the manufacturer typically offer better performance and stability.
- Identify Missing Drivers:
- Windows: Right-click the Start button, select “Device Manager.” Any devices with a yellow exclamation mark indicate missing or problematic drivers.
- Linux: Often, many drivers are included in the kernel, but specific hardware (especially discrete GPUs or Wi-Fi cards) might require proprietary drivers. Check your distribution’s documentation or use a utility like
lspci -kin the terminal to identify components.
- Download Drivers: The best source for drivers is always the manufacturer’s official website for your specific motherboard, graphics card, Wi-Fi adapter, and any other unique peripherals. Navigate to the “Support” or “Downloads” section, enter your product model, and download the latest drivers.
- Critical Drivers: Prioritize chipset drivers (for your motherboard), graphics card drivers (NVIDIA, AMD, Intel), and network drivers (Ethernet and Wi-Fi) first. Network drivers are especially important to get your PC online to download the rest.
- Install Drivers: Run the downloaded driver executables. Follow the on-screen prompts. You may need to restart your PC after installing some drivers.
- Windows Update: After installing core drivers, run Windows Update (Settings > Update & Security > Windows Update > Check for updates). Windows Update often finds and installs many remaining drivers automatically.
System Updates and Security
Keeping your operating system and software updated is paramount for security and stability. Updates patch vulnerabilities, introduce new features, and improve performance.
- Operating System Updates:
- Windows: Go to Settings > Update & Security > Windows Update and ensure all available updates are downloaded and installed. Restart your PC when prompted. Enable automatic updates for ongoing protection.
- Linux: Open your terminal and run your distribution’s update commands (e.g.,
sudo apt update && sudo apt upgradefor Ubuntu/Debian,sudo dnf updatefor Fedora). Regularly apply these updates.
- Antivirus and Firewall Setup:
- Windows: Windows Defender Antivirus and Firewall are built-in and generally sufficient for most users. Ensure they are enabled and up-to-date. For enhanced protection or specific business needs, consider a reputable third-party antivirus solution.
- Linux: While Linux is generally less targeted by malware, it’s not immune. Many users find the built-in firewall (
ufwon Ubuntu) sufficient. For specific use cases, ClamAV or similar tools can be installed.
- Browser Security: Install reputable ad-blockers, privacy extensions, and ensure your default browser is updated to the latest version.
Essential Software Installation
With your system updated and secured, it’s time to install the applications you’ll use daily. This is where your new PC truly begins to serve your specific needs.
- Web Browser: Download and install your preferred web browser (Chrome, Firefox, Edge, Brave, etc.).
- Office Suite:
- Windows: Microsoft Office (Word, Excel, PowerPoint) is a common choice, often requiring a license. Alternatively, free and open-source options like LibreOffice or web-based Google Workspace are excellent, cost-effective alternatives.
- Linux: LibreOffice is usually pre-installed or easily available in software repositories, providing comprehensive office functionality.
- Media Players: Install VLC Media Player or other preferred media players for video and audio playback.
- Communication Tools: Zoom, Slack, Microsoft Teams, Discord, etc., depending on your personal or professional communication needs.
- Productivity Tools: Image editors (GIMP, Photoshop), video editors (DaVinci Resolve, Kdenlive), code editors (VS Code), or any other specialized software relevant to your work or hobbies. Many free and open-source alternatives are available, often providing robust functionality without the financial outlay, which can be a key consideration for startups or individuals managing their budgets.
- Cloud Storage Sync: Install clients for OneDrive, Google Drive, Dropbox, etc., to keep your files synchronized and backed up.
Troubleshooting Common Issues and Pro Tips
Even with careful preparation, issues can arise. Knowing how to approach common problems and having a few pro tips up your sleeve can save you time and frustration.
-
“No bootable device found” or “Operating System not found”: This usually means your PC isn’t looking for the OS in the right place or can’t find the installation media.
- Check BIOS/UEFI boot order: Ensure your USB drive (for installation) or your main storage drive (after installation) is prioritized correctly.
- Verify media integrity: Recreate your bootable USB drive, or try a different USB port.
- Check drive connections: Ensure your SSD/HDD power and data cables are securely connected to the motherboard and power supply.
-
Driver Issues (e.g., no internet, low resolution):
- Use another device: If you have no internet, use another computer or your phone to download the necessary network drivers, transfer them via a USB stick, and install them on your new PC.
- Device Manager: In Windows, check Device Manager for error codes (right-click a problematic device > Properties). Use these codes to search online for solutions.
- Manufacturer websites: Always prioritize drivers from the hardware manufacturer’s official support pages.
-
Slow performance initially:
- Updates: Ensure all OS updates are completed. Background updates and indexing can slow down a new system temporarily.
- Drivers: Make sure all critical drivers (especially chipset and graphics) are installed.
- Bloatware: If your OS came pre-installed with trial software (less common if you installed it yourself, but possible with certain versions), consider uninstalling unnecessary programs.
Pro Tips for a Seamless Experience:
- Keep Installation Media Handy: Don’t delete or reformat your bootable USB drive immediately after installation. Keep it in a safe place. It can be invaluable for future troubleshooting, repairs, or reinstallation if needed.
- Research Compatibility: Before purchasing hardware or deciding on an OS, always do a quick search for known compatibility issues, especially with newer or niche components. This proactive step can prevent significant headaches.
- Regularly Back Up Your System: Once your system is perfectly set up, consider creating a system image or restore point. This “snapshot” allows you to quickly revert to a stable state if future issues arise, protecting your valuable time and data. This aligns with good digital security practices and ensures business continuity.
- Document Your Process: For complex setups, especially if you’re managing multiple machines or a brand’s tech infrastructure, document the steps you took, the drivers you installed, and any custom configurations. This knowledge base is invaluable for future maintenance or replication.
- Embrace Community Support: For Linux users, the active community forums and wikis for each distribution are incredible resources for troubleshooting and learning. Windows users also have extensive online communities and Microsoft support pages.
Conclusion: Your New PC, Ready for Action
Successfully installing an Operating System on your new PC is a significant accomplishment, marking the true birth of your digital workstation or entertainment hub. You’ve transformed a collection of powerful hardware into a functional, responsive, and secure computing environment, ready to tackle any task you throw at it.
Beyond the technical steps, this process empowers you with a deeper understanding of your machine’s inner workings. You’ve not only saved potential costs by undertaking this task yourself but also gained invaluable knowledge that will serve you well in maintaining and optimizing your system for years to come. Whether you’ve chosen the broad compatibility of Windows or the robust freedom of Linux, your careful setup ensures a stable foundation for all your future digital endeavors—from personal projects and online income generation to brand-building initiatives and cutting-edge tech exploration. Now, go forth and unleash the full potential of your new PC!
aViewFromTheCave is a participant in the Amazon Services LLC Associates Program, an affiliate advertising program designed to provide a means for sites to earn advertising fees by advertising and linking to Amazon.com. Amazon, the Amazon logo, AmazonSupply, and the AmazonSupply logo are trademarks of Amazon.com, Inc. or its affiliates. As an Amazon Associate we earn affiliate commissions from qualifying purchases.