
In the rapidly evolving digital landscape, where technology trends constantly redefine our interactions with gadgets and software, the humble printer remains a staple for homes and offices worldwide. From important documents to cherished photos, printers serve a critical function, yet their seamless operation often hinges on a crucial, often overlooked component: the printer driver. Understanding how to correctly install and manage printer drivers is not just a technical task; it’s a foundational skill that ensures productivity, maintains digital security, and ultimately optimizes your investment in your printing hardware. This guide will walk you through everything you need to know, transforming what might seem like a daunting technical challenge into a straightforward process.
Understanding Printer Drivers and Their Importance
Before diving into the “how-to,” it’s essential to grasp the “why.” What exactly is a printer driver, and why does it hold such significance in your tech ecosystem?
What is a Printer Driver?
At its core, a printer driver is a piece of software that acts as an interpreter between your computer’s operating system (like Windows or macOS) and your physical printer. Think of it as a universal translator. Your computer speaks in a language of digital commands and data, while your printer understands specific instructions for heating elements, ink dispersal, and paper movement. The driver translates your computer’s print commands into a format your specific printer model can comprehend and execute. Without this intermediary, your computer wouldn’t know how to “talk” to the printer, resulting in an unresponsive or non-functional device.
Why You Need One
The necessity of a printer driver extends beyond basic communication. It’s vital for several key reasons:
- Enabling Functionality: Drivers unlock all the features of your printer. Without the correct driver, you might only get basic black-and-white printing, if anything at all. Advanced features like duplex printing, specific paper tray selection, color calibration, scanning capabilities (for multifunction devices), and ink level monitoring are all controlled by the driver.
- Ensuring Compatibility: There are thousands of printer models from various brands, each with unique hardware specifications. A driver ensures that your operating system can work harmoniously with your particular printer, regardless of its make or model. This is where choosing reliable brands with robust driver support can significantly impact your long-term user experience and productivity.
- Optimizing Performance: Updated drivers can improve print speed, enhance print quality, and resolve bugs that might cause crashes or errors. They can even offer better power management for your device, subtly contributing to overall energy efficiency.
- Digital Security: Outdated drivers can sometimes present security vulnerabilities. Manufacturers frequently release driver updates not only for features and performance but also to patch security holes, protecting your network from potential exploits. Neglecting driver updates can leave a backdoor open to your system.
Common Scenarios for Driver Installation
You’ll typically find yourself needing to install a printer driver in a few common situations:
- Setting up a New Printer: This is the most obvious scenario. When you unbox a new printer, connecting it to your computer will almost always require driver installation to get it up and running.
- After an Operating System Update or Reinstallation: Major OS updates or a fresh installation often mean existing drivers become incompatible or are removed. Reinstalling or updating drivers ensures continued functionality.
- Troubleshooting Printer Issues: If your printer suddenly stops working, prints incorrectly, or exhibits strange behavior, a corrupted or outdated driver is often the culprit. Reinstalling or updating the driver is a common and effective troubleshooting step.
- Migrating to a New Computer: When you get a new computer, even if you keep your old printer, you’ll need to install the drivers on the new machine.
Preparing for Installation: The Pre-Checklist
Successful driver installation starts with proper preparation. Rushing into the process without these preliminary steps can lead to frustration and wasted time.
Gather Your Tools
Before you begin, ensure you have the following readily available:
- Your Printer: Make sure it’s powered on and connected to your computer (either via USB cable or connected to your Wi-Fi network if it’s a wireless printer).
- Your Computer: The device you wish to print from. Ensure it’s also powered on and connected to the internet.
- Internet Access: Crucial for downloading drivers from manufacturer websites or relying on your OS’s automatic updates.
- The Printer’s Model Number: This is absolutely vital. It’s usually found on a sticker on the back or bottom of the printer, or sometimes inside the front cover. Don’t confuse it with the series name; the exact model number (e.g., “HP OfficeJet Pro 9015” not just “HP OfficeJet”) is critical for finding the correct driver.
- Any Installation CDs/DVDs (Optional): While increasingly rare, some older printers still come with physical media. Keep it handy, though online downloads are generally preferred for up-to-date versions.
Identify Your Operating System
Printer drivers are OS-specific. A driver for Windows won’t work on macOS, and vice-versa. You need to know:
- Which Operating System you’re running: Windows (11, 10, 8, 7), macOS (Sonoma, Ventura, Monterey, etc.), or a specific Linux distribution.
- Whether your OS is 32-bit or 64-bit: While less common to specify now as 64-bit is dominant, older systems or specific software might still require 32-bit drivers. You can usually find this information in your system settings (e.g., “About” in Windows, “About This Mac” in macOS).
Know Your Printer Model
As mentioned, the exact model number is paramount. Even printers within the same series can have different internal components that require distinct drivers. A slight variation in the model number can lead to an incompatible driver, causing functionality issues or even system instability. Double-check this information before you start searching for drivers.
Check for Existing Drivers
If you’re reinstalling a driver to fix an issue, it’s often a good practice to completely uninstall the old, potentially corrupted driver first. This prevents conflicts and ensures a clean installation.
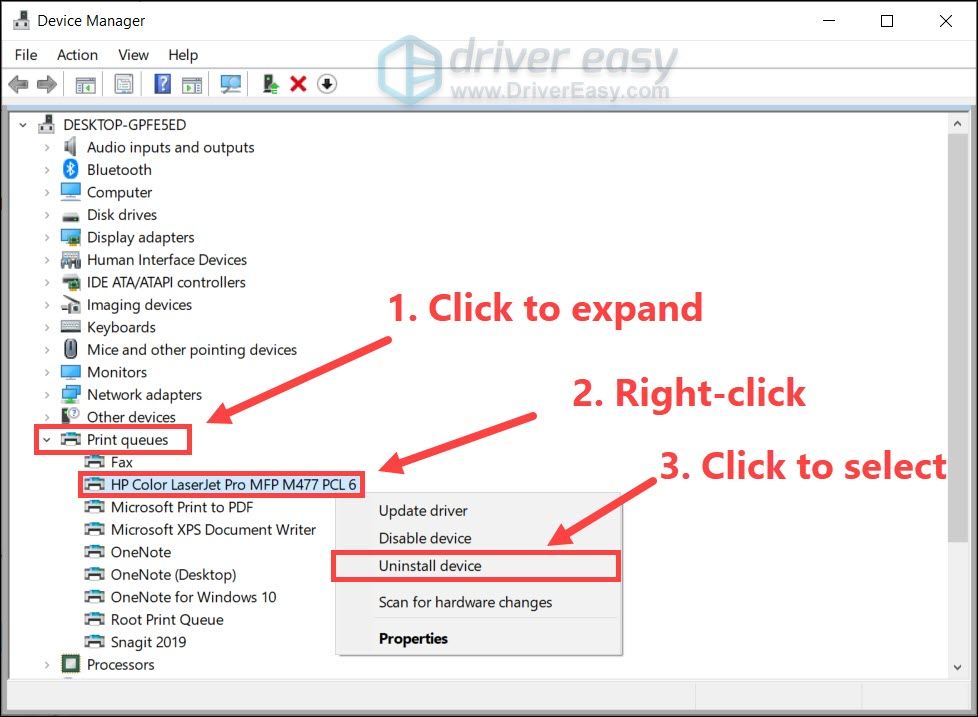
- On Windows: Go to “Settings” > “Bluetooth & devices” > “Printers & scanners” (or “Devices and Printers” in older versions), select your printer, and choose “Remove device.” You might also need to go to “Device Manager,” expand “Print queues,” right-click the printer, and select “Uninstall device.”
- On macOS: Go to “System Settings” > “Printers & Scanners,” select your printer, and click the “—” (minus) button to remove it.
Step-by-Step Installation Methods
With preparations complete, let’s explore the various methods for installing your printer driver, ranging from automatic to manual.
Method 1: Automatic Installation (Plug and Play)
This is the easiest and often the first method to try, especially with newer printers and operating systems.
-
How it Works: Modern operating systems like Windows 10/11 and recent macOS versions often have built-in driver repositories or actively search for and download drivers when a new device is connected.
- Connect Your Printer: Plug the USB cable from your printer into your computer, or ensure your wireless printer is connected to your network and discoverable.
- Wait for OS Detection: Your operating system should detect the new hardware and attempt to find and install a suitable driver automatically. You might see a notification indicating “Device setup” or “Installing device software.”
- Test Printing: Once the notification disappears, try printing a test page.
-
Pros: Extremely simple, quick, often sufficient for basic functionality.
-
Cons: The automatically installed driver might be generic or older, lacking advanced features specific to your printer model. It might not always provide the optimal performance or unlock all capabilities. For a truly rich experience, the manufacturer’s driver is usually better.
Method 2: Manufacturer’s Website (Most Reliable)
This is generally the recommended method for ensuring you get the most up-to-date and feature-rich driver for your specific printer model. Reputable brands invest heavily in their software support, providing dedicated driver pages.
- Identify Your Printer Model and OS: As per the pre-checklist.
- Go to the Manufacturer’s Official Website: For example, hp.com, epson.com, canon.com, brother.com, etc. Be wary of third-party driver sites, as they can sometimes bundle adware or provide incorrect drivers. Sticking to the official source is paramount for digital security and reliable performance.
- Navigate to the Support or Drivers Section: Look for tabs like “Support,” “Downloads,” “Drivers,” or “Software.”
- Search for Your Printer Model: Enter your exact printer model number into the search bar.
- Select Your Operating System: On the driver download page, ensure you select your correct operating system and its bit version (if applicable).
- Download the Driver Package: You’ll usually find a comprehensive driver package or a full software suite. It’s often better to download the full software package as it includes utilities that can enhance your printer’s functionality, like scanning software or print management tools.
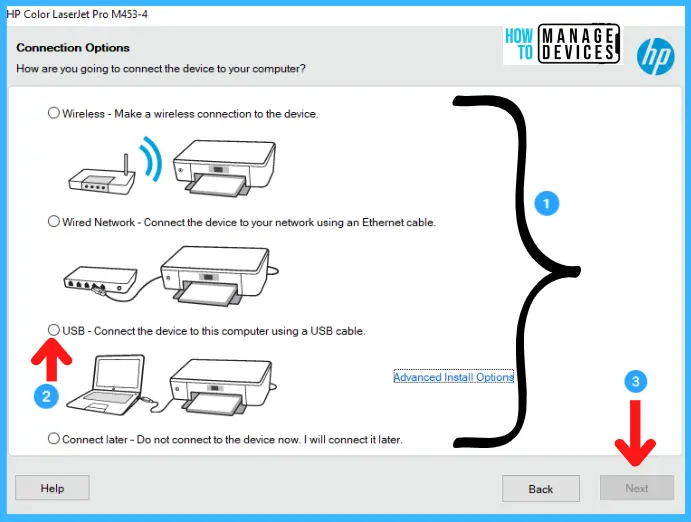
- Run the Installer: Once downloaded, locate the file (usually in your “Downloads” folder) and double-click it to start the installation wizard. Follow the on-screen instructions carefully. This typically involves accepting terms, choosing installation options (e.g., standard or custom), and sometimes connecting the printer when prompted.
- Restart Your Computer (Optional but Recommended): After installation, a restart can help ensure all changes are properly integrated into the system.
- Test Printing: Print a test page to confirm successful installation.
Method 3: Using the Installation CD/DVD
While becoming less common with the rise of digital downloads and disc-less computers, some older or entry-level printers still include an installation CD.
- Insert the CD/DVD: Place the disc into your computer’s optical drive.
- Run the Installer: An autoplay dialog box might appear, prompting you to run the setup program. If not, open “File Explorer” (Windows) or “Finder” (macOS), navigate to your optical drive, and double-click the setup file (e.g.,
setup.exeorinstall.pkg). - Follow On-Screen Instructions: The installation wizard will guide you through the process, similar to downloading from the manufacturer’s website.
- Connect Printer When Prompted: Ensure your printer is powered on and connected only when the installer explicitly asks you to.
- When to Use: Only if you lack internet access or if your printer is very old and its drivers are no longer available online.
- Limitations: Drivers on CDs are often outdated. Even if you use the CD, it’s a good idea to check the manufacturer’s website afterward for any newer updates.
Method 4: Manual Installation via Device Manager (Windows Advanced)
This method is particularly useful for troubleshooting, installing a driver that isn’t automatically detected, or installing a “basic” driver if the full software suite is causing issues. You would typically download the driver package from the manufacturer’s website first, but extract its contents without running the installer, or simply point to an unzipped driver folder.
- Download and Extract Driver: Download the driver package from the manufacturer’s website. If it’s a
.zipor.rarfile, extract its contents to a folder you can easily find. If it’s an.exefile, sometimes you can run it, and it will extract files to a temporary folder before running the actual installer; look for an option to just extract. - Open Device Manager:
- Windows 10/11: Right-click the Start button and select “Device Manager.”
- Older Windows: Go to “Control Panel” > “System and Security” > “Device Manager.”
- Locate Your Printer: Look under “Print queues,” “Other devices,” or “Unknown devices.” Your printer might appear with a yellow exclamation mark if its driver isn’t installed.
- Update Driver: Right-click on your printer device and select “Update driver.”
- Browse My Computer for Drivers: Choose this option.
- Specify Location: Click “Browse” and navigate to the folder where you extracted or saved the driver files. Ensure “Include subfolders” is checked.
- Install: Click “Next.” Windows will attempt to find and install the driver from the specified location.
- Complete Installation: Follow any further prompts and restart your computer if requested.
Troubleshooting Common Driver Installation Issues
Even with the best preparation, you might encounter issues. Here’s how to address some common problems, keeping your productivity in mind.
“Driver Not Found” or “Installation Failed”
- Double-Check Model & OS: The most frequent cause is an incorrect printer model number or wrong operating system selection. Re-verify both.
- Download Again: The download might have been corrupted. Delete the file and download it again.
- Run as Administrator: Right-click the installer file and select “Run as administrator” to ensure it has the necessary permissions.
- Temporarily Disable Antivirus/Firewall: Security software can sometimes interfere with installations, mistaking legitimate driver files for threats. Temporarily disable it during installation (and remember to re-enable it immediately afterward). This is a rare occurrence but worth considering.
Printer Not Responding After Installation
- Check Physical Connections: Ensure all cables (USB, power) are securely plugged in, and the printer is turned on.
- Network Connectivity (Wireless): If it’s a Wi-Fi printer, ensure it’s connected to the same network as your computer and has a strong signal. Run the printer’s own network configuration test, if available.
- Restart Everything: Restart your computer, the printer, and your Wi-Fi router. A fresh start often resolves transient communication glitches.
- Printer Default: Check your computer’s printer settings to ensure your newly installed printer is set as the default, or at least visible in the list of available printers.
Outdated or Incompatible Drivers
- Always Use Latest from Manufacturer: Always prioritize downloading the latest driver from the official manufacturer’s website. Generic drivers provided by the OS might work but could lack full compatibility or features.
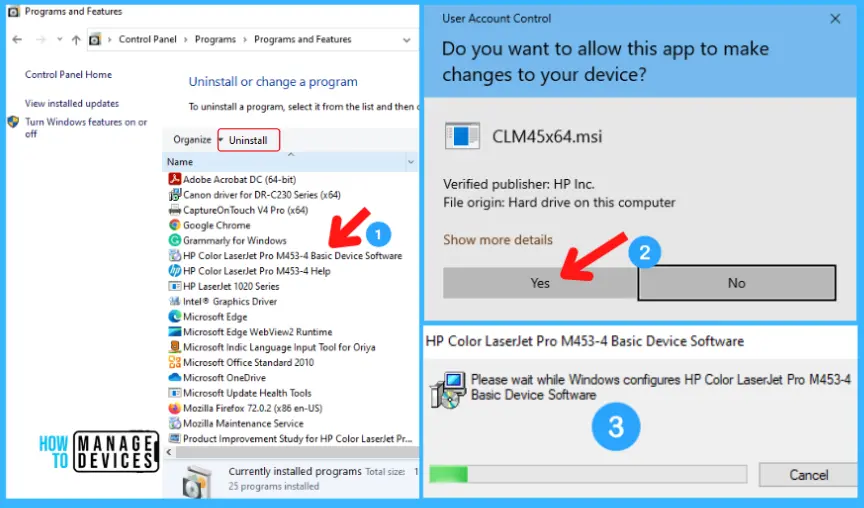
- Uninstall Old Drivers First: If you’re updating or reinstalling, fully uninstall any existing drivers before installing the new ones to prevent conflicts.
Connectivity Problems (USB, Wi-Fi)
- USB Port/Cable: Try a different USB port on your computer. If possible, try a different USB cable, as cables can sometimes go bad.
- Wi-Fi Interference: Move your printer closer to your Wi-Fi router or try to minimize other devices broadcasting on the same frequency. If your router supports both 2.4GHz and 5GHz bands, try connecting to the 2.4GHz band, as it has better range and wall penetration, though it might be slower.
- Firewall Settings: Ensure your computer’s firewall isn’t blocking communication with the printer, especially for network printers. You may need to add an exception for the printer’s software.
Antivirus/Firewall Interference
While mentioned under “Installation Failed,” this is worth reiterating. Security software, while vital for digital security, can be overly aggressive. If you’ve tried everything else, temporarily disabling your antivirus and firewall during the installation process only can sometimes resolve stubborn issues. Remember to re-enable them immediately. For financial tools and online income activities, having strong, active security is non-negotiable, so this step should only be a last resort and performed with extreme caution.
Best Practices for Printer Driver Management
Installing a driver is often a one-time event, but managing it effectively ensures long-term, hassle-free printing and contributes to overall system health.
Keeping Drivers Updated
- Regular Checks: Periodically visit your printer manufacturer’s support website to check for new driver releases. For tech enthusiasts, setting a reminder every few months can be beneficial.
- Benefits: Updates often bring performance improvements, new features, bug fixes, and critical security patches. Staying current not only enhances productivity by reducing errors but also safeguards your digital environment.
- OS Updates: Major operating system updates (e.g., Windows feature updates, new macOS versions) often necessitate checking for new printer drivers, as older drivers might become incompatible.
Backing Up Drivers
While not strictly necessary for most users given the ease of online downloads, advanced users or those with unique setups might consider backing up critical drivers.
- Why: If you frequently reinstall your OS or manage multiple computers, having drivers readily available can save time, especially if internet access is limited or the manufacturer unexpectedly pulls older drivers from their site.
- How: After a successful installation, you can often find the installed driver files in
C:WindowsSystem32DriverStoreFileRepositoryon Windows. Copying the relevant folders for your printer can serve as a backup. There are also third-party tools that can help with driver backup.
When to Seek Professional Help
While this guide empowers you to tackle most driver installation issues, there are times when seeking professional assistance makes financial and practical sense.
- Persistent, Complex Issues: If you’ve exhausted all troubleshooting steps and your printer still refuses to cooperate, it might indicate a deeper hardware problem or a complex software conflict that requires expert diagnosis.
- Time vs. Cost: Your time is valuable. If you’re spending hours on a problem that a technician could solve in minutes, the cost of professional help might be a worthwhile investment in your productivity and peace of mind. For businesses relying on efficient operations, minimizing downtime is directly related to financial performance.
- Beyond Software: If the issue seems to stem from the printer hardware itself (e.g., strange noises, paper jams that aren’t user error, scanner lamp not working), a repair technician is the way to go.
By understanding the role of printer drivers, following systematic installation methods, and adopting best practices for management, you can ensure your printing setup remains a reliable and productive tool in your digital arsenal. This fundamental technical skill not only saves you frustration but also contributes to the longevity and security of your devices, aligning perfectly with smart tech management and even astute personal finance by avoiding unnecessary replacements or repairs. Happy printing!
aViewFromTheCave is a participant in the Amazon Services LLC Associates Program, an affiliate advertising program designed to provide a means for sites to earn advertising fees by advertising and linking to Amazon.com. Amazon, the Amazon logo, AmazonSupply, and the AmazonSupply logo are trademarks of Amazon.com, Inc. or its affiliates. As an Amazon Associate we earn affiliate commissions from qualifying purchases.