The digital landscape is built upon a foundation of powerful, reliable web servers, and among the most enduring and widely used is Apache HTTP Server. As an open-source, cross-platform web server software, Apache has been instrumental in the growth of the internet, powering a significant portion of all websites across the globe. For anyone looking to host their own website, develop web applications, or simply understand the mechanics of web serving, installing Apache on a robust Linux distribution like Ubuntu is an essential first step.
This guide will walk you through the entire process of setting up Apache on an Ubuntu server, from initial system preparation to basic configuration and verification. Whether you’re a seasoned developer, a budding sysadmin, or just curious about how websites are served, this tutorial provides a clear, actionable roadmap to get your Apache web server up and running efficiently. By the end of this article, you’ll have a fully functional Apache instance, ready to host your web content and serve it to the world.
Understanding Apache and Its Role in Web Hosting
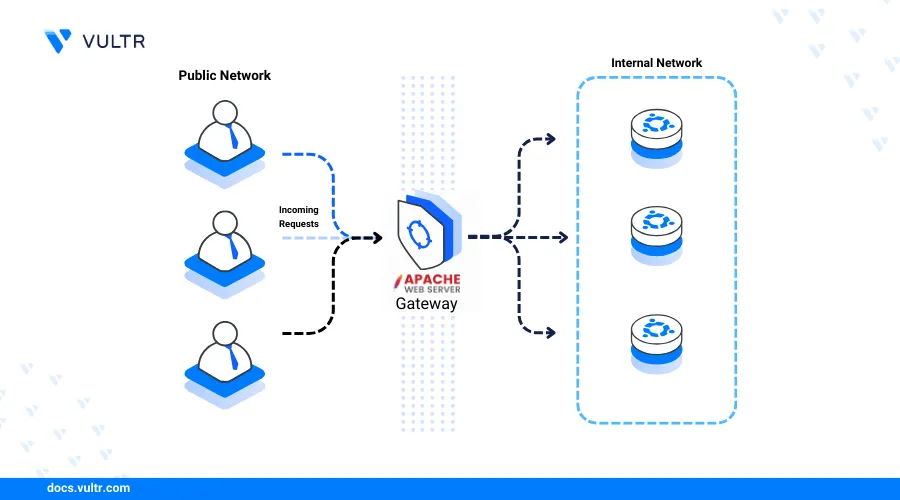
Before diving into the installation, it’s beneficial to understand what Apache is and why it remains a popular choice for web hosting infrastructure. Apache, often simply referred to as “httpd” (HTTP Daemon) on some systems, is a modular server that translates human-readable domain names into IP addresses, retrieves the corresponding web content (HTML files, images, scripts, etc.), and delivers it to the user’s browser. It acts as the intermediary between your server and the client’s web browser, orchestrating the request-response cycle that underpins all web browsing.
Its longevity and widespread adoption are testaments to its reliability, flexibility, and robust feature set. Being open-source, it benefits from a vast community of developers and users, ensuring continuous improvement, comprehensive documentation, and a wealth of third-party modules that extend its capabilities.
Why Choose Apache?
Apache’s enduring popularity stems from several key advantages:
- Open Source and Free: As an open-source project, Apache is free to use, distribute, and modify. This reduces operational costs and fosters a vibrant community.
- Modularity and Flexibility: Apache’s core design is highly modular. Features can be added or removed by enabling or disabling modules, allowing administrators to tailor the server precisely to their needs, optimizing performance and resource usage. This modularity makes it adaptable to various use cases, from simple static sites to complex dynamic web applications.
- Cross-Platform Compatibility: Apache runs on virtually all operating systems, including Unix-like systems (Linux, macOS) and Windows, offering broad deployment options.
- Robust and Reliable: Known for its stability and performance, Apache can handle high traffic loads and maintain uptime, making it a dependable choice for critical web services.
- Extensive Documentation and Community Support: Due to its long history and widespread use, Apache boasts a massive amount of documentation and an active community forum, making it easy to find solutions to virtually any problem.
- Virtual Host Capabilities: Apache makes it incredibly easy to host multiple websites on a single server using virtual hosts, which is a crucial feature for shared hosting environments or for developers managing several projects.
Prerequisites for Installation
Before you begin the installation process, ensure you have the following prerequisites in place:
- An Ubuntu Server Instance: This guide assumes you have an active Ubuntu server (e.g., Ubuntu 20.04 LTS or 22.04 LTS). This can be a virtual machine (VM) on your local machine, a cloud instance from providers like AWS, Azure, Google Cloud, or DigitalOcean, or a dedicated server.
- Root or Sudo Privileges: You need access to a user account with
sudoprivileges. This allows you to execute administrative commands necessary for installing software and configuring system services without logging in as therootuser, which is generally considered a security best practice. - Internet Connection: Your Ubuntu server must have an active internet connection to download packages from the Ubuntu repositories.
- Basic Command-Line Familiarity: While this guide is step-by-step, a basic understanding of Linux command-line interface (CLI) operations will be beneficial.
With these prerequisites met, you’re ready to proceed with the installation of your Apache web server.
Step-by-Step Installation Process
The installation of Apache on Ubuntu is straightforward, thanks to Ubuntu’s excellent package management system, APT (Advanced Package Tool). This section will guide you through updating your system, installing Apache, configuring the firewall, and verifying that everything is working as expected.
Updating Your System’s Package Index
The first and most crucial step before installing any new software on a Linux system is to update your local package index. This ensures that you download the latest versions of packages and that your system is aware of the most recent security patches and bug fixes. Running an update prevents potential conflicts and ensures a smooth installation process.
Open your terminal and execute the following commands:
sudo apt update
sudo apt upgrade -y
sudo apt update: This command downloads the package information from all configured sources (repositories). It doesn’t install or upgrade any packages but rather updates the list of available packages and their versions.sudo apt upgrade -y: After updating the package list, this command upgrades all currently installed packages to their newest versions. The-yflag automatically answers “yes” to any prompts, allowing the upgrade to proceed without manual intervention. This step is optional but highly recommended to ensure a stable and secure environment.
Once these commands complete, your system’s package information will be up-to-date, and all existing software will be upgraded.
Installing the Apache2 Package
With your system updated, you can now install the Apache web server package. On Ubuntu, the Apache package is named apache2.
To install Apache, run the following command:
sudo apt install apache2 -y
sudo apt install apache2: This command instructs APT to find and install theapache2package, along with any necessary dependencies.-y: Again, this flag automatically confirms the installation, allowing it to proceed without prompts.
The installation process will download the Apache server and its associated files, configure it, and start the Apache service automatically. Once the command finishes, Apache will be running in the background.
Adjusting the Firewall for Web Traffic
Ubuntu typically uses UFW (Uncomplicated Firewall) as its default firewall management tool. For Apache to serve web pages, you need to configure the firewall to allow incoming traffic on the standard HTTP (port 80) and HTTPS (port 443) ports. UFW provides application profiles for Apache, simplifying this process.
First, check the available UFW application profiles:
sudo ufw app list
You should see output similar to this, listing the Apache-related profiles:
Available applications:
  Apache
  Apache Full
  Apache Secure
  OpenSSH
Let’s understand what each Apache profile means:
- Apache: This profile opens only port 80 (HTTP traffic).
- Apache Full: This profile opens both port 80 (HTTP) and port 443 (HTTPS/SSL/TLS traffic). This is often the recommended choice as most modern websites eventually adopt HTTPS.
- Apache Secure: This profile opens only port 443 (HTTPS traffic), which is suitable if you plan to enforce HTTPS from the start and redirect all HTTP traffic.
For most initial setups, allowing both HTTP and HTTPS is a good starting point. You can enable the Apache Full profile:
sudo ufw allow "Apache Full"
Next, verify the firewall status to ensure the rules have been applied correctly:
sudo ufw status
The output should show that traffic is allowed on ports 80 and 443:
Status: active

To                         Action      From
--                         ------      ----
OpenSSH                    ALLOW       Anywhere
Apache Full                ALLOW       Anywhere
OpenSSH (v6)               ALLOW       Anywhere (v6)
Apache Full (v6)           ALLOW       Anywhere (v6)
If UFW was not enabled, you might need to enable it first. Be cautious when enabling UFW on a remote server, as it can block SSH access if not configured correctly. If SSH access is not blocked, enable UFW with:
sudo ufw enable
Confirm with y and press Enter. Then re-check sudo ufw status.
Verifying Apache’s Installation and Status
After installation and firewall configuration, it’s time to verify that Apache is running and accessible. There are two primary ways to do this: checking the service status and accessing the default Apache page from a web browser.
1. Check Apache Service Status:
You can use the systemctl command to check the status of the apache2 service:
systemctl status apache2
You should see output indicating that the service is active (running), similar to this:
● apache2.service - The Apache HTTP Server
     Loaded: loaded (/lib/systemd/system/apache2.service; enabled; vendor preset: enabled)
     Active: active (running) since Thu 2023-10-26 10:00:00 UTC; 5min ago
       Docs: https://httpd.apache.org/docs/2.4/
   Main PID: 1234 (apache2)
      Tasks: 6 (limit: 1129)
     Memory: 18.2M
        CPU: 423ms
     CGroup: /system.slice/apache2.service
             ├─1234 /usr/sbin/apache2 -k start
             ├─1235 /usr/sbin/apache2 -k start
             └─1236 /usr/sbin/apache2 -k start
...
The active (running) status confirms that Apache is up and operating.
2. Access the Default Apache Page:
Open your web browser and navigate to your server’s IP address. If you don’t know your server’s public IP address, you can find it using several methods:
- From the command line on your server:
bash

ip a
Look for theinetaddress associated with your main network interface (e.g.,eth0orenpXsY).
Alternatively, to get your public IP (if your server is on a public network):
bash

curl -4 icanhazip.com
- From your cloud provider’s dashboard: If you’re using a cloud VM, the public IP address is usually displayed prominently in the instance details.
Once you have your server’s IP address (e.g., 192.0.2.1), type it into your browser’s address bar:
http://your_server_ip_address (e.g., http://192.0.2.1)
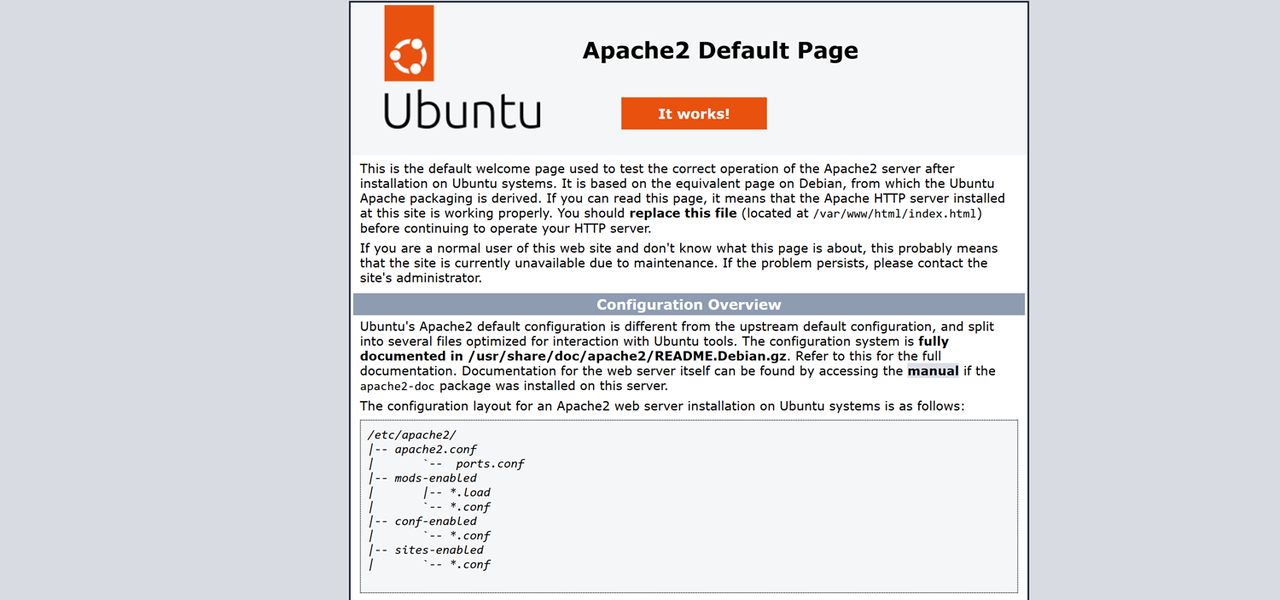
You should see the default “Ubuntu Apache2 Default Page,” which confirms that Apache is correctly installed and serving content. This page is located at /var/www/html/index.html on your server.
Congratulations! You have successfully installed and verified the Apache web server on your Ubuntu system.
Managing and Basic Configuration of Your Apache Server
With Apache installed, understanding how to manage its service and perform basic configurations is crucial for hosting your own websites. This section covers essential systemctl commands for Apache and delves into its directory structure and setting up virtual hosts.
Essential Apache Service Management Commands
Apache runs as a system service, and systemctl is the standard tool for managing it on Ubuntu. Here are the most commonly used commands:
sudo systemctl start apache2: This command starts the Apache service if it’s currently stopped.sudo systemctl stop apache2: This command gracefully stops the Apache service. All ongoing connections will be terminated.sudo systemctl restart apache2: This command stops and then starts the Apache service. Use this when making significant configuration changes that require a full reload of Apache’s state.sudo systemctl reload apache2: This command reloads the Apache configuration without stopping the service. This is generally preferred for minor configuration changes, as it avoids any downtime. Apache will load the new configuration while keeping existing connections open.sudo systemctl enable apache2: This command configures Apache to start automatically every time your server boots up. Apache is usually enabled by default upon installation.sudo systemctl disable apache2: This command prevents Apache from starting automatically on boot. You would then need to manually start it withsudo systemctl start apache2.systemctl status apache2: As seen earlier, this command displays the current status of the Apache service, indicating whether it’s running, stopped, or encountering issues.
Understanding Apache’s Directory Structure
Apache’s configuration files and web content are organized within a specific directory structure. Familiarity with these locations is vital for customizing your server.
The main configuration directory for Apache on Ubuntu is /etc/apache2/. Within this directory, you’ll find several important subdirectories and files:
/etc/apache2/apache2.conf: This is the main Apache configuration file. It contains global server settings. While you can edit this file, it’s generally recommended to use include directives and separate configuration files for better organization, especially for virtual hosts./etc/apache2/ports.conf: This file specifies the ports Apache listens on. By default, it’s configured for port 80 (HTTP) and port 443 (HTTPS) if SSL is enabled./etc/apache2/sites-available/: This directory contains configuration files for virtual hosts. These files define individual websites that Apache can serve. Files in this directory are “available” but not necessarily “enabled.”/etc/apache2/sites-enabled/: This directory contains symbolic links to the virtual host configuration files located insites-available/. Only virtual host files linked here are active. Apache provides utilities likea2ensiteanda2dissiteto manage these links./etc/apache2/mods-available/: Contains configuration files for various Apache modules./etc/apache2/mods-enabled/: Contains symbolic links to the enabled module configuration files frommods-available/.a2enmodanda2dismodare used to manage these./var/www/: This is the default root directory for web content./var/www/html/: The default document root for the default Apache website. Yourindex.html(the “It works!” page) is located here. For custom websites, you’ll typically create new directories within/var/www/(e.g.,/var/www/your_domain/html).
/var/log/apache2/: This directory stores Apache’s log files, includingerror.log(for server errors) andaccess.log(for requests made to the server). These logs are invaluable for troubleshooting.
Setting Up Your First Virtual Host
One of Apache’s most powerful features is its ability to host multiple domain names on a single server, each with its own configuration, using “Virtual Hosts.” This is essential if you want to host more than one website. We’ll set up a simple virtual host for a domain, let’s call it your_domain.com.
Creating the Document Root
First, create a directory for your website’s files. It’s a common practice to place these within /var/www/ and name the directory after your domain. We’ll also create an html subdirectory within it.
sudo mkdir -p /var/www/your_domain.com/html
Next, assign ownership of this directory to your user (or the Apache user if you prefer, but your user simplifies development) and set appropriate permissions:
sudo chown -R $USER:$USER /var/www/your_domain.com/html
sudo chmod -R 755 /var/www/your_domain.com
Now, create a simple index.html file inside your new document root to test the virtual host:
sudo nano /var/www/your_domain.com/html/index.html
Add some basic HTML content:
<!DOCTYPE html>
<html>
<head>
    <title>Welcome to Your Domain</title>
</head>
<body>
    <h1>Success! Your Virtual Host is Working!</h1>
    <p>This is the default page for your_domain.com.</p>
</body>
</html>
Save and close the file (Ctrl+X, Y, Enter).
Configuring the Virtual Host File
Now, create a new virtual host configuration file in the sites-available directory. It’s a good practice to copy the default configuration file as a template.
sudo cp /etc/apache2/sites-available/000-default.conf /etc/apache2/sites-available/your_domain.com.conf
sudo nano /etc/apache2/sites-available/your_domain.com.conf
Edit the file to look like this (you can remove commented lines for clarity):
<VirtualHost *:80>
    ServerAdmin webmaster@your_domain.com
    ServerName your_domain.com
    ServerAlias www.your_domain.com
    DocumentRoot /var/www/your_domain.com/html

    ErrorLog ${APACHE_LOG_DIR}/your_domain.com-error.log
    CustomLog ${APACHE_LOG_DIR}/your_domain.com-access.log combined

    <Directory /var/www/your_domain.com/html>
        Options -Indexes +FollowSymLinks
        AllowOverride All
        Require all granted
    </Directory>
</VirtualHost>
Let’s break down the important directives:
<VirtualHost *:80>: This specifies that this virtual host will listen on all network interfaces (*) for requests coming in on port 80.ServerAdmin: An email address where server error messages can be sent.ServerName: The primary domain name this virtual host should respond to. Ensure this matches your actual domain.ServerAlias: Any alternative names for your domain (e.g.,www.your_domain.com).DocumentRoot: The directory where your website’s files are located. This is thehtmlfolder we created.ErrorLogandCustomLog: These define the locations for your domain’s error and access logs, which are very helpful for debugging.<Directory /var/www/your_domain.com/html>: This block applies specific settings to the specified directory.Options -Indexes +FollowSymLinks: Prevents directory listings (for security) and allows Apache to follow symbolic links.AllowOverride All: Allows.htaccessfiles to override Apache settings for specific directories. This is crucial for many CMS like WordPress.Require all granted: Grants access to all requests.
Save and close the file.
Enabling the Virtual Host and Restarting Apache
Now, enable your new virtual host using the a2ensite utility and disable the default site to avoid conflicts (though Apache typically serves the first configured site for matching requests, it’s good practice to disable 000-default.conf if you’re not using it).
sudo a2ensite your_domain.com.conf
sudo a2dissite 000-default.conf
Before restarting Apache, it’s always wise to test your configuration for syntax errors:
sudo apache2ctl configtest
If it returns Syntax OK, you’re good to go. If there are errors, review your virtual host file carefully for typos.
Finally, reload Apache to apply the changes:
sudo systemctl reload apache2
To test your new virtual host, you’ll need to point your domain name’s DNS A record to your server’s IP address. If you don’t have a domain name or haven’t updated DNS yet, you can temporarily edit your local machine’s hosts file (on Linux/macOS: /etc/hosts, on Windows: C:WindowsSystem32driversetchosts) to map your_domain.com to your server’s IP address.
Once DNS is updated (or your hosts file modified), open your browser and navigate to http://your_domain.com. You should see the “Success! Your Virtual Host is Working!” page you created.
Enabling Key Apache Modules
Apache’s modular design means many functionalities are provided by modules that can be enabled or disabled as needed. You’ve already seen a2enmod in action implicitly. For example, mod_rewrite is a commonly used module for URL rewriting (e.g., creating “pretty URLs” in frameworks like WordPress, Laravel, or Symfony).
To enable a module like mod_rewrite:
sudo a2enmod rewrite
sudo systemctl reload apache2
The a2enmod command creates a symbolic link from mods-available to mods-enabled. After enabling any module, always reload or restart Apache for the changes to take effect. You can check which modules are currently enabled with apache2ctl -M.
Enhancing Security and Advanced Considerations
While you now have a functional Apache server, securing it is paramount, especially if it’s publicly accessible. Additionally, understanding advanced concepts like HTTPS is crucial for modern web hosting.
Basic Security Best Practices for Apache
- Keep Your System Updated: Regularly run
sudo apt update && sudo apt upgrade -yto apply security patches to Ubuntu and Apache. - Use a Firewall (UFW): As configured, UFW helps restrict access to only necessary ports. Don’t open ports you don’t need.
- Disable Directory Listings: Ensure
Options -Indexesis set in your virtual host configurations (as we did) to prevent visitors from browsing the contents of your directories. - Limit
AllowOverride: WhileAllowOverride Allis convenient for.htaccessfiles, it allows users to override many server settings. In highly secure environments or shared hosting, you might want to restrict this toAllowOverride Noneor specific directives (e.g.,AllowOverride FileInfo AuthConfig). - Monitor Logs: Regularly review
access.loganderror.logfor suspicious activity or recurring errors. Tools likefail2bancan automate blocking malicious IPs based on log entries. - Restrict Sensitive Files: Ensure sensitive configuration files or data are not accessible via the web server. Store them outside the
DocumentRootif possible. - Implement SSL/TLS (HTTPS): Encrypting traffic between the client and server is fundamental for security and user trust. This is covered next.
Integrating with SSL/TLS (HTTPS)
Serving your website over HTTPS (HTTP Secure) is no longer optional; it’s a standard requirement for security, SEO, and user trust. HTTPS encrypts data transmitted between the browser and the server, protecting sensitive information.
The process involves:
- Obtaining an SSL/TLS Certificate: Certificates are issued by Certificate Authorities (CAs). The most popular, free, and automated option is Let’s Encrypt, typically installed via Certbot.
- Configuring Apache for SSL: This usually involves enabling
mod_ssland creating a new virtual host configuration for port 443, pointing to your certificate files.
While a full guide to Certbot and HTTPS is beyond the scope of this installation tutorial, here’s a brief overview of the steps you’d typically take:
sudo apt install certbot python3-certbot-apache -y # Install Certbot and Apache plugin
sudo certbot --apache -d your_domain.com -d www.your_domain.com # Run Certbot to get and install certificate
Certbot will automatically modify your Apache configuration, enable mod_ssl, and set up HTTP to HTTPS redirection. After this, your site will be accessible via https://your_domain.com.
Common Troubleshooting Tips
Encountering issues is part of server management. Here are common troubleshooting steps:
- Check Apache Status:
systemctl status apache2will tell you if Apache is running. - Check Configuration Syntax:
sudo apache2ctl configtestis invaluable for catching errors in your configuration files before restarting. - Review Apache Logs: The
error.log(/var/log/apache2/error.log) is your best friend for diagnosing problems. Look for specific error messages and line numbers.access.logshows all requests, which can help determine if requests are even reaching Apache. - Check Firewall: Ensure UFW or any other firewall isn’t blocking incoming traffic on ports 80/443.
sudo ufw statusis key. - Verify DNS: Ensure your domain name correctly resolves to your server’s IP address. Use
ping your_domain.comordig your_domain.com. - Port Conflicts: Ensure no other service is using ports 80 or 443.
- Permissions: Incorrect file or directory permissions can prevent Apache from reading web content. Ensure Apache (or your user, for web root) has read access.

Conclusion and Next Steps
You have successfully installed, configured, and secured a basic Apache web server on your Ubuntu system. This journey has taken you from understanding Apache’s role in the web ecosystem to setting up virtual hosts, managing services, and touching upon critical security considerations. The ability to deploy and manage a web server is a foundational skill in the world of technology, opening doors to hosting personal projects, business websites, or diving deeper into web development.
This installation serves as a powerful starting point. From here, the possibilities are vast:
- LAMP Stack: You can extend your server into a full-fledged LAMP (Linux, Apache, MySQL, PHP) stack by installing MySQL (or MariaDB) for databases and PHP for server-side scripting. This is the foundation for popular content management systems like WordPress, Joomla, and Drupal.
- Content Management Systems (CMS): Install a CMS like WordPress, which makes building and managing websites incredibly easy without needing extensive coding knowledge.
- Performance Optimization: Explore Apache modules and configurations for caching, compression, and other optimizations to improve your website’s speed and responsiveness.
- Advanced Security: Implement more robust security measures, such as ModSecurity for web application firewall capabilities, or advanced DDoS protection.
- Monitoring: Set up monitoring tools to keep an eye on your server’s health, resource usage, and website uptime.
- Load Balancing: For high-traffic sites, you might eventually explore load balancing with Apache or other tools to distribute incoming requests across multiple servers.
The world of web hosting and server administration is continually evolving, but Apache remains a cornerstone. By mastering its installation and basic configuration, you’ve taken a significant step forward in your technological journey. Keep experimenting, keep learning, and enjoy the power of serving your own content to the world.
aViewFromTheCave is a participant in the Amazon Services LLC Associates Program, an affiliate advertising program designed to provide a means for sites to earn advertising fees by advertising and linking to Amazon.com. Amazon, the Amazon logo, AmazonSupply, and the AmazonSupply logo are trademarks of Amazon.com, Inc. or its affiliates. As an Amazon Associate we earn affiliate commissions from qualifying purchases.