
In today’s digital landscape, web security is no longer a luxury but an absolute necessity. Whether you’re running a personal blog, an e-commerce store, or a corporate portal, safeguarding your users’ data and ensuring the integrity of your website is paramount. At the heart of this security lies the SSL/TLS certificate, a fundamental component that encrypts communication between your web server and your visitors’ browsers. Without it, sensitive information — from login credentials to credit card numbers — travels across the internet in plain text, vulnerable to interception by malicious actors.
For businesses and individuals alike, the absence of an SSL certificate translates into immediate red flags: modern web browsers prominently display “Not Secure” warnings, search engines penalize unencrypted sites, and consumer trust plummets. In a world where digital security is directly linked to brand reputation and even financial stability, understanding how to properly install and configure an SSL certificate on your web server is an indispensable skill for any tech-savvy individual or IT professional. This comprehensive guide will walk you through the entire process, from understanding the basics to server-specific installation steps and crucial post-setup verification.
Understanding SSL/TLS: The Foundation of Web Security
Before diving into the technicalities of installation, it’s crucial to grasp what an SSL/TLS certificate is and why it holds such significance in the modern web. Often, the terms SSL (Secure Sockets Layer) and TLS (Transport Layer Security) are used interchangeably. While SSL was the original protocol, it has since been superseded by TLS, which offers stronger encryption and improved security features. However, the term “SSL certificate” has stuck due to its widespread recognition.
What Exactly is an SSL/TLS Certificate?
An SSL/TLS certificate is a small data file that digitally binds a cryptographic key to an organization’s details. When installed on a web server, it activates the padlock icon and the “https” protocol, establishing a secure connection between the web server and a browser. This secure connection ensures that all data passed between the two remains private and encrypted.
The certificate serves three primary functions:
- Encryption: It encrypts the data exchanged between the browser and the server, making it unreadable to anyone who might try to intercept it. This protects sensitive information like passwords, credit card details, and personal data.
- Authentication: It authenticates the identity of the server. When a browser connects to an HTTPS-secured website, it verifies the certificate’s authenticity against trusted Certificate Authorities (CAs). This ensures that users are connecting to the legitimate website and not a fraudulent one trying to impersonate it (phishing).
- Data Integrity: It ensures that the data has not been tampered with during transmission. If any data is altered, the browser will detect it and warn the user.
In essence, an SSL certificate acts as a digital passport for your website, confirming its identity and creating a secure, encrypted tunnel for all communications.
Why Your Website Needs SSL: Beyond Just Security
The benefits of implementing SSL/TLS extend far beyond just basic data encryption. In today’s competitive digital landscape, a secure website contributes significantly to your online presence, brand credibility, and even profitability.
- Enhanced Security: This is the most obvious benefit. SSL protects your users’ data from eavesdropping and tampering, safeguarding their privacy and your reputation. For e-commerce sites, this is non-negotiable for handling financial transactions securely.
- Increased User Trust and Brand Reputation: The “Not Secure” warning displayed by browsers like Chrome and Firefox can instantly erode user trust. Conversely, the padlock icon and “https” in the address bar reassure visitors that your site is legitimate and safe to interact with. This trust is crucial for maintaining a positive brand image and encouraging repeat visits.
- Improved Search Engine Rankings (SEO): Google explicitly uses HTTPS as a ranking signal. Websites secured with SSL/TLS are favored in search results, giving them a competitive edge over unsecured counterparts. This can lead to higher visibility, more organic traffic, and ultimately, greater online income potential.
- Compliance with Industry Standards: Many regulations and standards, such as GDPR (General Data Protection Regulation) and PCI DSS (Payment Card Industry Data Security Standard), mandate the use of encryption for handling personal and financial data. SSL/TLS compliance is often a foundational step towards meeting these requirements.
- Access to Modern Browser Features: Some advanced web technologies and APIs (like Geolocation, Service Workers, HTTP/2) require a secure context (HTTPS) to function. Without SSL, your website may be unable to leverage these modern features, limiting its functionality and future-proofing.
- Prevention of Browser Warnings: Unsecured websites trigger prominent browser warnings, scaring away potential visitors. A secure site offers a smooth, uninterrupted user experience.
In summary, installing an SSL certificate is a critical investment in your website’s security, user experience, brand image, and overall success in the digital realm.
Preparing for Installation: Gathering Your Resources
Before you can install an SSL certificate, there are several crucial steps to undertake. Proper preparation ensures a smooth installation process and helps avoid common pitfalls.
Acquiring Your SSL Certificate and Key Files
The very first step is to obtain an SSL certificate. There are several ways to do this:
- Commercial Certificate Authorities (CAs): Companies like DigiCert, Sectigo, GlobalSign, and GoDaddy offer various types of SSL certificates (Domain Validated, Organization Validated, Extended Validation) for purchase. These typically come with warranties and dedicated support.
- Free Certificate Authorities: Let’s Encrypt is a popular, free, automated, and open Certificate Authority that provides domain-validated certificates. It’s an excellent option for blogs, personal sites, and small businesses. Tools like Certbot make the process of obtaining and renewing Let’s Encrypt certificates very straightforward.
Regardless of where you obtain your certificate, you will typically receive several files. These usually include:
- Your Primary Certificate File (
your_domain.crtoryour_domain.cer): This is the certificate issued specifically for your domain name. - Intermediate Certificate(s) / CA Bundle (
ca_bundle.crtorintermediate.crt): These files contain one or more intermediate certificates that link your primary certificate back to a trusted root certificate in the CA’s hierarchy. This “chain of trust” is essential for browsers to verify your certificate’s authenticity. - Your Private Key File (
your_domain.key): This file is generated on your server (or locally) when you create the Certificate Signing Request (CSR). It is crucial and must be kept absolutely secret and secure. It should never be shared publicly or uploaded anywhere.
Important Note: The private key is generated before you request the certificate. If you lose or compromise your private key, your certificate becomes useless, and you will need to re-issue it.
Generating a Certificate Signing Request (CSR)
A Certificate Signing Request (CSR) is a block of encoded text that contains information about your website and your organization. It includes your public key and details like your common name (domain name), organization name, city, state, and country. You submit this CSR to the Certificate Authority when requesting an SSL certificate.
The process for generating a CSR varies slightly depending on your web server software:
- Apache/Nginx (OpenSSL): You typically use the OpenSSL command-line tool.
bash

openssl req -new -newkey rsa:2048 -nodes -keyout your_domain.key -out your_domain.csr
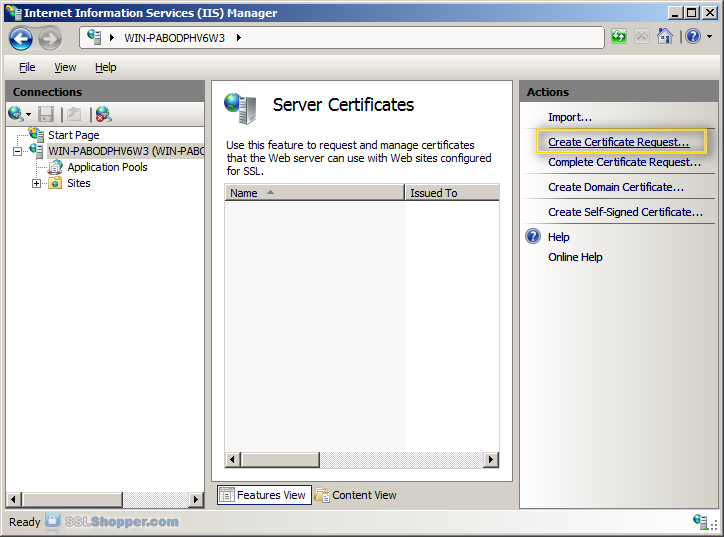
This command generates both your private key (your_domain.key) and the CSR (your_domain.csr). You will be prompted to enter your organizational details. - Microsoft IIS: IIS has a built-in wizard to generate CSRs. Navigate to Server Certificates, then “Create Certificate Request.”
- cPanel/Plesk: Most hosting control panels provide a user-friendly interface to generate CSRs, making the process much simpler.
When generating the CSR, pay close attention to the “Common Name” field. This must exactly match the domain name you want to secure (e.g., www.example.com or example.com). If you’re securing multiple subdomains or multiple domains, you’ll need a Wildcard or Multi-Domain (SAN) certificate, and the CSR generation steps will differ accordingly.
Essential Server Access and Pre-installation Checks
Before you begin the installation, ensure you have the necessary access and have taken precautionary measures:
- Root/Administrator Access: You’ll need root or administrator-level access to your web server (via SSH for Linux/Unix, or RDP for Windows Server) to upload files, modify configuration, and restart services.
- Backup Configuration Files: Always create a backup of your current web server configuration files (e.g.,
httpd.conffor Apache,nginx.conffor Nginx, orapplicationHost.configfor IIS) before making any changes. This allows you to revert to a working state if something goes wrong. - Identify Your Web Server Software: Know whether you’re running Apache, Nginx, IIS, or another server, as the installation steps are server-specific.
- Firewall Configuration: Ensure that port 443 (the standard port for HTTPS) is open on your server’s firewall.
Having all these elements in place will streamline the installation process significantly.
Step-by-Step Installation Guides for Popular Web Servers
The core process involves uploading your certificate files to the server and configuring your web server software to use them. While the underlying principles are similar, the exact commands and file locations differ for each web server.
Installing SSL on Apache HTTP Server
Apache is one of the most widely used web servers. The installation process typically involves enabling the SSL module, uploading certificate files, and configuring a virtual host.
-
Enable the SSL Module:
First, ensure themod_sslmodule is enabled. On Debian/Ubuntu systems:sudo a2enmod ssl sudo systemctl restart apache2On CentOS/RHEL systems,
mod_sslis usually installed and enabled by default with Apache. If not, install it:sudo yum install mod_ssl sudo systemctl restart httpd -
Upload Certificate Files:
Create a dedicated directory for your SSL certificates. A common location is/etc/ssl/certs/for the certificate files and/etc/ssl/private/for your private key.sudo mkdir -p /etc/ssl/certs sudo mkdir -p /etc/ssl/private # Upload your_domain.crt, ca_bundle.crt, and your_domain.key to these directories # Use scp or sftp to securely transfer filesEnsure the private key file has restricted permissions (e.g.,
600) so only root can read it:sudo chmod 600 /etc/ssl/private/your_domain.key -
Configure Apache Virtual Host:
Edit your Apache virtual host configuration file. This is often found in/etc/apache2/sites-available/your_domain.confon Debian/Ubuntu or/etc/httpd/conf.d/ssl.conf(or a dedicated virtual host file) on CentOS/RHEL.
You’ll need a new<VirtualHost>block configured to listen on port 443 (HTTPS):<VirtualHost *:443> ServerName your_domain.com ServerAlias www.your_domain.com DocumentRoot /var/www/html/your_domainSSLEngine on SSLCertificateFile /etc/ssl/certs/your_domain.com.crt SSLCertificateKeyFile /etc/ssl/private/your_domain.com.key SSLCertificateChainFile /etc/ssl/certs/ca_bundle.crt # Or SSLCACertificateFile depending on Apache version # Optional: Stronger security settings SSLProtocol all -SSLv2 -SSLv3 SSLCipherSuite EECDH+AESGCM:EDH+AESGCM:AES256+EECDH:AES256+EDH SSLHonorCipherOrder on # HSTS (optional, but recommended) Header always set Strict-Transport-Security "max-age=31536000; includeSubDomains" # Log files ErrorLog ${APACHE_LOG_DIR}/your_domain-error.log CustomLog ${APACHE_LOG_DIR}/your_domain-access.log combined</VirtualHost>
# Optional: Redirect HTTP to HTTPS
<VirtualHost *:80>
ServerName your_domain.com
ServerAlias www.your_domain.com
Redirect permanent / https://your_domain.com/
</VirtualHost>
Remember to enable the new site configuration on Debian/Ubuntu:
sudo a2ensite your_domain.conf -
Test Configuration and Restart Apache:
Always test your Apache configuration for syntax errors before restarting:
bash

sudo apachectl configtest
If the output isSyntax OK, restart Apache:
bash

sudo systemctl restart apache2 # or httpd for CentOS/RHEL
Configuring SSL on Nginx
Nginx is known for its high performance and efficient resource usage. SSL configuration is straightforward within its server blocks.
-
Upload Certificate Files:
Similar to Apache, create directories for your certificate files. Common locations are/etc/nginx/ssl/or/etc/ssl/nginx/.sudo mkdir -p /etc/nginx/ssl # Upload your_domain.crt, ca_bundle.crt, and your_domain.key to /etc/nginx/ssl/ # Use scp or sftp to securely transfer filesEnsure your private key has restricted permissions:
sudo chmod 600 /etc/nginx/ssl/your_domain.key -
Configure Nginx Server Block:
Edit your Nginx server block configuration file, typically found in/etc/nginx/sites-available/your_domain.confor/etc/nginx/conf.d/your_domain.conf.server { listen 443 ssl; listen [::]:443 ssl; # For IPv6 server_name your_domain.com www.your_domain.com;ssl_certificate /etc/nginx/ssl/your_domain.com.crt; ssl_certificate_key /etc/nginx/ssl/your_domain.com.key; ssl_trusted_certificate /etc/nginx/ssl/ca_bundle.crt; # This is the CA bundle/chain file # Optional: Stronger security settings ssl_protocols TLSv1.2 TLSv1.3; ssl_ciphers EECDH+AESGCM:EDH+AESGCM:AES256+EECDH:AES256+EDH; ssl_prefer_server_ciphers on; ssl_session_cache shared:SSL:10m; ssl_session_timeout 10m; add_header Strict-Transport-Security "max-age=31536000; includeSubDomains" always; # HSTS root /var/www/html/your_domain; index index.html index.htm index.php; # Other configurations like location blocks for PHP, static files, etc.}
# Optional: Redirect HTTP to HTTPS
server {
listen 80;
listen [::]:80; # For IPv6
server_name your_domain.com www.your_domain.com;
return 301 https://your_domain.com$request_uri;
}
If you’re using
sites-availableandsites-enabledstructure, create a symbolic link:sudo ln -s /etc/nginx/sites-available/your_domain.conf /etc/nginx/sites-enabled/ -
Test Configuration and Restart Nginx:
Test your Nginx configuration for syntax errors:
bash

sudo nginx -t
If the output indicatessyntax is okandtest is successful, restart Nginx:
bash

sudo systemctl restart nginx
Deploying SSL on Microsoft IIS
Microsoft’s Internet Information Services (IIS) is the web server for Windows environments. Installation is typically done through the IIS Manager GUI.
-
Open IIS Manager:
Go to “Administrative Tools” -> “Internet Information Services (IIS) Manager.” -
Complete Certificate Request:
In the “Connections” pane, select the server name. In the “IIS” section, double-click “Server Certificates.”
On the “Actions” pane, click “Complete Certificate Request.”
Browse to your primary certificate file (your_domain.crtor.cer). Provide a friendly name for the certificate (e.g.,your_domain_SSL).
This process will import your certificate and link it to the private key that was generated when you created the CSR. -
Bind the Certificate to Your Website:
In the “Connections” pane, expand “Sites” and select the website you want to secure.
In the “Actions” pane, click “Bindings…”
Click “Add…”
In the “Add Site Binding” dialog:- Type: Select
https. - IP address: Choose
All Unassignedor a specific IP address. - Port: Enter
443. - Host name: (Optional but recommended) Enter
your_domain.comfor SNI (Server Name Indication) if you host multiple SSL sites on one IP. - SSL certificate: Select the friendly name of the certificate you just imported from the dropdown list.
Click “OK” and then “Close.”
- Type: Select
-
Configure HTTP to HTTPS Redirect (Optional but Recommended):
For proper SEO and user experience, you should redirect all HTTP traffic to HTTPS.- Install the “URL Rewrite” module for IIS if you haven’t already.
- In IIS Manager, select your website. In the “IIS” section, double-click “URL Rewrite.”
- On the “Actions” pane, click “Add Rule(s)…” and select “Blank rule” under “Inbound Rules.”
- Name:
HTTP to HTTPS Redirect - Match URL:
- Requested URL:
Matches the Pattern - Using:
Regular Expressions - Pattern:
(.*)
- Requested URL:
- Conditions:
- Click “Add…”
- Condition input:
{HTTPS} - Check if input string:
Matches the Pattern - Pattern:
^OFF$ - Click “OK.”
- Action:
- Action type:
Redirect - Redirect URL:
https://{HTTP_HOST}/{R:1} - Redirect type:
Permanent (301) - Click “Apply” on the “Actions” pane.
- Action type:
The changes take effect immediately in IIS; no service restart is typically required for certificate bindings.
Post-Installation: Verification and Best Practices
Installing the SSL certificate is a major step, but the process isn’t complete without thorough verification and implementation of best practices to maximize security and performance.
Confirming Your SSL Installation is Successful
After installing the certificate, it’s essential to verify that everything is working as expected.
-
Browser Check:
Open your website in a web browser (e.g., Chrome, Firefox, Edge) usinghttps://your_domain.com. Look for:- Padlock Icon: A closed padlock icon in the address bar signifies a secure connection.
- “https://” Prefix: Confirm the URL starts with
https://. - Green Bar (for EV certificates): If you purchased an Extended Validation (EV) certificate, you might see a green address bar with your organization’s name.
- Certificate Details: Click on the padlock icon, then “Certificate” or “Connection secure” to view the certificate details, ensuring it’s issued for your domain and is valid.
-
Online SSL Checkers:
Use online tools like SSL Labs’ SSL Server Test (ssllabs.com/ssltest/) or DigiCert’s SSL Installation Checker. These tools perform a deep analysis of your SSL configuration, checking the certificate chain, protocols, cipher suites, and potential vulnerabilities. Aim for an ‘A’ or ‘A+’ rating. These tools are invaluable for catching subtle configuration errors or missing intermediate certificates. -
Check for Mixed Content Warnings:
After switching to HTTPS, browse through different pages of your website. Check your browser’s developer console (F12, then “Console” tab) for any “mixed content” warnings. Mixed content occurs when an HTTPS page loads non-HTTPS resources (e.g., images, scripts, stylesheets) from an unsecured origin. You’ll need to update all internal links and resource URLs to usehttps://or relative paths.
Implementing HTTPS Redirects and HSTS
Two crucial steps enhance your site’s security and ensure all traffic utilizes your new SSL certificate:
-
Force HTTPS Redirects:
Even with an SSL certificate installed, users might still access your site viahttp://if they manually type it or follow old links. It’s vital to automatically redirect all HTTP traffic to HTTPS. We included examples for Apache, Nginx, and IIS in the installation sections above. This ensures that all connections are encrypted, preventing data interception and providing a consistent user experience. -
HTTP Strict Transport Security (HSTS):
HSTS is a security policy mechanism that helps protect websites against downgrade attacks and cookie hijacking on insecure connections. When a browser receives an HSTS header from a website, it remembers for a specified duration (max-age) that the site should only be accessed using HTTPS. If a user tries to access the site via HTTP, the browser will automatically change it to HTTPS before even making a request to the server.
We included HSTS header configuration examples for Apache and Nginx. For IIS, you can add it via the “HTTP Response Headers” module.# Nginx example add_header Strict-Transport-Security "max-age=31536000; includeSubDomains" always;# Apache example Header always set Strict-Transport-Security "max-age=31536000; includeSubDomains"The
max-agevalue is in seconds (31536000 seconds = 1 year).includeSubDomainsensures the policy applies to all subdomains. HSTS should be implemented carefully after verifying HTTPS works perfectly, as it can cause accessibility issues if your HTTPS configuration is flawed.
Common Troubleshooting Scenarios
Even with careful preparation, issues can arise. Here are some common problems and their solutions:
-
“Not Secure” Warning Still Appears:
- Check
SSLCertificateChainFile/ssl_trusted_certificate: Often, this means the intermediate certificates (CA bundle) are missing or incorrectly configured, breaking the chain of trust. - Certificate Mismatch: Ensure the private key (
.key) matches the certificate (.crt) file. If they don’t, the server won’t be able to use the certificate. You can verify this using OpenSSL:
bash

# Get Modulus of CSR/CRT

openssl x509 -noout -modulus -in your_domain.crt | openssl md5

# Get Modulus of KEY

openssl rsa -noout -modulus -in your_domain.key | openssl md5
The MD5 hashes should match. - Incorrect ServerName/CN: The certificate’s Common Name (CN) must exactly match your
ServerNamein Apache/Nginx.
- Check
-
Mixed Content Warnings:
- Scan your website’s source code for
http://links to static resources (images, JS, CSS) and update them tohttps://or use protocol-relative URLs (//example.com/resource.js). - Use browser developer tools (F12) to identify insecure requests.
- Scan your website’s source code for
-
SSL Handshake Failure:
- Check firewall rules to ensure port 443 is open.
- Verify the certificate isn’t expired or revoked.
- Ensure the private key permissions are correct.
-
Website Unavailable After Restart:
- Check your server’s error logs (e.g.,
/var/log/apache2/error.logor/var/log/nginx/error.log) for specific error messages. - Run configuration tests (
apachectl configtest,nginx -t) again. - Revert to your backup configuration files if necessary.
- Check your server’s error logs (e.g.,
Maintaining Your Secure Connection and Future Considerations
Installing an SSL certificate is not a set-it-and-forget-it task. Ongoing maintenance is required to ensure continuous security.
Renewing Your SSL Certificate
SSL certificates are not permanent; they have an expiration date (typically 1-2 years for commercial certificates, 90 days for Let’s Encrypt). Allowing a certificate to expire will immediately result in “Not Secure” warnings and a complete breakdown of trust for your website.
- Commercial Certificates: Most CAs send renewal reminders well in advance. The renewal process usually involves generating a new CSR (though sometimes you can re-use the old one) and installing the new certificate files.
- Let’s Encrypt: Tools like Certbot are designed to automate the renewal process. Once configured, Certbot can automatically renew your certificates before they expire, ensuring uninterrupted service. It’s often run as a cron job.
Plan to renew your certificates well before their expiration date to avoid any service disruptions.
The Evolving Landscape of Digital Security
The field of digital security is constantly evolving. New vulnerabilities are discovered, and stronger encryption standards emerge. To stay secure, it’s good practice to:
- Keep Server Software Updated: Regularly update your web server (Apache, Nginx, IIS) and operating system to patch known security vulnerabilities.
- Monitor SSL/TLS Best Practices: Periodically review your SSL configuration using tools like SSL Labs. Aim to use modern TLS versions (e.g., TLS 1.2, TLS 1.3) and strong cipher suites. Deprecate older, less secure protocols like SSLv2, SSLv3, and even TLS 1.0/1.1 if your audience’s browser support allows.
- Consider Advanced Security Features: Explore additional security headers (e.g., Content Security Policy, X-XSS-Protection) and Web Application Firewalls (WAFs) for an extra layer of protection, especially for sensitive applications.
By actively managing your SSL certificates and staying informed about web security best practices, you ensure that your website remains a trusted and secure platform for your users, bolstering your brand and supporting your online endeavors. The investment in time and effort for proper SSL installation and maintenance is a small price to pay for the immense benefits of a secure and trustworthy online presence.
aViewFromTheCave is a participant in the Amazon Services LLC Associates Program, an affiliate advertising program designed to provide a means for sites to earn advertising fees by advertising and linking to Amazon.com. Amazon, the Amazon logo, AmazonSupply, and the AmazonSupply logo are trademarks of Amazon.com, Inc. or its affiliates. As an Amazon Associate we earn affiliate commissions from qualifying purchases.