
The landscape of sandbox gaming has been perpetually transformed by the modding community, and few names carry as much weight as the “All the Mods” (ATM) team. With the release of All the Mods 10 (ATM10), built upon the foundations of Minecraft 1.21, the community has reached a new milestone in technical integration and gameplay depth. Unlike its predecessors, ATM10 leverages the latest advancements in the NeoForge modding API, requiring a specific technical approach for installation and optimization.
Whether you are a seasoned system administrator looking to host a high-performance server or a player seeking to push your hardware to its limits, understanding the technical nuances of the installation process is vital. This guide provides a comprehensive breakdown of how to install All the Mods 10, focusing on software requirements, memory management, and environment configuration.
Understanding the Technical Foundation of All the Mods 10
Before initiating the installation, it is critical to understand the architectural shifts that define All the Mods 10. This version marks a significant transition in the modding ecosystem, moving away from legacy systems to embrace the cutting-edge features of Minecraft 1.21.
The Shift to NeoForge and Minecraft 1.21
For years, the Forge API was the gold standard for complex modpacks. However, ATM10 utilizes NeoForge, a more modern, performance-oriented fork of the original Forge project. This shift requires users to be more intentional about their installation environment. NeoForge is designed to handle the multi-threaded capabilities of modern CPUs more efficiently, which is essential for a pack that includes hundreds of individual mods ranging from complex machinery to expansive world-generation algorithms.
Hardware Requirements and System Optimization
ATM10 is a “kitchen sink” modpack, meaning it contains a vast array of technical, magical, and utility mods. Consequently, it is resource-intensive. To run ATM10 smoothly, your system should meet the following technical specifications:
- Processor: A CPU with high single-core performance is paramount, as Minecraft’s main game loop is largely single-threaded.
- Memory (RAM): A minimum of 8GB of RAM must be allocated specifically to the game client. This is distinct from your total system RAM. A system with 16GB total is highly recommended.
- Storage: An NVMe or SATA SSD is preferred over a traditional HDD to reduce chunk loading times and mitigate “micro-stuttering” during exploration.
Step-by-Step Installation via the CurseForge Ecosystem
The most efficient and user-friendly method for installing All the Mods 10 is through the CurseForge Desktop App. This platform automates the dependency management and version control aspects of the installation.
Setting Up the CurseForge Desktop Application
To begin, navigate to the official CurseForge website and download the launcher for your respective operating system (Windows or macOS). Once installed, ensure that the application is directed to your Minecraft directory. The software acts as a containerized environment, allowing you to keep your vanilla Minecraft installation separate from your modded instances.
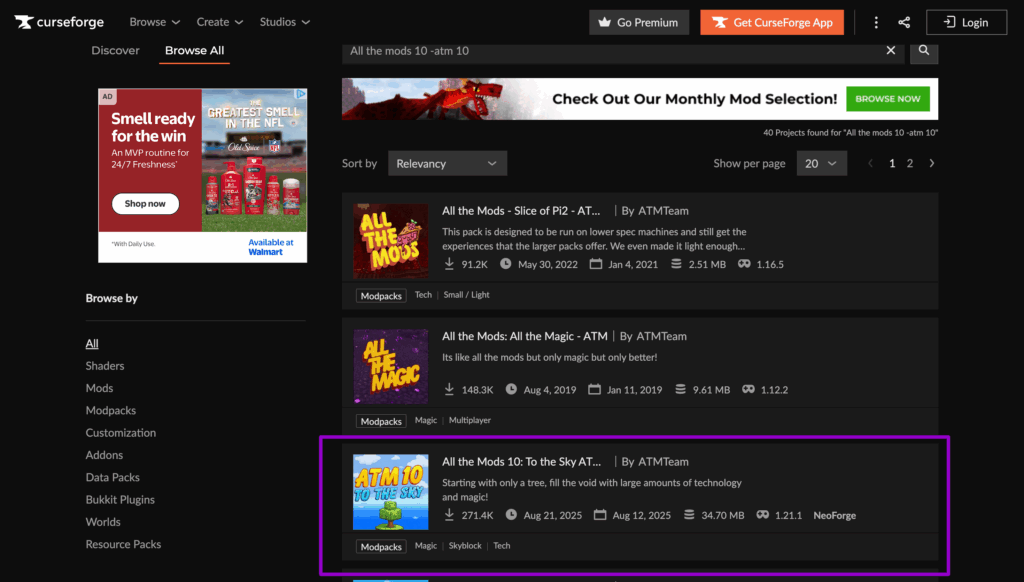
Within the app, search for “All the Mods 10” in the “Browse Modpacks” tab. It is vital to select the version maintained by the “ATMTeam” to ensure you are receiving the official, vetted updates. Click “Install,” and the software will begin pulling the hundreds of .jar files and asset overrides required for the pack.
Allocating System Resources for Peak Performance
One of the most common points of failure in modded Minecraft is the “Out of Memory” (OOM) error. By default, CurseForge may only allocate 4GB of RAM, which is insufficient for All the Mods 10.
To adjust this, navigate to the CurseForge settings, select the Minecraft tab, and scroll down to “Java Settings.” Here, move the “Allocated Memory” slider to at least 8192MB (8GB). If you have 32GB of system RAM, you may increase this to 10GB or 12GB, but be wary of “garbage collection” spikes; allocating too much RAM can sometimes cause the Java Virtual Machine (JVM) to stall while clearing unused data.
Advanced Installation: Leveraging Prism Launcher for Precision
For power users who demand more control over their Java runtime environments and instance metadata, the Prism Launcher is the preferred alternative. Prism is an open-source launcher that allows for granular control over every aspect of the modpack’s execution.

Configuring Java 21 Environments
All the Mods 10 runs on Minecraft 1.21, which necessitates the use of Java 21 (specifically the 64-bit version). Legacy versions like Java 8 or Java 17 will result in an immediate crash upon launch.
When using Prism Launcher, you must ensure that your “Java Path” points to a valid Java 21 OpenJDK or Oracle distribution. Prism makes this easy by allowing you to “Auto-detect” installed runtimes. Using the latest build of Java 21 is beneficial as it includes the most recent security patches and performance optimizations for the G1 Garbage Collector (G1GC).
Managing Instance Metadata and Dependencies
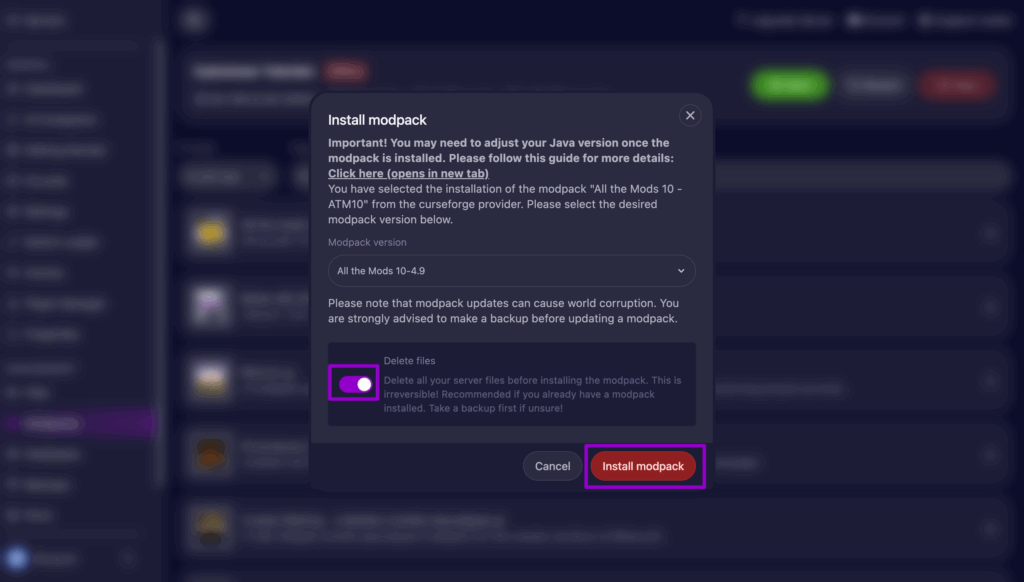
One of the advantages of Prism is its ability to import “All the Mods 10” directly from CurseForge or FTB (Feed The Beast) repositories while allowing the user to bypass proprietary bloatware. To install, click “Add Instance,” select “CurseForge,” and search for the pack.
Once the files are downloaded, Prism allows you to edit the instance.cfg file directly. This is where advanced users can input custom JVM arguments (such as -XX:+UseG1GC -XX:+ParallelRefProcEnabled) to further stabilize frame rates and reduce latency during high-load scenarios like automated resource processing.
Server-Side Deployment: Building a Multiplayer Infrastructure
Running All the Mods 10 on a server requires a different technical approach compared to a local client. Since the server handles the logic, physics, and world-state for all connected players, the overhead is significantly higher.
Linux vs. Windows Hosting Environments
For a professional-grade ATM10 server, a Linux distribution (such as Ubuntu Server or Debian) is the industry standard. Linux offers better memory management and lower system overhead than Windows, ensuring more resources are available for the NeoForge runtime.
When setting up the server, you will need to download the “Server Files” package from the ATM10 CurseForge page. These files include the user_args.txt and the run.sh script. On Linux, ensure the script is given execution permissions via the chmod +x run.sh command.
Automating Backups and Maintenance Scripts
A modpack as complex as All the Mods 10 is prone to data corruption if the server crashes during a world-save operation. Implementing an automated backup solution is a non-negotiable step for server administrators.
Using tools like “FTB Backups 2” (which is often included in the pack) or external cron jobs to compress the world folder allows for easy restoration. Furthermore, setting up a “Restart Script” is essential. Because Java applications can suffer from memory leaks over long periods, scheduling a daily server reboot ensures that the JVM remains fresh and performant.
Troubleshooting and Performance Tuning
Even with a perfect installation, the sheer scale of All the Mods 10 means that technical hurdles are inevitable. Understanding how to interpret log files is the key to resolving these issues.
Resolving Common Conflict Logs and Crash Reports
If the game fails to launch, your first point of reference should be the latest.log or debug.log found in the logs folder of your instance. Search for terms like “FATAL” or “Caused by.” In many cases, crashes in ATM10 are caused by driver incompatibilities. Ensure your GPU drivers are updated to the latest version, as the new rendering engine in Minecraft 1.21 interacts differently with hardware shaders than older versions did.
Integrating Performance Mods: Sodium vs. Embeddium
While All the Mods 10 comes pre-optimized, users on lower-end hardware may seek further enhancements. The pack typically includes “Embeddium” (a NeoForge port of the famous Sodium mod). This mod replaces the vanilla rendering engine with a more efficient pipeline, significantly increasing FPS.
If you experience graphical glitches, check the Embeddium settings under “Video Settings.” Disabling “Always Uploaded Buffers” or adjusting the “Chunk Update Threads” can often resolve flickering or “ghost blocks” without sacrificing the visual fidelity that makes ATM10 so immersive.
By following these technical guidelines, you ensure that your installation of All the Mods 10 is not just functional, but optimized for the long-term stability required for modern modded Minecraft. The transition to 1.21 represents a new era of digital creativity, and with the right setup, you are ready to explore everything this massive modpack has to offer.
aViewFromTheCave is a participant in the Amazon Services LLC Associates Program, an affiliate advertising program designed to provide a means for sites to earn advertising fees by advertising and linking to Amazon.com. Amazon, the Amazon logo, AmazonSupply, and the AmazonSupply logo are trademarks of Amazon.com, Inc. or its affiliates. As an Amazon Associate we earn affiliate commissions from qualifying purchases.