The hum of a finely-tuned engine, the assertive growl of a performance exhaust, or simply the peace of mind that comes from a well-maintained vehicle – these are experiences many car enthusiasts and daily drivers cherish. When it comes to modifying or replacing your car’s exhaust system, specifically the muffler, the idea of welding can often be a significant deterrent. Welding requires specialized equipment, specific skills, and often leads many to a professional shop, incurring significant labor costs.
However, a secret well-known among savvy DIYers is that installing an aftermarket muffler without welding is not only possible but also a highly accessible, cost-effective, and immensely satisfying project. This comprehensive guide will demystify the process, empowering you to upgrade your vehicle’s sound and performance from the comfort of your own garage. Whether you’re looking to replace a rusted OEM part, enhance your car’s acoustics, or simply save a substantial sum on professional labor, embracing the weld-free installation method is a smart move for any mechanically inclined individual.
We’ll navigate through the essential preparation, tools, step-by-step instructions, and even common troubleshooting tips, ensuring you have all the knowledge needed for a successful installation. Forget the arc and sparks; it’s time to discover the simplicity and efficiency of a clamp-on, bolt-on approach to aftermarket muffler installation.
Why Go Weld-Free? The Benefits of DIY Muffler Installation
Opting for a weld-free aftermarket muffler installation isn’t just a matter of convenience; it unlocks a host of advantages that cater to the budget-conscious, the aspiring mechanic, and those who simply appreciate the satisfaction of a job well done. In an era where online resources and smart tools (Tech) make complex tasks more approachable, tackling this automotive project yourself aligns perfectly with modern DIY ethos, directly impacting your wallet (Money) and allowing for greater personalization with chosen components (Brand).
Cost Savings and Financial Freedom
One of the most compelling reasons to undertake a weld-free muffler installation yourself is the significant financial saving. Professional automotive labor rates can quickly escalate, often ranging from $80 to $150 per hour or more, depending on your location and the shop’s expertise. A muffler replacement or upgrade, even a relatively simple one, can accumulate several hours of labor, especially if welding is involved. By choosing the DIY route, you eliminate these labor charges entirely. The money saved can then be reinvested into higher-quality aftermarket parts, other vehicle upgrades, or simply kept in your pocket. This approach aligns perfectly with sound personal finance principles, turning a potential expense into a rewarding investment in your own skills and vehicle. For those focused on online income or side hustles, understanding such cost-saving techniques can even spark ideas for content creation or specialized repair services.
Accessibility and Empowerment for Every Enthusiast
The primary barrier to exhaust system modifications for many has always been the perceived necessity of welding. By eliminating this requirement, the project becomes accessible to a much broader audience. You don’t need to enroll in welding courses, invest in expensive welding equipment, or possess years of specialized fabrication experience. Instead, the tools required are generally common hand tools found in most home garages, along with a few specific items like an exhaust pipe cutter. This accessibility empowers individuals who might have previously felt intimidated by automotive repairs to take control of their vehicle’s maintenance and upgrades. It fosters a sense of accomplishment and builds confidence, paving the way for tackling more complex projects in the future. This democratization of car modification is a testament to the power of readily available information and practical approaches to common automotive tasks.
Customization and Brand Choice Without Compromise
When you rely on a professional shop for exhaust work, you might be limited to the brands or types of mufflers they stock or prefer to work with. While many shops offer excellent choices, doing it yourself with a weld-free solution provides unparalleled freedom. You can meticulously research and select the exact aftermarket muffler that meets your specific criteria for sound profile, material quality, performance gains, and aesthetic appeal. Want a deep, throaty rumble from a specific performance brand like Borla or MagnaFlow? Or perhaps a more subtle, refined tone from a different manufacturer? The choice is entirely yours. This autonomy allows for true personalization, ensuring that the final result perfectly matches your vision for your vehicle. It’s an opportunity to truly embody your personal brand through your car, selecting components that reflect your taste and priorities, rather than being confined by a shop’s inventory.
Learning a New Skill and Connecting with Your Vehicle
Beyond the tangible benefits, undertaking a weld-free muffler installation offers the intangible reward of learning and personal growth. You’ll gain a deeper understanding of your vehicle’s exhaust system, how it functions, and how different components interact. This hands-on experience enhances your mechanical aptitude, problem-solving skills, and attention to detail. There’s an immense satisfaction that comes from stepping back and admiring a modification you’ve performed yourself, knowing you’ve invested your own time and effort into improving your vehicle. It’s a rewarding connection with your car that goes beyond simply driving it, fostering a sense of pride and competence. In an increasingly digital world, these practical, tactile skills offer a refreshing counterpoint, proving that some of the most rewarding “tech” involves working with your hands.
Essential Tools and Materials for Your Weld-Free Installation
Before you dive under your vehicle, proper preparation is paramount. Having all the necessary tools and components readily available will ensure a smooth, efficient, and frustration-free installation process. This section details everything you’ll need, from basic hand tools to specialized equipment and, of course, the star of the show: your new aftermarket muffler. Thinking ahead about what you need is a core principle of productivity, ensuring you avoid costly delays or repeat trips to the hardware store.
Gathering Your Arsenal: Tools for Success
The beauty of a weld-free installation lies in its reliance on common garage tools. Here’s a comprehensive list:
- Vehicle Jack and Jack Stands: Absolutely crucial for safely lifting and supporting your vehicle. Never work under a car supported only by a jack.
- Wrench Set and Socket Set (Metric/SAE): You’ll need various sizes to loosen and tighten exhaust clamps and hanger bolts. A ratchet with extensions will be particularly useful.
- Penetrating Oil: Essential for loosening rusted bolts and nuts that have been exposed to road grime and elements. Brands like WD-40 Specialist Penetrant or PB Blaster are highly recommended.
- Exhaust Hanger Removal Tool: While not strictly necessary (a pry bar or large flathead screwdriver can sometimes work), this specialized tool makes removing stubborn rubber exhaust hangers significantly easier and prevents damage.
- Rubber Mallet: Useful for gently tapping components into place or dislodging rusted sections.
- Exhaust Pipe Cutter or Reciprocating Saw (with metal blade): If you need to cut a section of your existing exhaust, these are the tools of choice. A chain-style exhaust pipe cutter is excellent for clean cuts in tight spaces.
- Safety Glasses and Gloves: Always protect your eyes and hands. Exhaust components can be sharp, and rust particles are irritating.
- Wire Brush: For cleaning rust and grime from existing pipes to ensure a good seal with new clamps.
- Torque Wrench: Crucial for tightening clamps and bolts to manufacturer specifications, preventing over-tightening which can strip threads or damage components, and under-tightening which leads to leaks.
Selecting the Right Aftermarket Muffler
Choosing the correct aftermarket muffler is critical, not just for sound and performance, but also for ensuring a weld-free installation is viable.
- Compatibility: Most importantly, ensure the aftermarket muffler is designed as a direct-fit, bolt-on replacement for your specific vehicle’s year, make, and model. Many manufacturers, especially reputable brands like Borla, MagnaFlow, Flowmaster, or Cherry Bomb, offer application-specific mufflers that perfectly align with your existing exhaust piping and hanger locations. Always double-check product descriptions and part numbers.
- Inlet/Outlet Diameter: Verify that the new muffler’s inlet and outlet pipe diameters match your existing exhaust system’s piping. This is essential for a secure, leak-free clamp connection.
- Muffler Type and Sound Profile: Aftermarket mufflers come in various designs (chambered, straight-through, turbo-style) each producing a distinct sound. Research sound clips and reviews online (leveraging Tech resources) to find a sound you’ll be happy with. Different brands often have signature sounds – consider which brand aligns with the acoustic performance you desire for your car’s “personal brand.”
- Material: Stainless steel offers superior corrosion resistance and longevity compared to aluminized steel, though it often comes at a higher price point. Consider your climate and budget when making this choice.
Crucial Hardware and Accessories for a Secure Fit
The success of a weld-free installation hinges on the quality and correct application of these supporting materials:
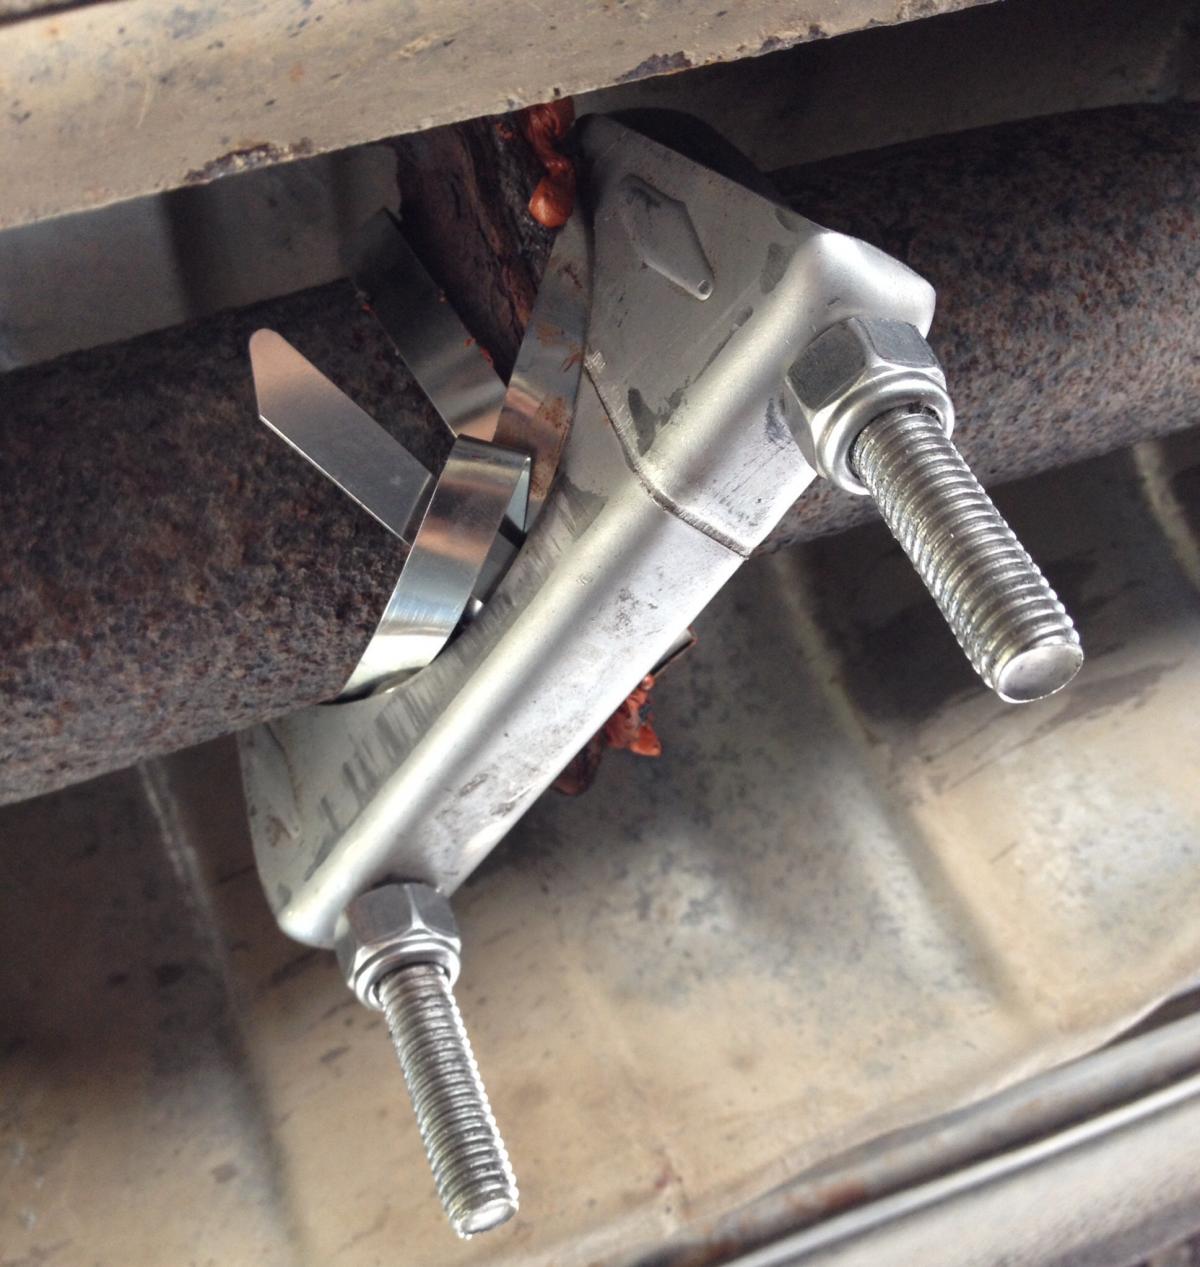
- Exhaust Clamps: High-quality band clamps (like butt-joint clamps or lap-joint clamps) are far superior to U-bolt clamps for sealing and holding power, and they create a cleaner look. Ensure they match the pipe diameter.
- New Exhaust Hangers: Often, your old rubber hangers might be dry-rotted, cracked, or simply too stiff to easily transfer to a new muffler. It’s good practice to replace them. Polyurethane hangers offer greater durability and reduce exhaust movement.
- Exhaust Sealant/Paste: This heat-resistant paste, often a silicone-based or cement-like compound, is applied to pipe joints before clamping. It helps create an airtight seal, preventing exhaust leaks and sealing minor imperfections.
- Anti-Seize Compound: Apply this to the threads of new bolts and clamps to prevent future seizing, making removal easier down the line.
Having these items on hand before you begin will save you valuable time and prevent mid-project interruptions, allowing you to focus on the task at hand with confidence.
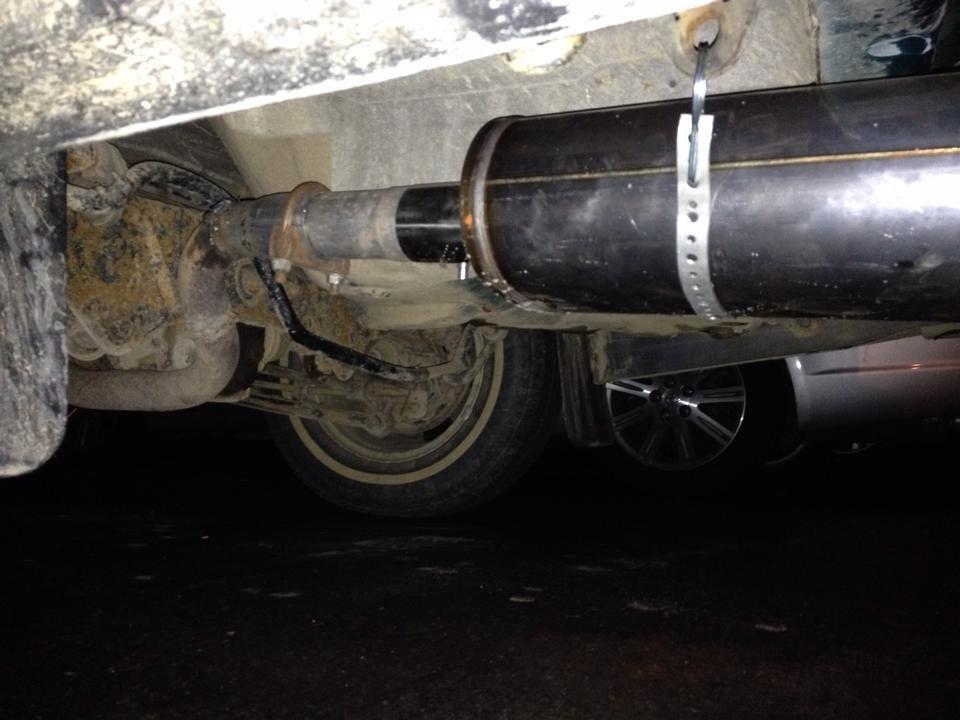
Step-by-Step Guide to a Seamless Weld-Free Muffler Swap
With your tools and new muffler ready, it’s time to get your hands dirty. This section provides a detailed, step-by-step walkthrough to ensure a safe and successful weld-free installation. Following these instructions carefully will not only yield a great-sounding exhaust but also bolster your confidence in tackling automotive projects.
Safety First: Preparing Your Workspace
Safety should always be your top priority. An improperly secured vehicle can lead to serious injury or worse.
- Park on a Flat, Level Surface: Ensure your car is on stable ground, away from traffic or hazards.
- Engage Parking Brake and Block Wheels: This prevents any accidental rolling. Use wheel chocks on the wheels opposite to the end you’re lifting.
- Lift the Vehicle: Using a sturdy floor jack, lift the rear of your vehicle to a comfortable working height. Ensure the jack is positioned on a secure frame point, not on exhaust components or flimsy bodywork.
- Secure with Jack Stands: Crucially, place heavy-duty jack stands under the vehicle’s frame rails or designated jack points. Lower the vehicle onto the stands, ensuring it’s stable. Gently shake the car to confirm it’s secure before crawling underneath.
- Personal Protective Equipment (PPE): Don your safety glasses and work gloves. A creeper can also make working underneath the car much more comfortable.
Disconnecting the Old: Removing the OEM Muffler
This is often the most challenging part due, primarily, to rust and seized components. Patience is key.
- Locate Connection Points: Identify where your existing muffler connects to the rest of the exhaust system (usually with a clamp or flange) and where it’s supported by rubber hangers.
- Apply Penetrating Oil: Liberally spray all bolts, nuts, and clamp connections with penetrating oil. Let it soak for at least 15-30 minutes, or even longer if the rust is severe. Reapply if needed. This step cannot be overstated for its importance.
- Loosen/Remove Clamps and Bolts: Using your socket and wrench set, carefully loosen and remove any clamps or bolts connecting the muffler to the exhaust pipe. If bolts are excessively rusted, you might need a breaker bar for extra leverage. Be prepared for them to snap – having replacement nuts and bolts on hand is a good idea.
- Remove Exhaust Hangers: This is where the exhaust hanger removal tool shines. Lubricate the rubber hangers with soapy water or silicone spray to make them slide off the metal rods more easily. If you don’t have the tool, a large pry bar or strong screwdriver can work, but be careful not to tear the rubber.
- Support and Remove the Muffler: Once all connections and hangers are free, the muffler will be heavy. Have someone help support it, or use a second jack. Carefully maneuver and lower the old muffler from underneath the vehicle.
Fitting the New: Installing the Aftermarket Muffler
With the old muffler out, the installation of your new aftermarket unit can begin.
- Clean Exhaust Pipe: Use a wire brush to thoroughly clean the end of the existing exhaust pipe where the new muffler will connect. Remove any rust, carbon buildup, or old sealant to ensure a clean surface for the clamp and sealant.
- Apply Anti-Seize and Sealant: If your new muffler comes with new bolts, apply anti-seize compound to the threads. Then, apply a bead of high-temperature exhaust sealant around the cleaned end of the existing exhaust pipe where the new muffler will slide over.
- Attach New Hangers (if applicable): If you’re replacing the rubber hangers, slide the new ones onto the muffler’s hanger rods before lifting it into place.
- Position the New Muffler: Carefully lift the new muffler into position, sliding the inlet pipe over the existing exhaust pipe, or aligning flanges if it’s a bolt-on type. Guide the hanger rods into the rubber hangers.
- Install Clamps/Bolts (Loosely at First): Place the new exhaust clamps over the connection points, but only tighten them finger-tight for now. This allows for adjustments. If it’s a bolted flange connection, install the bolts and nuts loosely.
- Align and Adjust: Step back and visually inspect the muffler’s alignment. Ensure it’s straight, centered, and that the exhaust tip protrudes appropriately from the rear bumper without touching. Adjust the muffler’s rotation and position as needed. This flexibility is a key advantage of loose clamps.
- Tighten All Connections: Once satisfied with the alignment, progressively tighten all clamps and bolts. If using a torque wrench, follow the manufacturer’s specifications for the clamps. Overtightening can crush pipes or strip threads, while undertightening will lead to leaks. Work systematically, tightening each clamp a little at a time until fully secure.
- Final Checks: Give all connections a firm tug and shake to ensure they are solid. Double-check that all hangers are properly seated.
Final Checks and Post-Installation Tips
You’re almost done! A few crucial steps remain to confirm your hard work pays off.
- Lower the Vehicle: Slowly lower your vehicle from the jack stands, then remove the jack.
- Initial Startup and Leak Check: Start the engine. Immediately listen for any unusual rattles, clunks, or whistling sounds, which could indicate a loose connection or an exhaust leak. With the engine running (and the exhaust system hot), carefully feel around the pipe joints for escaping gases, or use a smoke machine if available. Some people use soapy water sprayed on the joints; bubbles will form if there’s a leak.
- Re-Torque After Driving: After your first few drives (e.g., 50-100 miles), it’s a good idea to re-check and re-torque all clamps and bolts. Heat cycles can cause components to settle, and minor retightening might be necessary to maintain a perfect seal.
- Enjoy the New Sound: Take your car for a drive and appreciate the new sound profile. Most aftermarket mufflers require a “break-in” period of a few hundred miles before they achieve their final acoustic characteristics.
Common Challenges and Troubleshooting for DIYers
Even with meticulous planning, DIY projects can sometimes present unexpected hurdles. Understanding common challenges and how to address them can save you time, frustration, and ensure the longevity of your weld-free muffler installation. Anticipating these issues is a hallmark of good technical troubleshooting.
The Battle Against Rust
Rust is the archenemy of exhaust work, especially on older vehicles or those in harsh climates. Seized bolts and stubborn hangers are almost guaranteed.
- Seized Bolts/Nuts: If penetrating oil isn’t enough, try heating the nut with a propane torch (with extreme caution, away from fuel lines or flammable materials). The expansion and contraction can help break the rust bond. Alternatively, a nut splitter can be used to crack the nut, allowing easy removal.
- Stuck Hangers: If the rubber hangers simply won’t budge even with lubrication and the removal tool, consider cutting the metal hanger rod with an angle grinder or reciprocating saw. This is a last resort, as you’ll need to replace the entire hanger assembly, but it’s sometimes the only way. Always have new hangers on hand just in case.
- Rusted Pipes: If your existing exhaust pipe is heavily rusted or corroded at the connection point, it might be too thin or brittle for a secure clamp connection. In such cases, you might need to cut back to a healthier section of pipe and potentially use an exhaust pipe expander or a different type of coupler to bridge the gap.
Achieving a Perfect Seal
Exhaust leaks are annoying (and potentially dangerous due to carbon monoxide) and can degrade performance and sound.
- Identifying Leaks: A distinct “hissing” or “ticking” sound (especially when cold) usually indicates a leak. As mentioned, the soapy water test or feeling for escaping gases with a hand are effective methods.
- Insufficient Sealant: Ensure you applied enough high-quality exhaust sealant evenly around the joint.
- Improper Clamp Tightening: Clamps need to be tightened firmly but not excessively. Overtightening can warp or crush the pipe, creating a new leak path. Under-tightening obviously won’t seal properly. A torque wrench is ideal here.
- Mismatched Pipe Sizes: Even slight discrepancies in pipe diameter can prevent a perfect seal. Double-check your muffler’s inlet/outlet size against your vehicle’s existing pipe diameter. If there’s a minor difference, sometimes an exhaust pipe expander can gently reshape the existing pipe, or a specialized step-down/up clamp can be used.
Dealing with Misalignment
A crooked muffler or a misaligned exhaust tip can be an eyesore and may even cause contact with the bumper or suspension components, leading to rattles.
- Loose Clamps for Adjustment: The key to proper alignment is to keep all clamps slightly loose during the initial fitting process. This allows for rotational and lateral adjustments.
- Two-Person Job: Having a helper can be invaluable here. One person can hold the muffler in the desired position while the other tightens the clamps.
- Checking Clearance: Before final tightening, ensure there’s ample clearance between the muffler, tailpipe, and any surrounding vehicle components (fuel tank, suspension, bumper, heat shields). Exhaust systems move with engine torque and road bumps.
- Hanger Adjustment: Sometimes, bending the metal hanger rods slightly or using adjustable exhaust hangers can help achieve perfect alignment.
Noise and Vibration Concerns
After installing a new muffler, some specific noises or vibrations might arise.
- Rattling: A rattle often indicates contact between the exhaust system and another vehicle component (e.g., bumper, heat shield, suspension arm) or a loose hanger. Check clearances again and ensure all hangers are securely in place and not worn out.
- Drone: Some aftermarket mufflers, particularly aggressive ones, can produce an unpleasant “drone” at certain RPMs (usually during highway cruising). While a weld-free installation won’t cause drone itself, the choice of muffler might. If the drone is unbearable, you might consider adding an exhaust resonator or swapping the muffler for a different type with a less aggressive sound profile. This is often a matter of brand characteristic and personal preference.
- Exhaust Puffs/Leaks: If you hear distinct “puffing” sounds, especially when accelerating, it’s almost certainly an exhaust leak that needs immediate attention. Refer back to the “Achieving a Perfect Seal” tips.
By being prepared for these common issues and knowing how to troubleshoot them, you can confidently navigate your weld-free muffler installation, ensuring a professional-looking and great-sounding result.

Conclusion
Installing an aftermarket muffler without welding is a rewarding project that combines practical mechanics with significant benefits for the savvy car owner. By following the comprehensive steps outlined in this guide, you’ve not only learned a valuable skill but also saved substantial money, gained full control over your vehicle’s customization, and deepened your understanding of its mechanical workings.
The weld-free method empowers you to choose the exact aftermarket muffler that aligns with your desired sound and performance, allowing you to personalize your vehicle’s auditory signature (a key aspect of your car’s “brand identity”). Furthermore, the substantial cost savings achieved by foregoing professional labor directly contributes to your personal financial well-being, proving that smart DIY choices are a potent tool in managing your vehicle expenses effectively.
This project is a testament to the accessibility of modern automotive maintenance, where the right tools, detailed instructions, and a dose of patience can lead to professional-grade results without needing specialized welding equipment. So, if you’ve been contemplating a muffler upgrade or replacement, shed any apprehension about welding. Embrace the clamps, the hangers, and the satisfaction of a job expertly done by your own hands. Enjoy the enhanced rumble, the improved aesthetics, and the undeniable pride that comes with a successful DIY aftermarket muffler installation. Your car, and your wallet, will thank you.
aViewFromTheCave is a participant in the Amazon Services LLC Associates Program, an affiliate advertising program designed to provide a means for sites to earn advertising fees by advertising and linking to Amazon.com. Amazon, the Amazon logo, AmazonSupply, and the AmazonSupply logo are trademarks of Amazon.com, Inc. or its affiliates. As an Amazon Associate we earn affiliate commissions from qualifying purchases.