In today’s digital landscape, the ability to create stunning visual content, engaging videos, and robust designs is no longer a luxury but a necessity for individuals and businesses alike. Adobe Creative Cloud stands as the undisputed industry standard, a powerful ecosystem of interconnected applications that empower millions worldwide to bring their creative visions to life. From graphic designers and photographers to video editors and web developers, Creative Cloud offers an unparalleled suite of tools like Photoshop, Illustrator, Premiere Pro, InDesign, and many more, all designed to enhance productivity and foster innovation.
For those looking to dive into the world of professional design and media creation, installing Adobe Creative Cloud is the essential first step. This guide will walk you through the entire process, from preparing your system to troubleshooting common issues, ensuring a smooth and successful setup. We’ll also touch upon how this investment in technology can significantly impact your personal brand, corporate identity, and even open avenues for online income, aligning perfectly with the core topics of Tech, Brand, and Money that drive our platform. Whether you’re an aspiring artist, a seasoned professional, or a business looking to elevate your digital presence, mastering Creative Cloud is a game-changer. Let’s get started on unlocking your creative potential.
Preparing for Your Creative Cloud Installation
Before you even begin the download process, a little preparation can save you a lot of headaches. Ensuring your system is ready and understanding your subscription options are crucial steps for a seamless installation and a productive future with Adobe Creative Cloud. This initial phase aligns closely with our “Tech” focus, emphasizing system readiness and digital security, while also touching upon “Money” aspects related to subscription choices.
Checking System Requirements
Adobe Creative Cloud applications are powerful, and as such, they require a certain level of hardware to run efficiently. Running demanding software like Photoshop or Premiere Pro on an underpowered machine can lead to frustration, slow performance, and even project loss. Before you commit to a subscription, it’s vital to check the minimum system requirements for the specific applications you plan to use. While the Creative Cloud desktop app itself is lightweight, the individual applications within it can be quite demanding.
Typically, you’ll need:
- Operating System: A recent version of Windows (Windows 10/11) or macOS (the last 3-4 major versions are usually supported). Always check Adobe’s official website for the most up-to-date compatibility.
- Processor (CPU): A multi-core processor (Intel or AMD) with 64-bit support is standard. For video editing or 3D work, faster processors with more cores are highly recommended.
- Random Access Memory (RAM): This is often the biggest bottleneck. While 8GB might be a minimum for some apps, 16GB is a good starting point for general use, and 32GB or more is highly recommended for professional video editing, graphic design with large files, or motion graphics.
- Graphics Card (GPU): A dedicated graphics card with at least 2GB of VRAM is beneficial, especially for applications like Premiere Pro, After Effects, and Photoshop’s more intensive filters. NVIDIA, AMD, or Intel integrated GPUs (with sufficient RAM) can work for lighter tasks.
- Hard Disk Space: You’ll need substantial free space, not just for the installation files but also for temporary files, caches, and your project assets. SSD (Solid State Drive) storage is highly recommended for the operating system and application installations due to its speed, significantly improving load times and overall performance. Allocate at least 100GB of free space for the applications alone, and considerably more for your projects.
- Monitor Resolution: A display with at least 1920×1080 resolution is recommended for comfortable workspace.
Failing to meet these requirements can lead to poor performance, crashes, and ultimately, a negative impact on your productivity, making your investment less valuable.
Ensuring a Stable Internet Connection
The entire installation process, from downloading the Creative Cloud desktop app to installing individual applications and receiving updates, is internet-dependent. A stable and reasonably fast internet connection is crucial. The initial download of the Creative Cloud desktop app is relatively small, but individual applications like Photoshop or Premiere Pro can range from several gigabytes to tens of gigabytes. Attempting to download these large files on an unreliable or extremely slow connection can lead to corrupted downloads, prolonged wait times, and installation failures. Consider using a wired Ethernet connection instead of Wi-Fi for maximum stability during large downloads if possible.
Backing Up Important Data (Optional but Recommended)
While installing new software rarely causes data loss, it’s always a best practice in the realm of digital security to back up your critical files before making significant changes to your system. This falls under our “Tech” focus, specifically digital security and productivity. Accidents can happen – power outages during installation, unexpected system errors, or even user mistakes. Having a recent backup of your documents, photos, and projects ensures peace of mind. You can use cloud services, external hard drives, or network-attached storage (NAS) solutions for this purpose. This small preventative step safeguards your valuable assets and protects your productivity should the unforeseen occur.
Understanding Creative Cloud Plans and Subscriptions
Adobe Creative Cloud operates on a subscription model, offering various plans tailored to different user needs. This is where the “Money” aspect comes into play, as choosing the right plan is key to getting the most value for your investment.
The most common options include:
- Single App Plan: Ideal if you only need one specific application, like Photoshop for photography or Premiere Pro for video editing. This is often more cost-effective if your needs are highly specialized.
- All Apps Plan: This provides access to the entire suite of Creative Cloud applications, offering the best value for professionals who utilize multiple tools (e.g., Photoshop, Illustrator, InDesign, After Effects, Adobe XD) or those looking to expand their skill set.
- Photography Plan: A specialized bundle including Photoshop and Lightroom, perfect for photographers.
- Student and Teacher Plan: Adobe offers significant discounts for eligible students and educators, providing access to the All Apps plan at a reduced rate. This is an excellent opportunity for those in academia to access powerful tools without breaking the bank.
- Business Plans: Designed for teams and organizations, offering centralized billing, administration, and support.
Evaluate your current and future needs carefully. Consider not just what you use now, but what tools might enhance your “Brand Strategy” or enable new “Online Income” streams. Understanding the pricing tiers and the value proposition of each plan is crucial for making an informed financial decision.
Step-by-Step Guide to Installing Adobe Creative Cloud
With your system prepped and your subscription chosen, you’re ready to dive into the core installation process. This section provides a clear, step-by-step walkthrough, focusing on the practical “Tech” aspects of getting the software up and running.
Step 1: Visiting the Adobe Website and Signing Up/Logging In
Your journey begins at the official Adobe website. Navigate to www.adobe.com. If you’re a new user, you’ll need to sign up for an Adobe ID. This involves providing an email address and creating a password. If you already have an Adobe ID, simply log in to your account. Your Adobe ID is your gateway to managing your subscription, downloading apps, accessing cloud storage, and synchronizing your settings across devices. Ensure you use a valid email address that you have regular access to, as it will be used for account management and important notifications.
Step 2: Choosing Your Subscription Plan
Once logged in (or as part of the sign-up process), you’ll be prompted to select or confirm your Creative Cloud subscription plan. As discussed in the preparation phase, select the plan that best suits your needs – whether it’s the “All Apps” plan, a “Single App” plan, or the “Photography” plan. Follow the on-screen prompts to complete the payment details and activate your subscription. Adobe typically offers monthly or annual payment options; annual plans are often more cost-effective in the long run. After successful payment, your Creative Cloud entitlements will be activated, allowing you to proceed with downloading the software. This step bridges the “Money” decision with the “Tech” access to the applications.
Step 3: Downloading the Creative Cloud Desktop App
After activating your subscription, you’ll be directed to a page or receive an email with a link to download the Creative Cloud Desktop App. This application is the central hub for managing all your Adobe software. It’s relatively small and quick to download. Click the download button for your operating system (Windows or macOS). The file will typically be named something like CreativeCloudInstaller.exe (for Windows) or CreativeCloudInstaller.dmg (for macOS). Save it to a location on your computer where you can easily find it, such as your Downloads folder.
Step 4: Installing the Creative Cloud Desktop App
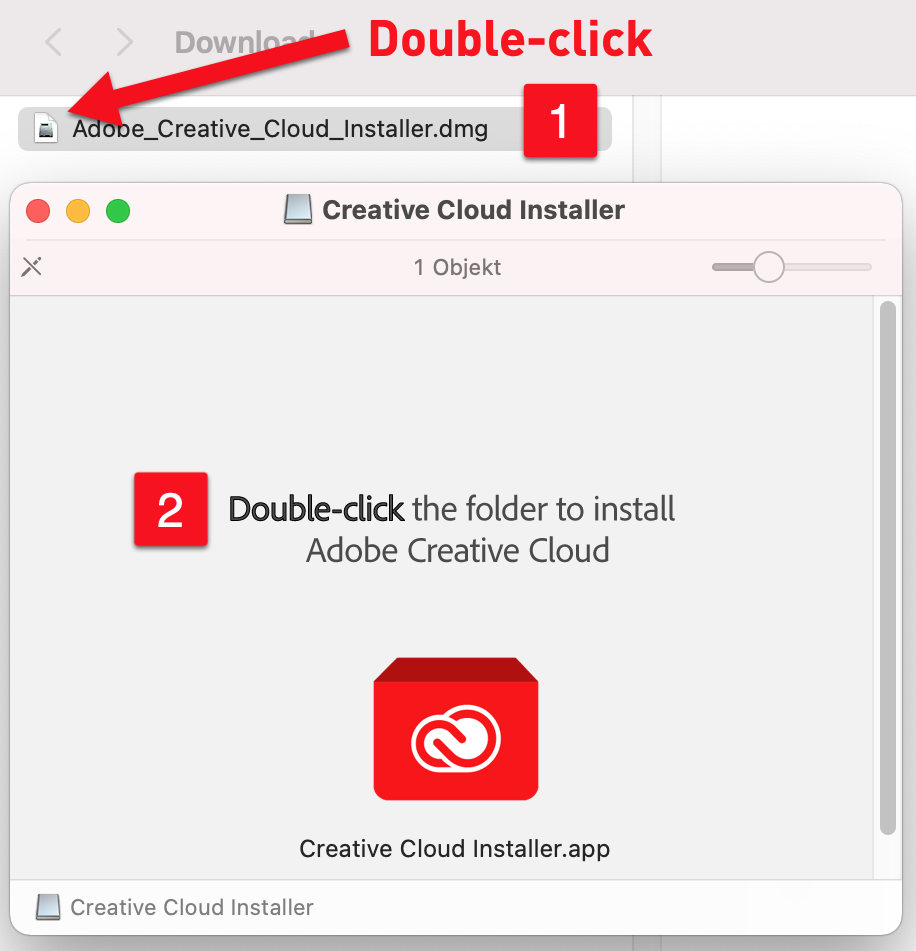
Once the download is complete, locate the installer file and double-click it to begin the installation.
- On Windows: The User Account Control (UAC) might ask for permission to run the installer; click “Yes.” Follow the on-screen instructions. You’ll likely just need to click “Continue” or “Install.” The installer will then download and set up the Creative Cloud Desktop App.
- On macOS: Double-click the
.dmgfile. This will open a window with the installer icon. Double-click the installer icon and follow the prompts. You may need to enter your macOS administrator password to authorize the installation.
The installation process for the desktop app is usually quick. Once it’s installed, it will automatically launch, and you may be prompted to log in again with your Adobe ID if you weren’t already.

Step 5: Installing Individual Creative Cloud Applications
With the Creative Cloud Desktop App successfully installed and running, you now have access to the entire library of Creative Cloud applications based on your subscription.
- Open the Creative Cloud Desktop App: If it didn’t launch automatically, find it in your applications folder (Windows Start Menu or macOS Applications folder) and open it.
- Navigate to the ‘Apps’ Tab: In the Creative Cloud Desktop App, you’ll see a list of available applications. You can filter them by category (e.g., Photography, Video & Audio, Design).
- Click ‘Install’ for Your Desired Apps: For each application you wish to use (e.g., Photoshop, Illustrator, Premiere Pro), click the “Install” button next to its name.
- Wait for Downloads and Installation: The app will then download and install each selected application individually. This can take a significant amount of time depending on your internet speed and the size of the application. You can track the progress within the Creative Cloud Desktop App.
- Launch Your Apps: Once an application is installed, the “Install” button will change to “Open.” Click “Open” to launch your newly installed Adobe Creative Cloud application. You can also find them in your system’s applications folder or Start Menu.
Repeat Step 5 for all the Creative Cloud applications you need. Remember, you don’t have to install everything at once; you can add or remove apps anytime through the Creative Cloud Desktop App.
Optimizing Your Creative Cloud Experience
Installing the applications is just the beginning. To truly harness the power of Adobe Creative Cloud and maximize your “Productivity” (Tech), ensure “Brand Consistency” (Brand), and potentially boost your “Online Income” (Money), it’s essential to optimize your workflow and leverage its integrated features.
Managing Your Apps and Updates
The Creative Cloud Desktop App is your central command for all things Adobe. Regularly open it to check for updates. Adobe frequently releases updates that include new features, performance enhancements, and crucial security patches. Keeping your applications up-to-date ensures you have access to the latest tools and maintain a secure environment for your work. You can configure update preferences within the app settings, choosing between automatic updates or manual control. Staying current with software iterations is a core “Tech” best practice that directly impacts your efficiency and the security of your digital assets.
Utilizing Creative Cloud Libraries and Syncing
One of the most powerful features of Creative Cloud is its seamless integration across applications and devices through Creative Cloud Libraries. These libraries allow you to store and share assets like colors, character styles, logos, images, and more, making them instantly accessible in Photoshop, Illustrator, InDesign, and other apps. This is invaluable for maintaining “Brand Consistency” across all your projects and is a cornerstone for professional “Corporate Identity.” For teams, libraries facilitate collaboration, ensuring everyone uses the same approved brand elements. Furthermore, Creative Cloud includes cloud storage, allowing you to sync files across multiple computers and mobile devices, enhancing productivity and enabling flexible workflows, a key “Tech” advantage.
Exploring Adobe Fonts and Stock
Your Creative Cloud subscription also grants you access to Adobe Fonts (formerly Typekit), an extensive library of high-quality fonts that can be activated and used across your Creative Cloud applications and even web projects. This eliminates the need to purchase individual font licenses and ensures you have a diverse typographic palette at your fingertips, crucial for “Brand Strategy” and “Design.” Similarly, Adobe Stock offers millions of royalty-free images, videos, vectors, and templates. While some content requires additional purchases, your Creative Cloud subscription often includes a selection of free assets or discounts. Leveraging these resources can significantly enhance the visual appeal and professionalism of your projects, saving time and money in sourcing assets.
Leveraging Tutorials and Community Resources
Adobe Creative Cloud has a robust ecosystem of learning resources. Whether you’re a beginner or an experienced user, there are countless official Adobe tutorials, community forums, YouTube channels, and online courses available. Investing time in learning new features or mastering specific techniques will directly improve your “Productivity” (Tech) and expand your skill set. This skill development can translate directly into new “Online Income” opportunities, whether through freelancing, offering specialized services, or enhancing your professional portfolio. Actively engaging with the creative community can also provide inspiration, feedback, and networking opportunities, strengthening your “Personal Branding.”
Troubleshooting Common Installation Issues
Even with careful preparation, you might occasionally encounter hiccups during the installation process. This section addresses common “Tech” issues and provides solutions to get you back on track quickly, minimizing downtime and maximizing your “Productivity.”
Internet Connection Problems
The most frequent culprit for installation failures is an unstable or slow internet connection.
- Symptoms: Downloads stall, error messages about network connectivity, or extremely slow progress.
- Solutions:
- Check your connection: Ensure your Wi-Fi is strong or consider connecting via an Ethernet cable for better stability.
- Temporarily disable firewalls/antivirus: Sometimes security software can block legitimate downloads. Temporarily disabling them (and re-enabling immediately after installation) might resolve the issue. Be cautious when doing this.
- Restart your router: A simple reboot can often fix intermittent connection issues.
- Check Adobe’s server status: Occasionally, Adobe’s servers might experience issues. Check their official status page for any outages.
Insufficient Disk Space
If your hard drive doesn’t have enough free space, the Creative Cloud Desktop App will alert you, and installation will fail.
- Symptoms: Error messages indicating “insufficient disk space” or “not enough room.”
- Solutions:
- Free up space: Delete unnecessary files, uninstall old programs, or move large files to an external drive or cloud storage.
- Empty your recycle bin/trash: Files moved there still occupy space until permanently deleted.
- Clear temporary files: Use your operating system’s disk cleanup utility to remove temporary internet files and system cache.
Installation Errors and Freezes
Sometimes the installer itself might freeze or return a generic error code.
- Symptoms: Installer stops responding, progress bar doesn’t move, or an error code appears without clear explanation.
- Solutions:
- Restart your computer: A fresh reboot can clear up background processes that might be interfering.
- Run the installer as administrator: On Windows, right-click the installer and select “Run as administrator.” On macOS, ensure you have administrator privileges.
- Clear Creative Cloud cache: Adobe has specific tools or manual steps to clear the Creative Cloud app’s cache, which can resolve corrupted download issues. Search Adobe’s support pages for instructions on “Creative Cloud cleaner tool” or “clear cache.”
- Check installation logs: For advanced troubleshooting, Adobe applications generate installation logs that can provide more specific error details. These are usually found in temporary directories.
Contacting Adobe Support
If you’ve exhausted all self-help options and are still facing persistent issues, don’t hesitate to contact Adobe Support.
- How to contact: Adobe offers chat, phone, and forum support. Access these through the “Help” section of the Creative Cloud Desktop App or by visiting the Adobe support website.
- What to provide: Be ready to provide your Adobe ID, details about your operating system, specific error messages or codes, and a clear description of the steps you’ve already taken. Having screenshots or a screen recording can be immensely helpful for quicker resolution.
Adobe’s support team is equipped to handle complex installation issues and can guide you through more specific troubleshooting steps or provide direct assistance, ensuring your investment in their tools remains productive.

Conclusion: Unlocking Your Creative Potential
Installing Adobe Creative Cloud is far more than just downloading a few software packages; it’s the gateway to unlocking unparalleled creative capabilities that can transform your personal and professional endeavors. By following the comprehensive steps outlined in this guide, from meticulously preparing your system and selecting the right subscription to navigating the installation process and troubleshooting potential issues, you’re now equipped to seamlessly integrate these industry-leading tools into your workflow.
The journey with Creative Cloud extends beyond mere installation. It’s an ongoing process of learning, optimizing, and leveraging its vast ecosystem. By actively managing updates, utilizing features like Creative Cloud Libraries for “Brand Consistency” and collaboration, and tapping into the wealth of “Tech” resources such as Adobe Fonts and extensive tutorials, you’re not just using software – you’re building a foundation for sustained creativity and productivity. This investment directly contributes to strengthening your “Personal Branding” and “Corporate Identity,” enabling you to produce high-quality content that stands out in a crowded digital world.
Furthermore, mastering Creative Cloud tools opens up significant avenues for “Online Income” and “Side Hustles,” empowering you to offer valuable design, video, and marketing services. Whether you’re enhancing your current career, starting a new freelance venture, or building a creative business, the skills acquired with Adobe Creative Cloud are invaluable “Financial Tools” that yield substantial returns.
So, go forth, explore the incredible power within Photoshop, Illustrator, Premiere Pro, and the entire Creative Cloud suite. Embrace the continuous learning curve, experiment with new features, and connect with the vibrant global community of creators. Your digital canvas awaits, and with Adobe Creative Cloud, your creative potential is truly limitless.
aViewFromTheCave is a participant in the Amazon Services LLC Associates Program, an affiliate advertising program designed to provide a means for sites to earn advertising fees by advertising and linking to Amazon.com. Amazon, the Amazon logo, AmazonSupply, and the AmazonSupply logo are trademarks of Amazon.com, Inc. or its affiliates. As an Amazon Associate we earn affiliate commissions from qualifying purchases.