
Blender, the free and open-source 3D creation suite, has revolutionized the landscape of digital art, animation, and game development. Its robust feature set and continuous development, fueled by a passionate global community, have propelled it into a league of its own. However, even with its extensive capabilities, Blender’s true power often lies hidden beneath its surface, waiting to be unleashed by its vibrant ecosystem of community-contributed tools: addons. These small yet mighty software extensions can dramatically enhance your workflow, introduce specialized functionalities, and bridge gaps in your creative process, transforming a powerful tool into an almost limitless one.
For anyone serious about mastering Blender – whether you’re a beginner looking to streamline simple tasks or an experienced professional aiming for hyper-specific optimizations – understanding how to properly install and manage addons is absolutely fundamental. It’s not just about adding features; it’s about tailoring the software to your unique needs, boosting productivity, and tapping into a vast repository of innovations that extend far beyond Blender’s core offerings. This comprehensive guide will walk you through every step of installing addons in Blender, from preparation to troubleshooting, ensuring you can confidently integrate these powerful enhancements into your 3D workflow.
Unlocking Blender’s Potential: The Power of Addons
Before we dive into the technicalities of installation, let’s take a moment to appreciate what Blender addons are and why they have become such an indispensable part of many artists’ toolkits. Understanding their role can underscore the importance of learning this process, framing it not just as a technical task but as a gateway to unprecedented creative efficiency.
What Exactly Are Blender Addons?
In essence, Blender addons are scripts or collections of scripts, usually written in Python, that extend Blender’s functionality. They are designed to integrate seamlessly into the user interface, often appearing as new panels, menus, or tools. Think of them as miniature software applications built specifically to augment Blender. Because Blender itself is open-source and provides a rich API (Application Programming Interface), developers from around the world can create these extensions, addressing needs that might be too niche for the core development team or providing experimental features before they are potentially integrated into the main program.
Addons range wildly in their scope and complexity. Some might be simple quality-of-life improvements, like a button to quickly align objects, while others can be incredibly complex, introducing entirely new rendering engines, procedural modeling systems, or advanced animation rigs. The beauty of this system is its modularity: you only install what you need, keeping your Blender installation lean while having the flexibility to expand its capabilities whenever a project demands it. This open-source, community-driven development model is a cornerstone of Blender’s success, making it incredibly adaptable to ever-evolving technological trends in the 3D industry.
Why Addons Are Indispensable for 3D Artists
The reasons for integrating addons into your Blender workflow are manifold, touching upon every aspect of a 3D artist’s daily routine:
- Enhanced Productivity: This is arguably the biggest draw. Many addons automate repetitive tasks, consolidate multi-step processes into a single click, or provide more intuitive ways to interact with Blender’s tools. For instance, an addon might help you quickly generate complex geometry like ivy or cables, saving hours of manual modeling. In a fast-paced environment where efficiency is key, such productivity gains are invaluable.
- Specialized Tools and Features: Blender’s core offers general-purpose tools, but specific industries or artistic styles often require highly specialized functionalities. Addons fill this void, offering bespoke solutions for architectural visualization, game asset creation, character rigging, VFX compositing, and much more. This allows artists to use Blender for a broader range of projects without needing to switch to different software.
- Workflow Customization: Every artist has a unique way of working. Addons allow you to customize Blender to fit your personal workflow like a glove. If a particular task feels cumbersome, there’s a good chance an addon exists to make it smoother. This level of personalization transforms Blender from a generic tool into a highly optimized personal workstation.
- Access to Cutting-Edge Innovations: The addon community often acts as a proving ground for new ideas and experimental features. Developers can rapidly prototype and release tools that might eventually inspire official Blender features, giving users early access to the latest advancements in 3D technology. This keeps artists at the forefront of what’s possible in digital creation.
- Community Support and Knowledge Sharing: The development and usage of addons foster a strong sense of community. Issues are often discussed, solutions are shared, and new ideas constantly emerge, creating a vibrant ecosystem of learning and collaboration. This collective intelligence ensures that Blender users always have access to new tools and improved ways of working.
In essence, addons empower you to sculpt Blender into the ultimate 3D creation machine tailored precisely to your creative vision and technical requirements. Mastering their installation is not just a technicality; it’s a strategic move towards unlocking peak productivity and expanding your creative horizons.
Preparing for Installation: Essential Steps
Before you even open Blender, a few preparatory steps will ensure a smooth and successful addon installation process. These involve understanding where to find addons and how to properly acquire them.
Downloading Your Desired Addon
The first and most crucial step is to obtain the addon file itself. Addons are typically distributed as .zip files. It’s critical not to unzip this file yourself before installing, as Blender is designed to handle the .zip archive directly during the installation process.
You’ll find Blender addons from a variety of reputable sources:
- Blender Market: This is arguably the largest commercial marketplace for Blender addons. It offers a wide range of professionally developed, often paid, addons that come with support and regular updates.
- Gumroad: Many independent developers use Gumroad to sell or distribute their addons, offering a mix of free and paid options.
- GitHub: As a platform for software development, GitHub hosts numerous open-source Blender addons. These are often free and developed by individuals or small teams. You’ll typically download the
.zipfile from the “Releases” section or by clicking “Code” and then “Download ZIP”. - Official Blender Website/Community Forums: Blender’s official website and community forums (like Blender Artists) often link to popular or officially endorsed addons.
- Developer Websites/Patreon: Many addon creators have their own websites or Patreon pages where they distribute their work directly.
When downloading, always ensure you are getting the correct version of the addon for your specific Blender version. Addons developed for older versions of Blender might not be compatible with newer releases, and vice-versa. Always check the developer’s notes or compatibility information before downloading. Once downloaded, place the .zip file in an easily accessible location, like your Downloads folder or a dedicated “Blender Addons” folder. Remember, do not extract the contents of the .zip file.
Understanding Blender’s File Structure (Optional but Recommended)
While not strictly necessary for the standard installation method, having a basic understanding of where Blender stores its addons can be immensely helpful, especially for troubleshooting or manual installations. Blender stores addons in specific directories within its configuration folders, which vary slightly depending on your operating system:
- Windows:
C:Users[Your Username]AppDataRoamingBlender FoundationBlender[Blender Version]scriptsaddons - macOS:
/Users/[Your Username]/Library/Application Support/Blender/Blender/[Blender Version]/scripts/addons/ - Linux:
~/.config/blender/[Blender Version]/scripts/addons/
The [Blender Version] part of the path will be specific to the version of Blender you are using (e.g., 3.6, 4.0). The AppData and Library folders are often hidden by default, so you might need to enable “Show hidden files/folders” in your operating system’s settings to navigate to them. Knowing this path will become particularly useful if you ever need to manually install an addon or diagnose an issue that prevents automatic installation.
The Standard Method: Installing via Blender Preferences
The vast majority of addons can and should be installed using Blender’s built-in preferences system. This is the simplest, most reliable, and recommended method for almost all users.
Navigating to the Add-ons Tab
- Open Blender: Launch your Blender application.
- Access Preferences: Go to the top menu bar and click on
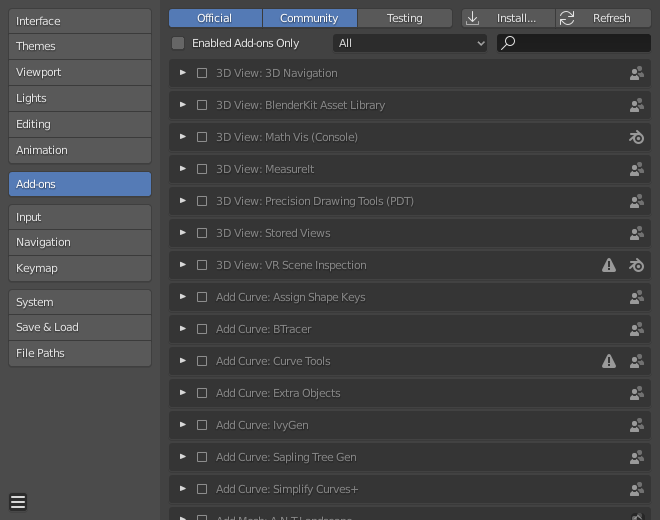
Edit > Preferences.... This will open the Blender Preferences window. - Select the Add-ons Tab: Within the Preferences window, look for the vertical list of tabs on the left-hand side. Click on the
Add-onstab (it often has a puzzle piece icon). This tab displays all currently installed and available addons, categorized and searchable.
Selecting and Installing the Addon File
- Click the “Install…” Button: At the top right of the
Add-onstab, you will see a button labeledInstall.... Click this button. A file browser window will pop up. - Locate Your Addon
.zipFile: Navigate through your file system to the location where you saved the downloaded addon.zipfile. - Select and Install: Select the
.zipfile (e.g.,my_awesome_addon.zip) and then click theInstall Add-onbutton in the file browser window.
Blender will now process the .zip file. If the installation is successful, the Preferences window will automatically refresh, and you should see your newly installed addon appear in the list. Importantly, it will likely be disabled by default.
Activating Your Newly Installed Addon
Once the addon appears in the list, you need to activate it to start using its features.
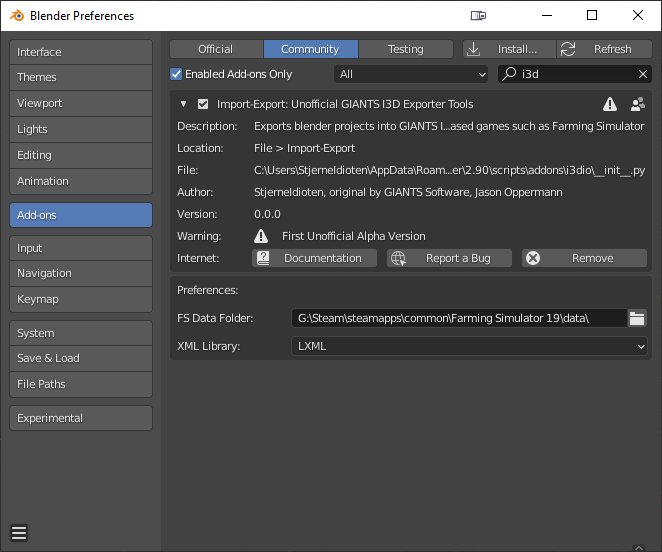
- Search for the Addon (Optional): If you have many addons, you can use the search bar at the top of the
Add-onstab to quickly find your newly installed addon by typing its name. - Enable the Addon: Locate the checkbox next to the addon’s name. Click this checkbox to enable the addon. A green checkmark will appear, indicating it’s active.
- Verify Activation: After enabling, you can usually expand the addon’s entry by clicking the small arrow to its left. This often reveals details about the addon, its version, author, and sometimes specific settings. A “Remove” button will also appear, which you can use to uninstall the addon later if needed.
Ensuring Persistence: Saving User Preferences
By default, changes made in the Blender Preferences window, including enabling addons, are saved automatically when you close the window (as of Blender 2.80+). However, it’s good practice to explicitly save your preferences, especially after making significant changes or if you are using an older Blender version.
- Automatic Save (Default): If “Auto-save Preferences” is enabled (usually found at the bottom-left of the Preferences window), your changes are saved automatically.
- Manual Save: If auto-save is off, or just for peace of mind, click the
☰menu icon (often called the “hamburger menu” or “File” menu) at the bottom-left of the Preferences window. From the dropdown, selectSave Preferences.
Once saved, the addon will be active every time you open Blender, ready for use in all your projects. You can now close the Preferences window and explore your new tools within Blender’s interface!
Advanced Installation & Troubleshooting: When Things Get Tricky
While the standard installation method works for most cases, there are instances where you might encounter issues, or need to resort to a more manual approach. Understanding these alternatives and troubleshooting techniques is crucial for advanced users and when dealing with less common scenarios.
Manual Installation: Understanding the Addons Folder
Manual installation is typically reserved for troubleshooting, when an addon is distributed in an unzipped format, or when you simply prefer to manage your addon files directly.
- Locate Blender’s Addons Directory: As mentioned earlier, you’ll need to navigate to Blender’s specific addon folder.
- Windows:
C:Users[Your Username]AppDataRoamingBlender FoundationBlender[Blender Version]scriptsaddons - macOS:
/Users/[Your Username]/Library/Application Support/Blender/Blender/[Blender Version]/scripts/addons/ - Linux:
~/.config/blender/[Blender Version]/scripts/addons/ - Remember to enable “show hidden files” if you can’t find
AppDataorLibrary.
- Windows:
- Unzip the Addon File (if necessary): If your addon came as a
.zipfile, extract its contents. You should end up with a single folder (e.g.,my_awesome_addon_folder) that contains the addon’s Python files, including an__init__.pyfile at its root. If the.zipcontains another.zipfile or multiple folders, look for the actual addon folder within it. The key is to find the folder that directly contains the__init__.pyfile. - Copy the Addon Folder: Copy this extracted addon folder (the one containing
__init__.py) directly into Blender’saddonsdirectory. - Restart Blender: Close Blender completely and then relaunch it.
- Enable the Addon: Go to
Edit > Preferences > Add-ons. Your manually installed addon should now appear in the list. You will still need to locate it and check the box to enable it, just like with the standard method.
This manual method gives you granular control over where your addons reside and can be useful for developers testing their own scripts or when an addon’s .zip structure isn’t compatible with Blender’s automated installer.
Common Installation Pitfalls and How to Resolve Them
Even with straightforward instructions, things can sometimes go awry. Here are some common issues and their solutions:
- “No Module Named…” or Similar Errors: This usually means the addon was either installed incorrectly or corrupted.
- Cause: Often happens when you install the wrong
.zipfile (e.g., a.zipof the entire GitHub repository instead of the specific addon folder’s.zip) or if the addon was manually unzipped incorrectly. - Solution: Ensure you are installing the correct
.zipfile directly from the developer. If manual installing, make sure you are copying the root addon folder (the one containing__init__.py) into Blender’s addons directory, not a parent folder. Re-downloading the addon can also resolve corrupted files.
- Cause: Often happens when you install the wrong
- Addon Not Appearing in Preferences After Installation:
- Cause: The
.zipfile might have an incorrect internal structure that Blender’s installer can’t parse, or you might have installed a non-addon file. - Solution: Verify the
.zipfile is indeed an addon. If you suspect an incorrect structure, try the manual installation method. Sometimes, restarting Blender completely can help it rescan for new addons.
- Cause: The
- Addon Installs But Doesn’t Work/Crashes Blender:
- Cause: Compatibility issues are the most common culprit. The addon might be designed for a different Blender version than the one you are using, or it might conflict with another addon.
- Solution: Check the addon’s documentation or developer notes for compatible Blender versions. If it’s a conflict, try disabling other addons one by one to isolate the problematic one. Report the issue to the addon developer with details of your Blender version and console error messages (Window > Toggle System Console).
- “Permission Denied” Errors:
- Cause: Your operating system might prevent Blender from writing files to certain directories.
- Solution: Try running Blender as an administrator (Windows) or with elevated permissions. Ensure your user account has read/write access to Blender’s configuration folders.
Compatibility Concerns and Version Management
The world of software is constantly evolving, and Blender is no exception. New versions are released regularly, bringing with them new features and, occasionally, changes to its API that can break older addons.
- Always Check Compatibility: Before downloading and installing an addon, always check the developer’s notes for its compatible Blender versions. A developer will typically specify if an addon works with Blender 2.9x, 3.x, 4.x, etc.
- Keep Blender Updated (Cautiously): While it’s generally good to stay updated with Blender’s stable releases for new features and bug fixes, be aware that a major Blender update might temporarily break some of your installed addons. It’s often wise to wait a short period after a major Blender release for addon developers to update their tools.
- Maintain Separate Blender Installations (Advanced): For professionals who rely heavily on specific addons, it might be beneficial to maintain separate installations of Blender – one stable version for production work and another newer version for testing and development. This way, you can gradually migrate your workflow and addons without disrupting ongoing projects. Tools like the Blender Launcher (for Windows) can simplify managing multiple Blender versions.
By being mindful of these potential hurdles and equipped with the knowledge of manual installation and troubleshooting, you can navigate the addon ecosystem with greater confidence and keep your Blender setup running smoothly.
Beyond Installation: Managing and Maximizing Your Addons
Installing an addon is just the first step. To truly leverage their power and maintain an efficient workflow, you need to know how to manage them over time and how to discover the best tools for your needs.
Updating and Uninstalling Addons
Addons, like any software, receive updates to fix bugs, add new features, or improve compatibility with newer Blender versions.
-
Updating an Addon: The general process for updating an addon is to first uninstall the old version and then install the new one.
- Go to
Edit > Preferences > Add-ons. - Locate the addon you wish to update.
- Expand its details by clicking the arrow.
- Click the
Removebutton. This will delete the addon files from your Blender installation. - Download the new version of the addon (as a
.zipfile). - Use the
Install...button in the Add-ons tab to install the new.zipfile, and then re-enable it.
Some addons might have their own built-in update mechanisms; always check the developer’s instructions.
- Go to
-
Uninstalling an Addon: If an addon is no longer needed, causing issues, or you simply want to declutter your Blender installation:
- Go to
Edit > Preferences > Add-ons. - Locate the addon.
- Disable it first by unchecking its box. While not strictly necessary for removal, it’s good practice.
- Expand its details and click the
Removebutton. - You may want to restart Blender afterward to ensure all traces are cleared from memory.
- Go to
Periodically reviewing and removing unused addons is a good practice to keep your Blender lean, reduce potential conflicts, and improve startup times.
Discovering Essential Addons for Enhanced Workflow
The sheer volume of Blender addons can be overwhelming. To get started, focus on addons that address common pain points or significantly boost productivity for your specific area of interest. Here are some categories and examples that are widely popular:
- Modeling & Retopology:
- HardOps/Boxcutter: Powerful tools for hard surface modeling, booleans, and workflow streamlining.
- RetopoFlow: Makes manual retopology significantly faster and more intuitive.
- Fluent: Another excellent addon for rapid hard surface modeling with non-destructive workflows.
- Animation & Rigging:
- Auto-Rig Pro: Automates character rigging with incredible efficiency, saving countless hours.
- Rigify: Blender’s built-in advanced rigging system, offering complex rigs with minimal setup.
- Rendering & Shading:
- Node Wrangler: An absolute must-have built-in addon that speeds up node editing and material creation exponentially.
- Cycles X: While now integrated, previous versions had experimental features before official release. Addons like
E-CyclesorK-Cyclesprovide optimized, GPU-accelerated versions of Cycles for faster renders. - Asset Browser (Built-in): While not an addon, it’s a powerful system that works perfectly with addon-provided assets.
- Scene Management & Utilities:
- Machin3tools: A collection of highly useful utilities for general workflow improvements.
- Asset Management (various addons): Help organize and reuse your assets across projects.
- Scatter: For efficient scattering of large amounts of objects (e.g., foliage, rocks) across terrains.
Always read reviews, watch tutorials, and consider the developer’s reputation when choosing addons, especially for paid ones. Investing in quality addons can often yield returns in terms of saved time and improved output quality far exceeding their cost.

The Future of Blender Addons and Community Contribution
The addon ecosystem is a testament to the vibrant open-source philosophy that underpins Blender. It highlights how community contribution, fueled by passion and ingenuity, can continuously expand the capabilities of a core piece of software. As technology trends like AI integration and real-time rendering evolve, so too will the addons that enhance Blender. We can expect to see more intelligent tools, more sophisticated procedural generation, and even deeper integration with external software and services, all driven by the creative minds of the addon development community.
By actively participating in this ecosystem – whether by using addons, providing feedback, or even learning Python to develop your own – you contribute to the collective advancement of 3D technology and ensure that Blender remains at the cutting edge of digital content creation.
In conclusion, learning how to install addons in Blender is more than just a technical skill; it’s a strategic move for any 3D artist. It empowers you to customize your workflow, unlock specialized tools, significantly boost your productivity, and stay at the forefront of digital creativity. By following the steps outlined in this guide, you can confidently navigate the world of Blender addons, transforming your 3D creation experience from great to truly exceptional. Embrace the power of the community, explore the vast possibilities, and let addons elevate your Blender journey.
aViewFromTheCave is a participant in the Amazon Services LLC Associates Program, an affiliate advertising program designed to provide a means for sites to earn advertising fees by advertising and linking to Amazon.com. Amazon, the Amazon logo, AmazonSupply, and the AmazonSupply logo are trademarks of Amazon.com, Inc. or its affiliates. As an Amazon Associate we earn affiliate commissions from qualifying purchases.