In the ever-evolving landscape of personalizing our digital lives, the ability to customize every aspect of our smartphones is a key differentiator. Beyond wallpapers and app icons, one of the most immediate and audible ways to express your individuality is by setting a custom ringtone. For Android users, the process of installing a new ringtone might seem straightforward, but it can also present a few nuances depending on your device, the origin of your ringtone, and your preferred method. This comprehensive guide will walk you through the various ways to get your favorite sounds playing every time your phone rings, ensuring your device is as unique as you are.

The main topics of our website revolve around Tech, Brand, and Money, and this guide firmly sits within the Tech domain, offering practical tutorials and insights into leveraging your devices to their fullest. While seemingly a simple tech task, the ability to set a custom ringtone also touches upon personal branding – how you present yourself even through your phone’s audio cues. And in a broader sense, understanding your device’s customization options can contribute to a more satisfying and productive user experience, indirectly impacting your overall digital well-being.
Understanding Android Ringtones: Where Do They Live?
Before diving into the installation process, it’s helpful to understand how Android handles ringtone files. Essentially, Android looks for audio files in specific system folders to designate them as available ringtones. These folders are typically located within your phone’s internal storage. The primary locations are:
- Ringtones: This is the most common and straightforward location for your custom ringtones.
- Notifications: While this folder is for notification sounds, some users might want to assign custom sounds here as well.
- Alarms: Similar to notifications, this folder houses custom alarm sounds.
- Music: Your general music library can also be a source, though moving files to the dedicated “Ringtones” folder is often more efficient for system recognition.
When you download a ringtone or create one, it will likely be in a common audio format like MP3, AAC, OGG, or WAV. Android is quite versatile and supports most of these formats. The key is ensuring the file is accessible to the system’s sound settings.
Where to Find Ringtones
There are several avenues for acquiring new ringtones:
- Pre-installed Ringtones: Most Android devices come with a selection of built-in ringtones. These are readily available through your phone’s settings menu.
- Third-Party Ringtone Apps: The Google Play Store is brimming with applications dedicated to providing a vast library of ringtones. These apps often categorize them by genre, artist, or theme, making it easy to browse and download. Some popular options include Zedge, Ringtone Maker, and Audiko.
- Downloading from Websites: Numerous websites offer free ringtones for download. Exercise caution when downloading from unknown sources, and ensure your device’s security settings are robust.
- Creating Your Own: If you have a specific audio clip you want to use – perhaps a snippet from a song, a memorable quote, or a personal recording – you can create your own ringtone using audio editing apps or software on your computer.
Once you have your desired audio file, the next step is to make it available to your Android system.
Method 1: Using Your Android Device’s Settings (The Easiest Way)
This is the most common and user-friendly method for installing ringtones, especially if your ringtone is already stored on your device or has been downloaded via an app.
For Most Android Devices (Stock Android, Samsung, Google Pixel, etc.)
The exact navigation might vary slightly depending on your Android version and phone manufacturer, but the general steps are as follows:
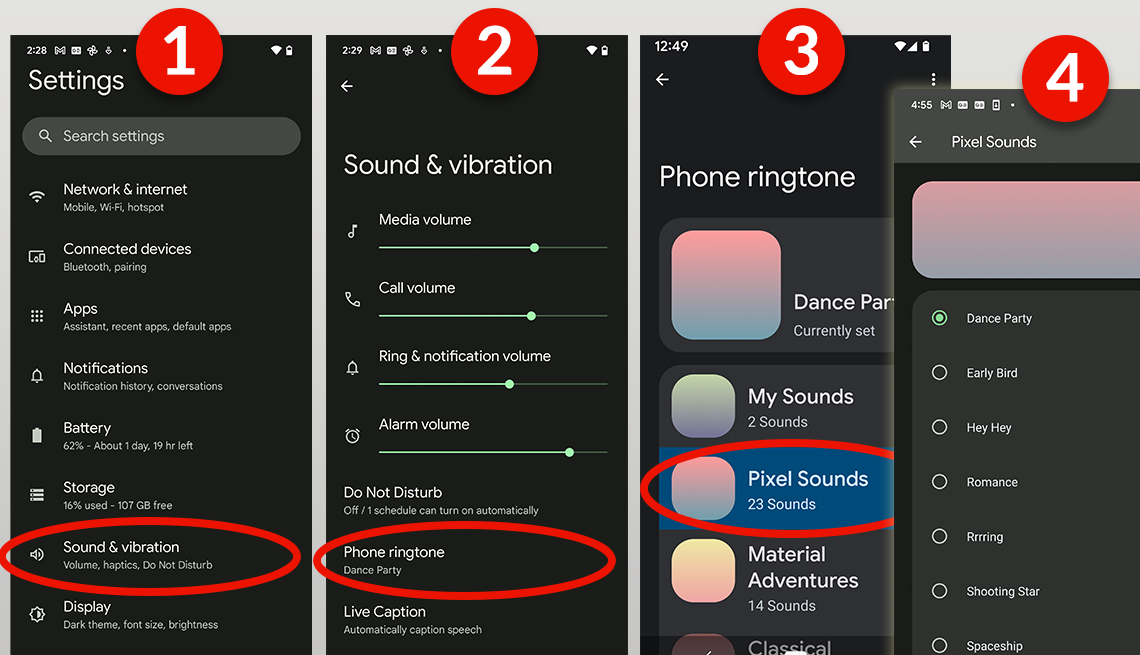
- Open the Settings App: Locate and tap the “Settings” icon on your home screen or in your app drawer.
- Navigate to Sound & Vibration (or similar): Look for a section labeled “Sound & Vibration,” “Sounds,” or “Sound & Notification.”
- Tap on Phone Ringtone: Within the sound settings, you should find an option for “Phone ringtone,” “Ringtone,” or something similar. Tap on it.
- Choose a Ringtone: You will typically see a list of pre-installed ringtones.
- To select a pre-installed ringtone: Simply tap on any of the listed ringtones to preview them. Once you find one you like, tap “OK” or the back arrow to set it.
- To add a custom ringtone: Look for an option that says “Add ringtone,” “Custom ringtone,” “My Sounds,” or a plus (+) icon. Tap on this.
- Browse Your Files: This action will usually open a file manager or a music picker interface. Navigate through your phone’s storage to find the audio file you want to use as your ringtone. This is where the “Ringtones” folder comes in handy if you’ve manually placed your custom sound there.
- Select Your Ringtone: Tap on the audio file you want to set. It should now appear in the list of available ringtones, often under a “Custom” or “Downloaded” section.
- Confirm Your Selection: Select your newly added ringtone from the list and confirm your choice by tapping “OK” or going back.
Note for Samsung Devices: Samsung phones often have a slightly different interface. You might find the ringtone option under Settings > Sounds and vibration > Ringtone. When adding a custom ringtone, you might need to tap the plus (+) icon at the top right corner and then select “Select from phone.”
Setting a Ringtone for a Specific Contact
Beyond setting a default ringtone for all incoming calls, Android also allows you to assign specific ringtones to individual contacts. This is a fantastic way to instantly know who is calling without even looking at your phone.
- Open the Contacts App: Find and open your phone’s “Contacts” app.
- Select a Contact: Tap on the contact you wish to assign a custom ringtone to.
- Edit the Contact: Look for an “Edit” button (often a pencil icon) or tap the three-dot menu and select “Edit.”
- Find the Ringtone Option: Scroll down within the contact’s details. You should see an option for “Ringtone” or “Set Ringtone.”
- Choose a Ringtone: Tap on this option. You will be presented with a list of your available ringtones, including any custom ones you’ve added.
- Select and Save: Choose the desired ringtone for this specific contact and tap “OK” or “Save.” The contact will now have a unique ringtone.
This feature is incredibly useful for prioritizing important contacts or simply adding a personal touch to your communication.
Method 2: Using a File Manager App
If your ringtone file is not automatically appearing in the system’s ringtone picker, or if you prefer a more direct approach, using a file manager app is an excellent alternative. Many Android phones come with a pre-installed file manager, or you can download one from the Google Play Store.
Steps to Use a File Manager
- Download or Locate a File Manager: If your phone doesn’t have one pre-installed, download a reputable file manager app from the Google Play Store (e.g., Files by Google, FX File Explorer, Solid Explorer).
- Find Your Ringtone File: Open the file manager app and navigate to the location where your ringtone audio file is saved. This could be your “Downloads” folder, “Music” folder, or wherever you saved it.
- Copy or Move the File:
- Long-press on the ringtone audio file to select it.
- Choose the “Copy” or “Move” option from the menu that appears.
- Navigate to the Ringtones Folder:
- Go to your phone’s internal storage.
- Look for a folder named “Ringtones.” If this folder doesn’t exist, you can usually create it yourself within the root of your internal storage.
- Paste the File: Once inside the “Ringtones” folder, select the “Paste” option. Your ringtone file should now be located in the correct system folder.
- Access via Settings: After placing the file in the “Ringtones” folder, you can now go back to your phone’s Settings > Sound & Vibration > Phone Ringtone. Your newly added ringtone should appear in the list of available options. Select it as described in Method 1.
This method is particularly useful for users who are comfortable managing files on their devices and want to ensure their ringtones are correctly placed for system recognition. It bypasses potential issues with how certain apps might manage their downloaded sounds.
Method 3: Using Ringtone Maker Apps
Ringtone maker apps are incredibly versatile tools that not only allow you to set custom ringtones but also to edit existing audio files to create your perfect ringtone. If you have a song and only want to use a specific 30-second clip as your ringtone, these apps are ideal.

How to Use a Ringtone Maker App
- Install a Ringtone Maker App: Search for “Ringtone Maker” on the Google Play Store and choose a highly-rated app (e.g., Ringtone Maker, MP3 Cutter and Ringtone Maker).
- Open the App and Select Audio: Launch the app. It will usually scan your device for audio files. Select the song or audio file you want to use.
- Edit the Audio Clip: Most ringtone maker apps provide a waveform editor.
- You’ll see sliders or handles that allow you to select the start and end points of your desired ringtone.
- Preview the selected section to ensure it’s exactly what you want.
- Many apps also offer features like fading in/out, volume adjustment, and other basic audio editing tools.
- Save Your Ringtone: Once you’re satisfied with your edited clip, tap the “Save” button. The app will prompt you to name your new ringtone.
- Set as Ringtone: After saving, the app will typically offer options to set the new sound directly as:
- Phone Ringtone: This will assign it as your default ringtone.
- Alarm Sound: You can set it as your default alarm.
- Notification Sound: You can set it as your default notification sound.
- Assign to Contact: You might also get an option to assign it to a specific contact.
If the app doesn’t offer direct setting options, it will usually save the audio file to a specific folder (often named “Ringtones” or within the app’s own directory). You can then use Method 1 or Method 2 to find and set it as your ringtone.
This method empowers you to create highly personalized audio experiences, transforming your favorite music or audio clips into unique identifiers for your calls.
By mastering these methods, you can transform your Android device from a generic piece of technology into a personalized communication tool that reflects your style and preferences. Whether it’s the thrill of a favorite song or a funny sound bite, your ringtone is just another way to make your digital life more enjoyable and expressive.
aViewFromTheCave is a participant in the Amazon Services LLC Associates Program, an affiliate advertising program designed to provide a means for sites to earn advertising fees by advertising and linking to Amazon.com. Amazon, the Amazon logo, AmazonSupply, and the AmazonSupply logo are trademarks of Amazon.com, Inc. or its affiliates. As an Amazon Associate we earn affiliate commissions from qualifying purchases.