Typography is a fundamental pillar of web design and software interface development. Within the WordPress ecosystem, the ability to transition beyond default system fonts is more than a creative choice; it is a technical optimization that affects readability, user experience (UX), and site performance. As WordPress evolves from a simple blogging platform into a sophisticated Content Management System (CMS), the methods for integrating custom typography have become more varied, ranging from simple plugin-based solutions to manual server-side injections.
This guide provides a comprehensive technical walkthrough on how to install a font in WordPress, ensuring that your site maintains a professional edge while adhering to modern web standards.

Understanding Typography in the WordPress Ecosystem
Before diving into the installation process, it is crucial to understand how WordPress handles fonts. Traditionally, WordPress relied on the user’s local system fonts or the defaults provided by the active theme. However, the modern web demands a more customized approach.
The Importance of Custom Fonts for User Experience
In the realm of software and web technology, the user interface (UI) is the bridge between the machine and the human. Typography plays a critical role in this interface. Custom fonts allow developers to establish a visual hierarchy, making information easier to consume. From a technical standpoint, choosing the right font involves balancing aesthetics with legibility. A font that is too thin or has poor kerning (the space between characters) can lead to high bounce rates and poor accessibility compliance.
Web-Safe Fonts vs. Custom Web Fonts
Historically, developers were limited to “web-safe fonts”—typefaces like Arial, Helvetica, and Times New Roman—that were pre-installed on almost all operating systems. Today, we utilize Web Fonts, which are downloaded by the browser while the page is rendering. These are typically delivered in formats like WOFF (Web Open Font Format) or WOFF2. WOFF2 is the industry standard for tech-focused websites because it offers superior compression, reducing the data load on the visitor’s browser without sacrificing visual quality.
Method 1: Using WordPress Plugins for Easy Integration
For many users and site administrators, the most efficient way to manage typography is through plugins. This method abstracts the code, allowing for rapid deployment without the need to edit theme files or access the server via FTP.
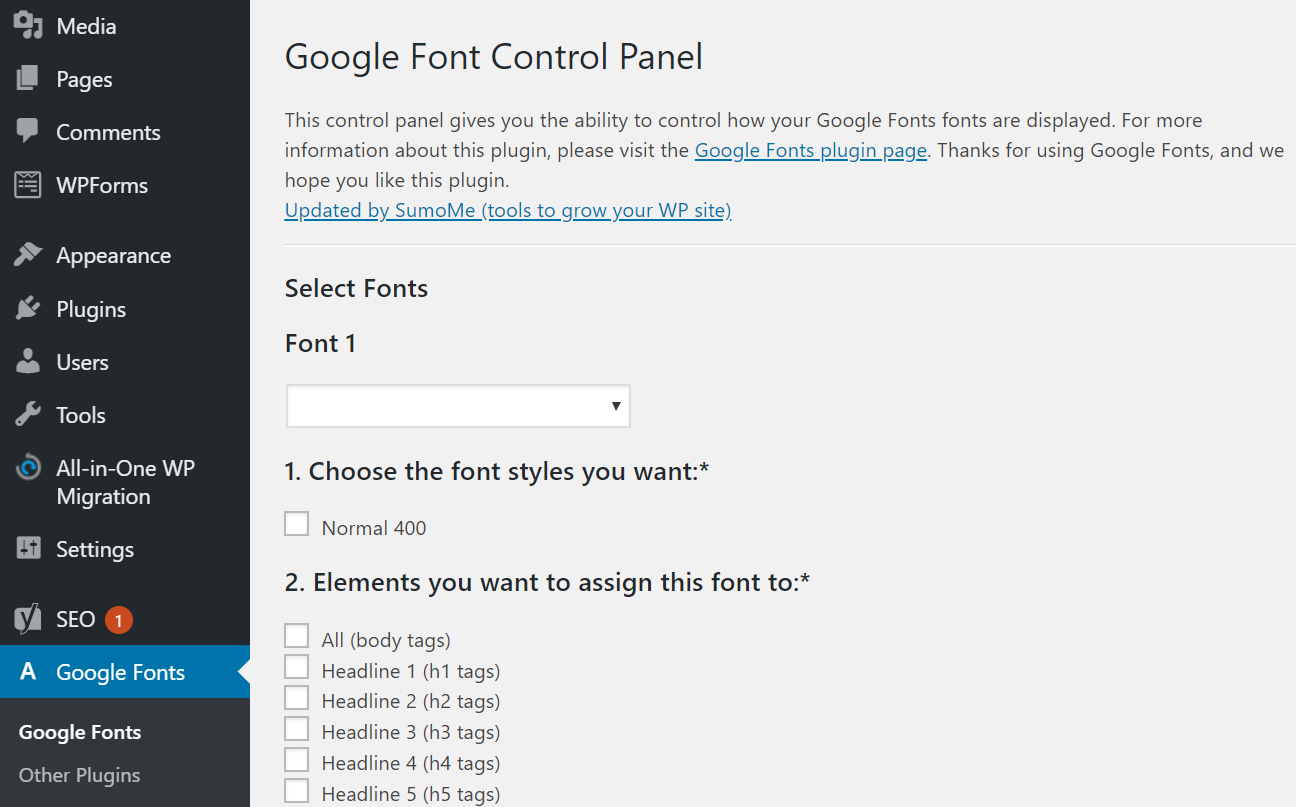
Utilizing the “Easy Google Fonts” Plugin
Google Fonts is perhaps the most popular repository for web fonts due to its massive library and reliable Content Delivery Network (CDN). The “Easy Google Fonts” plugin integrates directly with the WordPress Customizer.
Once installed, this plugin allows you to preview font changes in real-time. It provides a technical bridge between the Google Fonts API and your WordPress theme’s CSS. When you select a font, the plugin automatically generates the necessary <link> tags in the header of your site and applies the font-family CSS rules to the selected HTML elements (like H1 tags or body text). This is an ideal solution for those who want a vast selection without manual coding.
Using “Use Any Font” for Custom Uploads
If your project requires a proprietary font or a specific file you have purchased (such as a .ttf or .otf file), “Use Any Font” is a robust tool. This plugin simplifies the technical hurdle of font conversion and CSS @font-face implementation.
When you upload a font file through this plugin, it handles the conversion process to ensure compatibility across different browsers. It then stores the font files within your wp-content/uploads directory and enqueues the styles required to display them. This method is particularly useful for tech brands that have a unique corporate identity that isn’t available on public libraries like Google Fonts.
Method 2: Manually Installing Custom Fonts via CSS and FTP
For developers and tech enthusiasts who prefer to minimize plugin bloat, the manual method is the gold standard. This approach offers the most control over performance and security, as it reduces dependency on third-party developers.
Preparing Your Font Files (WOFF, WOFF2, TTF)
To begin a manual installation, you must ensure your font files are optimized for the web. While TTF (TrueType Font) and OTF (OpenType Font) are common, you should ideally have WOFF2 versions. You can use online converters or command-line tools to generate these.
Security is a major factor here. Ensure that the fonts you are using are legally licensed for web use. Using unlicensed software or assets can lead to legal complications for your business or client. Once your files are ready, organize them into a folder named fonts.
Uploading Fonts to Your Server
To make the fonts accessible to WordPress, you need to upload them to your web server. This is typically done using an SFTP client like FileZilla or through your hosting provider’s File Manager.
- Connect to your server via SFTP.
- Navigate to
/wp-content/themes/your-child-theme/. - Create a new folder named
fonts(if it doesn’t exist). - Upload your WOFF2 and WOFF files into this directory.
It is highly recommended to use a child theme for this process. If you modify the parent theme directly, your custom font configurations will be overwritten when the theme receives an update.
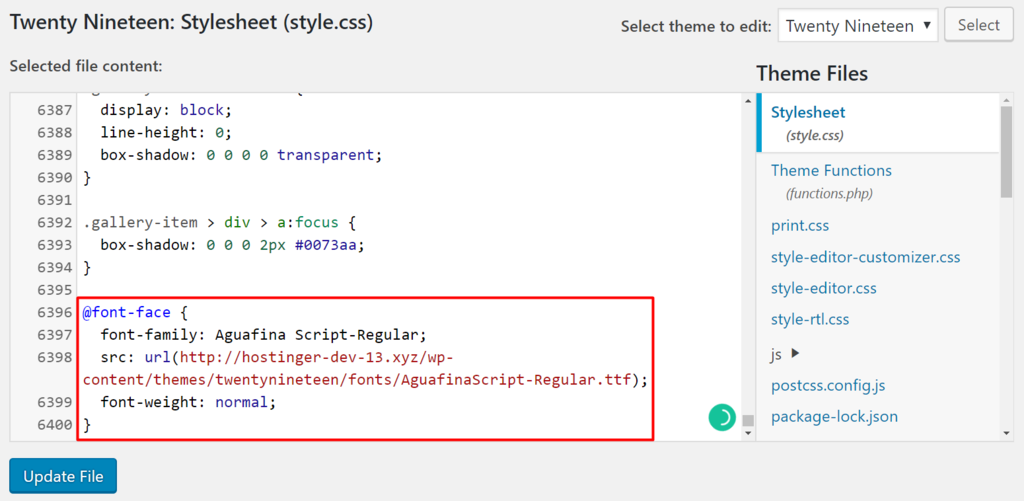
Implementing @font-face in your Stylesheet
Once the files are on the server, you must tell the browser how to use them. This is done using the @font-face CSS rule within your theme’s style.css file.
The technical syntax looks like this:
@font-face {
    font-family: 'MyCustomFont';
    src: url('fonts/mycustomfont.woff2') format('woff2'),
         url('fonts/mycustomfont.woff') format('woff');
    font-weight: normal;
    font-style: normal;
    font-display: swap;
}

body {
    font-family: 'MyCustomFont', sans-serif;
}
The font-display: swap; property is a critical technical detail. It instructs the browser to use a system font until the custom font has fully downloaded, preventing the “Flash of Invisible Text” (FOIT) and improving the perceived performance of your site.
Method 3: Leveraging the WordPress Site Editor (FSE)
With the introduction of Full Site Editing (FSE) in WordPress 6.0 and beyond, font management has moved into the core software architecture. This shift reflects the trend of “no-code” or “low-code” development within the tech industry.
Managing Fonts through the Global Styles Interface
For themes that support the Site Editor (like Twenty Twenty-Four), you can manage typography through the “Styles” menu. WordPress has introduced a “Font Library” feature that acts similarly to a digital asset manager.
In this interface, you can click on “Typography” and then the “Manage Fonts” icon. From here, you can install fonts directly from Google Fonts (which WordPress will host locally for privacy compliance, such as GDPR) or upload your own files. This feature automates the creation of the theme.json file entries, which is the modern technical standard for WordPress theme configuration.
The Future of Font Management in Core WordPress
The inclusion of a native Font Library indicates a move toward a more centralized system for asset management. From a technical perspective, this reduces the fragmentation caused by having dozens of different typography plugins. It also ensures that fonts are enqueued efficiently using the WordPress core’s optimized loading sequences, which can lead to better Core Web Vitals scores.
Technical Best Practices for Font Performance and Security
Installing a font is only half the battle; ensuring it doesn’t negatively impact your site’s performance or security is the other half.
Optimizing Font Loading Speed
Every custom font adds a request to your server’s load. To optimize this:
- Limit Font Weights: Do not load every weight (thin, light, bold, extra bold) if you only plan to use two. Each weight is a separate file that adds to the total page size.
- Preloading: You can use a
<link rel="preload">tag in your header to tell the browser to start downloading the font immediately, even before the CSS is fully parsed. - Subsetting: If your site is only in English, you can “subset” your fonts to remove characters from other languages (like Cyrillic or Greek), significantly reducing the file size.
Licensing and Legal Security
In the digital age, security also encompasses legal compliance. Many font licenses have specific clauses regarding “web use.” Some licenses are based on the number of monthly page views. Using a font without a proper license can result in “cease and desist” orders or financial penalties. Furthermore, when using Google Fonts, tech-savvy developers often prefer to host fonts locally (as mentioned in the FSE section) to avoid transmitting user IP addresses to third-party servers, thereby ensuring compliance with privacy regulations like the GDPR in Europe.
Conclusion
Installing a font in WordPress is a technical task that bridges the gap between design and development. Whether you choose the accessibility of a plugin, the control of a manual FTP upload, or the modernity of the WordPress Font Library, the goal remains the same: a fast, readable, and visually cohesive digital experience. By following these technical standards—optimizing file formats, using child themes, and prioritizing loading performance—you ensure that your WordPress site stands at the forefront of modern web technology.
aViewFromTheCave is a participant in the Amazon Services LLC Associates Program, an affiliate advertising program designed to provide a means for sites to earn advertising fees by advertising and linking to Amazon.com. Amazon, the Amazon logo, AmazonSupply, and the AmazonSupply logo are trademarks of Amazon.com, Inc. or its affiliates. As an Amazon Associate we earn affiliate commissions from qualifying purchases.