
In an increasingly connected world, the concept of home security has evolved beyond traditional locks and alarms. The modern smart home is a bastion of convenience and protection, with camera doorbells standing out as one of its most essential sentinels. These innovative gadgets offer a seamless blend of technology and peace of mind, allowing you to see, hear, and speak to visitors – or even potential intruders – from anywhere in the world using just your smartphone. They are a prime example of how everyday technology, encompassing advanced AI tools, intuitive apps, and robust digital security features, converges to make our lives safer and more productive.

Whether you’re concerned about package deliveries, curious about who’s at your door when you’re away, or simply desire an extra layer of security, installing a camera doorbell is an excellent investment. While the prospect of DIY installation might seem daunting to some, this comprehensive tutorial is designed to demystify the process. We’ll guide you through every step, from selecting the right device to the final configuration, ensuring a smooth and successful setup. By undertaking this project yourself, you not only save on professional installation costs – a smart move for your personal finance – but also gain a deeper understanding of your home’s security infrastructure. Let’s unlock the full potential of your front door.
1. Preparing for Your Camera Doorbell Installation: The Foundation of Success
A successful installation begins long before you pick up a screwdriver. Thorough preparation, encompassing careful product selection, gathering the necessary tools, and prioritizing safety, is paramount. This initial phase sets the stage for a smooth process, aligning with the website’s focus on technology reviews and practical tutorials.
1.1 Choosing the Right Camera Doorbell for Your Home
The market is flooded with various camera doorbell brands and models, each boasting unique features and functionalities. Making the right choice involves understanding your specific needs and the technical compatibility with your existing home setup.
- Wired vs. Wireless (Battery-Powered):
- Wired doorbells typically connect to your home’s existing doorbell wiring (16-24VAC transformer). They offer continuous power, eliminating the need for battery changes, and often provide more reliable connections and advanced features. Brands like Ring Pro, Nest Hello, and Eufy Wired are popular choices. This option usually involves a bit more hands-on electrical work but offers consistent performance, tapping into your home’s permanent infrastructure.
- Wireless doorbells are battery-powered, offering unparalleled flexibility in placement since they don’t require existing wiring. They are ideal for homes without a traditional doorbell or for renters. However, batteries need periodic recharging (ranging from weeks to months, depending on usage), and some models might have slightly slower response times. Popular wireless options include Ring Battery Doorbells, Arlo Essential, and various Eufy battery models. They are a testament to the advancements in portable gadget technology.
- Key Features to Consider:
- Resolution and Field of View: Look for 1080p HD or higher for clear video. A wider field of view (e.g., 160-180 degrees) ensures you capture more of your doorstep.
- Night Vision: Infrared or color night vision is crucial for monitoring after dark.
- Two-Way Audio: Essential for speaking with visitors or deterring unwanted guests.
- Motion Detection and AI Tools: Advanced motion detection, often powered by AI algorithms, can differentiate between people, animals, and packages, reducing false alarms. This is a prime example of AI tools enhancing digital security. Many doorbells allow you to customize motion zones.
- Cloud Storage vs. Local Storage: Most smart doorbells offer cloud storage plans (subscription-based) for video recordings. Some, like specific Eufy models, provide local storage (e.g., via microSD card or HomeBase), offering a “no subscription fee” advantage that can appeal to the “Money” conscious consumer.
- Smart Home Integration: Compatibility with platforms like Amazon Alexa, Google Assistant, or Apple HomeKit allows for seamless integration into your smart home ecosystem, enabling voice control, displaying video on smart displays, and creating automated routines. This highlights the “Technology Trends” aspect of modern gadgets.
- Brand Reputation: While we don’t endorse specific brands, considering reputable manufacturers (e.g., Ring, Google Nest, Arlo, Eufy, Wyze) known for their reliability, customer support, and regular software updates (critical for digital security) is always wise. Reviews and tutorials often highlight the user experience and long-term performance of these established “Brands.”
1.2 Essential Tools and Materials for Installation
Gathering your tools beforehand saves time and frustration. Most items are common household tools, but a few specialized ones might be required, especially for wired installations.
- Basic Hand Tools:
- Screwdriver set (Phillips and flathead)
- Pencil (for marking drill holes)
- Level (to ensure your doorbell is straight)
- Drill and appropriate drill bits (masonry bits for brick/stucco, wood bits for siding)
- Wire strippers (if modifying existing wiring)
- Caulk gun and outdoor-grade silicone sealant (for weatherproofing)
- Safety and Electrical Tools (Crucial for Wired Installations):
- Voltage tester or multimeter (essential for checking doorbell wire voltage and confirming power is off)
- Safety glasses
- Materials (Often Included with the Doorbell Kit):
- Your new camera doorbell
- Mounting bracket and screws/anchors
- Chime kit or power kit (often required for wired installations, installed inside your existing chime box)
- Wire extenders (if your existing wires are too short)
1.3 Safety First: Disconnecting Power
This is the most critical step for wired doorbell installations. Failing to turn off the power can result in electrical shock or damage to your new device.
- Locate Your Circuit Breaker Box: This is usually in a utility closet, basement, or garage.
- Identify the Correct Breaker: Look for labels like “Doorbell,” “Chime,” or “Front Door.” If unlabeled, you might need to flip breakers one by one until your existing doorbell (if you have one) stops working.
- Test the Wires: Use a voltage tester or multimeter to confirm that no power is flowing through the doorbell wires at your front door. Touch the leads of the tester to the exposed ends of the doorbell wires. If the tester shows no voltage, it’s safe to proceed. Even if you’re installing a wireless doorbell, it’s a good practice to turn off the breaker for the existing doorbell if you’re removing it.
2. The Step-by-Step Installation Process for Wired Camera Doorbells
Wired camera doorbells tap into your home’s existing electrical system, providing reliable, continuous power. This section details the steps for a typical wired installation, a cornerstone of any smart home “Tutorial.”
2.1 Removing Your Old Doorbell Button
If you have an existing doorbell, you’ll need to remove it to expose the wiring.
- Unscrew the Old Doorbell: Carefully unscrew the existing doorbell button from the wall.
- Disconnect Wires: Gently pull the button away from the wall to reveal two low-voltage wires. Disconnect these wires from the old doorbell terminals. If the wires are brittle or frayed, you might need to strip a small amount of insulation to expose fresh copper.
- Assess the Wiring: Use your multimeter to double-check the voltage of the wires. Most smart doorbells require 16-24VAC. If your voltage is too low, you might need to upgrade your doorbell transformer (a more advanced DIY task or one for a professional electrician).
2.2 Installing the Mounting Bracket
The mounting bracket provides the secure base for your new camera doorbell.
- Position the Bracket: Hold the new doorbell’s mounting bracket against the wall at the desired height (typically 48-52 inches from the ground for optimal viewing, but adjust based on your specific doorbell’s field of view and your entryway). Ensure it’s level.
- Mark Drill Holes: Use a pencil to mark the locations for the drill holes through the bracket.
- Drill Pilot Holes: Using the appropriate drill bit for your wall material (wood, stucco, brick), drill pilot holes at the marked spots. If drilling into masonry, insert the plastic anchors provided with your doorbell kit into the pilot holes.
- Secure the Bracket: Feed the existing doorbell wires through the center opening of the mounting bracket, then use the provided screws to firmly attach the bracket to the wall.
2.3 Wiring the New Camera Doorbell
This is where your new device connects to your home’s power.
- Connect Wires: Take the two low-voltage wires coming from your wall and connect them to the terminals on the back of your new camera doorbell. The specific connection points will be detailed in your doorbell’s instruction manual; typically, there are two screws labeled “Front” or “Terminal 1” and “Terminal 2.” It often doesn’t matter which wire goes to which terminal for low-voltage AC, but always check your specific model’s instructions.
- Ensure Secure Connection: Tighten the terminal screws firmly to ensure a good electrical connection. Tug gently on the wires to confirm they are securely held. If your existing wires are too short, use the included wire extenders if your kit provides them.
- Tuck Wires: Carefully tuck any excess wiring back into the wall cavity or into the space behind the mounting bracket. Avoid crimping the wires.
2.4 Securing the Doorbell Unit
With the wiring complete, it’s time to affix the doorbell itself.
- Attach the Doorbell: Align the camera doorbell with the mounting bracket. Most doorbells slide onto the bracket and then click into place. Some models may require a small security screw at the bottom to prevent easy removal.
- Weatherproofing (Optional but Recommended): For extra protection against the elements, apply a bead of outdoor-grade silicone sealant around the edges of the doorbell and bracket, leaving the bottom edge open to allow any condensation to drain. This prolongs the life of your gadget and enhances its “Digital Security” against environmental factors.
2.5 Installing the Chime Kit (if required)
Many wired smart doorbells come with a power kit or chime connector that needs to be installed inside your existing indoor doorbell chime box. This ensures the correct power delivery and allows your traditional chime to work alongside the smart doorbell.
- Locate Your Indoor Chime: This is typically a rectangular box on a wall, often near the front door or in a hallway.
- Open the Chime Box: Carefully remove the cover of your existing chime.
- Identify Terminals: Inside, you’ll see a small circuit board and two main terminals, usually labeled “Front” and “Trans” (for Transformer).
- Install the Chime Kit: Follow your doorbell’s specific instructions. This usually involves connecting the chime kit’s wires to these terminals, or sometimes directly to the chime’s internal mechanism. The kit often acts as a resistor or power conditioner.
- Reassemble: Once the chime kit is installed, replace the chime cover.
3. Setting Up Your Wireless (Battery-Powered) Camera Doorbell
Wireless camera doorbells offer a simpler installation process, making them an appealing choice for many, especially those without existing wiring.
3.1 Charging and Initial Setup
Before mounting, ensure your wireless doorbell is ready for action.
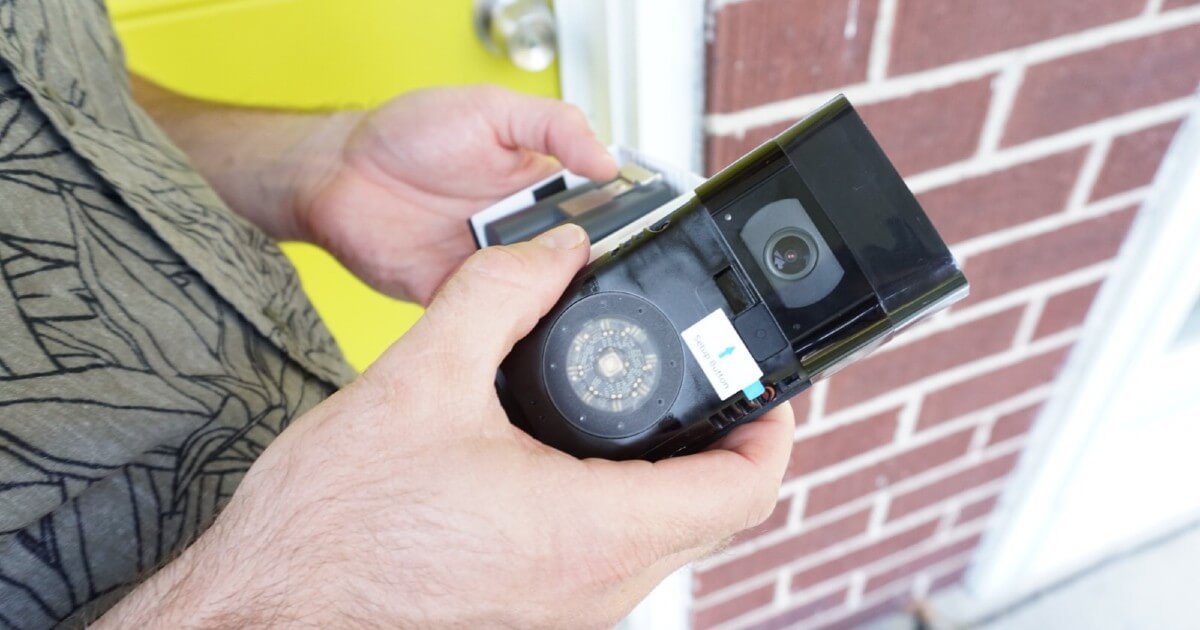
- Charge the Battery: Fully charge the doorbell’s removable battery pack using the provided USB cable. This can take several hours.
- Download the App: While the battery charges, download the manufacturer’s official app (e.g., Ring, Arlo, Eufy) from your device’s app store.
- Create an Account and Pair: Open the app, create an account (if you don’t have one), and follow the on-screen instructions to add your new device. This typically involves scanning a QR code on the doorbell or pressing a setup button. The app will guide you through connecting the doorbell to your home’s Wi-Fi network.
3.2 Mounting the Wireless Doorbell
Without the need for wiring, placement is highly flexible.
- Choose Optimal Location: Select a spot near your front door that offers an unobstructed view and good Wi-Fi signal strength. The same height recommendations (48-52 inches) apply.
- Mark and Drill: Hold the mounting bracket against the wall, mark the drill holes, and drill pilot holes as needed. Insert anchors if drilling into masonry.
- Secure Bracket: Attach the mounting bracket to the wall using the provided screws.
- Insert Battery and Mount Doorbell: Insert the fully charged battery into the doorbell. Then, attach the doorbell unit to its mounting bracket. Most wireless doorbells slide on and are secured with a small security screw at the bottom.
- Optional: Solar Charger: Some wireless doorbells offer optional solar chargers that can be installed alongside the doorbell to provide continuous trickled charging, significantly extending battery life and reducing maintenance.
4. Post-Installation Configuration and Optimization: Maximizing Your Smart Security
Once physically installed, the digital setup and customization are crucial for unlocking your camera doorbell’s full potential. This involves tapping into its software and “App” features, as well as considering “Digital Security” best practices.
4.1 Connecting to Wi-Fi and App Setup
This step bridges your physical installation with your digital smart home.
- Restore Power (for wired models): Return to your circuit breaker box and flip the breaker back on. Your doorbell should power up.
- Follow In-App Instructions: If you haven’t already, the app will now guide you through connecting your doorbell to your home’s Wi-Fi network. Ensure you have your Wi-Fi password ready. A strong, stable Wi-Fi connection is vital for performance.
- Firmware Updates: Most new devices will require a firmware update upon initial setup. Allow this to complete; it ensures your doorbell has the latest features and security patches.
- Name Your Device: Give your doorbell a descriptive name (e.g., “Front Door Camera”).
4.2 Customizing Settings for Optimal Performance
The power of smart doorbells lies in their customizable features. Take time to explore these settings within the app.
- Motion Detection Zones: Define specific areas within the camera’s view where you want motion to be detected. This helps eliminate alerts from passing cars or trees swaying in the wind, focusing on critical areas like your porch or walkway. Advanced AI features in newer models can intelligently filter out irrelevant motion.
- Sensitivity Levels: Adjust how sensitive the motion detector is. Too high, and you’ll get constant notifications; too low, and you might miss important events.
- Notification Preferences: Choose how you receive alerts (push notifications, email, smart display alerts). Integrate with other smart home devices (e.g., flash smart lights when motion is detected).
- Two-Way Talk: Test the two-way audio to ensure clear communication.
- Privacy Settings: Configure recording schedules, choose when motion detection is active, and understand how your data is stored and managed. This is a crucial “Digital Security” aspect.
- Smart Home Integration: Connect your doorbell to your preferred smart home ecosystem (Alexa, Google Assistant). This allows you to view the live feed on smart displays, receive announcements through smart speakers, and even integrate with smart locks for remote entry. These integrations exemplify modern “Technology Trends” and “Apps.”
4.3 Testing and Troubleshooting Common Issues
After setup, thorough testing ensures everything works as expected.
- Ring the Doorbell: Press the doorbell button. Verify that your indoor chime rings (if applicable) and that your smartphone receives a notification.
- Test Motion Detection: Walk in front of the doorbell within your defined motion zones. Check if you receive notifications and if video recordings are triggered.
- Test Two-Way Audio: Initiate a two-way conversation through the app to ensure clear sound on both ends.
- Common Issues and Basic Troubleshooting:
- No Power (Wired): Recheck breaker, wiring connections at doorbell and chime, and transformer voltage.
- Poor Wi-Fi Connection: Move your Wi-Fi router closer, consider a Wi-Fi extender, or relocate the doorbell if possible. Ensure no physical obstructions block the signal.
- Excessive/Missed Motion Alerts: Adjust motion zones and sensitivity settings.
- Audio Problems: Check app volume settings, microphone, and speaker settings.
- Device Offline: Check Wi-Fi connection, router status, and ensure the doorbell has power. A simple restart of your router and doorbell can often resolve connectivity issues.
5. Maximizing Your Camera Doorbell’s Potential and Long-Term Value
Installing your camera doorbell is just the beginning. To truly leverage this smart gadget, understand its advanced capabilities and commit to ongoing maintenance and digital security practices.
5.1 Advanced Features and Integrations
Modern camera doorbells are more than just smart buttons; they’re intelligent security hubs.
- Subscription Services: Many brands offer optional subscription plans that unlock features like extended cloud video history, advanced AI detection (e.g., package detection, facial recognition), and professional monitoring. While an additional cost, these services can significantly enhance your “Digital Security” and overall experience, providing excellent “Money” value for peace of mind.
- Smart Lock Integration: Connect your camera doorbell to compatible smart locks. This allows you to see who’s at the door and then unlock it remotely, perfect for letting in family, friends, or service providers. This seamless interaction embodies the latest “Technology Trends” in smart home automation.
- Routine Creation: Utilize your smart home platform (Alexa, Google Home) to create routines. For example, when motion is detected at night, automatically turn on exterior smart lights, or have your smart speaker announce, “Someone is at the front door.”
- Voice Assistant Commands: Use voice commands to view your doorbell’s live feed on a smart display or hear who’s ringing the bell through your smart speakers.
5.2 Maintenance and Digital Security Best Practices
To ensure your camera doorbell remains a reliable part of your home security system, a few simple practices are key.
- Regular Cleaning: Periodically wipe the camera lens and motion sensor with a soft, damp cloth to remove dust, dirt, or spiderwebs that can obscure the view or trigger false alerts.
- Firmware Updates: Always install firmware updates when prompted. These updates often include security patches, bug fixes, and new features, crucial for maintaining your device’s “Digital Security” and performance.
- Strong Passwords and Two-Factor Authentication (2FA): Protect your doorbell account with a strong, unique password and enable 2FA wherever possible. This adds an essential layer of “Digital Security” against unauthorized access.
- Data Privacy: Be aware of how your video data is stored, accessed, and shared. Review the manufacturer’s privacy policy and customize privacy settings within the app to align with your comfort level.

Conclusion: Empowering Your Home with Smart Security
Installing a camera doorbell is an empowering step towards a smarter, more secure home. What might initially seem like a complex technological undertaking is, as this tutorial demonstrates, a perfectly achievable DIY project. You’ve navigated the choices of cutting-edge “Gadgets,” embraced practical “Tutorials,” and integrated sophisticated “Apps” and “AI Tools” into your personal “Digital Security” strategy.
The benefits extend far beyond simply knowing who’s at the door; it’s about deterring crime, monitoring deliveries, staying connected with your home, and gaining invaluable peace of mind. By following these steps, you’ve not only enhanced your home’s defenses but also taken charge of your smart home journey, potentially saving on professional installation costs – a tangible “Money” benefit. Embrace the future of home security, one smart ring at a time.
aViewFromTheCave is a participant in the Amazon Services LLC Associates Program, an affiliate advertising program designed to provide a means for sites to earn advertising fees by advertising and linking to Amazon.com. Amazon, the Amazon logo, AmazonSupply, and the AmazonSupply logo are trademarks of Amazon.com, Inc. or its affiliates. As an Amazon Associate we earn affiliate commissions from qualifying purchases.