Windows 11, Microsoft’s latest operating system, brought with it a sleek new interface, improved productivity features, and a stronger emphasis on security. However, its release also came with a significant hurdle for many users: stringent system requirements, particularly the need for a Trusted Platform Module (TPM) 2.0 and Secure Boot enabled. While these requirements are designed to enhance security and user experience, they left millions of perfectly capable machines unable to officially upgrade.
For tech enthusiasts, power users, and those simply unwilling to upgrade their hardware, the question quickly became: “How can I force install Windows 11?” This comprehensive guide delves into the methods, risks, and benefits of installing Windows 11 on unsupported hardware, ensuring you’re well-equipped to make an informed decision and execute the process successfully. We’ll explore the technical intricacies, provide step-by-step tutorials, and discuss what to expect post-installation, all within the context of maximizing your technological assets.
Understanding Windows 11 Compatibility and Why Bypassing Matters
Before diving into the “how-to,” it’s crucial to grasp why these bypasses exist and the implications of using them. Microsoft’s brand strategy for Windows 11 focused heavily on security and performance, leading to the strict compatibility checklist.
The Official Requirements: A Quick Recap
Microsoft officially mandates several key hardware components for Windows 11:
- Processor: 1 GHz or faster with 2 or more cores on a compatible 64-bit processor or System on a Chip (SoC). Generally, this means 8th generation Intel Core processors or newer, AMD Ryzen 2000 series or newer, and Qualcomm Snapdragon 850 or newer.
- RAM: 4 GB or greater.
- Storage: 64 GB or greater available storage.
- System Firmware: UEFI, Secure Boot capable.
- TPM: Trusted Platform Module (TPM) version 2.0.
- Graphics Card: Compatible with DirectX 12 or later with WDDM 2.0 driver.
- Display: High definition (720p) display greater than 9” diagonally, 8 bits per color channel.
- Internet Connection and Microsoft Account: Required for initial setup of Windows 11 Home edition and for some feature updates.
The two most common stumbling blocks for older (but still powerful) PCs are the TPM 2.0 and Secure Boot requirements. Many motherboards released prior to 2017/2018 either lack TPM 2.0 entirely or only support TPM 1.2, which isn’t sufficient. Similarly, while UEFI has been common, Secure Boot might not have been enabled by default or even supported on some older systems.
Why Consider Bypassing? The Allure of Windows 11
So, why go through the trouble of forcing an install? The motivations are varied:
- Access to New Features: Windows 11 offers a refreshed user interface, Snap Layouts and Groups for enhanced multitasking, Android app support via the Amazon Appstore (though this has seen limited uptake), widgets, and performance improvements, particularly in gaming and resource management. For power users, these features can significantly boost productivity and overall user experience.
- Future-Proofing (within limits): While unofficial, installing Windows 11 ensures your system is running the latest OS, potentially extending its useful life by allowing you to use newer software that might eventually require Windows 11.
- Curiosity and Learning: For many tech enthusiasts, the challenge itself is part of the appeal. Understanding how to navigate system limitations and perform advanced installations is a valuable skill, aligning perfectly with the “Tech Tutorials” aspect of our platform.
- Cost Savings: Upgrading an entire PC or buying a new one just for Windows 11 can be a significant financial investment. Forcing the installation allows users to continue using their existing, perfectly functional hardware, saving money that can be invested elsewhere, perhaps in other productivity tools or financial instruments.
The Risks and Rewards of Unsupported Installations
While the rewards can be appealing, it’s crucial to acknowledge the risks involved with installing Windows 11 on unsupported hardware:
- Lack of Official Updates: Microsoft has stated that unsupported PCs may not receive security updates or feature updates. While many users have reported receiving updates without issues, this remains a potential risk. Lack of security updates can leave your system vulnerable, a significant concern in digital security.
- Stability and Performance Issues: While many unsupported machines run Windows 11 without a hitch, there’s a chance of encountering driver compatibility issues, system instability, or degraded performance due to hardware not being fully optimized for the OS.
- No Microsoft Support: Should you encounter problems, Microsoft will not provide technical support for installations on unsupported hardware. You’ll be reliant on community forums and your own troubleshooting skills.
- Hardware Lifespan: While you avoid immediate hardware upgrades, running an OS on potentially incompatible components might, in rare cases, lead to unforeseen wear or issues over a longer period, though this is less common with modern hardware.
Understanding these points is vital for informed decision-making. If you proceed, you do so with a clear understanding of these caveats.
Essential Preparations Before You Begin
Executing a forced Windows 11 installation requires careful preparation. Skipping these steps can lead to data loss or a frustrating, incomplete process.
Data Backup: Your Digital Safety Net
This is perhaps the single most critical step. Anytime you perform a major OS installation or upgrade, there’s a non-zero risk of data loss. Forcing an installation on unsupported hardware slightly elevates this risk.
- Cloud Backup: Services like OneDrive, Google Drive, Dropbox, or iCloud offer convenient ways to back up important documents, photos, and files.
- External Drive Backup: Connect an external hard drive and copy all critical folders and files. Consider using built-in Windows backup tools like File History or creating a system image.
- Clone Your Drive: For advanced users, cloning your entire system drive using software like Macrium Reflect Free or Clonezilla creates an exact copy, allowing for a complete restoration if anything goes wrong. This is the ultimate safety net.
Do not proceed until you are absolutely certain your valuable data is securely backed up.
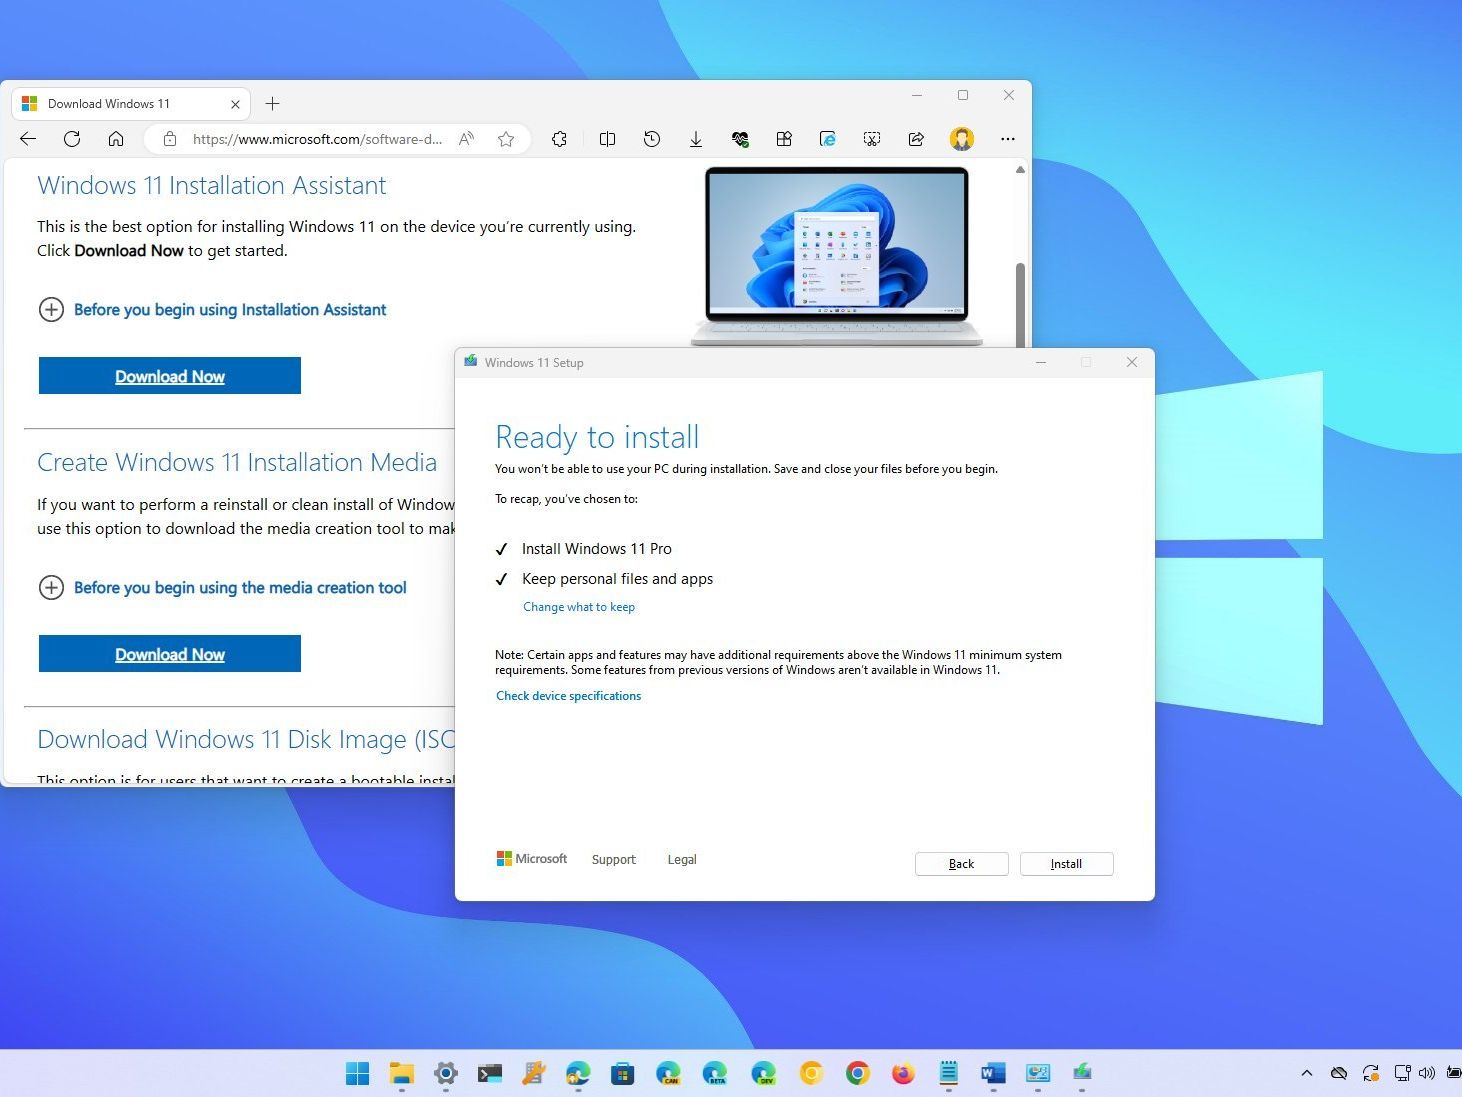
Obtaining the Windows 11 ISO File
You’ll need the official Windows 11 installation media. Always download this directly from Microsoft to ensure authenticity and avoid modified, potentially malicious versions.
- Visit the Microsoft Windows 11 Download Page: Go to
microsoft.com/software-download/windows11. - Download Windows 11 Disk Image (ISO): Scroll down to the “Download Windows 11 Disk Image (ISO)” section.
- Select Edition: Choose “Windows 11 (multi-edition ISO)” and click “Download.”
- Select Product Language: Choose your desired language and confirm.
- Initiate Download: Click the 64-bit Download button. The ISO file is typically around 5-6 GB, so ensure you have a stable internet connection and sufficient storage.
Creating Your Bootable Installation Media
Once you have the ISO, you need to turn it into a bootable USB drive. This drive will be used to start your computer and initiate the Windows 11 installation. You’ll need a USB flash drive with at least 8 GB of storage.
- Windows Media Creation Tool (Official but limited): While Microsoft provides a Media Creation Tool, it typically performs the compatibility check, making it unsuitable for forced installations without additional steps. We will rely on third-party tools or direct ISO manipulation.
- Rufus (Recommended for Bypass Methods): Rufus is a free, open-source utility that excels at creating bootable USB drives, especially for Windows installations. It offers built-in options to bypass Windows 11 requirements, making it incredibly convenient for our purpose. We will detail its use in a later section.
- Ventoy (Advanced): Ventoy allows you to create a single bootable USB drive onto which you can simply copy multiple ISO files. The drive then presents a boot menu allowing you to choose which OS to install. While powerful, its specific bypass features might be less direct than Rufus.
For the purpose of this guide, we will focus on Rufus due to its direct utility in bypassing Windows 11 requirements.
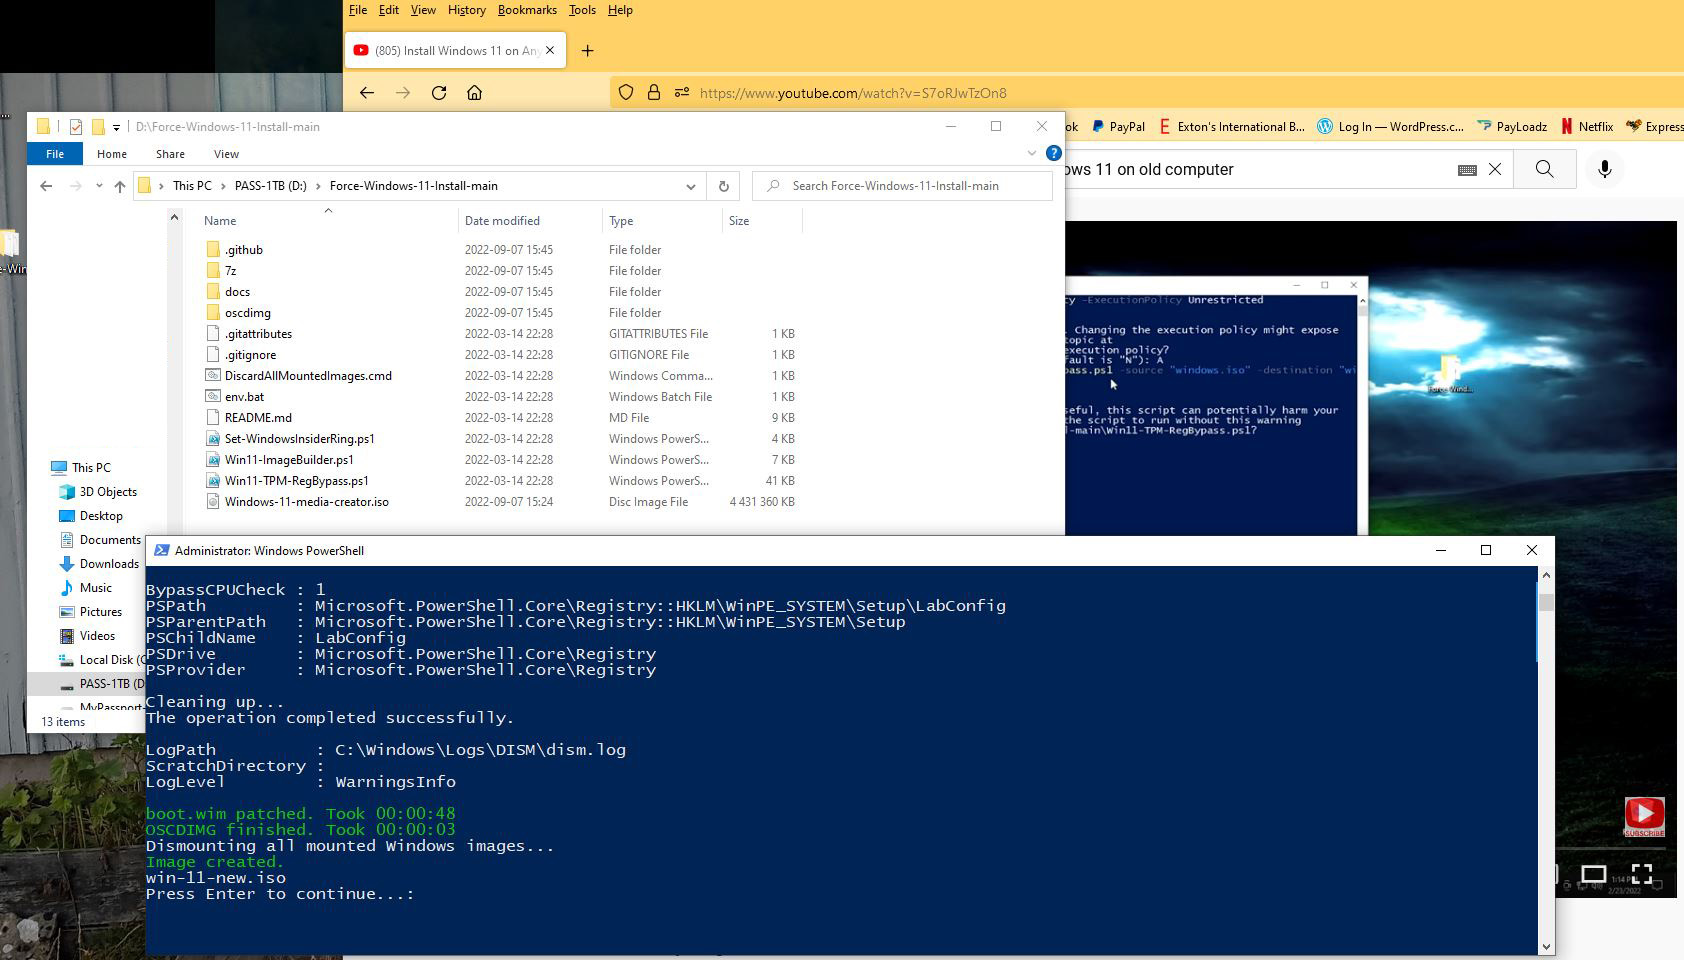
Method 1: The Registry Hack – Bypassing Requirements Directly
This method involves making a simple modification to the Windows Registry during the installation process. This tells the installer to ignore the TPM 2.0 and Secure Boot checks. It’s effective for both clean installations and in-place upgrades.
Step-by-Step: Modifying the Registry for Installation
- Start the Windows 11 Installation:
- Boot your PC from the Windows 11 bootable USB drive you created.
- On the “Windows Setup” screen, select your language, time format, and keyboard, then click “Next.”
- Click “Install now.”
- If prompted for a product key, you can click “I don’t have a product key” for now (you can activate later).
- Accept the license terms and click “Next.”
- Choose “Custom: Install Windows only (advanced)” for a clean install or “Upgrade: Install Windows and keep files, settings, and applications” for an in-place upgrade (though the bypass works better with clean installs).
- At this point, if your PC is unsupported, you will likely encounter an error message stating, “This PC can’t run Windows 11.”
-
Open Command Prompt: When you see the “This PC can’t run Windows 11” message, do not close the setup. Instead, press Shift + F10 on your keyboard. This will open a Command Prompt window.
-
Launch Registry Editor: In the Command Prompt, type
regeditand press Enter. This will open the Registry Editor. -
Navigate and Create the Key:
- In the Registry Editor, navigate to the following path:
HKEY_LOCAL_MACHINESYSTEMSetup - Right-click on the “Setup” key (folder) in the left-hand pane.
- Select
New > Key. - Name the new key
LabConfigand press Enter.
- In the Registry Editor, navigate to the following path:
-
Create the Bypass Values within LabConfig:
- Right-click on the newly created
LabConfigkey. - Select
New > DWORD (32-bit) Value. - Name this first value
BypassTPMCheckand press Enter. - Double-click
BypassTPMCheck, change its “Value data” to1, and click “OK.” - Repeat the process: Right-click
LabConfig,New > DWORD (32-bit) Value. - Name this second value
BypassSecureBootCheckand press Enter. - Double-click
BypassSecureBootCheck, change its “Value data” to1, and click “OK.” - (Optional but recommended for full bypass): You can also add
BypassRAMCheckandBypassStorageCheckwith aValue dataof1if you suspect RAM or storage might also be an issue, though TPM and Secure Boot are the primary blockers.
- Right-click on the newly created
-
Close Registry Editor and Command Prompt: Close both the Registry Editor and the Command Prompt windows.
Executing the Installation with the Registry Bypass
- Go Back in Setup: Click the “Back” arrow in the top-left corner of the “This PC can’t run Windows 11” message.
- Proceed with Installation: You should now be back at the “Choose which type of installation you want” screen. Select your desired installation type (Custom or Upgrade) and proceed. The installer should now allow you to select a drive and continue with the Windows 11 installation without encountering the compatibility error.
- Follow On-Screen Instructions: Continue with the standard Windows 11 installation steps (selecting partition, creating user account, etc.).
This method is highly effective and doesn’t require any third-party tools beyond the Windows 11 ISO itself.
Method 2: Leveraging Rufus for a Streamlined Bypass
Rufus is a powerful and popular utility for creating bootable USB drives. Its strength for Windows 11 lies in its integrated options to automatically patch the installation media, making it incredibly easy to bypass the hardware checks.
Downloading and Configuring Rufus
- Download Rufus: Go to the official Rufus website:
rufus.ie. - Download the Latest Version: Scroll down and download the latest executable version (e.g., “Rufus 4.x Portable”).
- Run Rufus: Insert your USB flash drive (8GB or larger) into your PC. Double-click the downloaded Rufus executable to run it. It’s a portable app, so no installation is required.
Creating a Bootable USB with Automated Bypasses
Once Rufus is open:
- Device: Ensure your USB flash drive is selected under the “Device” dropdown. Double-check this, as choosing the wrong device can erase data from another drive!
- Boot selection: Click “SELECT” and navigate to where you saved your Windows 11 ISO file. Select the ISO.
- Image Option: This is where Rufus shines. Once the ISO is loaded, the “Image Option” dropdown will appear. Select “Extended Windows 11 Installation (no TPM/no Secure Boot/8GB- RAM)”. This option automatically applies the necessary patches to the installation media.
- Partition scheme: Usually, “GPT” for UEFI systems is the standard, and “MBR” for older BIOS systems. Rufus often defaults to the correct one based on your system. If unsure, leaving it as default or checking your system’s boot mode (UEFI vs. Legacy BIOS) is recommended.
- Target system: Should automatically be “UEFI (non CSM)” for most modern systems.
- Volume label: You can leave this as default or change it (e.g., “Win11_Bypass”).
- File system and Cluster size: Leave these as default.
- Click “START”: Rufus will warn you that all data on the USB drive will be destroyed. Confirm by clicking “OK.”
Rufus will now create the bootable USB drive. This process can take some time, depending on your USB drive speed and computer performance.
Performing the Windows 11 Installation via Rufus
- Boot from the USB: Once Rufus completes creating the bootable drive, restart your computer and boot from the newly created USB drive. You might need to access your BIOS/UEFI settings (often by pressing F2, F10, F12, or Del during startup) to change the boot order or select the USB drive directly.
- Follow Standard Installation Steps: The Windows 11 setup process will begin. Since Rufus has already patched the ISO, you should not encounter the “This PC can’t run Windows 11” message. Simply follow the on-screen prompts to complete the installation.
- Select your language, time, and keyboard preferences.
- Click “Install now.”
- Enter your product key or click “I don’t have a product key.”
- Accept the license terms.
- Choose “Custom: Install Windows only (advanced)” for a clean install. This is generally recommended for unsupported hardware to avoid potential conflicts with older system files.
- Select the drive or partition where you want to install Windows 11. Be careful not to accidentally format a drive containing important data.
- Proceed with the remaining setup steps, including creating a user account, setting up privacy options, and connecting to the internet.
This method is arguably simpler for many users, as it automates the bypass process, reducing the need for manual registry edits during the installation.
Post-Installation: What to Expect and How to Optimize Your System
Successfully installing Windows 11 on unsupported hardware is a major step. However, the journey doesn’t end there. There are crucial considerations for ensuring system stability, functionality, and security.
Driver Updates and System Stability
After the installation, the first priority is to ensure all your hardware components have the correct drivers.
- Device Manager Check: Open Device Manager (search for it in the Start menu). Look for any devices with yellow exclamation marks, indicating missing or problematic drivers.
- Manufacturer Websites: Visit the official websites of your motherboard, graphics card, Wi-Fi adapter, and any other crucial peripherals. Download the latest Windows 10 or, if available, Windows 11 drivers. Often, Windows 10 drivers work perfectly fine with Windows 11.
- Windows Update: Run Windows Update. While Microsoft might restrict some updates for unsupported systems, core driver updates and initial security patches are often delivered through this channel.
- Chipset Drivers: Don’t forget to install the latest chipset drivers from your motherboard manufacturer (e.g., Intel, AMD) as these are vital for overall system performance and stability.
Pay close attention to graphics drivers, as outdated ones can lead to display issues or poor performance in games and media. System stability might vary depending on your specific hardware configuration. If you encounter frequent crashes or unusual behavior, check event logs (search for “Event Viewer”) for clues and consider updating or rolling back problematic drivers.
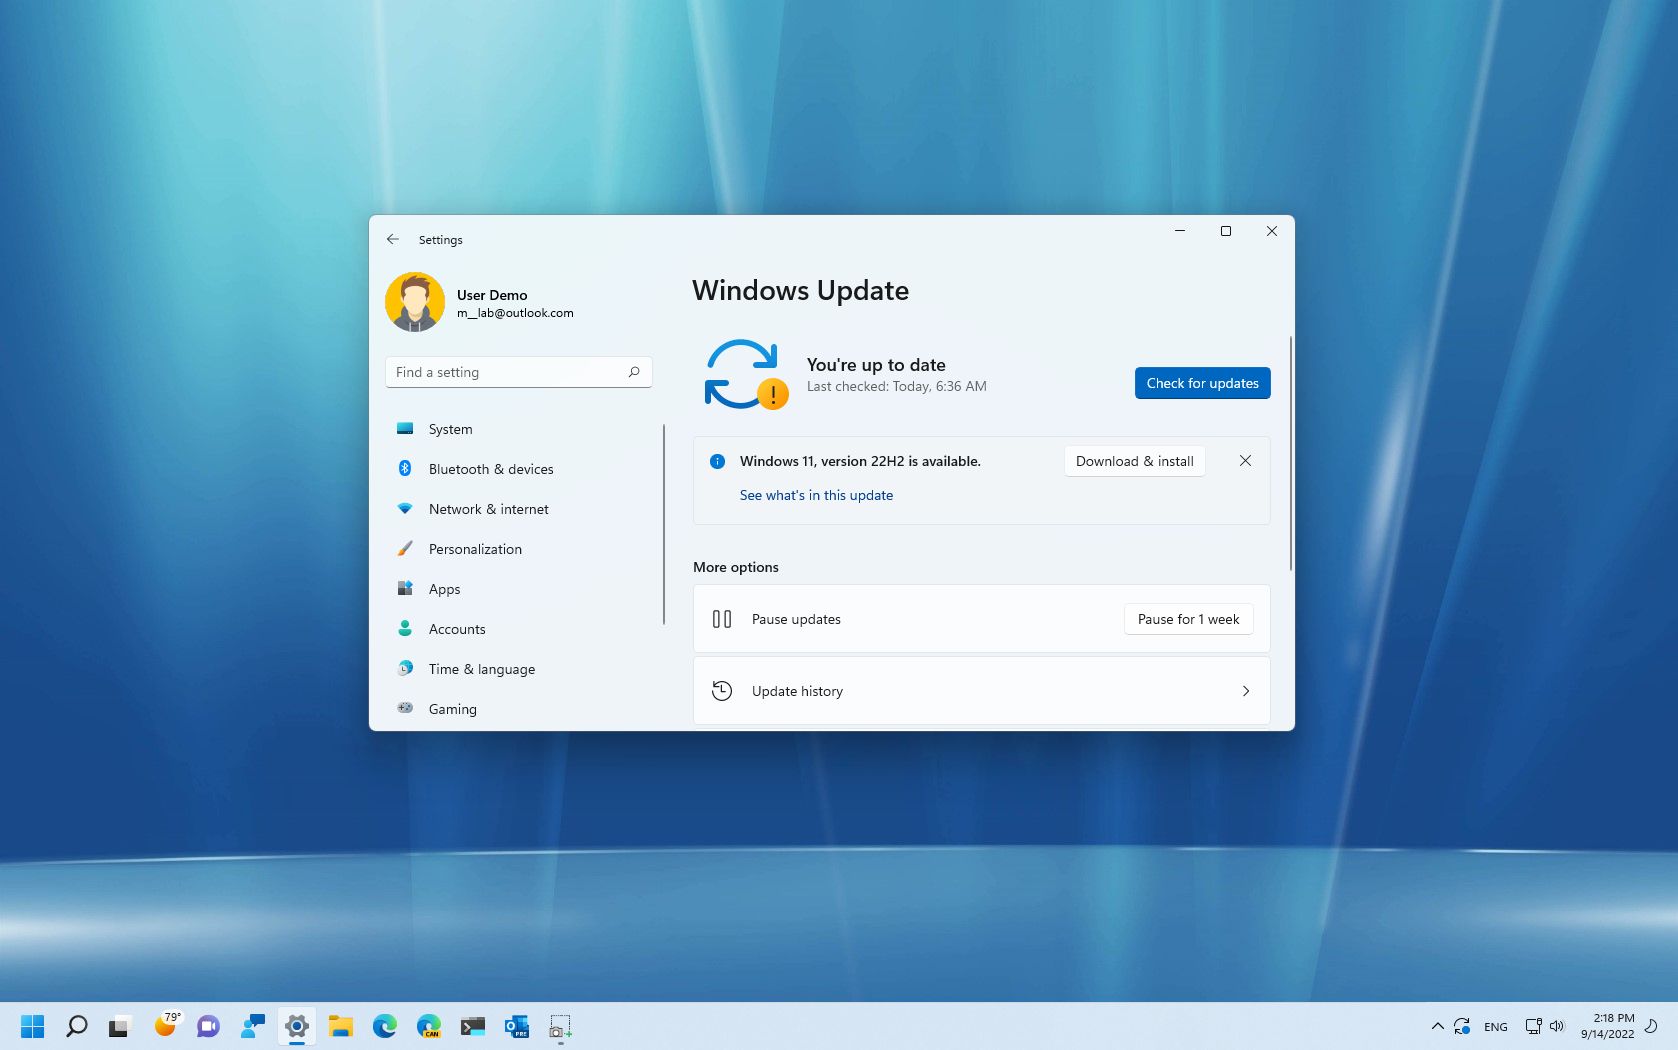
Understanding Future Updates and Potential Challenges
As mentioned, Microsoft’s official stance is that unsupported systems may not receive updates. However, in practice, many users report receiving both cumulative updates and even feature updates (like 22H2, 23H2) without issues.
- Cumulative Updates: These are monthly security and bug fix updates. They are critical for maintaining system security. So far, these have largely been delivered to unsupported systems.
- Feature Updates: These are larger updates that introduce new features and sometimes significant changes to the OS. There is a higher chance that Microsoft could block these for unsupported systems in the future.
- Workarounds for Feature Updates: If Microsoft does eventually block feature updates, the community often develops new workarounds, similar to the initial bypass methods. This might involve applying new registry tweaks or using tools like Rufus again with updated ISOs.
- Security Patches: The most critical updates are security patches. The concern here is that if a significant vulnerability is discovered, and Microsoft decides not to patch unsupported systems, your machine could become a target. While this hasn’t been a widespread issue yet, it remains a long-term consideration for digital security.
Stay informed by following reputable tech news outlets and community forums (like Reddit’s r/Windows11) for the latest information regarding updates for unsupported systems.
Security Implications and Best Practices
While TPM 2.0 and Secure Boot are key security features designed to prevent rootkits and malware from tampering with the boot process, bypassing them doesn’t automatically turn your system into a security nightmare. However, it does remove some layers of protection that Windows 11 was designed to leverage.
- Robust Antivirus/Anti-malware: Ensure you have a strong, up-to-date antivirus solution. Windows Defender is built-in and generally performs well, but third-party options are also available.
- Firewall: Keep your Windows Firewall enabled and configured correctly.
- Regular Software Updates: Beyond Windows itself, keep all your applications and browser up to date. Software vulnerabilities are a common entry point for attacks.
- Safe Browsing Habits: Exercise caution with suspicious links, email attachments, and downloads. Phishing and social engineering remain major threats.
- Strong Passwords and Multi-Factor Authentication (MFA): Use unique, strong passwords for your accounts and enable MFA wherever possible.
- Data Encryption (BitLocker): Even without TPM 2.0, you can still use BitLocker for full disk encryption, though it won’t have the hardware-rooted key storage. This adds a layer of protection if your device is stolen.
By adopting these best practices, you can significantly mitigate the security risks associated with running Windows 11 on unsupported hardware. The goal is to compensate for the bypassed hardware security features with vigilant software and user-level security measures, thus protecting your digital assets and maintaining your personal brand of a secure and responsible tech user.
In conclusion, forcing the installation of Windows 11 on unsupported hardware is a viable option for many users. While it comes with certain caveats, particularly around official support and potential update restrictions, the benefits of accessing a modern OS on existing hardware can outweigh these risks for informed individuals. By carefully preparing, following the installation steps, and implementing robust post-installation best practices, you can enjoy Windows 11’s enhancements without immediately investing in new hardware.
aViewFromTheCave is a participant in the Amazon Services LLC Associates Program, an affiliate advertising program designed to provide a means for sites to earn advertising fees by advertising and linking to Amazon.com. Amazon, the Amazon logo, AmazonSupply, and the AmazonSupply logo are trademarks of Amazon.com, Inc. or its affiliates. As an Amazon Associate we earn affiliate commissions from qualifying purchases.