
In the digital age, typography is more than just pretty letters; it’s a powerful communication tool. Whether you’re a graphic designer crafting a brand identity, a marketer aiming for compelling campaign visuals, a blogger enhancing your website’s aesthetic, or simply someone who appreciates the artistry of type, the ability to use custom fonts can significantly elevate your work. You’ve likely stumbled upon a font online that perfectly captures the mood or style you’re after, downloaded it, and now a question lingers: “How do you install downloaded fonts?” This guide will demystify the process, covering installation on the most common operating systems and offering insights into managing your growing font library.

Understanding Font Files and Formats
Before diving into the installation process, it’s helpful to understand what you’ve downloaded. Fonts typically come in various file formats, each with its own characteristics and compatibility. The most common formats you’ll encounter are:
- TrueType Fonts (.ttf): This is a widely compatible font format, supported by both Windows and macOS. TTF fonts are scalable, meaning they look good at any size without losing quality. They are a good all-around choice for most applications.
- OpenType Fonts (.otf): An evolution of TrueType, OpenType fonts offer more advanced features, such as ligatures, stylistic alternates, and swashes, which can add a touch of sophistication and individuality to your text. They are also cross-platform compatible and highly recommended for professional design work.
- Web Open Font Format (.woff and .woff2): These formats are specifically designed for web use. They are compressed and optimized for faster loading times in web browsers. While you can install and use them on your system, their primary purpose is for website development.
When you download a font, it’s often bundled in a compressed archive file, such as a .zip file. Your first step after downloading will almost always be to extract these files to a location on your computer where you can easily access them.
Extracting Font Files
Most operating systems have built-in tools to handle .zip files.
- On Windows: Right-click on the
.zipfile and select “Extract All…” or “Extract Here.” Choose a destination folder for the extracted font files. - On macOS: Double-click the
.zipfile. macOS will automatically extract the contents into a new folder in the same location.
Once extracted, you’ll find the actual font files (e.g., MyAwesomeFont.ttf or MyAwesomeFont.otf).
Installing Fonts on Windows
Windows offers a straightforward method for installing fonts, making it accessible even for beginners.
Method 1: The “Install” Option (Recommended for Simplicity)
This is the quickest and most intuitive way to install a font for all users on your system.
- Locate the Font File: Navigate to the folder where you extracted your font files.
- Right-Click the Font File: Find the
.ttfor.otffile you wish to install. Right-click on it. - Select “Install”: A context menu will appear. Click on “Install.”
- If you are prompted for administrator permission, click “Yes.”
- If you see “Install for all users,” it’s generally best to choose this option to ensure the font is available system-wide. This may require administrator privileges.
Once the installation process completes, the font will be available in most applications that allow you to select fonts, such as Microsoft Word, Adobe Photoshop, PowerPoint, and others.
Method 2: Using the Fonts Folder
This method is useful if you want to manage your fonts more centrally or if the “Install” option doesn’t appear as expected.
- Open the Fonts Folder:
- Press
Windows Key + Rto open the Run dialog box. - Type
fontsand press Enter, or click “OK.” - Alternatively, you can navigate to
C:WindowsFontsdirectly in File Explorer.
- Press
- Drag and Drop Font Files: With the Fonts folder open, drag the extracted
.ttfor.otffont files from their location directly into the Fonts folder. - Windows Will Install Automatically: Windows will automatically detect the files and install them. You might see a brief progress bar.
This method also installs the font for all users and makes it accessible across your system.
Installing Multiple Fonts at Once (Windows)
If you’ve downloaded a font family with multiple weights (e.g., Regular, Bold, Italic, Light), you can install them all simultaneously.
- Select All Font Files: In the folder containing your extracted fonts, click and drag a box around all the
.ttfor.otffiles you want to install, or hold down theCtrlkey and click on each file individually. - Right-Click and Install: Right-click on any of the selected font files and choose “Install” or “Install for all users.”
Windows will then proceed to install all the selected fonts.
Installing Fonts on macOS
macOS also provides a user-friendly interface for font installation, primarily through the Font Book application.

Method 1: Double-Click to Install (Most Common)
This is the simplest and most common way to install fonts on a Mac.
- Locate the Font File: Find the extracted
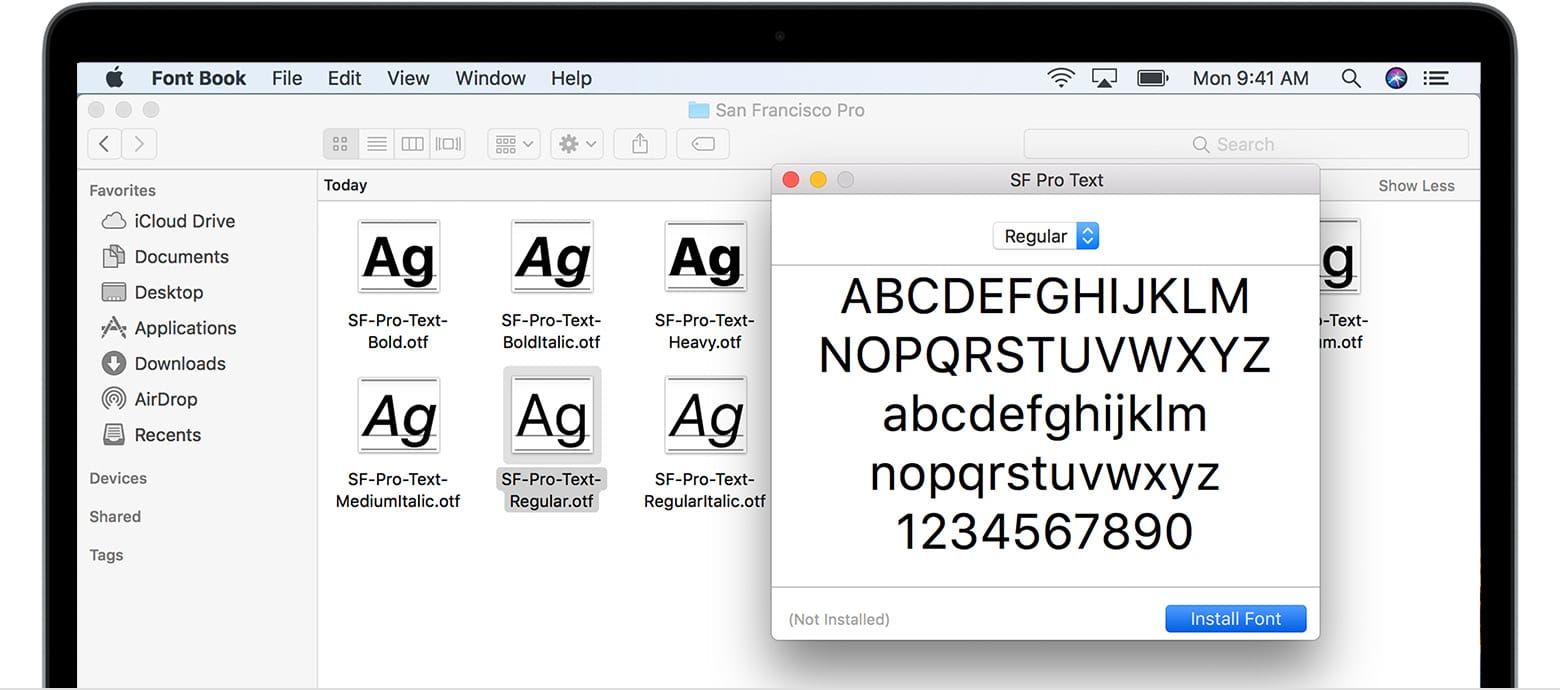
.ttfor.otffont file on your Mac. - Double-Click the Font File: When you double-click a font file, macOS will automatically open it in the Font Book application.
- Click “Install Font”: A preview of the font will be displayed within Font Book. Click the “Install Font” button in the dialog box.
Font Book will then install the font for your user account.
Method 2: Using Font Book Manually
If you prefer to manage your fonts through Font Book directly, you can add them manually.
- Open Font Book:
- Open Spotlight Search by pressing
Command + Spacebar. - Type “Font Book” and press Enter.
- Alternatively, go to your Applications folder and find Font Book.
- Open Spotlight Search by pressing
- Add Fonts:
- In Font Book, go to the menu bar and select File > Add Fonts….
- Alternatively, click the “+” button in the Font Book toolbar.
- Select Font Files: A Finder window will appear. Navigate to the location of your extracted font files, select the
.ttfor.otffiles, and click “Open.”
Font Book will then add and validate the fonts.
Installing Multiple Fonts at Once (macOS)
Similar to Windows, you can install multiple fonts simultaneously on macOS.
- Select All Font Files: In Finder, select all the
.ttfor.otffont files you wish to install. You can do this by clicking and dragging a selection box or by holding down theCommandkey and clicking on each file. - Double-Click Any Selected File: Once all desired font files are selected, double-click any one of them. Font Book will open, and you’ll see previews for all selected fonts.
- Click “Install Font” for Each: Font Book will prompt you to install each font individually. Click “Install Font” for each one.
- Alternatively, after selecting multiple fonts in Font Book, you might find an “Install Selected Fonts” option if you right-click within the Font Book window or look under the File menu.
Font Book Preferences: User vs. Computer Installation
By default, Font Book installs fonts for the current user. This means only your user account on that Mac will have access to the font. If you want to make the font available to all users on the Mac (e.g., for shared computers or when multiple people use the same machine), you can change Font Book’s preferences.
- Open Font Book.
- Go to Font Book > Preferences… (or Settings… on newer macOS versions).
- Under the “Default install location” or “Installation,” choose “Computer” instead of “User.”
- Now, when you install fonts, they will be installed system-wide. This usually requires administrator permission.
Managing Your Font Library
As you download and install more fonts, your collection can quickly grow. Effective management becomes crucial to avoid clutter and ensure you can always find the perfect typeface when you need it.
Organizing Your Fonts
- Create Dedicated Folders: Before installing, consider creating a folder on your computer (e.g., “My Font Collection”) and subfolders for different categories (e.g., “Serif,” “Sans Serif,” “Script,” “Display,” “Brand Fonts”). This makes it easier to browse and locate fonts.
- Use Font Management Software: For extensive font libraries, specialized font management software can be invaluable. Tools like Suitcase Fusion, FontExplorer X, or NexusFont (for Windows) offer features like:
- Previewing fonts: See what a font looks like before activating it.
- Grouping and tagging: Organize fonts into custom sets.
- Conflict resolution: Handle situations where you have duplicate or conflicting font files.
- Activation/Deactivation: Temporarily activate fonts for use in applications without permanently installing them. This keeps your system lean and prevents slow downs.
Deleting Unused Fonts
If you find you’re no longer using certain fonts, it’s good practice to uninstall them to keep your system running smoothly and your font menus tidy.
- On Windows: Open the Fonts folder (
C:WindowsFonts), select the font(s) you want to remove, right-click, and choose “Delete.” - On macOS: Open Font Book, select the font(s) you want to remove from the list, right-click (or go to File > Remove Font), and choose “Remove” or “Delete.”
Troubleshooting Common Font Installation Issues
While font installation is usually seamless, occasional hiccups can occur.
- Corrupted Font Files: If a font fails to install, the downloaded file might be corrupted. Try re-downloading it from the source.
- Font Type Not Supported: Ensure you are trying to install supported font formats (.ttf, .otf). PDFs or image files containing text are not font files.
- Administrator Privileges: On Windows, ensure you have administrator rights if you’re trying to “Install for all users.” On macOS, you’ll be prompted for your password when installing system-wide.
- Restarting Applications: After installing a new font, some older applications might not recognize it immediately. Close and reopen the application (e.g., Word, Photoshop) to refresh its font list.
- System Restart: In rare cases, a full system restart might be necessary for the operating system to fully register the newly installed fonts.
Conclusion
Mastering the art of font installation is a fundamental skill for anyone looking to enhance their digital creations. Whether you’re tweaking a personal project or refining a professional brand, the ability to seamlessly integrate new typefaces into your workflow empowers you to express your vision with greater precision and style. By following these straightforward steps for Windows and macOS, and by adopting good font management practices, you can confidently expand your typographic palette and ensure your message is always communicated with impact. Now, go forth and explore the vast, beautiful world of fonts!
aViewFromTheCave is a participant in the Amazon Services LLC Associates Program, an affiliate advertising program designed to provide a means for sites to earn advertising fees by advertising and linking to Amazon.com. Amazon, the Amazon logo, AmazonSupply, and the AmazonSupply logo are trademarks of Amazon.com, Inc. or its affiliates. As an Amazon Associate we earn affiliate commissions from qualifying purchases.