In the dynamic world of technology, where every gigabyte counts and system performance directly impacts productivity, the question of managing digital clutter becomes increasingly pertinent. For Windows users, a common source of such clutter, yet one fraught with potential consequences if mishandled, is the “previous Windows installation.” This typically refers to the Windows.old folder created after a major operating system upgrade or an older, unused installation on a multi-boot system. The immediate appeal of deleting these files is clear: reclaiming valuable disk space. However, before you dive into indiscriminate deletion, understanding what these files are, why they exist, and the safest methods for their removal is crucial. This article will demystify previous Windows installations, guide you through the process of cleaning them up, and highlight important considerations to ensure your system remains stable and secure.
Understanding Previous Windows Installations: What Are They?
Before you decide whether to remove something, it’s essential to understand what it is you’re dealing with. “Previous Windows installations” can refer to a few different scenarios, each requiring a slightly different approach and consideration.
The Windows.old Folder: Your Reversion Safeguard
The most common form of a “previous Windows installation” you’ll encounter is the Windows.old folder. Whenever you upgrade your Windows operating system – say, from Windows 10 to Windows 11, or from one major version of Windows 10 to another – the system doesn’t immediately overwrite all your old system files. Instead, it carefully archives them into a folder named Windows.old located in the root directory of your C: drive.
This folder serves a critical purpose: it acts as a rollback mechanism. If, after an upgrade, you encounter critical issues, software incompatibilities, or simply dislike the new version, Windows provides an option to revert to your previous operating system using the files stored in Windows.old. This safety net is invaluable, particularly for users or businesses that rely on specific legacy software that might not be immediately compatible with the latest OS version. Typically, Windows maintains this folder for about 10 days (though this can sometimes be longer depending on specific configurations and Windows versions) after an upgrade, giving users a window of opportunity to decide whether to keep the new OS or revert. After this period, Windows may automatically delete it to free up space.
Recovery Partitions and OEM Bloatware
Another aspect that might be considered a “previous Windows installation,” or at least related to system recovery, are recovery partitions. These are hidden partitions created by PC manufacturers (OEMs) or by Windows itself during installation. OEM recovery partitions usually contain a factory image of Windows along with pre-installed drivers, software (often referred to as “bloatware”), and utilities specific to that computer model. Their purpose is to allow you to restore your computer to its out-of-the-box state without needing a separate installation disk.
While these aren’t “previous installations” in the sense of an older OS version, they occupy significant disk space and can be mistaken for dispensable files. Deleting them might free up space, but it also means losing the manufacturer’s easy recovery option. Windows also creates its own recovery partition, which contains the Windows Recovery Environment (WinRE) – essential tools for troubleshooting startup problems, performing system restores, or accessing advanced boot options. Deleting this can severely hamper your ability to recover from system failures.
Multiple OS Installations and Disk Management
Less common for the average user, but a distinct possibility for power users and developers, is having multiple full Windows installations (or even different operating systems like Linux) on separate partitions or drives. This is known as a dual-boot or multi-boot setup. In such cases, each operating system exists independently. If you decide to decommission one of these installations – perhaps an older version of Windows you no longer use, or a test environment – you are essentially deleting a “previous Windows installation” in its entirety. This involves more direct disk management, often requiring formatting the partition where the unwanted OS resides. The primary goal here is usually to reclaim a large block of storage for other purposes or simplify the boot process.
Understanding these distinctions is the first step towards making an informed decision about managing your system’s storage. Each type has its own implications for deletion and recovery.
Why You Might Want to Delete Them (And the Benefits)
The primary motivation behind deleting previous Windows installations is almost always disk space, but the benefits extend beyond mere storage capacity. A well-managed drive contributes to overall system health and user experience, aligning perfectly with productivity goals and digital security best practices.
Reclaiming Precious Disk Space
Modern applications, high-resolution media, and sprawling game installations can quickly consume even generously sized SSDs. The Windows.old folder, for instance, can often span tens of gigabytes, sometimes exceeding 20-30GB. For users with smaller SSDs (e.g., 128GB or 256GB, common in older laptops or entry-level models), this amount of space can be critical. Reclaiming this space means more room for new software, personal files, or simply maintaining a healthy buffer for temporary files and system operations. This directly impacts the user’s ability to install necessary tools or store important data without constantly worrying about “Disk Full” warnings. For businesses, efficient storage management can even translate to cost savings by delaying the need for hardware upgrades.
Enhancing System Performance and Stability
While the Windows.old folder itself doesn’t actively consume system resources once an upgrade is complete, a critically full drive certainly can. When your primary drive approaches full capacity, Windows struggles to perform essential tasks like creating temporary files, managing virtual memory (page file), or conducting defragmentation (for HDDs). This can lead to noticeable slowdowns, longer boot times, application crashes, and general system instability. By freeing up significant space, you give Windows room to breathe, allowing it to operate more efficiently and maintain optimal performance. A clean drive can also simplify file indexing and error checking, indirectly contributing to a snappier user experience.
Decluttering Your Digital Workspace
Beyond the tangible benefits of space and performance, there’s an undeniable psychological advantage to a clean digital environment. A cluttered hard drive can feel overwhelming, mirroring a cluttered physical workspace. Knowing that your system contains only the necessary files and applications contributes to a sense of order and control. This “decluttering” mindset, applied to technology, can boost productivity by removing distractions and ensuring that resources are allocated to active, useful components. From a personal branding perspective, a well-maintained and efficient computer reflects attention to detail and a proactive approach, which can subtly extend to how one is perceived professionally. For organizations, maintaining streamlined systems is part of good IT governance, minimizing potential vulnerabilities and simplifying future maintenance.
The Safest Ways to Delete Previous Installations
When it comes to deleting critical system files, caution is paramount. Fortunately, Windows provides built-in, safe methods designed to remove previous installations without jeopardizing your current system.
Utilizing Disk Cleanup for Windows.old
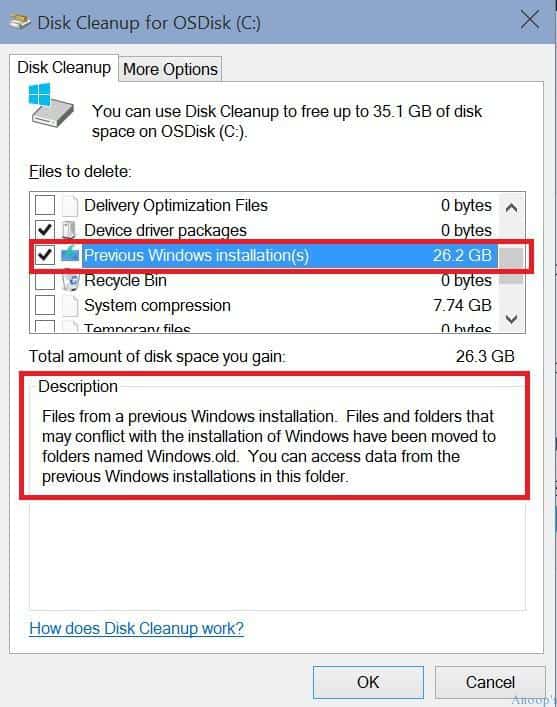
This is the recommended and safest method for removing the Windows.old folder. Disk Cleanup is a native Windows utility designed to identify and remove various types of unnecessary files, including temporary files, Recycle Bin contents, and crucially, “Previous Windows installation(s).”
How to use it:
- Search for “Disk Cleanup” in the Windows search bar and open the application.
- Select your C: drive (or the drive where Windows is installed) and click “OK.”
- In the Disk Cleanup window, click on “Clean up system files.” This step is crucial because “Previous Windows installation(s)” is considered a system file and won’t appear in the initial scan.
- Once the system files scan is complete, a new list of items will appear. Scroll down and locate “Previous Windows installation(s)” (or similar wording).
- Check the box next to it. You might also find other categories like “Windows upgrade log files” or “Temporary Windows installation files” that you can safely select to free up even more space.
- Click “OK” and then “Delete Files” to confirm. Windows will then safely remove the
Windows.oldfolder and associated files.
This method is safe because Disk Cleanup is designed to only remove files that Windows itself deems safe to delete and that are no longer necessary for your current operating system’s function, while respecting the rollback period.
Leveraging Storage Sense (Windows 10/11)
Storage Sense is a more modern, automated approach to disk management available in Windows 10 and 11. It can automatically free up space by deleting temporary files, emptying the Recycle Bin, and managing old system files.

How to use it:
- Go to
Settings > System > Storage. - Under “Storage management,” toggle “Storage Sense” to “On” if it’s not already.
- Click on “Configure Storage Sense or run it now.”
- Here, you can set how often Storage Sense runs and what it cleans up. Look for options related to “Delete temporary files that my apps aren’t using” and ensure “Delete previous versions of Windows” or “Delete temporary installation files” is checked.
- You can also manually run it by clicking “Run Storage Sense now” at the bottom of this page.
Storage Sense offers a set-and-forget solution for maintaining disk space, making it a powerful tool for ongoing system hygiene, especially for busy professionals or IT departments managing multiple machines.
Managing Multiple OS Installations via Disk Management
If you have a dual-boot or multi-boot setup and want to remove an entire old operating system installation (not just Windows.old), you’ll need to use Disk Management. This method is more advanced and carries a higher risk if not performed correctly.
How to use it:
- Search for “Disk Management” or “Create and format hard disk partitions” in the Windows search bar and open it.
- Identify the partition containing the old Windows installation you wish to remove. Be extremely careful here; deleting the wrong partition can lead to data loss or render your current OS unbootable. Look at the drive letter, size, and file system to confirm.
- Right-click on the identified partition and select “Delete Volume.”
- Confirm the deletion. This will make the space “Unallocated.”
- You can then extend an existing partition (e.g., your current Windows partition) into this unallocated space, or create a new simple volume for data storage.
This process essentially wipes the entire partition, removing the operating system and all its files. It’s critical to back up any data from that partition before deleting it.
Advanced Scenarios: Formatting Drives and Clean Installs
In some cases, especially when migrating to a new drive, troubleshooting persistent issues, or repurposing an old drive, a full format might be the best option.
- Formatting a data drive: If an old Windows installation is on a secondary drive that you want to completely erase and reuse for data storage, you can right-click the drive in “This PC” (File Explorer), select “Format,” and follow the prompts. Choose a file system like NTFS and perform a quick format for speed.
- Clean Installation: The most thorough way to deal with previous installations and ensure a completely fresh start is to perform a clean installation of Windows. This involves booting from a Windows installation media (USB drive or DVD) and choosing to custom install, during which you can delete all existing partitions on the target drive and create new ones. This wipes everything, including any
Windows.oldfolders or other OS installations. This is the ultimate “declutter” option, guaranteeing optimal performance but requiring a full reinstallation of all your applications and data.
Important Considerations Before You Delete (Risks and Best Practices)
While the benefits of deleting previous Windows installations are clear, approaching this task without due diligence can lead to significant headaches. There are critical factors to consider to ensure a smooth, risk-free process.
The Point of No Return: Losing the Rollback Option
The most immediate consequence of deleting the Windows.old folder is the permanent loss of the ability to revert to your previous Windows version. As mentioned, this folder is Windows’ built-in safety net. Once it’s gone, your only recourse for going back to an older OS would be a clean installation, which is a much more involved and time-consuming process.
Therefore, it’s paramount to be absolutely certain that your current Windows installation is stable, compatible with all your essential software and hardware, and performing as expected before you delete Windows.old. Give your system at least a week or two post-upgrade to ensure everything is running smoothly. This due diligence is a cornerstone of good digital security and productivity practices.
Back Up Your Data: A Non-Negotiable Step
Regardless of which method you choose for deletion – be it Disk Cleanup, Storage Sense, or Disk Management – a comprehensive backup of your important data is a non-negotiable prerequisite. While Disk Cleanup and Storage Sense are designed to be safe, human error or unforeseen system glitches can always occur. When dealing with Disk Management and full partition deletion, the risk of accidental data loss is significantly higher.
Best practices for backup:
- Cloud Storage: Utilize services like OneDrive, Google Drive, or Dropbox for your documents, photos, and critical files.
- External Hard Drive: Maintain a regular backup schedule to an external drive. This is especially good for larger files or full system images.
- System Image: Consider creating a full system image (using Windows’ built-in tools or third-party software) if you want the ability to restore your entire system to a specific point in time, applications and all.
- Verification: After backing up, always verify that your files are accessible and intact on the backup medium.
Data loss can be catastrophic, leading to significant productivity loss, financial costs, and even reputational damage for businesses. Prioritizing robust backup strategies is a fundamental aspect of digital asset management.
Ensuring System Stability Post-Upgrade
Beyond the initial few days, continue to monitor your system’s behavior for any subtle issues that might not immediately manifest. Look out for:
- Random crashes or blue screens: These indicate deeper system instabilities.
- Software compatibility issues: Especially for specialized or older applications crucial to your workflow.
- Driver problems: Devices not working correctly or performing poorly.
- Performance degradation: Unexplained slowdowns or resource hogging.
If you observe any of these problems, resolving them with the current OS is often preferable, but if they persist and you suspect the upgrade is the culprit, the Windows.old folder (if still present) offers your easiest path back.
Impact on Recovery Options
If you delete OEM recovery partitions or the Windows Recovery Environment partition, you might limit your options for system recovery in the future. While you can always create your own Windows installation media (USB drive) to reinstall Windows, losing the OEM partition means you won’t easily be able to restore your system to its factory default state with all pre-installed drivers and software. For most users, creating a USB recovery drive is a more flexible and often cleaner solution than relying on OEM partitions, but it’s important to be aware of the trade-off.
When is the Right Time to Delete?
Timing is everything when it comes to removing previous Windows installations. Rushing the process can lead to regret, while waiting too long might see Windows delete it automatically, or simply leave you with unnecessary clutter.
After a Successful Upgrade and Stable Operation
The optimal time to delete the Windows.old folder is after you have thoroughly tested your upgraded system for a reasonable period, typically 10 to 30 days. This allows ample time to:
- Confirm all your essential software and hardware drivers are functioning correctly.
- Verify all your critical data is accessible and unmodified.
- Ensure overall system stability and performance meet your expectations.
Once you are confident in the new operating system, and you’ve backed up any crucial data, then you can proceed with deleting Windows.old using Disk Cleanup or Storage Sense. This patient approach ensures that you don’t inadvertently paint yourself into a corner.

When Disk Space is Critically Low
While stability is key, there are instances where immediate action might be necessary. If your primary drive is critically low on space, significantly impacting system performance and your ability to install updates or new applications, then deleting Windows.old becomes a priority. Even in this scenario, prioritize backing up your data, even if the stability test period is shorter than ideal. A sluggish, full drive is a productivity killer, and addressing the space issue can sometimes resolve underlying performance problems. For professionals and businesses, disk space management can be directly tied to financial efficiency, as optimizing existing resources can delay costly hardware investments.
In conclusion, the answer to “Can I delete previous Windows installations?” is a resounding “Yes,” but with significant caveats and a strong emphasis on caution. By understanding the types of “previous installations,” their purpose, the safe methods for removal, and the critical importance of backups and system stability checks, you can confidently manage your storage, enhance your system’s performance, and maintain a clean, efficient digital environment. This proactive approach not only frees up valuable resources but also contributes to a more secure and productive computing experience.
aViewFromTheCave is a participant in the Amazon Services LLC Associates Program, an affiliate advertising program designed to provide a means for sites to earn advertising fees by advertising and linking to Amazon.com. Amazon, the Amazon logo, AmazonSupply, and the AmazonSupply logo are trademarks of Amazon.com, Inc. or its affiliates. As an Amazon Associate we earn affiliate commissions from qualifying purchases.