
In an increasingly connected world, enhancing home security and convenience has become a top priority for many homeowners and renters alike. Among the myriad of smart home devices, the wireless Ring doorbell stands out as a popular and effective solution, offering peace of mind through vigilant monitoring and seamless communication. This guide will walk you through every step of installing your wireless Ring doorbell, ensuring a smooth setup process from start to finish. We’ll delve into the practical aspects, from initial preparations to advanced settings, helping you unlock the full potential of this innovative piece of technology.
Ring doorbells, part of the larger Amazon ecosystem, have revolutionized the way we interact with our front doors. Gone are the days of missing packages, unexpected visitors, or lingering uncertainties about who’s knocking. With a wireless Ring doorbell, you gain the ability to see, hear, and speak to anyone at your door from virtually anywhere, all through your smartphone, tablet, or PC. Its wireless nature, powered by a rechargeable battery, eliminates the need for complex wiring, making it an accessible and attractive option for a wide range of residences. For enthusiasts of cutting-edge gadgets and those keen on digital security, mastering the installation of this device is an empowering step towards a smarter, more secure home.
Why Choose a Wireless Ring Doorbell?
The decision to opt for a wireless Ring doorbell often comes down to a blend of practical advantages and the desire for enhanced security and convenience. Unlike its wired counterparts, the battery-powered wireless model offers unparalleled flexibility and ease of installation, making it a favorite for many.
Enhanced Security and Convenience
The primary allure of a Ring doorbell lies in the significant boost it provides to your home’s security posture. Equipped with high-definition video, two-way audio, and motion detection capabilities, it acts as a vigilant sentinel for your entryway. You receive instant notifications on your smart device whenever motion is detected or the doorbell is pressed, allowing you to respond in real-time. This means you can:
- Monitor deliveries: Never miss a package again. You can instruct delivery drivers remotely or simply keep an eye on your parcels until you retrieve them.
- Screen visitors: See who’s at your door before you open it, adding an extra layer of personal safety.
- Deter potential intruders: The visible presence of a smart doorbell, coupled with its recording capabilities, can act as a powerful deterrent against unwanted visitors. The ability to use the two-way talk feature to speak to someone, even if you’re not home, can make it seem like the house is occupied.
- Capture evidence: All events triggered by motion or a doorbell press are recorded and stored in the cloud (with a Ring Protect subscription), providing valuable footage in case of an incident. This digital security aspect is a core benefit, allowing for review and sharing of critical moments.
Beyond security, the convenience factor is immense. Imagine being able to answer your door from your backyard, office, or even a different country. For busy professionals, travelers, or those simply seeking a more streamlined lifestyle, the wireless Ring doorbell offers an unmatched level of control and connectivity over their home’s entry point.
Flexibility and Ease of Installation
One of the most compelling reasons to choose a wireless Ring doorbell is its inherent flexibility and straightforward installation process. As a battery-powered device, it doesn’t require any pre-existing doorbell wiring, which is a major hurdle for many homeowners when considering wired smart doorbells. This liberation from electrical connections means:
- No existing wiring needed: Perfect for homes without traditional doorbells, apartments, or renters who can’t alter permanent fixtures.
- Placement freedom: You can install the doorbell almost anywhere near your front door, as long as it has a strong Wi-Fi signal. This allows for optimal camera angles and coverage, rather than being restricted by existing wiring locations.
- DIY-friendly: The installation process is designed for the average user, requiring only basic tools and minimal technical expertise. This aligns perfectly with the “Tech Tutorials” aspect of our website, empowering users to confidently set up their own gadgets.
- Portability: While not designed to be moved frequently, the wireless nature makes it easier to relocate if you decide to change your entrance setup or even move to a new home.
The combination of advanced security features, unparalleled convenience, and a user-friendly installation process makes the wireless Ring doorbell an intelligent investment for modern smart homes.
Essential Preparations Before You Begin
Before you grab your tools and start mounting your new device, a little preparation goes a long way. Taking these preliminary steps will ensure a smooth, efficient installation and optimal performance from your wireless Ring doorbell.
What’s in the Box? (and What You’ll Need)
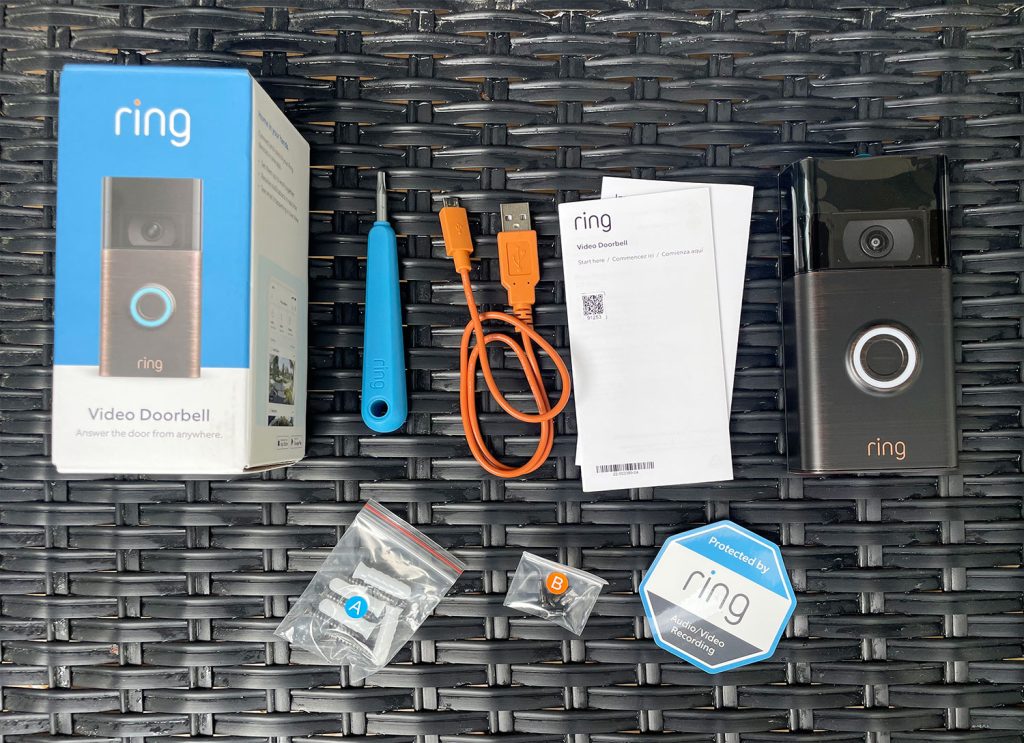
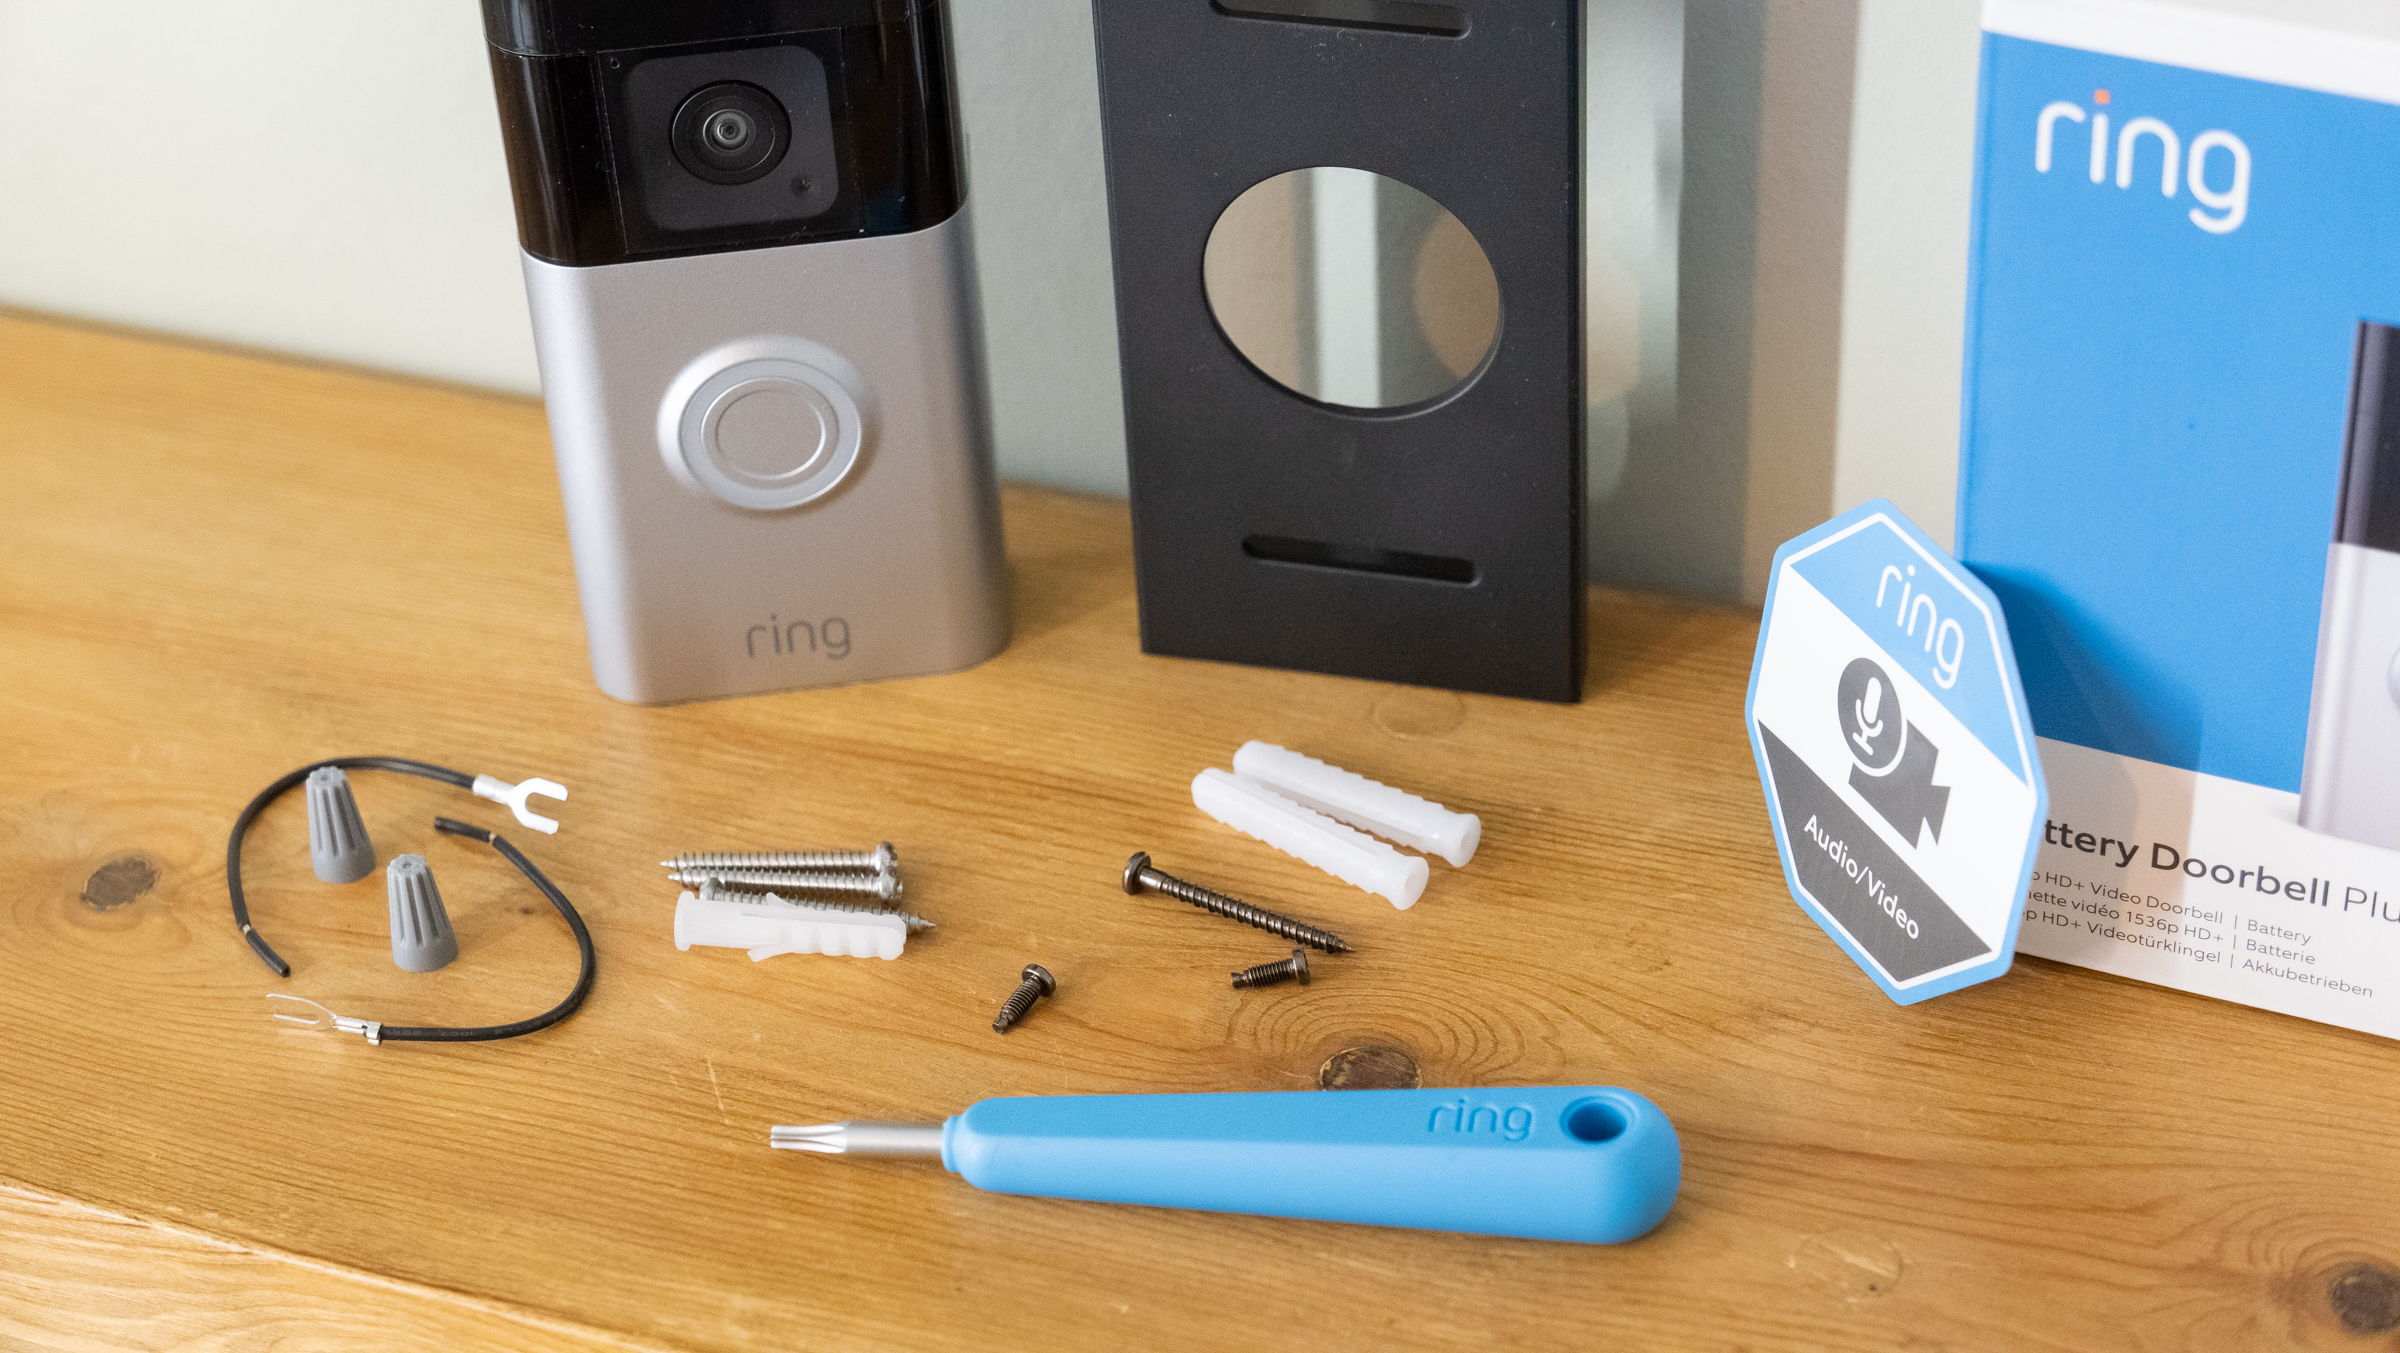
Upon unboxing your new wireless Ring doorbell, you’ll typically find the following items:
- Ring Doorbell (Battery Model): The main unit.
- Mounting Bracket: The plate that attaches to your wall, onto which the doorbell slides.
- Installation Screws and Wall Anchors: For securing the mounting bracket to various surfaces.
- Security Screw and Star-Shaped Screwdriver: A small screw located at the bottom of the doorbell, used to secure it to the mounting bracket to prevent theft.
- USB Charging Cable: For charging the doorbell’s battery.
- User Manual/Quick Start Guide: Contains essential information and often a QR code for easy setup.
In addition to what’s supplied, you’ll need a few common household tools:
- Power Drill and Drill Bit: For creating pilot holes (the specific size will be in your manual, usually matching the wall anchors).
- Phillips-head Screwdriver: For attaching the mounting bracket.
- Pencil: For marking drill holes.
- Ladder or Step Stool (Optional): If your chosen installation spot is high.
- A strong 2.4 GHz Wi-Fi network: Crucial for connectivity.
Charging Your Ring Doorbell Battery
This is perhaps the most critical preparatory step for a wireless Ring doorbell. You must fully charge the battery before installation. Ring batteries typically take 6-8 hours to fully charge from empty.
- Locate the battery: For most wireless Ring doorbells, the battery pack is removable. Press the release tab on the bottom or back of the doorbell to slide it out.
- Connect to power: Use the provided USB charging cable (or any standard micro-USB or USB-C cable, depending on your model) and plug it into the battery. Connect the other end to a USB power source, such as a phone charger block or a computer’s USB port.
- Monitor indicator light: The battery will usually have an indicator light that shows its charging status. It might be red while charging and turn green when fully charged. Refer to your specific model’s manual for exact light indicators.
A full charge ensures your doorbell has enough power to go through the setup process and operate effectively for its initial period, preventing premature low-battery alerts and troubleshooting headaches.
Download the Ring App and Account Setup
The Ring app is the command center for your doorbell. Without it, you cannot set up or manage your device.
- Download the app: Search for “Ring Always Home” in your smartphone’s app store (Apple App Store for iOS or Google Play Store for Android).
- Create an account: If you’re a new user, open the app and follow the prompts to create an account. This typically involves providing your email, setting a password, and verifying your email address. If you already have a Ring or Amazon account, you can often log in directly.
- Enable notifications: Ensure the Ring app has permission to send you notifications on your phone. This is vital for receiving alerts when someone rings the doorbell or motion is detected.
- Familiarize yourself: Take a moment to explore the app’s interface. Understanding where settings, live view, and event history are located will make post-installation customization much easier.
Optimal Placement for Your Ring Doorbell
Choosing the right location for your doorbell is crucial for its performance and your overall security.
- Height: Ring recommends installing the doorbell approximately 48 inches (1.2 meters) from the ground to the bottom of the doorbell. This height provides an optimal viewing angle to capture visitors’ faces while minimizing triggers from small animals or passing vehicles.
- Wi-Fi Signal Strength: Since it’s a wireless device, a strong Wi-Fi signal is paramount. Before drilling, test the Wi-Fi signal at your desired location using your smartphone. If the signal is weak, consider options like a Ring Chime Pro (which extends Wi-Fi range for Ring devices) or repositioning your Wi-Fi router. A weak signal will lead to delayed notifications, poor video quality, and battery drain.
- Field of View: Consider what you want the camera to see. Avoid placing it where it will be obstructed by walls, plants, or decorative items. The camera has a wide-angle lens, but placement still impacts what’s captured.
- Sunlight Exposure: Try to avoid direct, prolonged sunlight exposure, especially if the sun shines directly into the camera lens for extended periods. This can cause glare and overexposure, making it difficult to see faces. If unavoidable, Ring often sells wedge kits to angle the doorbell slightly.
- Motion Detection Zones: Think about the areas you want to monitor for motion. Placement affects how effectively you can set up customized motion zones later.
By carefully considering these preparatory steps, you’ll lay a solid foundation for a successful and trouble-free Ring doorbell installation, aligning with best practices for digital security and smart home integration.
Step-by-Step Installation Guide
With your battery charged, the app ready, and the perfect spot chosen, it’s time for the physical installation. This process is designed to be straightforward, empowering you to secure your home in no time.
In-App Setup: Connecting Your Doorbell to Wi-Fi
The initial pairing of your Ring doorbell to your home Wi-Fi network is done entirely through the Ring app.
- Open the Ring App: Tap “Set up a Device” on the dashboard.
- Select Device Type: Choose “Doorbells” from the list of device categories.
- Scan the QR Code: The app will prompt you to scan the QR code located on the front of your Ring doorbell or its packaging. This automatically identifies your specific device model. If scanning fails, you can manually enter the 5-digit PIN.
- Confirm Your Location: The app will ask you to confirm or enter your address. This is important for enabling features like neighborhood alerts and for emergency services (if you opt for Ring Protect Plus).
- Name Your Device: Give your doorbell a descriptive name (e.g., “Front Door,” “Main Entrance”).
- Put Device into Setup Mode: Your Ring doorbell will automatically enter setup mode after scanning. If not, you might need to press the small orange button on the back of the device. The light on the front of the doorbell will typically spin or flash blue.
- Connect to Ring’s Temporary Network: Your phone will temporarily disconnect from your home Wi-Fi and connect to a Wi-Fi network created by your Ring doorbell (e.g., “Ring-XXXXXX”). Follow the app’s prompts to do this.
- Connect to Your Home Wi-Fi: Once connected to the Ring network, the app will display a list of available 2.4 GHz Wi-Fi networks. Select your home network and enter your Wi-Fi password.
- Complete Setup: The doorbell will now attempt to connect to your home Wi-Fi. Once successful, the light on the front of the doorbell will flash blue a few times and then glow solid blue. The app will confirm the successful setup. At this point, you can test the doorbell by pressing the button – your phone should receive a notification.
Mounting the Bracket
Now it’s time to physically attach the doorbell to your wall.
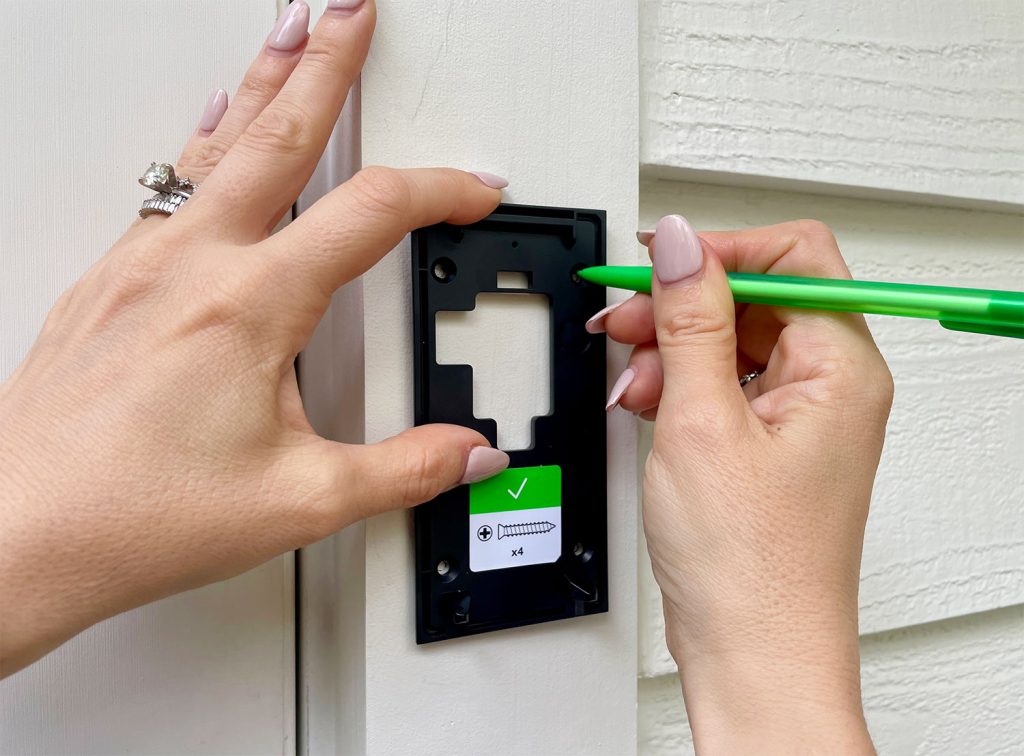
- Position the Bracket: Hold the mounting bracket against the wall at your chosen height (approx. 48 inches/1.2m from the ground to the bottom of the doorbell). Use a level to ensure it’s straight.
- Mark Drill Holes: Use a pencil to mark the positions of the screw holes through the bracket.
- Drill Pilot Holes: Using your power drill and the appropriate drill bit (check your manual for the size), carefully drill pilot holes at the marked spots. If you’re drilling into soft materials like wood siding, you might not need anchors.
- Insert Wall Anchors (if necessary): If drilling into stucco, brick, concrete, or other masonry, insert the provided wall anchors into the pilot holes. Gently tap them flush with a hammer. These anchors provide a secure grip for the screws.
- Attach the Mounting Bracket: Align the mounting bracket with the pilot holes (and anchors, if used) and secure it to the wall using the provided mounting screws and your Phillips-head screwdriver. Make sure it’s firmly attached and doesn’t wiggle.
Securing Your Ring Doorbell
With the bracket in place, the final step is to attach the doorbell itself.
- Align and Slide: Take your charged Ring doorbell and align the top edge with the top of the mounting bracket.
- Slide Down: Gently slide the doorbell downwards until it clicks securely into place on the bracket. You should feel it lock.
- Insert Security Screw: Locate the small security screw hole at the very bottom of the doorbell. Using the provided star-shaped (or Phillips, depending on your model) screwdriver, insert and tighten the security screw. This small screw is crucial as it prevents someone from easily removing your doorbell, acting as an anti-theft measure. Do not overtighten.
Final Testing and Adjustments
Before concluding the installation, perform a few tests to ensure everything is working correctly.
- Press the Doorbell: Press the main button on your Ring doorbell. Your phone should receive an instant “Someone is at your Front Door” notification. Tap the notification to open the Live View.
- Test Two-Way Talk: In the Live View, tap the microphone icon to speak and the speaker icon to listen. Ensure you can hear sound from the doorbell and that your voice transmits clearly.
- Test Motion Detection: Walk around in front of your doorbell’s field of view to trigger motion detection. You should receive a “Motion Detected” notification.
- Adjust Motion Settings (in app): If you’re getting too many false alerts (e.g., from cars passing by) or not enough (missing people), go into the Ring app settings for your doorbell. Navigate to “Motion Settings” to customize:
- Motion Zones: Draw specific areas within the camera’s view where you want to detect motion. Exclude busy roads or sidewalks.
- Motion Sensitivity: Adjust how sensitive the motion sensor is.
- Motion Frequency: For battery devices, you can set how often the doorbell checks for motion, balancing detection with battery life.
- Check Video Quality: Ensure the video feed is clear, free of glare, and covers the area you intend to monitor. If not, you may need to subtly adjust the angle of the doorbell (Ring sells wedge kits for this purpose) or address any obstructions.
By following these detailed steps, your wireless Ring doorbell will be fully installed and operational, ready to enhance your home’s security and connect you to your doorstep like never before.
Maximizing Your Ring Doorbell Experience
Installing your wireless Ring doorbell is just the beginning. To truly leverage its capabilities and integrate it seamlessly into your smart home ecosystem, a few post-installation steps and ongoing practices are essential. These tips align with advanced tech usage and digital security best practices.
Customizing Motion Settings and Alerts
Fine-tuning your motion settings is paramount to getting the most out of your Ring doorbell while avoiding an onslaught of unnecessary notifications and preserving battery life.
- Smart Alerts: Within the Ring app, access your doorbell’s “Motion Settings.” Enable “Smart Alerts” to differentiate between “People Only” detection. This helps reduce notifications from cars, pets, or swaying trees.
- Motion Zones: This feature allows you to define specific areas in your camera’s field of view where you want to detect motion. Draw custom zones to exclude areas like busy streets, neighbors’ yards, or parts of your garden where motion isn’t relevant to your entryway security.
- Motion Sensitivity: Adjust the sensitivity slider. A higher sensitivity will detect smaller movements, while a lower setting will only trigger for more significant motion. Experiment to find the sweet spot for your environment.
- Motion Frequency: For battery-powered doorbells, this setting influences how often your device checks for motion. Choosing “Standard” or “Frequent” provides more robust detection but consumes more battery. “Light” or “Periodically” saves battery but might miss some events. Balance your security needs with desired battery life.
- Snapshot Capture: Enable Snapshot Capture to have your doorbell periodically take still images between motion-triggered events, providing a more complete timeline of activity at your door.
Integrating with Other Smart Home Devices
The true power of smart home technology lies in its ability to connect and communicate. Ring doorbells are designed to integrate seamlessly with a range of other devices, enhancing both security and convenience.
- Amazon Alexa: As an Amazon company, Ring products are deeply integrated with Alexa. Once linked through the Alexa app, you can:
- “Alexa, show me the front door” to view live video on an Echo Show or Fire TV.
- “Alexa, answer the front door” to speak to visitors through your Echo device.
- Set up routines, such as turning on lights when motion is detected.
- Ring Chime/Chime Pro: If you don’t have an existing doorbell chime or want additional chime locations, a Ring Chime plugs into any standard outlet and rings when your doorbell is pressed. The Chime Pro also acts as a Wi-Fi extender, boosting the signal to your Ring devices, which is particularly useful for wireless doorbells located far from your router.
- Other Ring Devices: If you expand your Ring ecosystem with security cameras (e.g., Stick Up Cam, Floodlight Cam) or an alarm system, they can all be managed through the same Ring app, creating a unified and comprehensive home security network. Link them to trigger recordings across multiple devices when one detects motion.
- Smart Locks: While not directly integrated in the same way as Alexa, you can often manage compatible smart locks (e.g., Yale, Schlage) from within the Ring app dashboard, allowing you to unlock your door for a visitor you see on your doorbell camera.
Maintaining Your Ring Doorbell for Longevity
Like any electronic device, a little care and maintenance can significantly extend the life and performance of your wireless Ring doorbell.
- Regular Cleaning: Dust, cobwebs, and dirt can accumulate on the camera lens and motion sensor, impairing performance. Gently wipe the lens and the rest of the doorbell with a soft, microfiber cloth. Avoid harsh chemicals or abrasive materials.
- Battery Management: For wireless doorbells, battery life is a key concern.
- Monitor battery levels: The Ring app will notify you when the battery is low. Try to recharge it promptly to avoid service interruptions.
- Have a spare battery (optional): For continuous protection, consider purchasing an extra quick-release battery pack. This allows you to swap out a depleted battery for a fully charged one instantly, minimizing downtime.
- Optimize settings: As discussed above, smart motion settings and a less frequent motion detection schedule can significantly prolong battery life. Cold weather can also temporarily reduce battery performance.
- Firmware Updates: Ring regularly releases firmware updates that improve performance, add new features, and patch security vulnerabilities. Ensure your doorbell is connected to Wi-Fi, and the updates will typically download and install automatically in the background. Check your app settings to ensure automatic updates are enabled.
- Review Event History: Regularly reviewing your video event history (especially with a Ring Protect subscription) helps you understand typical activity at your door, identify any unusual patterns, and ensure your motion settings are optimal.
By proactively managing these aspects, you’ll not only enjoy a seamless smart security experience but also ensure your investment in digital home security continues to protect your property efficiently for years to come.
Troubleshooting Common Installation Issues
Even with careful planning, sometimes things don’t go exactly as expected. Here are some common issues users encounter during or after installing a wireless Ring doorbell, along with practical solutions.
Wi-Fi Connectivity Problems
A stable Wi-Fi connection is the backbone of your wireless Ring doorbell’s functionality. Without it, the device is essentially a glorified conventional doorbell.
- “Doorbell is Offline” or Setup Fails to Connect:
- Signal Strength: The most common culprit is a weak Wi-Fi signal at the installation location. Use your phone to check the signal strength while standing where the doorbell is mounted. If it’s weak, consider:
- Relocating Router: If possible, move your Wi-Fi router closer to the front door.
- Ring Chime Pro: This device acts as a Wi-Fi extender specifically designed for Ring devices, boosting the signal where needed.
- Wi-Fi Mesh System: For larger homes, a mesh Wi-Fi system provides consistent coverage throughout the property.
- Incorrect Password: Double-check your Wi-Fi password during setup. Even a single incorrect character can prevent connection.
- 2.4 GHz vs. 5 GHz: Ring doorbells primarily operate on the 2.4 GHz band, which offers better range through walls than 5 GHz. Ensure your router is broadcasting a 2.4 GHz network, and your phone is connected to it during the initial setup process.
- Router Overload: Too many devices on your network can cause congestion. Try disconnecting some devices temporarily during setup.
- Reboot Router & Doorbell: A simple reboot of your Wi-Fi router and taking the battery out and reinserting it into the doorbell can often resolve minor glitches.
- Signal Strength: The most common culprit is a weak Wi-Fi signal at the installation location. Use your phone to check the signal strength while standing where the doorbell is mounted. If it’s weak, consider:
- Delayed Notifications or Poor Video Quality: This also points to a struggling Wi-Fi connection. Follow the signal strength solutions above.
Battery Life Concerns
Wireless Ring doorbells rely on their battery, and unexpected drains can be frustrating.
- Battery Draining Too Fast:
- High Motion Activity: If your doorbell is constantly detecting motion (e.g., a busy street, active pets in the yard), it will record more often and drain the battery faster. Adjust “Motion Zones” and “Motion Frequency” (as discussed in the ‘Maximizing Your Experience’ section) to focus on essential areas and reduce unnecessary recordings.
- Cold Weather: Extreme cold temperatures significantly reduce battery performance and capacity. This is a common issue in winter months.
- Bring Battery Inside: During very cold spells, you might need to bring the battery inside to charge more frequently or even keep it warm before reinserting.
- Wired Option (Future Consideration): If cold weather is a consistent problem, and you have existing doorbell wiring, you might consider a wired Ring doorbell for continuous power.
- Wi-Fi Signal Strength: A weak Wi-Fi signal forces the doorbell to work harder to maintain connection, leading to faster battery drain. Improve your Wi-Fi signal as suggested above.
- Live View Usage: Frequent use of Live View (peeking into the camera without a motion trigger) consumes battery.
- Faulty Battery: Though rare, a battery could be defective. If troubleshooting doesn’t help, contact Ring support for a replacement.
- Doorbell Not Charging: Ensure the USB cable and power adapter are working. Try a different cable or power source. Check the battery’s indicator light for charging status.
Motion Detection False Alarms
Getting constant notifications for non-threats can quickly become irritating.
- Excessive Motion Alerts:
- Poorly Configured Motion Zones: This is the primary reason. Go into the Ring app and redefine your motion zones to exclude areas with high, irrelevant activity (e.g., main road, public sidewalk, tree branches swaying in the wind, small animals). Focus the zones specifically on your entryway and immediate surroundings.
- Motion Sensitivity: Reduce the motion sensitivity setting.
- Sunlight/Shadows: Moving shadows or sudden changes in sunlight can sometimes trigger motion detection. Adjust sensitivity or angles if this is a consistent issue.
- Heat Sources: Some older models might be triggered by sudden temperature changes or heat sources. While less common in newer models, it’s worth noting.
- Missing Important Motion Events:
- Motion Zones Too Small or Incorrectly Placed: Ensure your zones cover the full area you wish to monitor.
- Low Motion Sensitivity: Increase sensitivity.
- Motion Frequency: For battery models, if set to “Light” or “Periodically,” you might miss some events. Switch to “Standard” or “Frequent” for more comprehensive detection.
- Obstructions: Make sure nothing is blocking the camera’s view or the motion sensor.
By systematically addressing these common troubleshooting points, you can ensure your wireless Ring doorbell operates efficiently, providing reliable security and peace of mind without unnecessary frustrations. Don’t hesitate to consult Ring’s extensive online support or community forums for more specific advice if you encounter unique issues.
Conclusion
Installing a wireless Ring doorbell is an empowering step towards a smarter, more secure home. By following this comprehensive guide, from the initial preparations and the step-by-step physical and app-based setup, to customizing its settings and understanding how to troubleshoot common issues, you’ve gained the knowledge to confidently integrate this powerful piece of technology into your daily life.
The wireless Ring doorbell offers more than just a camera at your door; it provides a constant connection to your home, giving you real-time insights and control over your entryway security. It’s a testament to how accessible and user-friendly advanced tech solutions have become, enabling everyone to enhance their digital security without needing professional installation. Embrace the convenience, enjoy the peace of mind, and savor the feeling of being always home, even when you’re away. Your smart home journey, with enhanced security at its core, has just begun.
aViewFromTheCave is a participant in the Amazon Services LLC Associates Program, an affiliate advertising program designed to provide a means for sites to earn advertising fees by advertising and linking to Amazon.com. Amazon, the Amazon logo, AmazonSupply, and the AmazonSupply logo are trademarks of Amazon.com, Inc. or its affiliates. As an Amazon Associate we earn affiliate commissions from qualifying purchases.