In an increasingly digital world, the need for physical documents remains surprisingly persistent. From important legal forms and academic papers to cherished family photos, the ability to print reliably at home or in the office is a cornerstone of productivity. Among the myriad printer brands, HP stands out as a dominant force, renowned for its diverse range of printers catering to every need, from basic inkjet models for casual users to advanced laser printers for demanding business environments. Given their widespread popularity, understanding the fundamentals of maintaining an HP printer, particularly the seemingly simple task of installing print cartridges, is a vital skill for millions of users.

Yet, this common task often becomes a source of frustration. A printer suddenly stops printing, displaying an ominous “low ink” or “cartridge empty” message, bringing workflow to an abrupt halt. The process of replacing a cartridge, while seemingly straightforward, can be fraught with minor complexities: knowing which cartridge to buy, correctly removing the old one, preparing the new one, and ensuring it’s properly seated to avoid costly errors or damage. This comprehensive guide aims to demystify the process, providing a detailed, step-by-step walkthrough, enriched with best practices and troubleshooting tips, ensuring your HP printer remains a reliable workhorse. We’ll delve not just into the how-to, but also the why, touching upon aspects of technology, brand considerations, and even the financial implications of your printing choices.
Why Understanding Your HP Printer is Key
Your HP printer is more than just a peripheral device; it’s a sophisticated piece of technology designed to integrate seamlessly into your digital life. Understanding its basic operation, especially cartridge installation, is crucial not only for uninterrupted printing but also for optimizing its longevity and performance.
The HP Ecosystem: Ink, Toner, and Your Printing Needs
HP’s reputation for innovation extends to its cartridge technology. Whether your HP printer uses inkjet cartridges (liquid ink) or toner cartridges (powdered toner), the fundamental principle is to deliver a precise amount of colorant onto paper. Inkjet printers are typically favored for their ability to produce high-quality color prints, including photos, making them popular for home use and small offices. HP’s thermal inkjet technology, for instance, heats the ink to create bubbles that eject tiny droplets onto the page. Toner printers, on the other hand, use an electrostatic process to fuse toner powder onto paper with heat, excelling in speed, volume, and crisp text quality, often making them the preferred choice for business documents.
Knowing whether your specific HP model uses ink or toner is the first step in successful cartridge replacement. This knowledge not only dictates the type of cartridge you purchase but also influences the nuances of the installation process. Beyond the physical act, understanding the technological intricacies ensures you appreciate the precision involved and treat your printer with the care it deserves.
The Cost of Printing: A Financial Perspective
Printing, while seemingly a minor expense, can accumulate into a significant cost over time. The price of ink and toner cartridges often raises eyebrows, leading many users to seek cheaper alternatives. This financial aspect ties directly into the installation process. Improper installation can lead to wasted ink, damaged cartridges, or even printer malfunctions, resulting in additional expenses in replacements or repairs.
Furthermore, the choice between genuine HP cartridges, compatible third-party cartridges, or refill services presents a financial dilemma. While third-party options might seem more appealing on price, they often come with risks to print quality, printer longevity, and even warranty validity. We’ll explore these financial considerations later, emphasizing how smart choices and correct installation can safeguard your printing investment and reduce long-term costs.
Essential Preparations Before You Begin
Before you even think about opening your printer’s access door, a few preparatory steps can ensure a smooth, mess-free, and successful cartridge installation. These steps are crucial for both your safety and the longevity of your printer.
Gathering Your Tools and Workspace Setup
While print cartridge installation generally doesn’t require specialized tools, having a clean and organized workspace can make a significant difference.
- New Cartridges: Ensure you have the correct HP genuine cartridges for your specific printer model. Check the cartridge numbers carefully, as even slight variations can lead to incompatibility. HP typically lists compatible cartridge numbers prominently on the printer itself, in the user manual, and on their website.
- Lint-Free Cloth: A soft, lint-free cloth can be useful for wiping away any accidental ink smudges or dust, though direct contact with cartridge nozzles should be avoided.
- Gloves (Optional): If you’re particularly sensitive to ink or wish to avoid any potential mess, a pair of disposable gloves can be helpful, especially with older, potentially leaking cartridges.
- Well-Lit Area: Ensure you’re working in a well-lit environment to clearly see the cartridge slots and any small tabs or levers.
- Flat, Stable Surface: Place your printer on a stable, flat surface to prevent it from moving during the installation process.
Safety First: Power and Printer Care
Safety is paramount when dealing with any electronic device. While installing cartridges is a low-risk procedure, a few precautions are advisable:
- Power On, But No Print Jobs: It’s crucial that your HP printer is powered ON. This allows the print carriage to move into the correct position for cartridge access. However, ensure there are no active print jobs in the queue, as the printer might attempt to print during the process, which could be hazardous or disrupt the installation.
- Unplugging (If Necessary): While generally not required for cartridge installation, if you need to move the printer significantly or perform any deeper maintenance, always unplug it from the wall outlet to prevent electrical hazards. For cartridge changes, keeping it plugged in and powered on is usually best as it helps the printer prepare itself.
- Handle with Care: Printer components, especially the print carriage and internal mechanisms, can be delicate. Avoid forcing parts or applying excessive pressure. Gentleness and precision are key to preventing accidental damage.
A Step-by-Step Guide to Cartridge Installation
Now that you’re prepared, let’s walk through the actual cartridge installation process. While minor variations exist between HP models (e.g., DeskJet, OfficeJet, LaserJet), the core steps remain largely consistent.
Accessing the Cartridge Compartment
- Power On the Printer: Ensure your HP printer is turned on. Look for the power button, usually located on the control panel. Wait for the printer to fully initialize, and for any blinking lights to become steady.
- Locate and Open the Cartridge Access Door: This door is typically on the front or top of the printer. Its exact location varies by model. For inkjet printers, it’s usually a large flap that lifts up or pulls open. For some LaserJet models, you might need to open a front cover and then pull out a tray. Consult your printer’s manual if you’re unsure.
- Wait for the Print Carriage to Position: Once the door is open, the print carriage (the component that holds the cartridges) will automatically move to the center or a designated access area. This might take a few seconds, accompanied by some whirring sounds. Do not attempt to manually move the carriage, as this can damage the printer. Wait until it comes to a complete stop and is stationary.
Removing the Old Cartridge: A Gentle Approach
With the carriage in position, you can now remove the depleted cartridges.
- Identify the Empty Cartridge: Your printer’s software or control panel might indicate which specific cartridge is empty. Visually inspect the cartridges in the carriage.
- Release the Cartridge: Most HP inkjet cartridges are held in place by a small latch or clip. Gently press down on the back of the cartridge or lift a small lever to release it. Some models might require you to push the cartridge slightly inwards before it springs out. For toner cartridges, there’s usually a handle to pull.
- Pull Out the Old Cartridge: Once released, carefully pull the old cartridge straight out of its slot. Avoid tilting or twisting it excessively to prevent any residual ink or toner from spilling.
- Dispose Responsibly: Place the old cartridge aside for recycling. Many office supply stores and HP itself offer free recycling programs for used ink and toner cartridges, contributing to environmental sustainability.
Unpacking and Preparing the New Cartridge
This step is critical for ensuring proper functionality and preventing damage.

- Remove from Packaging: Take the new HP genuine cartridge out of its sealed plastic packaging.
- Locate and Remove Protective Tape/Clip: New cartridges come with protective tape, plastic clips, or orange caps covering the nozzles or electrical contacts. These must be carefully removed before installation.
- Inkjet Cartridges: Look for an orange or clear plastic strip with an arrow, usually covering the copper-colored electrical contacts and/or the ink nozzles. Gently pull this tape straight off. Do not touch the copper contacts or the nozzles with your fingers, as oils from your skin can interfere with printing. Do not remove any other labels or stickers on the cartridge, as these are vital for airflow.
- Toner Cartridges: Toner cartridges often have a sealing strip that needs to be pulled out, or orange protective clips that snap off. Follow the instructions on the cartridge packaging itself, as designs can vary significantly.
- Check for Damage: Briefly inspect the new cartridge for any visible damage or leaks. If you notice anything unusual, do not install it and contact your retailer or HP support.
Installing the New Cartridge: Precision and Care
Now for the main event: inserting the fresh cartridge.
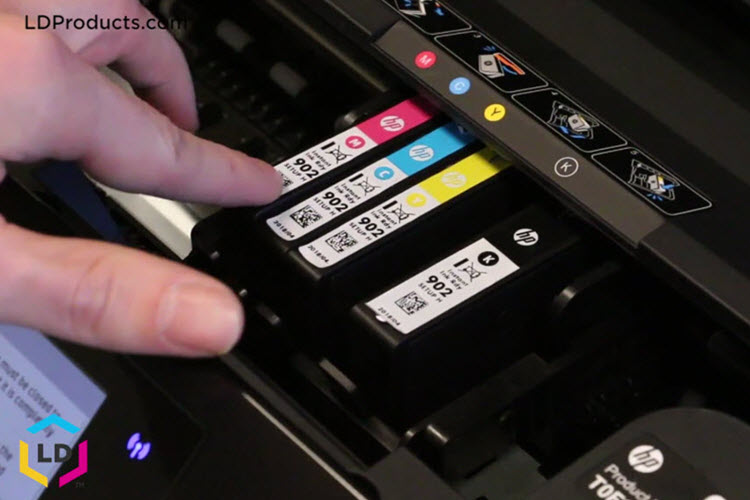
- Match Cartridge to Slot: Each cartridge has a designated slot, often color-coded (for inkjets) or uniquely shaped. Ensure you’re inserting the correct cartridge (e.g., black ink into the black slot, cyan into cyan, etc.).
- Slide into Slot: Gently slide the new cartridge into its corresponding slot. For inkjet cartridges, push it in firmly until you hear a distinct click, indicating it’s properly seated and latched. For toner cartridges, align it with the tracks in the printer and slide it in until it’s fully seated and locks into place. Never force a cartridge into a slot; if it doesn’t go in easily, double-check its orientation and whether it’s the correct cartridge type.
- Repeat for All Cartridges: If you are replacing multiple cartridges, repeat the removal and installation steps for each one.
Finalizing the Installation and Initial Tests
After all new cartridges are in place, the final steps involve closing the printer and allowing it to recalibrate.
- Close the Cartridge Access Door: Gently close the access door. It should click securely into place.
- Printer Calibration/Alignment: Your HP printer might automatically initiate a calibration or alignment process. This is a crucial step where the printer prints a test page and scans it internally to ensure the cartridges are properly aligned for optimal print quality. Follow any on-screen prompts or control panel messages. If prompted, load plain paper into the input tray.
- Print a Test Page: Once the alignment process is complete (or if the printer doesn’t automatically align), it’s highly recommended to print a test page or a diagnostic page. This confirms that all cartridges are recognized and printing correctly, and helps identify any immediate issues with print quality.
Troubleshooting Common Installation Issues
Even with the clearest instructions, sometimes things don’t go as planned. Here are solutions to common problems you might encounter.
When the Printer Doesn’t Recognize the Cartridge
This is a frequent and frustrating issue, often signaled by an error message like “cartridge not detected” or “missing ink.”
- Re-seat the Cartridge: The most common fix is to simply remove the new cartridge and re-insert it, ensuring it clicks firmly into place. Sometimes it just needs a more secure connection.
- Check Protective Tape: Double-check that all protective tape or clips have been completely removed from the cartridge. A tiny piece left on the contacts can prevent recognition.
- Clean Electrical Contacts: If the issue persists, carefully remove the cartridge. Using a clean, dry, lint-free cloth (or a cotton swab lightly dampened with distilled water), gently wipe the copper-colored electrical contacts on both the cartridge and inside the printer’s carriage. Allow them to air dry completely before re-inserting the cartridge. Avoid touching the ink nozzles themselves.
- Restart the Printer: Turn the printer off, unplug it from the wall for about 60 seconds, then plug it back in and turn it on. This can sometimes clear internal errors and force the printer to re-scan for cartridges.
- Try a Different Cartridge (if available): If you have another new cartridge of the same type, try installing it. This helps determine if the issue is with the printer slot or a faulty cartridge.
Dealing with Smudges and Poor Print Quality
After installation, if your prints are smudged, streaky, or have incorrect colors, there are a few things to investigate.
- Run Printhead Cleaning/Alignment: Most HP printers have built-in utilities in their software or control panel for cleaning the printheads and performing alignment. These processes help clear clogged nozzles and ensure precise ink delivery. You might need to run the cleaning cycle multiple times.
- Check Ink Levels: Verify that all new cartridges show full ink levels in the printer software. If a cartridge shows low levels immediately, it might be faulty or improperly recognized.
- Ensure Proper Paper Type: Using the correct paper type for your print job (e.g., photo paper for photos, plain paper for documents) can significantly impact print quality. Ensure the printer settings match the paper loaded.
- Genuine HP Cartridges: If you’re using compatible or refilled cartridges, poor print quality is a common side effect. Genuine HP cartridges are engineered to work flawlessly with HP printers, offering consistent quality and reliability.
Beyond the Basics: Firmware and Connectivity
Occasionally, software issues or outdated firmware can impact cartridge recognition or performance.
- Update Printer Firmware: Check the HP support website for your printer model to see if there are any available firmware updates. Firmware updates often include bug fixes and improved compatibility with new cartridge batches.
- Reinstall Printer Drivers: If all else fails and you suspect a software conflict, try uninstalling and reinstalling your HP printer drivers on your computer.
Maximizing Your Printing Investment: Tips and Best Practices
Installing cartridges correctly is just one piece of the puzzle. To truly maximize your HP printer’s performance and get the most out of your printing budget, consider these broader strategies.
Genuine HP vs. Compatible Cartridges: A Brand and Money Dilemma
This is a classic debate among printer users.
- Genuine HP Cartridges: These are manufactured by HP and designed specifically for your printer. They offer guaranteed compatibility, consistent print quality, reliability, and typically come with HP’s warranty. While often more expensive upfront, they can prevent costly printer damage or re-prints due to poor quality, potentially saving money in the long run. From a “Brand” perspective, using genuine products maintains the intended performance and reliability promised by HP.
- Compatible/Third-Party Cartridges: Produced by other manufacturers, these are designed to fit and function in HP printers. Their main appeal is a lower price point. However, they can come with risks: inconsistent quality, potential leaks, printer recognition issues, and may even void your printer’s warranty. The “Money” saved upfront might be offset by frustrations, damaged prints, or even printer repair costs.
- Refilled Cartridges: Similar to compatibles, these involve refilling empty genuine cartridges. Quality varies widely depending on the refiller and ink used.
For critical documents and reliable performance, investing in genuine HP cartridges is generally recommended. For less important drafts where cost is the absolute primary concern, compatibles might be considered, but with caution.
The HP Instant Ink Program: Convenience or Cost Trap?
HP offers a subscription service called Instant Ink, where your printer automatically orders new cartridges when ink levels are low, and they’re shipped directly to your door. You pay a monthly fee based on the number of pages you print, not the amount of ink you use.
- Convenience: The primary benefit is convenience – you never run out of ink, and cartridges are sent automatically. It aligns with modern “Tech” trends of subscription services and IoT.
- Cost-Effectiveness: For users who print a consistent number of pages each month, especially those who print a lot of color, Instant Ink can be very cost-effective. A full-color photo counts as one page, just like a black-and-white text document.
- Potential Drawbacks: If your printing habits are erratic, or you print very little, a subscription might not always be the cheapest option. If you cancel the subscription, the Instant Ink cartridges will stop working, even if they contain ink. Understanding your own “Money” habits is key here.
Printer Maintenance for Longevity and Performance
Beyond cartridges, general printer care can significantly extend its life and maintain optimal performance.
- Regular Cleaning: Periodically clean the exterior of your printer with a damp cloth. For laser printers, cleaning toner residue inside the printer (following manufacturer guidelines) can prevent future print quality issues.
- Dust Control: Keep your printer in a relatively dust-free environment. Dust can clog vents and interfere with moving parts.
- Proper Shutdown: Always power down your printer correctly using its power button, rather than just unplugging it. This allows the printheads to “park” in a protected position, preventing them from drying out.
- Use Your Printer Regularly: For inkjet printers, printing at least once a week helps prevent ink nozzles from drying out and clogging.
Conclusion: Empowering Your Printing Experience
The seemingly simple act of installing print cartridges in your HP printer is, in fact, a miniature masterclass in managing your personal technology. By understanding the process, respecting the intricacies of the HP “Brand,” making informed “Money” decisions about cartridge types, and engaging in proactive “Tech” maintenance, you empower yourself to bypass common frustrations and ensure a smooth, reliable printing experience.
From the initial preparation of your workspace to the final test print, each step contributes to the longevity and efficiency of your device. By following this comprehensive guide, you’re not just changing a cartridge; you’re taking control of your printing ecosystem, saving time, reducing waste, and maximizing your investment in one of the most essential tools in your home or office. Happy printing!
aViewFromTheCave is a participant in the Amazon Services LLC Associates Program, an affiliate advertising program designed to provide a means for sites to earn advertising fees by advertising and linking to Amazon.com. Amazon, the Amazon logo, AmazonSupply, and the AmazonSupply logo are trademarks of Amazon.com, Inc. or its affiliates. As an Amazon Associate we earn affiliate commissions from qualifying purchases.