In an increasingly digital world, access to robust productivity tools is no longer a luxury but a necessity. For many, Microsoft Office remains the gold standard, offering an unparalleled suite of applications that power everything from academic essays to complex corporate financial models. While Apple’s macOS ecosystem boasts its own impressive tools, the universal appeal and ubiquitous compatibility of Microsoft Word, Excel, PowerPoint, and Outlook often make them indispensable, even for dedicated Mac users.
This comprehensive guide will walk you through the entire process of installing Microsoft Office on your Mac, ensuring a smooth setup experience and immediate access to these powerful applications. We’ll delve into the necessary preparations, the step-by-step installation, activation, and even touch upon troubleshooting common issues, all while considering how this essential software enhances your digital security, productivity, and even your financial acumen by streamlining your work and projects.

Why Microsoft Office Remains Essential for Mac Users
Despite the excellent native applications available on macOS, Microsoft Office continues to hold a significant place in the productivity landscape. Its enduring popularity stems from a combination of robust features, universal compatibility, and its evolution into a dynamic, cloud-connected service. Understanding these core strengths can reinforce the value proposition for any Mac user considering its installation.
Bridging the Productivity Gap with Unmatched Features
Microsoft Office, at its heart, is a powerhouse of productivity. For Mac users, installing the suite means gaining access to a mature, feature-rich set of applications that often go beyond the capabilities of their Apple counterparts, especially in professional contexts.
- Microsoft Word: More than just a word processor, Word offers advanced formatting tools, robust collaboration features (like tracking changes and comments), sophisticated citation management, and extensive template libraries. Whether you’re drafting a complex legal document, writing a research paper, or creating a newsletter for your small business, Word on Mac provides the tools to produce professional-grade content that aligns with corporate identity standards, making it a cornerstone for personal branding and corporate communication.
- Microsoft Excel: The undisputed leader in spreadsheet software, Excel’s capabilities for data analysis, visualization, and complex calculations are unmatched. From managing personal finances and tracking investments to creating intricate business models and performing statistical analysis, Excel on Mac provides a powerful platform. For those venturing into online income streams or side hustles, mastering Excel can be a direct pathway to better financial management and data-driven decision-making.
- Microsoft PowerPoint: For compelling presentations, PowerPoint remains the industry standard. Its extensive array of design templates, animation options, and multimedia integration tools allow Mac users to create dynamic and engaging slides that capture attention. Whether for academic presentations, client pitches, or internal team updates, PowerPoint empowers effective communication, a critical component of any brand strategy.
- Microsoft Outlook: Far more than just an email client, Outlook integrates email, calendar, contacts, and task management into a single, cohesive interface. For those managing busy schedules, coordinating teams, or handling multiple communication channels for their brand, Outlook on Mac offers powerful organizational features that significantly boost digital security through integrated spam filters and secure connections, alongside enhancing personal productivity.
The depth and breadth of these applications ensure that Mac users are not just getting basic functionality, but access to advanced tools that can handle the most demanding tasks, helping them stay ahead in technology trends and workflow optimization.
Compatibility, Collaboration, and Industry Standards
One of the most compelling reasons for Mac users to install Microsoft Office is its unparalleled compatibility and status as an industry standard. While Apple’s iWork suite (Pages, Numbers, Keynote) has improved considerably, exchanging documents with Windows users, or anyone using Office, often leads to formatting issues or missing features when not using Office itself.
- Seamless Document Exchange: When collaborating on projects, especially across different operating systems or with external partners, using Microsoft Office ensures that your documents look and behave exactly as intended for all parties. This eliminates frustrating compatibility glitches and streamlines workflows, a critical factor for project efficiency and maintaining a strong corporate identity through consistent document presentation.
- Global Standard: In many industries, businesses, and educational institutions, Microsoft Office files (.docx, .xlsx, .pptx) are the de facto standard. Having the native applications on your Mac ensures you can open, edit, and create these files without compromise, facilitating smoother communication and collaboration. This adherence to industry norms is a subtle but powerful aspect of brand reputation and operational efficiency.
- Real-time Collaboration: With Microsoft 365, Office on Mac integrates robust real-time co-authoring capabilities. Multiple users can work on the same document simultaneously, seeing changes as they happen. This cloud-powered feature is a game-changer for teams, enhancing productivity and ensuring everyone is working on the most current version of a file, regardless of their device or location. This exemplifies how cutting-edge apps and AI tools are transforming traditional software.
The Microsoft 365 Advantage: More Than Just Software
The modern iteration of Microsoft Office, known as Microsoft 365, offers significantly more than the traditional perpetual license. It transforms the suite into a service, providing continuous updates, cloud integration, and additional benefits that enhance its value proposition, particularly from a financial and productivity standpoint.
- Always Up-to-Date: A Microsoft 365 subscription ensures you always have the latest versions of Word, Excel, PowerPoint, Outlook, and other included apps (like OneNote and Teams). This means new features, security updates, and performance improvements are delivered automatically, keeping your software modern and secure against emerging digital threats. This aligns perfectly with staying current with technology trends.
- Cloud Storage and Synchronization: Subscribers receive 1 TB of OneDrive cloud storage per user, allowing for easy access to files from any device, anywhere. This cloud integration is crucial for digital security through automatic backups and enables seamless synchronization across your Mac, iPhone, iPad, and other devices, boosting productivity by ensuring your work is always available.
- Cross-Device Access: A single Microsoft 365 Personal or Family subscription allows installation on multiple devices—typically five devices per user, including Macs, PCs, tablets, and smartphones. This flexibility is invaluable for individuals and families managing various gadgets and ensures consistent access to their essential productivity tools.
- Premium Support: Microsoft 365 subscribers often benefit from premium technical support, providing peace of mind knowing that help is available if issues arise, further protecting your investment in these essential productivity tools.
From a “Money” perspective, while a subscription might seem like an ongoing expense, the value derived from continuous updates, cloud storage, and multi-device access often outweighs the initial cost of a perpetual license, especially over time. It’s an investment in uninterrupted productivity and future-proof software, which can contribute to greater efficiency in your side hustles or business finance.
Preparing Your Mac for Microsoft Office Installation
Before diving into the installation process, a few preparatory steps can ensure a smooth and successful setup. Addressing these prerequisites upfront will prevent common issues and ensure your Mac is ready to welcome the Microsoft Office suite.
System Requirements Check
The first step is to verify that your Mac meets the minimum system requirements for the version of Microsoft Office you intend to install. Installing software on an unsupported system can lead to performance issues, instability, or outright failure.
- macOS Version: Microsoft Office typically supports the three most recent versions of macOS. For example, if the current macOS is Sonoma, Office will generally support Sonoma, Ventura, and Monterey. Always check the official Microsoft Office support page for the most current requirements. To check your macOS version, click the Apple menu in the top-left corner of your screen and select “About This Mac.”
- Processor: Most modern Macs with Intel or Apple Silicon (M1, M2, M3 chips) processors will be compatible.
- RAM (Memory): A minimum of 4 GB RAM is usually recommended for optimal performance. More RAM is always better, especially if you plan to run multiple Office applications simultaneously or work with large files.
- Hard Disk Space: Office requires a significant amount of storage space for the application files. Ensure you have at least 10 GB of available hard disk space. You can check your available storage in “About This Mac” under the “Storage” tab. If space is tight, consider offloading unnecessary files or applications to optimize your gadget’s performance.
- Display: A display with a resolution of 1280×800 or higher is recommended for the best user experience.
Meeting these basic requirements ensures that the software will run efficiently, allowing you to fully leverage its capabilities for productivity and financial management without frustrating slowdowns.
Essential Prerequisites: Microsoft Account and Subscription
To download, install, and activate Microsoft Office, you’ll need a valid Microsoft account and an active subscription or a one-time purchase license key.
- Microsoft Account: This is your digital key to the Microsoft ecosystem. If you don’t have one, you can create one for free at account.microsoft.com. This account will be linked to your Office license and used for activation and managing your subscriptions and cloud services. Ensuring your account is secure with a strong password and two-factor authentication is crucial for digital security.
- Active Microsoft 365 Subscription or One-Time Purchase:
- Microsoft 365 Subscription: This is the most common and recommended option for continuous access to the latest features and cloud benefits. You can purchase a subscription (Personal, Family, Business, Enterprise) directly from the Microsoft website or through authorized retailers. Your subscription details will be linked to your Microsoft account.
- Perpetual License (e.g., Office Home & Business): If you prefer a one-time purchase, you’ll typically receive a product key. You’ll redeem this key via your Microsoft account to associate the license with it. Be mindful that perpetual licenses generally don’t include feature updates, only security updates, and typically cover only one Mac.
- Internet Connection: A stable internet connection is required for downloading the installer, activating the software, and accessing cloud-based features like OneDrive and real-time collaboration.
Having these elements ready will make the installation process straightforward and hassle-free, getting you closer to leveraging these powerful apps for all your Tech, Brand, and Money needs.
Choosing Your Microsoft Office Version
Before downloading, consider which version of Office best suits your needs and budget. The primary distinction is between Microsoft 365 (subscription-based) and a one-time purchase (perpetual license).
- Microsoft 365 (Recommended for Most Users):
- Benefits: Always up-to-date versions of apps, 1TB OneDrive storage per user, multi-device installation, premium support.
- Best For: Individuals, families, small businesses, students, and anyone who wants continuous access to the latest features and cloud services. From a financial perspective, it provides ongoing value and adapts to new technology trends.
- Plans: Personal (1 user), Family (up to 6 users), Business (for organizations).
- Office Home & Business / Home & Student (One-Time Purchase):
- Benefits: You own the software license indefinitely for that specific version.
- Limitations: No feature updates (only security updates), no OneDrive storage, usually limited to one computer.
- Best For: Users who prefer to make a single payment and don’t need cloud features or continuous updates. Consider the long-term financial implications; while cheaper upfront, you might need to purchase a new version years down the line for compatibility or new features.
Making an informed decision here ensures you invest in the right productivity tools that align with your financial goals and technological preferences, solidifying your brand’s operational efficiency.
Step-by-Step Installation and Activation Process
With your Mac prepared and your Microsoft account and license ready, you can now proceed with the actual installation and activation of Microsoft Office. This process is generally straightforward, but following each step carefully will ensure a smooth setup.
Downloading the Installer
The primary and safest place to download the Microsoft Office installer is from your Microsoft account page.
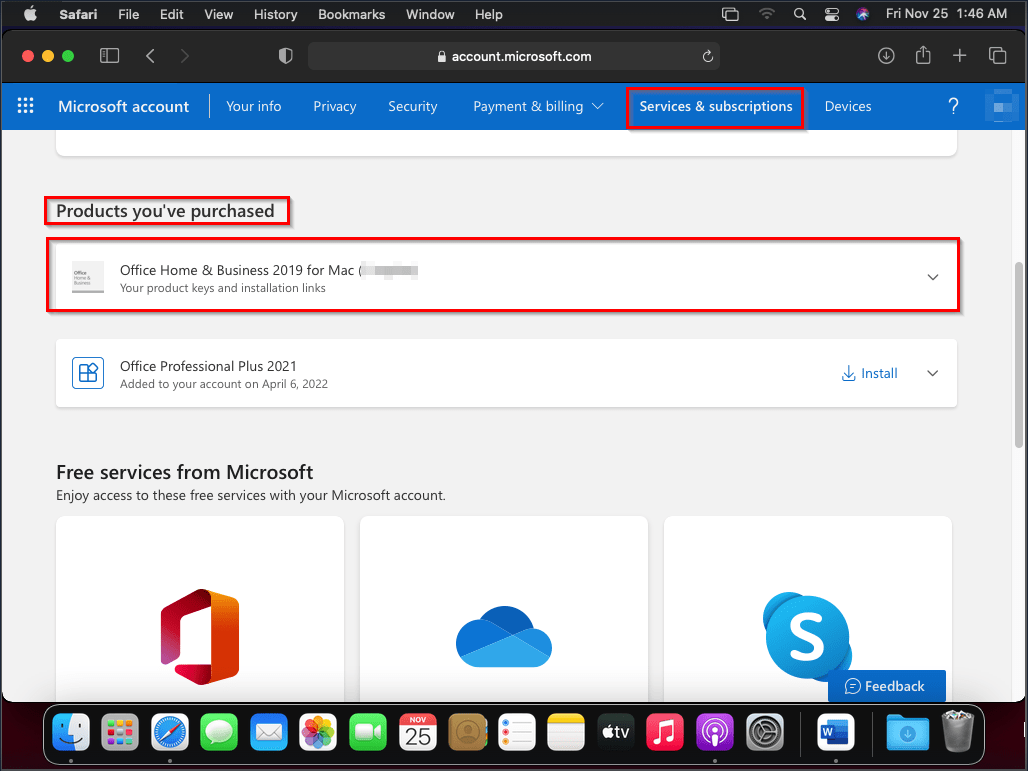
- Go to your Microsoft Account: Open your web browser and navigate to https://account.microsoft.com/services.
- Sign In: Enter your Microsoft account credentials (email, phone, or Skype name, and password). This is the account associated with your Microsoft 365 subscription or one-time purchase.
- Locate Your Product: Once signed in, look for your Microsoft 365 subscription or your perpetual Office product.
- Download the Installer: Under your product, you should see an “Install” button. Click it. This will typically initiate the download of the Office installer package (.pkg file) directly to your Mac’s Downloads folder. Ensure you download the version specifically for macOS, as prompted. The file size can be significant, so allow some time for the download to complete, depending on your internet speed. This is a critical step in adopting new apps and digital security best practices by getting software directly from the source.
Running the Installation Wizard
Once the installer package has finished downloading, you can begin the installation process.
- Locate the Installer File: Go to your Downloads folder (or wherever your browser saves downloaded files) and find the Microsoft Office installer package. It will typically be named something like “MicrosoftOfficeInstaller.pkg.”
- Launch the Installer: Double-click the
.pkgfile to open the Microsoft Office installer wizard. - Follow On-Screen Prompts:
- A welcome screen will appear. Click “Continue.”
- Review the software license agreement. You’ll need to agree to the terms to proceed. Click “Continue” and then “Agree.”
- The installer will prompt you to choose an installation location. For most users, the default location (your main hard drive) is appropriate. Click “Install.”
- You may be prompted to enter your Mac’s administrator password to authorize the installation. This is a standard security measure for installing software on macOS.
- The installation process will then begin. This can take several minutes, depending on your Mac’s speed and the size of the Office suite. A progress bar will indicate the status.
- Complete Installation: Once the installation is finished, you’ll see a confirmation message. Click “Close.” You can now move the installer file to the Trash to free up disk space if you wish.
Activating Your Microsoft Office Suite
After the software is installed, the final crucial step is activation. This links your installed Office applications to your Microsoft account and license, allowing you full functionality.
- Launch an Office Application: Open any Office application, such as Word, Excel, or PowerPoint. You can find them in your Applications folder or via Spotlight Search (Command + Space and type the app name).
- Sign In to Activate: The first time you launch an Office application, you will typically be greeted with a “Sign in to Activate Office” window. Click “Sign In.”
- Enter Microsoft Account Credentials: Enter the email address associated with your Microsoft 365 subscription or the account where you redeemed your perpetual license. Follow the prompts to enter your password.
- Confirm License: If you have multiple Office licenses or subscriptions under your account, you might be asked to choose which one to use for activation on this Mac. Select the appropriate license.
- Start Using Office: Once successfully signed in, the application will activate. You should now have full access to all features. A welcome tour or quick setup might appear, guiding you through initial preferences.
Initial Setup and Updates
With Office activated, take a moment to ensure everything is up-to-date and configured for optimal use.
- Check for Updates: Even immediately after installation, it’s a good idea to check for any pending updates. Open any Office app, go to the Help menu, and select “Check for Updates.” Microsoft AutoUpdate will launch. Make sure it’s set to automatically install updates, which is crucial for digital security and accessing the latest features.
- Pin to Dock: For quick access, drag the icons of your most frequently used Office applications (Word, Excel, PowerPoint, Outlook) from your Applications folder to your Mac’s Dock.
- Customize Preferences: Each Office application has preferences you can adjust (e.g., auto-save frequency, privacy settings, themes). Explore these settings to personalize your experience and optimize your productivity workflow.
By following these steps, your Mac will be fully equipped with Microsoft Office, ready to tackle any task and enhance your overall digital security and productivity.
Troubleshooting Common Installation and Usage Issues
Even with careful preparation, sometimes things don’t go perfectly during installation or while using Office. Knowing how to address common issues can save you time and frustration, getting you back to being productive quickly.
Addressing Download and Installation Problems
- Corrupted Download: If the installer package won’t open or installation fails, the download file might be corrupted. Delete the downloaded
.pkgfile, clear your browser’s cache, and try downloading it again from your Microsoft account. A stable internet connection is vital here. - Insufficient Disk Space: The most common installation error is insufficient disk space. Ensure you have at least 10 GB free before starting. If not, delete old files, empty the Trash, or uninstall unused applications.
- Internet Connection Issues: Activation requires an internet connection. If you’re having trouble activating, check your Wi-Fi or Ethernet connection. Temporarily disabling your firewall or VPN might also help if they are blocking communication with Microsoft’s activation servers, though ensure you re-enable them afterwards for digital security.
- Permissions Problems: Sometimes, macOS permissions can prevent software installation. Restarting your Mac in Safe Mode and then trying the installation, or repairing disk permissions using Disk Utility (though less common on newer macOS versions), might resolve this.
- Older macOS Versions: If you’re running an older macOS version not supported by the latest Office, you may need to upgrade your macOS or seek an older, compatible version of Office (which might not be available for new purchases).
Resolving Activation Errors
Activation is where many users encounter hiccups.
- “Product Not Licensed” or “Too Many Installations”:
- Verify Account: Ensure you’re signing in with the exact Microsoft account linked to your Office license.
- Manage Installations: If you have a Microsoft 365 subscription, you can manage and deactivate installations on old devices through your Microsoft account services page (https://account.microsoft.com/services). This frees up an installation slot for your Mac.
- Check Subscription Status: Confirm your Microsoft 365 subscription is active and not expired.
- Internet Connection: Again, a stable internet connection is crucial for activation.
- Date and Time Settings: Incorrect date and time settings on your Mac can interfere with activation servers. Ensure your Mac’s date and time are set to update automatically.
- Antivirus/Firewall Interference: Occasionally, security software can block the activation process. Temporarily disable them (with caution) and try again. Remember to re-enable them immediately.
- Contact Microsoft Support: If you’ve tried all the above and still face activation issues, it’s best to contact Microsoft Support directly. They can verify your license and help troubleshoot account-specific problems.
Performance Tips for Office on Mac
Even after successful installation and activation, you might want to optimize Office’s performance.
- Keep Office Updated: Regularly checking for and installing updates (via the Help menu > Check for Updates) ensures you have the latest bug fixes and performance enhancements, crucial for maintaining optimal app performance and digital security.
- Close Unused Applications: Running many applications simultaneously can consume RAM and CPU resources, slowing down Office. Close any apps you’re not actively using.
- Reduce Animation/Visual Effects: In some Office applications (like PowerPoint), excessive animations or high-resolution images can strain your Mac. Optimize these elements for smoother performance.
- Clear Cache: Over time, Office applications can accumulate cache files. Clearing these might improve performance. This usually involves navigating to
~/Library/Containers/and deleting folders related to specific Office apps (e.g.,com.microsoft.Word). Exercise caution when modifying Library files. - Upgrade Hardware: If your Mac is consistently slow with Office despite these tips, it might be time to consider a hardware upgrade (more RAM, an SSD) or even a newer Mac, especially if your current gadget is very old and struggling with modern software requirements. This is an investment in your long-term productivity and efficiency, aligning with prudent financial planning.
By being aware of these common issues and their solutions, you can effectively manage your Microsoft Office installation, ensuring it remains a reliable tool for all your tech-driven tasks and financial endeavors.
Maximizing Your Microsoft Office Experience on Mac
Installing and activating Microsoft Office is just the beginning. To truly unlock its potential and integrate it seamlessly into your macOS workflow, consider these tips for maximizing your experience. This is where the synergy between technology trends, personal productivity, and even elements of brand and money become most apparent.
Integrating with macOS Features
Microsoft has done an excellent job of making Office applications feel at home on a Mac. Leveraging native macOS features can significantly enhance your user experience.
- Spotlight Search: Utilize Spotlight (Command + Space) to quickly find and open Office documents, even if you’re unsure where they’re saved. Just type part of the document name, and Spotlight will typically find it. This is a massive time-saver for productivity.
- Dark Mode: Office apps fully support macOS Dark Mode, making them easier on the eyes in low-light environments. You can usually toggle this within the Office app preferences or by changing your system-wide macOS appearance settings.
- Handoff: If you start a document on your iPhone or iPad using the Office mobile apps, Handoff can seamlessly let you continue working on it on your Mac. This cross-device continuity is a prime example of modern tech convenience.
- Quick Look: Select an Office document in Finder and press the Spacebar to get a quick preview without opening the full application. This is incredibly useful for quickly reviewing documents.
- iCloud Drive Integration: While OneDrive is the default cloud storage for Microsoft 365, you can also save Office documents to iCloud Drive, offering flexibility if you primarily use Apple’s cloud service for other files. This allows you to choose the best “digital security” and storage solution for your specific needs.
- Universal Clipboard: Copy text or images from an Office document on your Mac and paste it instantly onto your iPhone or iPad (and vice versa) thanks to Universal Clipboard, streamlining content creation for your brand’s social media or marketing materials.
Leveraging Microsoft 365 Cloud Services
The power of Microsoft Office is dramatically amplified when coupled with Microsoft 365’s cloud services, especially for collaboration and accessibility.
- OneDrive for Cloud Storage and Sync: Store all your Office documents in OneDrive. This ensures automatic backups (a crucial digital security feature), accessibility from any device (Mac, PC, web, mobile), and seamless synchronization. Your changes are saved in the cloud, so you always have the latest version. For remote work or managing multiple side hustles, this is invaluable.
- Real-Time Co-authoring: Open a document stored in OneDrive or SharePoint, share it with others, and collaborate in real-time. See exactly where others are typing and what changes they’re making. This feature transforms team productivity, making remote collaboration effortless and efficient, aligning with modern technology trends in work environments.
- Version History: OneDrive automatically keeps a version history of your documents. If you make a mistake or need to revert to an earlier state, you can easily restore previous versions, providing an extra layer of digital security and peace of mind.
- Web Versions of Office Apps: Even if you don’t have the desktop apps installed on a particular device, your Microsoft 365 subscription gives you access to full-featured web versions of Word, Excel, and PowerPoint through your browser. This offers unparalleled flexibility and access.
- Microsoft Teams: Included with many Microsoft 365 subscriptions, Teams integrates chat, video conferencing, file sharing, and app integration. It’s a powerful hub for collaboration, especially when working on Office documents with a team, improving overall business finance and operational efficiency.

Exploring Alternatives and Supplements
While Microsoft Office is powerful, it’s also part of a broader ecosystem of productivity tools. Understanding alternatives and how Office can supplement other tools provides a holistic view.
- Apple iWork Suite (Pages, Numbers, Keynote): Apple’s native suite is free, well-integrated with macOS, and excellent for basic tasks and personal use. For Mac-only environments, it can be a strong contender. However, compatibility with external Office users remains its primary drawback.
- Google Workspace (Docs, Sheets, Slides): Google’s cloud-based suite is fantastic for real-time collaboration and web-first workflows. It’s free for personal use and offers robust paid plans for businesses. Many integrate Google Workspace for internal collaboration while still using Microsoft Office for final document polishing or specific features.
- LibreOffice/OpenOffice: These are free, open-source alternatives that offer a comprehensive suite of tools similar to Office. While not as polished or feature-rich as Microsoft Office, they provide a cost-effective solution for basic document creation and editing, which can be a consideration from a “Money” perspective for users on a tight budget or those exploring financial tools.
Ultimately, the choice to install Microsoft Office on your Mac is an investment in unparalleled productivity, universal compatibility, and a powerful suite of tools that seamlessly integrate into both your personal and professional life. By leveraging its features alongside macOS and cloud services, you’re not just installing software; you’re enhancing your digital toolkit, strengthening your personal brand through professional outputs, and making a smart financial move towards more efficient and secure digital work.
aViewFromTheCave is a participant in the Amazon Services LLC Associates Program, an affiliate advertising program designed to provide a means for sites to earn advertising fees by advertising and linking to Amazon.com. Amazon, the Amazon logo, AmazonSupply, and the AmazonSupply logo are trademarks of Amazon.com, Inc. or its affiliates. As an Amazon Associate we earn affiliate commissions from qualifying purchases.