In today’s fast-evolving digital landscape, versatility and efficiency are paramount. Whether you’re a seasoned developer, a curious tech enthusiast, or someone looking to explore new operating systems without altering your primary setup, virtualization offers an elegant solution. This guide will walk you through the essential steps of installing Ubuntu Linux on Oracle’s VirtualBox, transforming your existing computer into a powerful platform for experimentation, development, and secure browsing. By mastering this process, you not only gain a valuable technical skill but also unlock new avenues for personal branding, productivity, and even potential income streams, aligning perfectly with the core themes of technology, brand, and money.
Understanding Virtualization and Why Ubuntu on VirtualBox?
At its heart, virtualization is the creation of a virtual (rather than actual) version of something, such as an operating system, a server, a storage device, or network resources. In our context, we’re focusing on hardware virtualization, where a “hypervisor” (like VirtualBox) allows multiple operating systems to run concurrently on a single physical machine. This host machine runs a host operating system (e.g., Windows, macOS), while the virtualized operating systems are known as guest operating systems (e.g., Ubuntu Linux).
The Power of Virtualization: Isolating Environments
The primary appeal of virtualization lies in its ability to create isolated environments. Imagine wanting to try out a new software, test an application in a different operating system, or safely browse the internet without risking your main system’s stability or security. A virtual machine (VM) provides a sandbox where you can do all this and more. Any changes or potential threats within the VM are contained, preventing them from affecting your host system. This isolation is invaluable for:
- Software Development and Testing: Developers can set up multiple virtual environments for different projects, test applications on various operating systems, or simulate production server environments without needing dedicated hardware for each. This streamlines the development cycle, reduces potential conflicts, and improves overall code quality.
- Learning and Experimentation: For students and aspiring IT professionals, VMs offer a risk-free space to learn new operating systems, practice command-line interfaces, or experiment with system configurations. It’s an ideal setting to break things and learn how to fix them, all without the fear of rendering your main machine unusable.
- Security and Privacy: Running potentially risky applications or browsing untrusted websites within a VM adds a layer of security. If the VM gets compromised, it can be easily discarded and recreated, protecting your host system and personal data. This concept is increasingly vital in an era of sophisticated cyber threats.
- Legacy Software Support: If you rely on older software that only runs on an outdated operating system, a VM can keep that software alive and functional without the need for an obsolete physical machine.
Why Ubuntu? A Gateway to Linux
Ubuntu is one of the most popular and user-friendly distributions of Linux, an open-source operating system renowned for its stability, security, and flexibility. Its widespread adoption stems from several key advantages:
- Free and Open Source: Ubuntu is completely free to download, use, and distribute, making it an excellent choice for individuals and businesses looking to cut down on software licensing costs. Its open-source nature also fosters a massive community of developers and users who contribute to its continuous improvement and provide extensive support.
- User-Friendly Interface: While Linux sometimes has a reputation for being command-line intensive, Ubuntu offers a polished, intuitive desktop environment (GNOME by default) that is easy for newcomers to navigate, resembling the experience of Windows or macOS.
- Robust and Secure: Linux systems, including Ubuntu, are generally less susceptible to malware and viruses compared to proprietary operating systems, thanks to their architecture and the rapid response of the open-source community to security vulnerabilities.
- Versatile and Powerful: Ubuntu is not just for desktops; it powers a significant portion of the world’s servers, cloud infrastructure, and IoT devices. Learning Ubuntu provides a foundational understanding that is transferable across a wide range of computing environments, opening doors to careers in system administration, cloud computing, and cybersecurity.
- Rich Software Ecosystem: Ubuntu boasts a vast repository of free applications for virtually any task, from office suites (LibreOffice) and web browsers (Firefox, Chrome) to powerful development tools and media editors.
The Strategic Advantage: Tech, Brand, and Money Synergy
Embracing virtualization with Ubuntu on VirtualBox transcends a mere technical exercise; it’s a strategic move that aligns with the broader themes of technology, personal branding, and financial acumen.
From a Tech perspective, you’re gaining hands-on experience with fundamental IT infrastructure. Understanding how operating systems interact, managing virtual hardware, and navigating a Linux environment are highly sought-after skills in today’s job market. This technical proficiency forms the bedrock for advanced topics like cloud computing (AWS, Azure, Google Cloud all heavily rely on Linux), containerization (Docker, Kubernetes), and cybersecurity.
For your Brand, mastering Linux and virtualization significantly enhances your personal and professional profile. It demonstrates initiative, a commitment to continuous learning, and an ability to work with open-source technologies – qualities highly valued by employers and collaborators. Listing these skills on your resume or portfolio showcases you as a proactive, adaptable, and tech-savvy individual capable of tackling diverse challenges. For entrepreneurs or freelancers, it means having the technical foundation to build and manage your own web servers, development environments, or specialized tools without relying on expensive third-party services.
Financially, the benefits are clear. Both VirtualBox and Ubuntu are free, offering a powerful, no-cost alternative to proprietary software. This immediately translates to Money saved on licensing fees. Furthermore, the skills acquired – setting up servers, automating tasks, troubleshooting systems – are directly applicable to high-demand roles in IT and software development, leading to increased earning potential. For those exploring side hustles, a robust Ubuntu VM can be the perfect platform for web development, data analysis projects, or even learning ethical hacking, all of which can generate online income. This investment in knowledge and open-source tools pays dividends, both in career opportunities and direct cost savings.
Pre-Installation Checklist: Gathering Your Tools
Before we dive into the installation process, it’s crucial to ensure your system is prepared and you have all the necessary components downloaded. This pre-flight check will save you time and prevent potential headaches during the setup.
System Requirements and Preparations
While VirtualBox and Ubuntu are relatively lightweight, running a virtual machine does consume resources from your host system. To ensure a smooth experience, consider the following:
- Processor: A modern 64-bit processor with virtualization support enabled (Intel VT-x or AMD-V). Most modern CPUs support this, but you might need to enable it in your computer’s BIOS/UEFI settings.
- RAM: A minimum of 4GB of RAM on your host system is recommended. You’ll typically allocate 2GB or more to the Ubuntu VM. More RAM on the host means you can allocate more to the VM, leading to better performance.
- Hard Disk Space: At least 20-30GB of free hard disk space on your host for the Ubuntu virtual disk image. Ubuntu itself requires about 10-15GB after installation, but extra space is always good for applications and files.
- Operating System: Your host operating system (Windows, macOS, Linux) should be up to date.
- Internet Connection: Required for downloading files and for initial updates within Ubuntu.
Preparation Tip: Before starting, ensure your host system has sufficient free disk space and close any unnecessary applications to free up RAM.
Downloading VirtualBox and Ubuntu ISO
The two main components you’ll need are the VirtualBox software and the Ubuntu installation image (ISO file).
-
Download Oracle VM VirtualBox:
- Navigate to the official VirtualBox website:
www.virtualbox.org - Click on the “Downloads” link.
- Select the package appropriate for your host operating system (e.g., “Windows hosts,” “macOS hosts,” “Linux distributions”).
- Download the latest stable version.
- Also download the VirtualBox Extension Pack. This is crucial for additional functionality like USB 2.0/3.0 support, VirtualBox RDP, disk encryption, and NVMe. Ensure the Extension Pack version matches your VirtualBox application version. You’ll usually find a link to it on the same downloads page, under “VirtualBox X.X.X Oracle VM VirtualBox Extension Pack.”
- Navigate to the official VirtualBox website:
-
Download Ubuntu Desktop ISO:
- Go to the official Ubuntu website:
ubuntu.com/download/desktop - Choose the latest Long Term Support (LTS) version. LTS releases are supported for five years, offering greater stability and reliability compared to interim releases.
- Click the “Download” button. The ISO file will be several gigabytes, so ensure you have a stable internet connection.
- Go to the official Ubuntu website:
Once both files are downloaded, you’re ready to proceed with the installation.
Step-by-Step Guide: Setting Up Your Virtual Environment
With your prerequisites in order, let’s proceed to the core process of setting up your Ubuntu virtual machine. This section will guide you through installing VirtualBox, creating a new VM, and finally installing Ubuntu within it.
Installing VirtualBox on Your Host System
This step is generally straightforward, similar to installing any other application on your host operating system.
-
Run the Installer: Locate the downloaded VirtualBox installer executable (e.g.,
.exefor Windows,.dmgfor macOS) and double-click it to start the installation wizard. -
Follow On-Screen Prompts:
- For Windows: Click “Next,” accept the default installation location unless you have a specific reason to change it, and confirm the features you want to install (typically, the default components are sufficient). You might be prompted to install network adapters; allow these installations as they are necessary for the VM’s networking capabilities.
- For macOS: Drag the VirtualBox icon to your Applications folder. You might need to adjust security settings to allow applications from “identified developers” if prompted.
- For Linux: Installation usually involves package managers (
apt install virtualboxon Debian/Ubuntu-based systems) or specific distribution packages, as detailed on the VirtualBox download page.
-
Complete Installation: Once the installation finishes, launch VirtualBox Manager.
-
Install VirtualBox Extension Pack:
- In VirtualBox Manager, go to
File > Preferences > Extensions. - Click the “Add” icon (a small box with a plus sign) and navigate to where you downloaded the
Oracle_VM_VirtualBox_Extension_Pack-*.vbox-extpackfile. - Select it and click “Install.”
- Review the license agreement and click “I Agree.” You may need to enter your host system’s password for security.
- In VirtualBox Manager, go to

Creating a New Virtual Machine for Ubuntu
Now, let’s create the virtual machine that will house your Ubuntu installation.
- Open VirtualBox Manager: If it’s not already open, launch VirtualBox.
- Click “New”: In the VirtualBox Manager window, click the “New” button (or go to
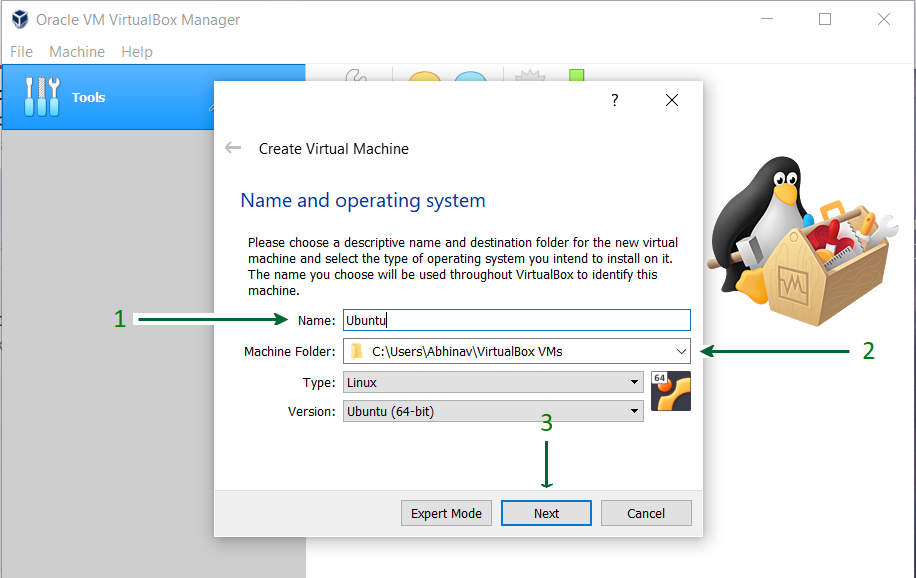
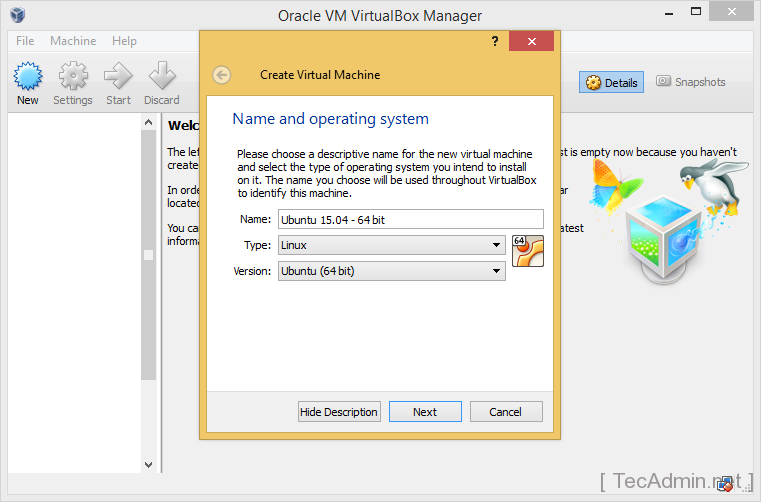
Machine > New). - Name and Operating System:
- Name: Give your virtual machine a descriptive name, like “Ubuntu 22.04 LTS.”
- Machine Folder: Choose a location on your host’s hard drive to store the VM’s files. Ensure this location has ample free space.
- Type: Select “Linux.”
- Version: Select “Ubuntu (64-bit).” VirtualBox is often smart enough to pre-fill these if your VM name contains “Ubuntu.” Click “Next.”
- Memory Size (RAM):
- Allocate RAM for your VM. For Ubuntu, a minimum of 2048 MB (2GB) is recommended for a smooth experience. If your host has 8GB or more RAM, you can comfortably allocate 4096 MB (4GB) to the VM. Avoid allocating more than half of your host’s physical RAM to prevent performance issues on your host. Click “Next.”
- Hard Disk:
- Select “Create a virtual hard disk now” and click “Create.”
- Hard disk file type: Choose “VDI (VirtualBox Disk Image)” as it’s the native format. Click “Next.”
- Storage on physical hard disk: Select “Dynamically allocated.” This means the virtual disk file will only grow as you use space inside the VM, rather than immediately consuming the full allocated size. This is generally more flexible. Click “Next.”
- File location and size: Specify the maximum size for your virtual hard disk. Ubuntu Desktop typically requires about 15-20GB. Set it to at least 25GB, or preferably 30-40GB to allow for updates, applications, and personal files. Click “Create.”
Your new Ubuntu VM should now appear in the left pane of the VirtualBox Manager.
Installing Ubuntu within the Virtual Machine
With the VM created, the next step is to “load” the Ubuntu ISO and begin the operating system installation.
- Configure VM Settings:
- Select your new Ubuntu VM in the VirtualBox Manager and click “Settings” (or go to
Machine > Settings). - Go to the “Storage” section.
- Under “Controller: IDE,” click on the empty CD/DVD drive icon (it usually says “Empty”).
- In the “Attributes” section on the right, click the small disc icon next to “Optical Drive” and choose “Choose a disk file…”
- Navigate to where you downloaded the Ubuntu ISO file and select it. Click “Open.” This virtually inserts the Ubuntu installation disc into your VM.
- (Optional but recommended) Go to “System” > “Processor” and increase the number of CPUs to 2 if your host has multiple cores and you can spare them.
- (Optional) Go to “Display” > “Screen” and increase “Video Memory” to 128MB or 256MB. Enable “3D Acceleration.”
- Click “OK” to save the settings.
- Select your new Ubuntu VM in the VirtualBox Manager and click “Settings” (or go to
- Start the Virtual Machine: Select your Ubuntu VM and click the “Start” button (the green arrow).
- Begin Ubuntu Installation:
- The VM will boot up, and you should see the Ubuntu boot menu. Choose “Try or Install Ubuntu.”
- After a moment, you’ll be presented with the Ubuntu welcome screen.
- Choose your Language on the left.
- Click “Install Ubuntu” on the right (not “Try Ubuntu,” which would only run it live without installing).
- Keyboard Layout: Select your preferred keyboard layout and click “Continue.”
- Updates and other software:
- Choose “Normal installation.”
- Tick “Download updates while installing Ubuntu” (requires an internet connection).
- Tick “Install third-party software for graphics and Wi-Fi hardware and additional media formats” (recommended for better compatibility and multimedia support). Click “Continue.”
- Installation type: This is crucial.
- Select “Erase disk and install Ubuntu.” Do not worry; this will only erase the virtual disk you created in VirtualBox, not your host’s physical hard drive.
- Click “Install Now.”
- You’ll get a warning about changes being written to disks; confirm by clicking “Continue.”
- Where are you? Click on your location on the map (or type it in) for time zone settings. Click “Continue.”
- Who are you? Enter your name, choose a username, and create a strong password. This will be your login for Ubuntu. Tick “Require my password to log in.” Click “Continue.”
- Wait for Installation to Complete: The installation process will now run, copying files and configuring the system. This can take anywhere from 15 to 30 minutes, depending on your system’s speed.
- Restart: Once the installation is complete, you will be prompted to “Restart Now.” Click it. When the VM restarts, it might tell you to “Please remove the installation medium.” Simply press
ENTER, as VirtualBox automatically detaches the ISO upon successful installation.
Congratulations! Ubuntu is now installed on your VirtualBox VM.
Post-Installation Essentials: Optimizing Your Ubuntu VM
After successfully installing Ubuntu, there are a few crucial post-installation steps to take. These steps enhance the virtual machine’s performance, integrate it more seamlessly with your host system, and provide a much better user experience.
Installing VirtualBox Guest Additions
VirtualBox Guest Additions are a package of device drivers and system applications that optimize the guest operating system for better performance and usability within VirtualBox. They enable features such as:
- Better Video Support: Improved screen resolution options and faster graphics performance.
- Seamless Mouse Pointer Integration: No need to “capture” and “release” the mouse pointer between the host and guest.
- Shared Clipboard: Copy and paste text between your host and guest systems.
- Drag’n’Drop: Drag files between your host and guest (if configured).
- Shared Folders: Easily share files and folders between your host and guest.
How to Install Guest Additions:
- Start your Ubuntu VM.
- Once logged into Ubuntu, go to the VirtualBox menu bar at the top of your host system’s window (not inside the VM).
- Click
Devices > Insert Guest Additions CD Image.... - Ubuntu should automatically detect the “CD” and ask if you want to run it. Click “Run.”
- If it doesn’t auto-run, open your file manager in Ubuntu, navigate to the CD drive (usually named “VBoxGAsX.X.X”), and double-click the
autorun.shscript or right-click in the folder and select “Open in Terminal,” then run./VBoxLinuxAdditions.run. - You will be prompted for your Ubuntu password. Enter it and press Enter.
- The installation will run in a terminal window. This process compiles kernel modules, so it might take a few minutes.
- Once completed, press Enter to close the terminal.
- Restart your Ubuntu VM for the changes to take effect. Go to the top-right corner of Ubuntu, click the power icon, and select “Restart.”
Configuring Shared Folders and Clipboard
After installing Guest Additions, you can set up shared clipboard, drag-and-drop, and shared folders for enhanced productivity.
- Shared Clipboard and Drag’n’Drop:
- With your Ubuntu VM running, go to the VirtualBox menu bar on your host:
Devices > Shared Clipboard. Select “Bidirectional.” - Go to
Devices > Drag'n'Drop. Select “Bidirectional.” - These changes take effect immediately. Test them by copying text on your host and pasting it into Ubuntu, and vice-versa.
- With your Ubuntu VM running, go to the VirtualBox menu bar on your host:
- Shared Folders:
- Shut down your Ubuntu VM (not just save its state).
- In VirtualBox Manager, select your Ubuntu VM and click “Settings.”
- Go to “Shared Folders.”
- Click the “Add new shared folder” icon (folder with a plus sign).
- Folder Path: Click the dropdown arrow and select “Other…” Navigate to a folder on your host system that you want to share (e.g., a “SharedVMFiles” folder).
- Folder Name: VirtualBox will auto-fill this.
- Mount point: (Optional) You can specify where it mounts, but it’s usually handled automatically.
- Check “Auto-mount” and “Make Permanent.” “Read-only” is optional if you don’t want the VM to write to the host folder.
- Click “OK” and then “OK” again to close the VM settings.
- Start your Ubuntu VM.
- To access the shared folder in Ubuntu, it will typically be mounted in
/media/sf_<shared_folder_name>. For example, if your shared folder was named “SharedVMFiles,” you’d find it at/media/sf_Shared_VM_Files. - Important Note: By default, only members of the
vboxsfgroup can access shared folders. To add your user to this group:- Open a terminal in Ubuntu (Ctrl+Alt+T).
- Type:
sudo adduser $USER vboxsf(replace$USERwith your actual Ubuntu username, or just run it as is, and it will use your current user). - Enter your password.
- Restart Ubuntu VM again for the group membership change to take effect.
- After restarting, you should be able to access the shared folder via the file manager or terminal.
Initial System Updates and Customizations
A freshly installed Ubuntu system, even from the latest ISO, will likely have some pending updates.
- Update Your System:
- Open a terminal (Ctrl+Alt+T).
- Run:
sudo apt update(to refresh the package list). - Run:
sudo apt upgrade(to install available updates). Confirm withYwhen prompted. - These commands ensure your system is secure and running the latest software.
- Install Essential Software: Consider installing a few basics:
- Web browser: While Firefox is included, you might want Chrome/Brave (
sudo apt install chromium-browseror download from respective websites). - Development tools: If you plan to code, install
build-essential(sudo apt install build-essential). - Version control: Git (
sudo apt install git).
- Web browser: While Firefox is included, you might want Chrome/Brave (
- Personalize Your Desktop: Explore Ubuntu’s “Settings” for customizing the appearance, dock, wallpapers, and other user interface elements to suit your preferences.
Unleashing Your Ubuntu VM: Next Steps and Troubleshooting
With your Ubuntu VM fully set up and optimized, you’re ready to explore the vast possibilities it offers. This section will touch upon common issues and suggest paths for further exploration.
Common Issues and Quick Fixes
Even with careful setup, you might encounter minor hiccups. Here are some common issues and their solutions:
- “No bootable medium found” error: This usually means the Ubuntu ISO wasn’t properly attached or the boot order in VM settings is incorrect.
- Go to VM Settings > Storage, ensure the ISO is attached to the virtual optical drive.
- Go to VM Settings > System > Motherboard, ensure “Optical” and “Hard Disk” are checked in the boot order and are above “Floppy.”
- Slow performance:
- Ensure you’ve allocated sufficient RAM and CPU cores (VM Settings > System).
- Verify Guest Additions are installed.
- Check if your host machine’s virtualization features (Intel VT-x/AMD-V) are enabled in BIOS/UEFI.
- Close unnecessary applications on your host.
- Screen resolution stuck or limited:
- Install Guest Additions.
- Ensure “3D Acceleration” is enabled in VM Settings > Display.
- Cannot access shared folders:
- Make sure Guest Additions are installed and the
vboxsfgroup membership is correctly applied (and you’ve restarted). - Verify the shared folder path in VM Settings is correct.
- Make sure Guest Additions are installed and the
- No internet connection:
- Check your host’s internet connection.
- In VM Settings > Network, ensure “Adapter 1” is “NAT” (default and generally works) or “Bridged Adapter” (if you need the VM to appear as a separate device on your network).
- Inside Ubuntu, verify network settings (usually automatic via DHCP).
For more complex issues, the VirtualBox and Ubuntu community forums are excellent resources.
Expanding Your Linux Horizons
Your Ubuntu VM is more than just an operating system; it’s a launchpad for learning and innovation. Here are some ideas for what to do next:
- Learn the Linux Command Line: The terminal is incredibly powerful. Start with basic commands (
ls,cd,mkdir,rm,sudo,man) and gradually explore scripting. This skill is a cornerstone of professional IT work. - Web Development Environment: Install a web server (Apache or Nginx), a database (MySQL/PostgreSQL), and a scripting language (PHP, Python, Node.js) to create a full-fledged development environment for building websites and web applications.
- Experiment with Different Desktop Environments: Ubuntu defaults to GNOME, but you can install others like KDE Plasma, XFCE, or MATE for a different look and feel (
sudo apt install kubuntu-desktopfor KDE). - Explore Containerization: Dive into Docker, which allows you to package applications and their dependencies into portable containers. This is a game-changer for deployment and development.
- Practice Digital Security: Use your VM to safely explore cybersecurity tools (e.g., nmap, Wireshark) or learn about system hardening without risking your main system.
- Automate Tasks: Write shell scripts to automate repetitive tasks, improving your productivity and efficiency.
By actively engaging with your Ubuntu VM, you’re not just consuming technology; you’re becoming a creator and master of it. This hands-on experience translates directly into tangible skills that bolster your technical prowess, enhance your personal brand, and open doors to new financial opportunities in the ever-expanding tech industry.
Installing Ubuntu Linux on VirtualBox is an empowering step into the world of open-source software and virtualization. It provides a secure, flexible, and free environment for learning, developing, and experimenting. From understanding the underlying technology to leveraging it for personal growth and financial benefit, this tutorial has laid out a clear path for anyone looking to expand their digital toolkit. Embrace the journey, and watch as your technical capabilities and opportunities grow. The virtual world awaits your command.
aViewFromTheCave is a participant in the Amazon Services LLC Associates Program, an affiliate advertising program designed to provide a means for sites to earn advertising fees by advertising and linking to Amazon.com. Amazon, the Amazon logo, AmazonSupply, and the AmazonSupply logo are trademarks of Amazon.com, Inc. or its affiliates. As an Amazon Associate we earn affiliate commissions from qualifying purchases.