The automotive world has witnessed a revolution in lighting technology, with Light Emitting Diodes (LEDs) leading the charge. Beyond mere illumination, LEDs offer a blend of cutting-edge technology, aesthetic enhancement, and tangible financial benefits that traditional incandescent bulbs simply cannot match. For car enthusiasts, tech aficionados, and budget-conscious drivers alike, upgrading your vehicle’s lighting system to LEDs is a compelling project. It’s an opportunity to infuse your car with a modern flair, improve visibility, and potentially save money in the long run.
This comprehensive guide will walk you through the entire process of installing LED lights in your car, from understanding the various options and gathering the right tools to executing a flawless installation and troubleshooting any snags. We’ll also delve into how this upgrade aligns with key aspects of our website’s focus areas: the underlying Tech innovation, the Brand identity it creates for your vehicle, and the savvy Money decisions involved in a DIY approach.
Why Upgrade to LED Car Lighting? The Tech, Brand, and Money Advantages
Before diving into the nuts and bolts of installation, it’s essential to understand the multifaceted benefits that make LED lighting a superior choice for your car. This isn’t just about brighter lights; it’s about a smarter, more efficient, and more personalized driving experience.
The Technological Edge of LEDs
At its core, the appeal of LEDs lies in their advanced technology. Unlike incandescent bulbs that generate light by heating a filament, LEDs produce light through the movement of electrons in a semiconductor material. This fundamental difference translates into several significant advantages:
- Exceptional Energy Efficiency: LEDs consume significantly less power than traditional bulbs. This means less strain on your car’s electrical system, alternator, and battery, potentially leading to marginal improvements in fuel efficiency and prolonged battery life. For tech enthusiasts, this is a prime example of optimizing system performance.
- Remarkable Longevity: With lifespans often exceeding 50,000 hours, LEDs can outlast your car. This drastically reduces the frequency of bulb replacements, making them a “set it and forget it” solution, a true testament to modern engineering.
- Superior Brightness and Clarity: LEDs produce a much brighter and crisper light, improving visibility for both the driver and others on the road. This isn’t just about aesthetics; it’s a critical safety upgrade, allowing you to see further and be seen more clearly.
- Instant On/Off Capability: Unlike older bulbs that might have a slight delay, LEDs illuminate instantly, which is particularly beneficial for brake lights where every millisecond counts in preventing rear-end collisions.
- Durability and Robustness: Lacking a fragile filament, LEDs are far more resistant to vibrations and impacts, making them ideal for the dynamic environment of a car. They also operate cooler, reducing the risk of heat-related damage to surrounding components.
- Color Temperature Versatility: LEDs offer a wide spectrum of color temperatures, from warm whites to cool blues, allowing for precise aesthetic control that was once impossible. Advanced RGB LEDs can even change colors, often controlled via smartphone apps, showcasing the integration of smart tech into automotive accessories.
Enhancing Your Car’s Brand and Aesthetic
Your car is an extension of your personality, and LED lighting offers an unparalleled opportunity for personalization and enhancing its “brand” presence.
- Modernization and Premium Feel: LEDs instantly give an older car a contemporary upgrade, making it look newer and more luxurious. Think about the sleek, signature lighting seen on high-end vehicles – that look is now achievable for a fraction of the cost.
- Unique Styling and Personal Branding: Custom LED setups, whether it’s vibrant interior ambient lighting, subtle puddle lights, or dynamic exterior accents, allow you to create a unique visual identity for your vehicle. It’s a statement of individuality, much like personal branding for an individual or a business.
- Improved Curb Appeal: A well-executed LED upgrade can significantly boost your car’s curb appeal, making it stand out from the crowd. While not a direct financial return, increased attractiveness can play a role in resale value and simply make you more proud of your ride.
- Functional Aesthetics: Beyond pure looks, LEDs enhance functionality. Brighter interior lights make it easier to find items, while accent lights can highlight specific features of your car’s design, turning a utilitarian element into a stylistic choice.
The Financial Wisdom of LED Conversion
While there’s an initial investment, the long-term financial benefits of converting to LED lighting make it a smart “money” move for the savvy car owner.
- Long-Term Savings on Replacements: Given their extraordinary lifespan, you’ll rarely, if ever, need to replace an LED bulb. Compare this to the frequent replacement of incandescent bulbs, and the savings on parts and labor (if professionally installed) become substantial over the life of the car.
- DIY Cost Efficiency: By tackling this project yourself, you bypass professional installation fees, which can often be as much as, or more than, the cost of the LED components themselves. This DIY approach directly impacts your personal finance, allowing you to allocate those savings elsewhere.
- Potential for Increased Vehicle Value: While highly subjective, tasteful and functional modifications, such as a modern lighting system, can make your vehicle more appealing to potential buyers if you decide to sell. It signals that the car has been well-maintained and upgraded with modern technology.
- Marginal Fuel Savings: Though small, the reduced power draw from LEDs can translate to less load on your engine, potentially leading to fractional improvements in fuel economy over thousands of miles. Every little bit helps in managing vehicle running costs.
Planning Your LED Project: Types, Tools, and Essential Safety
A successful LED installation begins long before you touch a single wire. Thorough planning, understanding your options, and prioritizing safety are paramount.
Choosing the Right LED Lights for Your Ride
The world of automotive LEDs is vast, offering solutions for nearly every application. Your choice will depend on the area you wish to illuminate and the aesthetic you’re aiming for.
- LED Bulb Replacements: These are designed to directly replace existing incandescent bulbs (e.g., dome lights, map lights, brake lights, turn signals, reverse lights). They come in various base types (wedge, festoon, bayonet) and often include built-in resistors for CANBUS compatibility (important for preventing “bulb out” warnings in newer cars).
- LED Strip Lights: Flexible and versatile, these come in various lengths, colors (including RGB), and often with adhesive backing. They are perfect for interior accent lighting (footwells, dashboard, under seats), trunk lighting, or exterior applications like grille accents or underglow. Waterproof versions are crucial for exterior use.
- LED Pods/Bars: More robust and powerful, these are typically used for off-road lighting, auxiliary fog lights, or high-intensity reverse lights.
- Specialty Kits: Dedicated kits for specific areas like interior ambient lighting (often fiber optic or custom-fit strips), projector headlights, or comprehensive underglow systems.
- Application Areas:
- Interior: Dome lights, map lights, footwell lighting, dashboard accents, glove box, trunk.
- Exterior: Headlights (low/high beam), taillights, brake lights, turn signals, reverse lights, fog lights, daytime running lights (DRLs), grille lights, underglow, puddle lights, license plate lights.
When selecting, always ensure the LEDs are rated for 12V automotive use. Consider the color temperature (e.g., 6000K for a crisp white, 3000K for a warm yellow). For exterior lights, research reputable brands known for durability and proper light patterns, especially for headlights, to avoid blinding other drivers.
Essential Tools and Materials
Having the right tools will make the installation process smoother, safer, and more professional.
- Basic Hand Tools: Screwdriver set (Phillips and flathead), socket set, trim removal tools (plastic pry tools are indispensable for avoiding scratches on interior panels), pliers.
- Wire Strippers and Crimpers: Essential for making clean electrical connections.
- Multimeter: Absolutely critical for testing voltage, continuity, and diagnosing issues. Do not skip this!
- Electrical Tape and Heat Shrink Tubing: For insulating connections. Heat shrink tubing, applied with a heat gun (or even a lighter carefully), provides a more durable and professional finish.
- Zip Ties and Mounting Clips: For neat wire management and securing LED strips or modules.
- Automotive Adhesive/Double-Sided Tape: High-quality, heat-resistant adhesive for mounting LED strips or modules.
- Fuse Tap Kits (Add-a-Circuit): These allow you to safely tap into your car’s fuse box for power without cutting into existing wiring. They typically include a fuse holder for both the original circuit and your new LED circuit.
- Inline Fuses and Fuse Holders: For circuits connected directly to the battery or high-current applications, providing crucial protection.
- Soldering Iron and Solder (Optional but Recommended): For the most robust and reliable electrical connections, especially in areas prone to vibration.
- Safety Glasses and Gloves: Always protect your eyes and hands.
Prioritizing Safety: A Non-Negotiable Step
Working with your car’s electrical system requires caution. Neglecting safety can lead to damage to your vehicle, or worse, personal injury.
- Disconnect the Battery: Always disconnect the negative (-) terminal of your car’s battery before starting any electrical work. This prevents accidental short circuits and electric shocks.
- Work in a Well-Ventilated Area: If you’re using a soldering iron or any chemicals, ensure good ventilation.
- Understand Your Car’s Electrical System: Consult your car’s owner’s manual or a specific wiring diagram for your model. Locate the fuse box and identify circuits that provide constant power, switched power (on with ignition), and accessory power (on when the car is on, but off during cranking).
- Use Appropriately Rated Fuses: Never install a fuse with a higher amperage rating than specified. If you’re adding a new circuit, ensure the inline fuse is rated appropriately for your LED load to protect the wiring.
- Check Local Laws: Especially for exterior lighting, laws vary widely regarding color (e.g., no red/blue forward-facing lights), brightness, and placement. Always ensure your modifications comply with local regulations to avoid fines or safety hazards.
Step-by-Step Installation Guide: Bringing Your Car to Life with Light
With planning complete and tools ready, it’s time to transform your car. While specific steps vary by vehicle and LED type, these general principles apply to most installations.
General Wiring Principles for Car LEDs
Understanding how to properly power and ground your LEDs is fundamental.
- Understanding Polarity: LEDs are diodes, meaning they only allow current to flow in one direction. They have a positive (+) and a negative (-) terminal. Connecting them backward will prevent them from illuminating. Always test your connections with a multimeter before finalizing.
- Choosing a Power Source:
- Fuse Box (Recommended for most accessories): Using a fuse tap (add-a-circuit) is the cleanest and safest way to get power. You can tap into a circuit that’s always on (constant 12V), one that’s on with the ignition (switched 12V), or one that’s tied to an accessory (e.g., cigarette lighter fuse).
- Existing Wiring: For specific applications like dome lights or trunk lights, you might tap directly into the existing wires for those fixtures. However, be cautious and ensure the circuit can handle the added load.
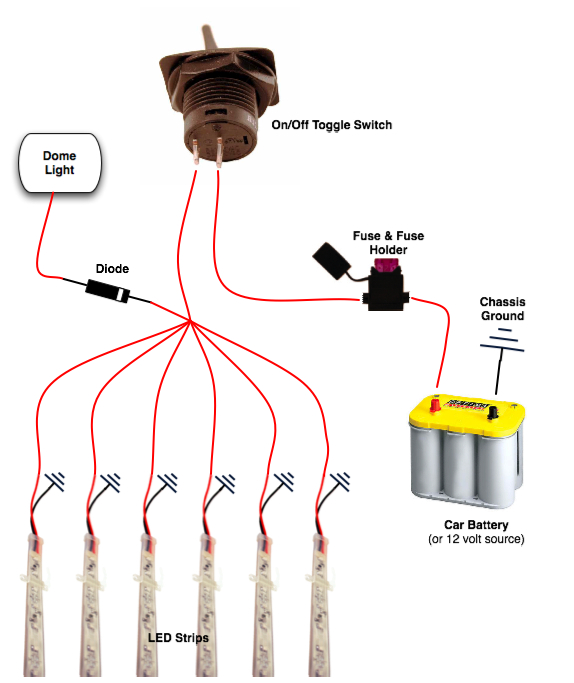
- Direct to Battery: For high-power applications (e.g., underglow kits with multiple strips or larger light bars), you might connect directly to the battery. ALWAYS use an inline fuse close to the battery and a relay if the current draw is significant, to protect the circuit and your car.
- Grounding: A secure ground connection is as important as a good power connection. Connect the negative (-) wire from your LEDs to a clean, unpainted metal surface on the car’s chassis (e.g., a bolt that’s securely fastened to the frame). Scrape away any paint to ensure metal-on-metal contact.
- Making Secure Connections:
- Crimping: Use proper crimping tools and connectors (e.g., butt connectors, spade connectors) for reliable, solder-less connections. Ensure the crimp is tight and tug on the wire to confirm it won’t pull out.
- Soldering (Highly Recommended): For the most durable connections, especially in areas subject to vibration or moisture, soldering and then heat-shrinking the connection is superior.
- Insulation: Always insulate all bare wire connections with electrical tape or, preferably, heat shrink tubing, to prevent short circuits.

Interior LED Installation: Ambiance and Functionality
Interior LEDs are fantastic for creating a personalized atmosphere and improving practicality.
- Footwell Lighting:
- Mounting: Decide on the placement for your LED strips (e.g., under the dashboard, along the console). Use strong adhesive tape or mounting clips.
- Routing Wires: Carefully tuck and route wires under interior trim panels, carpet, and along the console. Use your trim removal tools to gently pry open panels.
- Power Connection: Identify a switched 12V power source in your fuse box using a multimeter (e.g., a fuse for the radio, cigarette lighter, or accessory power). Use a fuse tap to connect the positive (+) wire.
- Ground Connection: Connect the negative (-) wire to a suitable chassis ground point (e.g., a bolt under the dashboard).
- Dome/Map Light Replacement:
- Access: Gently pry open the lens cover of your existing dome or map light.
- Bulb Swap: Carefully remove the old incandescent bulb. Note its type (wedge, festoon).
- Install LED: Insert the new LED replacement bulb. If it doesn’t light up, reverse its orientation (due to polarity).
- Test and Reassemble: Test the light before snapping the cover back on.
- Dashboard/Accent Lighting: This often involves flexible LED strips or fiber optics. Route wires behind dashboard panels, tapping into ignition-switched power or even the illumination circuit (dimmer controlled) for a more integrated look.
Exterior LED Installation: Visibility and Style
Exterior LEDs demand durability and adherence to regulations.
- Headlight/Taillight Bulb Replacements:
- Access: Depending on your car, accessing headlight or taillight bulbs can range from a simple twist of the housing to requiring fender liner removal or even bumper removal. Consult your car’s manual.
- Compatibility: Ensure your LED replacement bulbs are the correct size and, crucially, that they are CANBUS error-free if your car’s system requires it.
- Installation: Remove the old bulb and install the new LED bulb. Pay attention to any external drivers or fans that need to be secured.
- Test: Test the lights before fully reassembling everything. For headlights, ensure the beam pattern is correct and not blinding to oncoming traffic; adjustments may be necessary.
- Underglow/Grille Lighting:
- Mounting: Secure waterproof LED strips or pods to the underside of your car chassis or behind the grille using strong adhesive, mounting clips, or screws. Ensure they are positioned to avoid damage from road debris.
- Wire Routing: Route all wires securely away from moving parts, exhaust, and hot engine components. Use zip ties liberally.
- Power & Switching: For underglow, connect the positive (+) wire (with an inline fuse) directly to the battery or through a relay if controlled by a switch. Connect the negative (-) to a chassis ground. You might want to install an interior switch for control.
- Waterproofing: Ensure all connections are fully waterproofed using heat shrink and silicone sealant.
Testing, Troubleshooting, and Maintaining Your New LED Setup
Once installed, a thorough check and understanding of potential issues will ensure your LED upgrade performs flawlessly for years to come.
Verifying Your Installation
After installation, take these steps to confirm everything is working as intended:
- Initial Power-Up Check: Reconnect your car’s battery and turn on all circuits that power your new LEDs. Verify that every light comes on and functions correctly.
- Functionality Test: For interior lights, check if they respond to door openings, dimmer switches, or dedicated buttons. For exterior lights, test all functions (brake, turn, reverse, high/low beams).
- Connection Inspection: Gently tug on all wires and connections to ensure they are secure. Look for any loose or exposed wiring.
- Panel Reinstallation: Carefully reinstall all interior trim panels, ensuring they snap back into place without pinching wires.
Common Troubleshooting Scenarios
Even with careful installation, issues can arise. A multimeter is your best friend here.
- Lights Not Turning On:
- Check Power: Use a multimeter to verify 12V at the positive (+) wire of the LED.
- Check Ground: Ensure the negative (-) wire has a solid ground connection (zero resistance between the LED ground and the chassis).
- Check Fuse: Inspect the fuse in your fuse tap or inline fuse holder. A blown fuse indicates a short circuit or overload.
- Check Polarity: For LED bulbs, try reversing their orientation as they are polarity sensitive.
- Check Connections: Loose or improperly crimped/soldered connections are a common culprit.
- Flickering or Dimming:
- Loose Connection: Re-check all power and ground connections.
- Insufficient Power: The circuit you tapped into might not provide enough stable current.
- CANBUS Issues: For bulb replacements, if your car’s computer expects a certain resistance (from an incandescent bulb) and doesn’t see it, it might cause flickering or “bulb out” warnings. You may need LED bulbs with built-in CANBUS decoders or external resistors.
- Voltage Drop: For long runs of wire or multiple LEDs, ensure the wire gauge is sufficient to prevent voltage drop.
- LEDs Staying On/Ghosting (Even When Off):
- This often happens in newer cars with CANBUS systems that send small amounts of residual current even when a circuit is technically “off.” CANBUS-compatible LEDs or external resistors can resolve this.
- Incorrect wiring (e.g., tapping into a constant power source instead of a switched one).
- Water Ingress (Exterior Lights): If exterior lights stop working after rain or a car wash, it’s likely a moisture issue. Re-seal all connections and mounting points with silicone sealant and ensure waterproof connectors were used.
Long-Term Care and Maintenance
LEDs are generally low-maintenance, but a few practices can ensure their longevity:
- Regular Inspection: Periodically check wiring, mounting points, and connections for signs of wear, corrosion, or loosening.
- Clean Lenses: Keep the lenses or surfaces of your LEDs clean to ensure maximum light output and clarity.
- UV Protection: For exterior LEDs, prolonged exposure to harsh UV rays can degrade plastic lenses. Consider using UV protectant sprays if your lights are exposed.
Beyond Installation: Maximizing Your Car’s LED Potential
Your journey with car LEDs doesn’t have to end with basic installation. The world of automotive lighting is constantly evolving, offering even more ways to integrate tech and personalize your ride.
Smart Control and Customization
Modern LED kits often come with advanced control options that enhance the “tech” aspect of your upgrade:
- App-Controlled RGB LEDs: Many strip lights and ambient kits can be controlled via smartphone apps, allowing for dynamic color changes, brightness adjustments, and even pre-programmed light shows.
- Sound-Activated Modes: Some systems can sync LED light patterns to the beat of your music, adding an immersive element to your driving experience.
- Integration with Car Electronics: More sophisticated systems can be integrated with door sensors, turn signals, or even your car’s infotainment system for automated lighting effects.
Legality and Responsible Modding
While exciting, it’s crucial to always remember the “brand” you present on the road and adhere to legal and ethical considerations:
- Know Your Local Laws: Reiterate the importance of understanding specific regulations for exterior lighting. Colors like red and blue are typically reserved for emergency vehicles and can lead to severe penalties if used on forward-facing lights.
- Avoid Distraction: Ensure your lighting modifications do not create glare for other drivers or contribute to visual clutter that could cause accidents. The goal is to enhance, not detract from, safety.
- Maintain Roadworthiness: Ensure any modifications do not compromise the structural integrity or functional safety of your vehicle.
The Future of Automotive Lighting
The LED revolution is just one step. The “tech” landscape of automotive lighting continues to advance rapidly:
- Adaptive Headlights: Systems that automatically adjust beam patterns to road conditions, speed, and oncoming traffic.
- OLED (Organic LED) Technology: Offering ultra-thin, flexible lighting panels for unique design possibilities in taillights and interior accents.
- Laser Lights: Even more powerful and precise than LEDs, offering incredible range and brightness, currently found in high-end luxury vehicles.
- Projection and Communication: Future lighting might project information onto the road or even communicate with other vehicles and infrastructure.

Conclusion
Installing LED lights in your car is more than just a simple modification; it’s a strategic upgrade that touches upon core aspects of modern automotive ownership. From the undeniable technological superiority and energy efficiency to the ability to craft a unique visual “brand” for your vehicle, and the savvy “money” savings achieved through DIY installation and long-term durability, the benefits are clear.
This project empowers you to take control of your car’s aesthetic and functionality, marrying the thrill of hands-on work with the satisfaction of a superior outcome. Remember to prioritize safety, plan meticulously, and always adhere to local regulations. With this comprehensive guide, you’re well-equipped to illuminate your ride, enhance its appeal, and enjoy the lasting advantages that only a well-executed LED conversion can provide. So, grab your tools, embrace the DIY spirit, and let your car shine brighter than ever before.
aViewFromTheCave is a participant in the Amazon Services LLC Associates Program, an affiliate advertising program designed to provide a means for sites to earn advertising fees by advertising and linking to Amazon.com. Amazon, the Amazon logo, AmazonSupply, and the AmazonSupply logo are trademarks of Amazon.com, Inc. or its affiliates. As an Amazon Associate we earn affiliate commissions from qualifying purchases.