
In today’s fast-paced digital landscape, Java remains a cornerstone technology, powering everything from enterprise-level applications and robust backend systems to Android mobile apps and sophisticated big data solutions. Its “write once, run anywhere” philosophy, coupled with its immense ecosystem and strong community support, makes it an indispensable tool for developers and a critical component for many software applications. If you’re looking to dive into Java development or simply need to run Java-based software on your Windows machine, a proper installation is the first and most crucial step. This comprehensive guide will walk you through the process, ensuring a smooth setup and providing you with the foundation to leverage Java’s full potential.

Java’s omnipresence across various platforms and its continuous evolution underscore its significance in the tech world. For anyone interested in technology trends, software development, or even just ensuring their system runs optimally, understanding how to manage fundamental technologies like Java is key. Our focus here is on empowering you with the practical knowledge to install and configure Java on Windows, setting the stage for further exploration into its vast capabilities.
Understanding Java: JRE vs. JDK and Why It Matters
Before we dive into the installation process, it’s essential to understand the different components of Java and which one you’ll likely need. This distinction is critical for both end-users and developers, directly impacting system setup and development workflows.
Java Runtime Environment (JRE)
The JRE is designed for users who only need to run Java applications. It contains the Java Virtual Machine (JVM), core classes, and supporting files. If you’re an end-user simply trying to launch a Java-based desktop application or play a browser-based Java game (though browser applets are less common now), the JRE is typically sufficient. It allows your system to execute compiled Java code but does not provide the tools needed to write or compile new Java programs. Think of it as the engine that runs existing Java software.
Java Development Kit (JDK)
The JDK is a superset of the JRE and is specifically tailored for Java developers. In addition to the JRE components, the JDK includes development tools such as the Java compiler (javac), debugger (jdb), and other utilities necessary for creating, compiling, and packaging Java applications. If your goal is to program in Java, build Android apps, or work with development environments like Eclipse, IntelliJ IDEA, or NetBeans, you absolutely need the JDK. For the purpose of this guide, which assumes a developer-centric approach or at least a desire for full functionality, we will focus on installing the JDK.
Choosing Your JDK: Oracle vs. OpenJDK
Historically, Oracle JDK was the primary distribution. However, with licensing changes, OpenJDK has risen to prominence as a free and open-source alternative. Many vendors, like Adoptium (formerly AdoptOpenJDK), Amazon Corretto, Microsoft Build of OpenJDK, and Red Hat, provide their own distributions of OpenJDK.
- Oracle JDK: Offers robust performance and commercial support, but newer versions (beyond Java 8) require a commercial license for enterprise use. Free for personal use and development.
- OpenJDK Distributions (e.g., Adoptium, Amazon Corretto): These are free, open-source, and frequently updated. They are functionally equivalent to Oracle JDK for most purposes and are widely adopted by developers and organizations looking for a cost-effective and flexible solution. For most users, an OpenJDK distribution like Adoptium’s Temurin is an excellent choice. This guide will use an OpenJDK distribution for its accessibility and widespread use.
For the vast majority of users and developers today, an OpenJDK distribution is the recommended path due to its open-source nature and robust community support, aligning perfectly with modern tech trends emphasizing collaboration and accessibility.
Step-by-Step Guide: Downloading and Installing Java (JDK)
This section will guide you through the practical steps of acquiring and installing the Java Development Kit on your Windows operating system. We will assume you are downloading an OpenJDK distribution, specifically Temurin from Adoptium, which is a popular and reliable choice.
1. Prerequisites and System Preparation
Before initiating the download, ensure your system meets these basic requirements:
- Operating System: Windows 10 or 11 (64-bit recommended, 32-bit versions are rare for modern Java).
- Administrator Privileges: You will need administrator rights on your Windows machine to install software and modify system environment variables.
- Internet Connection: A stable internet connection is required to download the installation package.
- Disk Space: Ensure you have at least 500 MB to 1 GB of free disk space for the JDK installation and related tools.
It’s also a good idea to check if you have any older Java versions installed. While modern Java installations often coexist, sometimes older PATH entries can cause conflicts. You can check by opening Command Prompt (search for cmd) and typing java -version. If it shows an older version, you might consider uninstalling it via “Add or remove programs” in Windows Settings, especially if you’re experiencing issues, though it’s often not strictly necessary.
2. Downloading the Java Development Kit (JDK)
Follow these steps to download the JDK installer:
- Visit an OpenJDK Provider Website: Open your web browser and navigate to a reputable OpenJDK distribution site. A popular choice is Adoptium:
https://adoptium.net/. - Select Your Version: On the Adoptium homepage, you’ll typically see a prominent “Latest LTS Release” download button. LTS stands for Long-Term Support, meaning these versions receive extended maintenance and updates, making them ideal for stability. At the time of writing, Java 17 and Java 21 are common LTS versions. It’s generally recommended to download the latest LTS version unless your project specifically requires an older one.
- Choose Your Operating System and Architecture: Ensure “Windows” is selected for the operating system and “x64” for the architecture (most modern Windows systems are 64-bit). The website usually auto-detects this.
- Download the Installer: Click the download button for the
.msiinstaller package. This is usually the easiest way to install Java on Windows, as it guides you through the process. Alternatively, you might see a.zipfile for manual installation, but the.msiis preferred for convenience. - Save the File: Save the
.msifile to a location you can easily find, such as your “Downloads” folder.
3. Running the JDK Installer
Once the download is complete, proceed with the installation:
- Locate the Installer: Navigate to the folder where you saved the
.msifile (e.g.,Downloads). - Run as Administrator: Right-click on the downloaded
.msifile (e.g.,OpenJDK_hotspot_jdk-17.0.X_windows-x64.msi) and select “Run as administrator.” This ensures the installer has the necessary permissions to modify your system. - Follow the Installation Wizard:
- Welcome Screen: Click “Next.”
- License Agreement: Read the license agreement and check “I accept the terms in the License Agreement,” then click “Next.”
- Custom Setup: This screen allows you to choose which features to install and where to install Java.
- Environment Variables: Crucially, ensure that “Set JAVA_HOME variable” and “Associate .jar files” are selected. The Adoptium installer conveniently offers these options, simplifying the post-installation setup.
- Installation Path: You can change the default installation directory (typically
C:Program FilesEclipse Adoptiumjdk-XX.X.X.X-hotspot), but it’s usually safe to leave it as default unless you have specific organizational requirements. - Click “Next.”
- Ready to Install: Click “Install.”
- User Account Control (UAC): If prompted by UAC, click “Yes” to allow the installer to make changes to your device.
- Installation Progress: The installer will copy files and configure settings. This may take a few moments.
- Completion: Once the installation is finished, click “Finish.”
Congratulations! You have successfully installed the Java Development Kit on your Windows machine. Now, let’s verify that everything is working as expected.
Verifying Your Java Installation and Setting Environment Variables
Even if the installer claims success, it’s crucial to verify the installation. For developers, this involves ensuring that the operating system can locate the Java compiler and runtime executables, which is managed through environment variables.
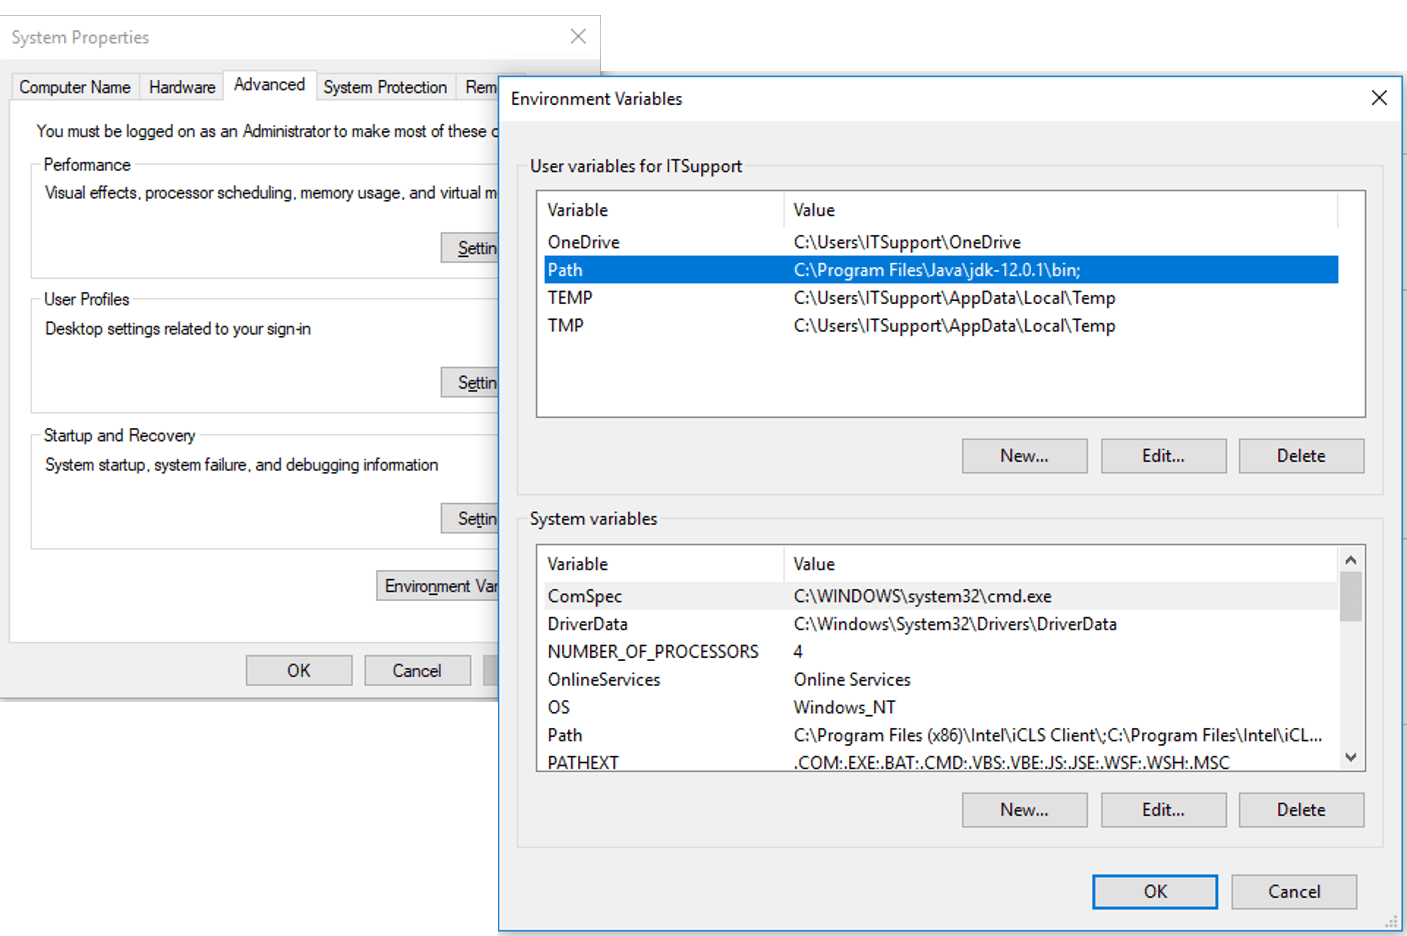
1. Verifying Basic Java Installation
To check if Java is recognized by your system:
- Open Command Prompt: Search for
cmdin the Windows search bar and open the “Command Prompt” application. It’s important to open a new Command Prompt window after installation, as existing ones might not recognize the newPATHchanges. - Check Java Version: Type the following command and press Enter:
bash

java -version
You should see output similar to this (the version numbers will vary based on your installed JDK):
openjdk version "17.0.9" 2023-10-17 LTS

OpenJDK Runtime Environment Temurin-17.0.9+9 (build 17.0.9+9)

OpenJDK 64-Bit Server VM Temurin-17.0.9+9 (build 17.0.9+9, mixed mode, sharing)
If you see an error like “‘java’ is not recognized as an internal or external command,” it means thePATHenvironment variable is not correctly set. If you used an installer like Adoptium’s that setsJAVA_HOMEand modifiesPATHautomatically, this should ideally not happen.
2. Verifying the Java Compiler (javac)
For developers, it’s equally important to confirm that the Java compiler is accessible:
- In the same Command Prompt window, type:
bash

javac -version
You should see output indicating thejavacversion:
javac 17.0.9
Ifjavacis not recognized, it confirms that your system’sPATHvariable might not be correctly configured to include the JDK’sbindirectory, which is wherejavac.exeresides.
3. Manually Setting JAVA_HOME and Updating PATH (If Needed)
While many modern JDK installers handle environment variables automatically, manual configuration might be necessary in some cases (e.g., if you installed from a .zip file, or if the automatic setup failed). Correctly setting JAVA_HOME and modifying the Path variable is crucial for many development tools and build systems to locate your Java installation.
Understanding Environment Variables
JAVA_HOME: This is a user-defined system variable that points to the root directory of your JDK installation (e.g.,C:Program FilesEclipse Adoptiumjdk-17.0.9.9-hotspot). Many IDEs, build tools (like Maven or Gradle), and scripts rely onJAVA_HOMEto find the Java installation.Path: This is a system-wide environment variable that tells your operating system where to look for executable files when you type a command (likejavaorjavac) in the Command Prompt. We need to add thebindirectory of your JDK (%JAVA_HOME%bin) to thisPathvariable.
Steps to Manually Configure Environment Variables:
-
Find Your JDK Installation Path: Navigate to the directory where you installed Java. If you used the default Adoptium installer, it’s typically
C:Program FilesEclipse Adoptiumjdk-XX.X.X.X-hotspot(replaceXX.X.X.Xwith your specific version). Copy this path. -
Open Environment Variables Window:
- Search for “environment variables” in the Windows search bar.
- Select “Edit the system environment variables.” This will open the System Properties dialog.
- Click the “Environment Variables…” button at the bottom right.
-
Set
JAVA_HOMESystem Variable:- Under “System variables” (the lower section), click “New…”.
- For “Variable name,” type
JAVA_HOME. - For “Variable value,” paste the JDK installation path you copied in step 1 (e.g.,
C:Program FilesEclipse Adoptiumjdk-17.0.9.9-hotspot). - Click “OK.”
-
Update the
PathSystem Variable:- In the “System variables” section, scroll down and find the “Path” variable. Select it and click “Edit…”.
- In the “Edit environment variable” dialog, click “New.”
- Type
%JAVA_HOME%bin(this uses theJAVA_HOMEvariable you just created). - Ensure this entry is moved to the top of the list using the “Move Up” button. This prioritizes your newly installed JDK over any other potentially older Java versions.
- Click “OK” on the “Edit environment variable” window.
- Click “OK” on the “Environment Variables” window.
- Click “OK” on the “System Properties” window.
-
Final Verification (Crucial):
- Close ALL existing Command Prompt windows.
- Open a new Command Prompt window.
- Type
echo %JAVA_HOME%and press Enter. It should display your JDK installation path. - Type
java -versionand press Enter. It should show your installed Java version. - Type
javac -versionand press Enter. It should show your installedjavacversion.
If all three commands return the expected output, your Java development environment is correctly set up!
Troubleshooting Common Installation Issues
Even with a detailed guide, you might encounter issues. Here are some common problems and their solutions:
1. “‘java’ is not recognized as an internal or external command” or “‘javac’ is not recognized”
- Cause: The
Pathenvironment variable is either not set correctly or doesn’t include thebindirectory of your JDK. - Solution: Follow the “Manually Setting JAVA_HOME and Updating PATH” steps precisely. Ensure you open a new Command Prompt window after making changes to environment variables. Existing windows won’t pick up the changes. Double-check for typos.
2. Multiple Java Versions Detected / Old Java Version Showing Up
- Cause: You might have multiple Java versions installed, and an older one is prioritized in your
Pathvariable. - Solution:
- Check your
Pathvariable (refer to “Update thePathSystem Variable” steps). Look for multiple entries pointing to Java installations (e.g.,C:Program FilesJavajdk...binorC:ProgramDataOracleJavajavapath). - Prioritize your desired JDK by moving
%JAVA_HOME%binto the very top of thePathlist. - Consider uninstalling older, unnecessary Java versions via “Add or remove programs” in Windows Settings to avoid conflicts.
- Check your
3. Installation Fails or Rolls Back
- Cause: Insufficient administrative privileges, corrupted download, low disk space, or conflicts with antivirus software.
- Solution:
- Ensure you “Run as administrator” when launching the
.msiinstaller. - Redownload the
.msifile to rule out a corrupted download. - Free up disk space if necessary.
- Temporarily disable your antivirus software (if you trust the source) during installation, then re-enable it.
- Ensure you “Run as administrator” when launching the
4. JAVA_HOME Not Found by IDE or Build Tool
- Cause: The IDE or build tool (like Maven, Gradle) isn’t correctly configured to use your
JAVA_HOMEor is looking for Java in a different location. - Solution:
- Ensure the
JAVA_HOMEsystem variable is set correctly (not just a user variable). - Restart your IDE after setting environment variables.
- Many IDEs have their own settings to specify the JDK path. Check your IDE’s preferences (e.g., in IntelliJ IDEA: File > Project Structure > SDKs; in Eclipse: Window > Preferences > Java > Installed JREs). Point it directly to your JDK installation path.
- Ensure the
Conclusion and Next Steps
You have now successfully installed and configured Java on your Windows machine. This is a foundational step that opens up a world of possibilities in software development. Java’s robust nature and its vast ecosystem mean that learning it can significantly boost your tech career, offering pathways into enterprise application development, Android mobile development, big data processing, and more. For those tracking technology trends, mastering Java provides a deeper understanding of the backbone of many modern systems.
With Java installed, here are some recommended next steps to continue your journey:
- Install an Integrated Development Environment (IDE): Popular choices include IntelliJ IDEA (Community Edition is free), Eclipse, and Apache NetBeans. An IDE provides a powerful environment for writing, debugging, and managing your Java code.
- Write Your First Java Program: Start with a simple “Hello, World!” program to test your setup within an IDE. This immediate application of your new environment can be incredibly rewarding.
- Explore Java Tutorials: Many excellent online resources offer free Java tutorials, guiding you through the basics of syntax, object-oriented programming, and core libraries. Websites like Oracle’s Java Tutorials, W3Schools, and Baeldung are great starting points.
- Version Control: Learn Git and set up a GitHub account. Version control is essential for any developer, allowing you to track changes to your code and collaborate with others.
- Dive Deeper into the Java Ecosystem: Once comfortable with the basics, explore frameworks like Spring Boot for web development, Hibernate for database interaction, or Android Studio for mobile app creation.
Installing Java is more than just running an executable; it’s about setting up a powerful engine for innovation. By following this guide, you’ve equipped your Windows machine with one of the most versatile programming languages available, paving the way for countless development opportunities and a deeper engagement with the world of technology. Happy coding!
aViewFromTheCave is a participant in the Amazon Services LLC Associates Program, an affiliate advertising program designed to provide a means for sites to earn advertising fees by advertising and linking to Amazon.com. Amazon, the Amazon logo, AmazonSupply, and the AmazonSupply logo are trademarks of Amazon.com, Inc. or its affiliates. As an Amazon Associate we earn affiliate commissions from qualifying purchases.