
Ubuntu, with its robust open-source foundation, offers a powerful computing experience. While it comes pre-installed with Firefox, many users, especially those deeply integrated into the Google ecosystem or seeking specific browser functionalities, opt to install Google Chrome. Chrome offers a seamless blend of performance, extensive features, and a vast library of extensions, making it a preferred choice for productivity, digital security, and access to a world of online applications. This guide will walk you through the process of installing Google Chrome on your Ubuntu system, covering both graphical and command-line methods, along with essential tips for maintenance and troubleshooting.

Why Choose Google Chrome for Your Ubuntu System?
Before diving into the installation process, it’s worth understanding why millions of users choose Google Chrome, even when excellent alternatives like Firefox are readily available on Ubuntu. The decision often boils down to a combination of performance, ecosystem integration, and feature set that aligns with modern digital demands.
Google Chrome, at its core, is built on the Chromium open-source project, but it distinguishes itself with proprietary features and optimizations that enhance the user experience. For professionals and casual users alike, its advantages are manifold:
- Seamless Google Ecosystem Integration: For users who rely heavily on Google services like Gmail, Google Drive, Calendar, Docs, and Google Meet, Chrome offers unparalleled integration. Signing in allows for instant synchronization of bookmarks, passwords, history, and extensions across all your devices, whether they run Windows, macOS, Android, iOS, or Ubuntu. This continuity is a significant boost to productivity, minimizing friction between different aspects of your digital life.
- Performance and Speed: Chrome is renowned for its speed, particularly in JavaScript execution and page rendering. Its V8 JavaScript engine is highly optimized, making web applications and complex websites feel snappier. While resource consumption can sometimes be a concern, Google continually optimizes Chrome for efficiency, especially in newer versions.
- Vast Extension Library: The Chrome Web Store boasts an enormous collection of extensions that can transform your browsing experience. From productivity tools like task managers and note-takers to digital security enhancements such as ad blockers and password managers, and even specialized tools for branding, marketing, or financial management, the sheer breadth of options allows for incredible customization to suit individual or business needs.
- Robust Developer Tools: For web developers, Chrome’s built-in developer tools are considered some of the best in the industry. They offer powerful capabilities for inspecting elements, debugging JavaScript, monitoring network activity, and profiling performance, which are crucial for building and maintaining modern web applications.
- Digital Security Features: Google invests heavily in Chrome’s security. It includes features like Safe Browsing, which warns you about malicious websites and downloads, and a robust sandboxing architecture that isolates tabs and processes, preventing malicious code from affecting your entire system. Regular, automatic updates ensure you’re always running the latest security patches, crucial for protecting your personal data and financial transactions online.
- Cross-Platform Consistency: If you use Chrome on other operating systems, installing it on Ubuntu provides a consistent user interface and experience, reducing the learning curve and making the transition between different environments seamless. This is particularly valuable for businesses or individuals managing multiple devices for various tasks, from brand management to online income generation.
By installing Chrome, you’re not just getting another browser; you’re gaining a gateway to a highly integrated, performant, and secure web experience that can significantly enhance your productivity and digital workflow on Ubuntu.
Getting Started: Prerequisites and System Preparation
Before you begin the installation process, it’s essential to ensure your Ubuntu system is ready. A few preliminary steps will prevent common issues and ensure a smooth setup.
Essential Prerequisites
- Internet Connection: Google Chrome must be downloaded from the internet. Ensure you have a stable and active internet connection.
- Administrative Privileges (Sudo Access): To install software on Ubuntu, you’ll need
sudo(superuser do) privileges. This typically means you need to be logged in as a user with administrative rights. - 64-bit Ubuntu System: Google Chrome for Linux is exclusively available for 64-bit systems. Most modern Ubuntu installations are 64-bit, but you can verify this by opening a terminal (Ctrl+Alt+T) and typing
uname -m. If the output isx86_64, you have a 64-bit system. - Sufficient Disk Space: While Chrome itself isn’t massive, ensure you have adequate free disk space for the browser and its cache.
Updating Your System
It’s always a good practice to update your package lists and upgrade your installed packages before adding new software. This ensures you have the latest system libraries and security patches, which can prevent dependency conflicts during installation.
Open your terminal (Ctrl+Alt+T) and run the following commands:
sudo apt update
sudo apt upgrade
The sudo apt update command refreshes the list of available packages and their versions, while sudo apt upgrade installs newer versions of the packages you have on your system. Enter your password when prompted. This process might take a few minutes depending on when you last updated.
The User-Friendly Path: Installing Chrome via .deb Package
This method is often preferred by users who are more comfortable with graphical interfaces than the command line. It involves downloading a .deb package (Ubuntu’s native package format) and installing it, similar to how you’d install software on Windows or macOS.
Downloading the Google Chrome .deb Package
- Open Your Existing Web Browser: Launch Firefox (Ubuntu’s default browser) or any other browser you have installed.
- Navigate to the Official Google Chrome Download Page: It’s crucial to download Chrome from its official source to ensure authenticity and security. Go to:
https://www.google.com/chrome/ - Initiate the Download: On the Chrome download page, you’ll see a prominent “Download Chrome” button. Click it.
- Select the Correct Package: A pop-up window will appear, asking you to “Download Chrome for Linux.” Ensure that “64 bit .deb (For Debian/Ubuntu)” is selected. This is the correct package format for Ubuntu.
- Accept Terms and Download: Read the Google Chrome Terms of Service and click “Accept and Install.”
- Save the File: Your browser will prompt you to save the file. Choose a location that’s easy to access, such as your
Downloadsfolder, and click “Save File.” The file name will typically be something likegoogle-chrome-stable_current_amd64.deb.
Installing the .deb Package Graphically
Once the download is complete, you can install it using Ubuntu’s graphical software installer.
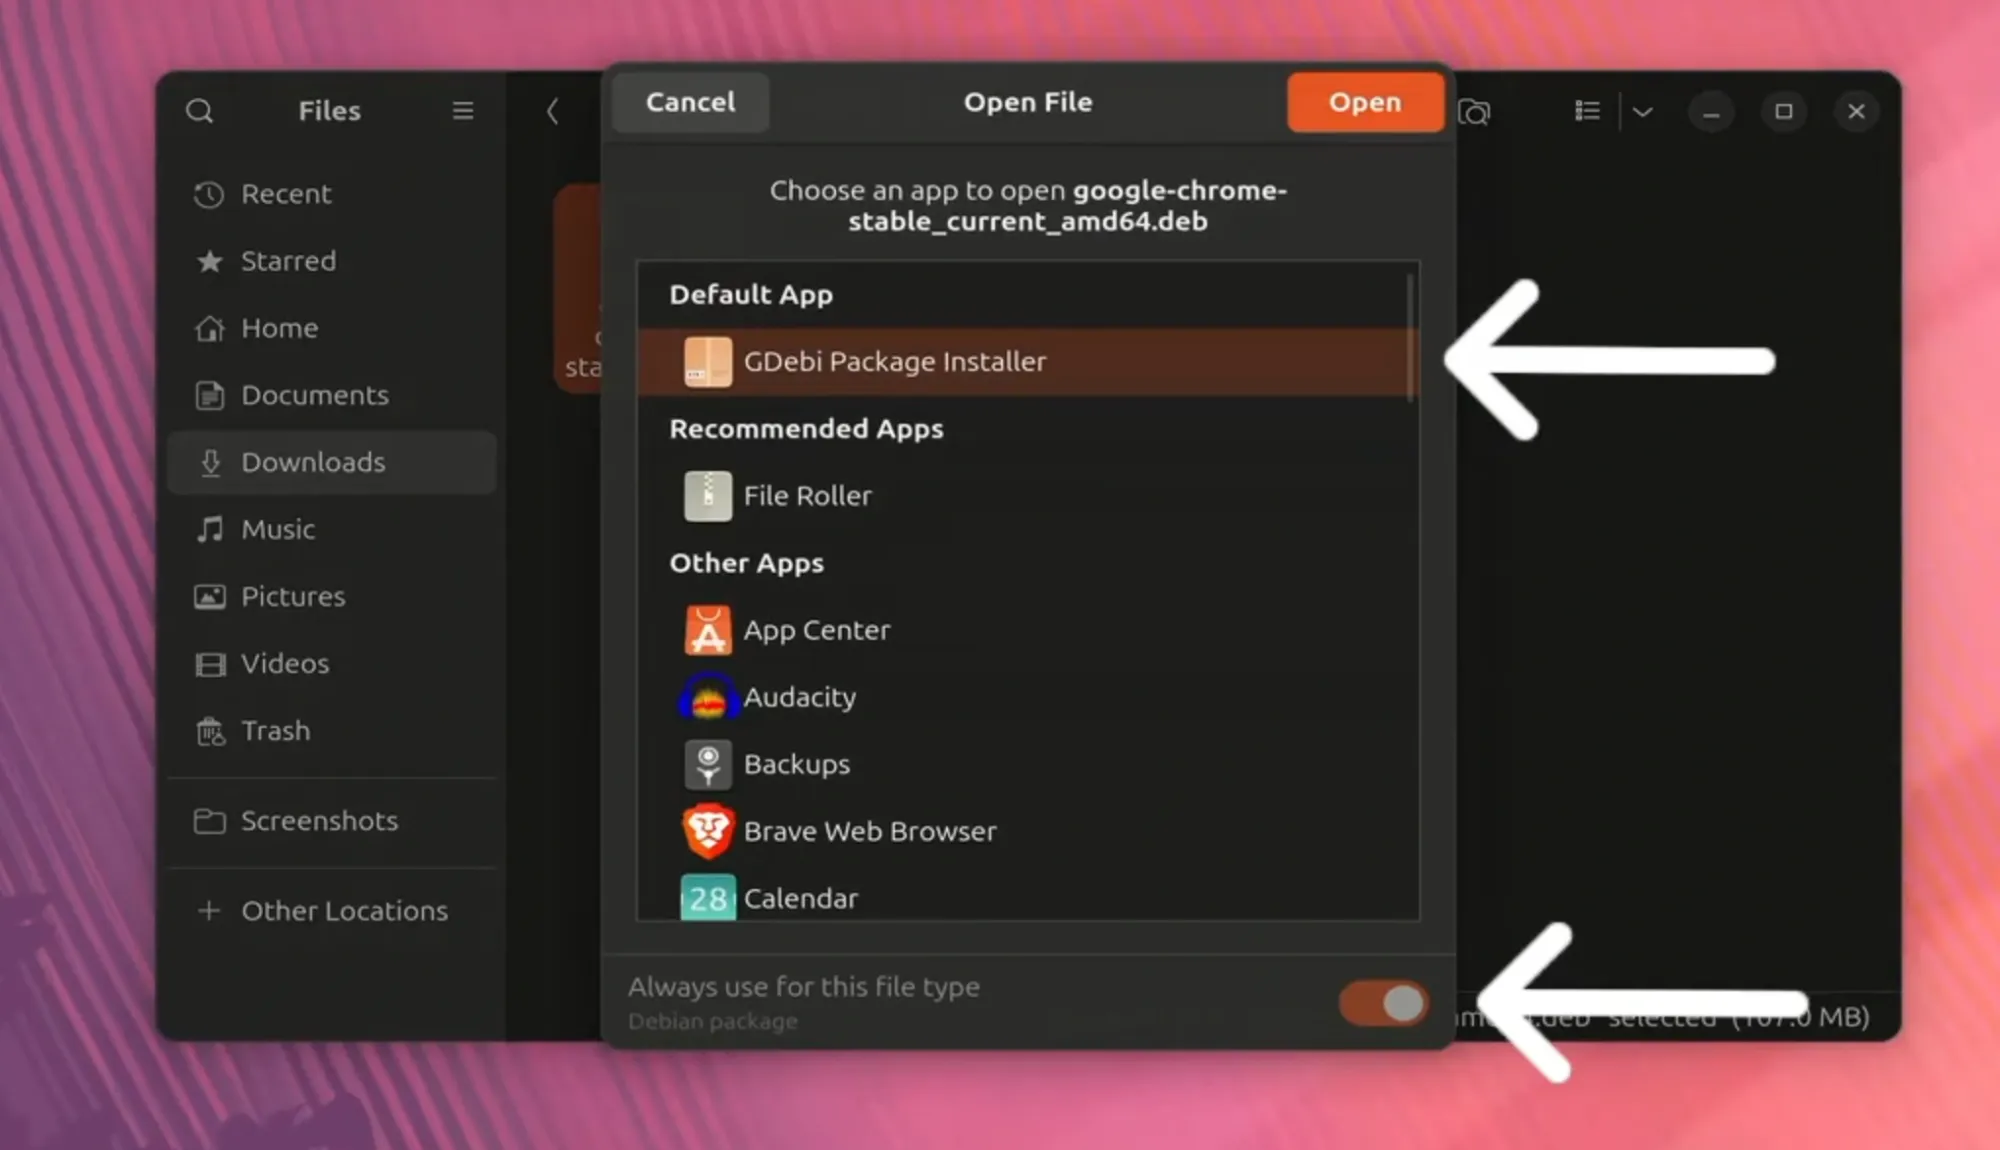
- Open Your File Manager: Navigate to the folder where you saved the
.debfile (e.g.,~/Downloads). - Double-Click the .deb File: Locate
google-chrome-stable_current_amd64.deband double-click it. - Launch Software Center: Ubuntu’s Software Center (or “Software Install” application) should automatically open, displaying information about Google Chrome.
- Click “Install”: You’ll see an “Install” button. Click it, and you’ll be prompted to enter your administrator password.
- Wait for Installation: The Software Center will handle the installation process, including resolving any dependencies. This may take a few moments. Once complete, the button will change to “Remove,” indicating successful installation.
Installing the .deb Package via Terminal (Alternative for .deb)
For those who prefer the terminal even when using a .deb package, or if the graphical installer encounters issues, you can use the dpkg command.
- Open Terminal: Press Ctrl+Alt+T.
- Navigate to Downloads Directory: Use the
cdcommand to change to your Downloads directory (or wherever you saved the.debfile):
bash

cd ~/Downloads
- Install the .deb Package: Use
dpkgto install the package. Replacegoogle-chrome-stable_current_amd64.debwith the exact filename if it differs.
bash

sudo dpkg -i google-chrome-stable_current_amd64.deb
- Handle Dependencies (Crucial Step): It’s common for
dpkgto report dependency errors after this step. To fix these, useapt --fix-broken install:
bash

sudo apt --fix-broken install
This command tellsaptto find and install any missing dependencies thatdpkgcouldn’t handle on its own. After this, Google Chrome should be fully installed.
The Command Line Advantage: Installing Chrome via Google’s APT Repository
This method is generally preferred by experienced Linux users because it’s more efficient, ensures automatic updates, and integrates Chrome seamlessly into Ubuntu’s package management system. When you use this method, Google’s official repository is added to your system, meaning Chrome will be updated along with your other system software whenever you run sudo apt update && sudo apt upgrade.
Importing Google’s GPG Key
To ensure the authenticity of the packages downloaded from Google’s repository, you need to import Google’s public GPG (GNU Privacy Guard) key. This key is used to verify the digital signature of the packages, confirming they haven’t been tampered with.
-
Open Terminal: Press Ctrl+Alt+T.
-
Import the GPG Key: Execute the following command:
wget -q -O - https://dl.google.com/linux/linux_signing_key.pub | sudo apt-key add -wget -q -O - https://dl.google.com/linux/linux_signing_key.pub: This part downloads the public GPG key from Google’s server.-q: Stands for “quiet,” suppressingwget‘s output.-O -: Directs the output to standard output (the terminal screen) instead of saving it to a file.
|: This is a pipe, which takes the output ofwgetand feeds it as input to the next command.sudo apt-key add -: This command adds the GPG key (received via the pipe) to your system’s list of trusted keys. You’ll be prompted for your password.
Note on
apt-keydeprecation: Whileapt-key addstill works on current Ubuntu versions, it’s considered deprecated. For more robust security practices, a modern approach would be to download the key and place it directly into/etc/apt/trusted.gpg.d/or/etc/apt/keyrings/. However, for simplicity and compatibility with many existing guides,apt-key addis often still used.
Adding the Google Chrome Repository to Your System
Next, you need to tell your Ubuntu system where to find the Google Chrome packages. This is done by adding a new entry to your APT (Advanced Package Tool) sources list.
- Add the Repository: In the same terminal, run the following command:
bash

sudo sh -c 'echo "deb [arch=amd64] http://dl.google.com/linux/chrome/deb/ stable main" > /etc/apt/sources.list.d/google-chrome.list'
sudo sh -c '...': This executes the enclosed command as root.echo "...": This prints the string specifying the repository details.deb [arch=amd64]: Indicates it’s a Debian-style binary package repository for 64-bit architectures.http://dl.google.com/linux/chrome/deb/: The URL of Google’s Chrome repository.stable main: Specifies thestablebranch andmaincomponent of the repository.
> /etc/apt/sources.list.d/google-chrome.list: This redirects the output of theechocommand into a new file namedgoogle-chrome.listwithin the/etc/apt/sources.list.d/directory. Files in this directory are automatically read byaptto find new software sources.
Updating Package Lists and Installing Google Chrome
With the GPG key imported and the repository added, your system now knows where to find Google Chrome. The final steps are to update your package lists and then install the browser.
- Update Package Lists: You must refresh your package lists so
aptis aware of the new Google Chrome packages available from the repository you just added.
bash

sudo apt update
You should see output indicating that the Google Chrome repository was successfully fetched. - Install Google Chrome: Now, you can install the stable version of Google Chrome:
bash

sudo apt install google-chrome-stable
aptwill list the packages to be installed and ask for confirmation. TypeYand press Enter to proceed. The installation process will download and set up Google Chrome on your system.
Launching, Updating, and Managing Your Google Chrome Installation
Once Google Chrome is successfully installed, you’ll want to launch it, understand how to keep it updated, and know how to remove it if needed.
Launching Google Chrome
There are a couple of ways to open your newly installed browser:
- From the Applications Menu:
- Click on the “Show Applications” icon in your Ubuntu Dock (usually at the bottom-left corner of the screen).
- Type “chrome” in the search bar.
- Click on the “Google Chrome” icon that appears.
- From the Terminal:
- Open your terminal (Ctrl+Alt+T).
- Type
google-chromeand press Enter.
The first time you launch Chrome, it will ask if you want to make it your default browser and if you want to send usage statistics to Google. You can choose your preferences. It will then prompt you to sign in to your Google account, which is recommended to sync your data and preferences across devices, significantly boosting your productivity and personal branding consistency online.
Keeping Google Chrome Updated
One of the significant advantages of installing Chrome via the APT repository is that it integrates seamlessly with Ubuntu’s update mechanism.
- Automatic Updates: Whenever you run
sudo apt update && sudo apt upgrade(which you should do regularly for general system maintenance and digital security), Google Chrome will automatically be checked for updates and upgraded to the latest version if one is available. This ensures you always have the newest features, performance improvements, and critical security patches without manual intervention. Regular updates are paramount for maintaining robust digital security against evolving online threats.
Uninstalling Google Chrome (Optional)
If, for any reason, you decide you no longer want Google Chrome on your Ubuntu system, you can easily remove it using the terminal.
- Open Terminal: Press Ctrl+Alt+T.
- Remove the Browser:
bash

sudo apt remove google-chrome-stable
This command removes the Google Chrome browser package. - Remove Configuration Files (Optional, for a cleaner uninstall): If you want to remove Chrome’s configuration files as well (e.g., if you’re experiencing issues or want a completely clean slate), use
purge:
bash

sudo apt purge google-chrome-stable
- Remove the Repository File (Optional): You can also remove the repository entry that you added earlier. This prevents
aptfrom trying to update Chrome from Google’s servers after it’s been removed.
bash

sudo rm /etc/apt/sources.list.d/google-chrome.list
- Clean Up: After uninstalling, it’s good practice to clean up any orphaned dependencies:
bash

sudo apt autoremove
This command removes packages that were installed as dependencies for other packages but are no longer needed.
Troubleshooting and Optimizing Your Chrome Experience on Ubuntu
While the installation process is generally straightforward, you might encounter a few hiccups or wish to optimize Chrome’s performance on your Ubuntu system.
Common Installation and Launching Issues
- “Unable to locate package google-chrome-stable”:
- Cause: This usually means your system hasn’t successfully fetched the package list from Google’s repository, or the repository was not added correctly.
- Solution: Double-check that you correctly added Google’s GPG key and the repository entry (
/etc/apt/sources.list.d/google-chrome.list). Then, crucially, runsudo apt updateagain to refresh your package lists before attemptingsudo apt install google-chrome-stable.
- “Dependency problems”:
- Cause: This often happens when installing the
.debpackage directly if required libraries are missing. - Solution: After using
sudo dpkg -i, always runsudo apt --fix-broken installto resolve these dependencies automatically.
- Cause: This often happens when installing the
- Chrome not launching or crashing:
- Cause: This can be due to corrupted user profiles, outdated graphics drivers, or conflicts with system settings.
- Solution:
- Try launching from the terminal (
google-chrome) to see if any error messages are displayed. - Try resetting your Chrome profile. Close Chrome, then open a terminal and rename your profile directory:
mv ~/.config/google-chrome ~/.config/google-chrome-backup. Relaunch Chrome. This will create a fresh profile (you’ll lose local browsing data but synced data will return upon login). - Ensure your graphics drivers are up to date, especially if you have an NVIDIA or AMD GPU.
- Sometimes, hardware acceleration can cause issues. You can try disabling it in Chrome’s settings (
chrome://settings/system).
- Try launching from the terminal (
Optimizing Chrome on Ubuntu
While Chrome is powerful, it can be resource-intensive. Here are tips to optimize its performance on your Ubuntu machine:
- Manage Extensions: Every extension consumes RAM and CPU cycles. Regularly review your installed extensions (
chrome://extensions/) and disable or remove those you don’t actively use. Prioritize essential productivity and digital security extensions. - Limit Open Tabs: Too many open tabs can quickly drain system resources. Use tab management extensions or bookmark frequently visited pages. Consider tab-suspending extensions that unload inactive tabs from memory.
- Keep Chrome Updated: As mentioned, regular updates (
sudo apt update && sudo apt upgrade) bring performance improvements and bug fixes, crucial for maintaining an efficient browser. - Hardware Acceleration: For systems with capable GPUs, hardware acceleration can offload graphics processing, making browsing smoother. Ensure it’s enabled in Chrome settings unless it causes issues.
- Clear Cache and Browsing Data: Periodically clearing your browser cache and cookies can sometimes resolve sluggishness, especially if it’s accumulated over a long period. Go to
chrome://settings/clearBrowserData. - Use Task Manager: Chrome has its own built-in task manager (Shift+Esc or Menu -> More tools -> Task manager) that shows resource usage per tab and extension. This is an invaluable tool for identifying resource hogs.
By following these optimization tips, you can ensure that Google Chrome runs smoothly and efficiently on your Ubuntu system, providing a fast and productive browsing experience for all your tech, brand, and money-related online activities.

Conclusion
Installing Google Chrome on Ubuntu is a straightforward process that significantly enhances your web browsing capabilities, especially if you’re deeply integrated into the Google ecosystem or require specific features for productivity, digital security, or professional tasks like brand management and online income generation. Whether you prefer the graphical convenience of the .deb package or the command-line efficiency of the APT repository method, both approaches ensure you gain access to a powerful, feature-rich browser that keeps you connected and productive.
By following this comprehensive guide, you’ve not only installed Chrome but also understood the underlying mechanisms, learned how to keep it updated automatically, and gained insights into troubleshooting and optimization. Embrace the seamless integration, vast extension library, and robust performance that Google Chrome brings to your Ubuntu desktop, empowering you to navigate the digital world with greater ease and efficiency. Happy browsing!
aViewFromTheCave is a participant in the Amazon Services LLC Associates Program, an affiliate advertising program designed to provide a means for sites to earn advertising fees by advertising and linking to Amazon.com. Amazon, the Amazon logo, AmazonSupply, and the AmazonSupply logo are trademarks of Amazon.com, Inc. or its affiliates. As an Amazon Associate we earn affiliate commissions from qualifying purchases.