In a digital world saturated with information, the way we present content is almost as crucial as the content itself. From personal documents and creative projects to professional presentations and branding materials, typography plays a pivotal role in shaping perception, readability, and overall aesthetic appeal. While your PC comes pre-loaded with a decent selection of fonts, the true power of digital expression often lies in the ability to transcend these defaults and embrace a vast universe of custom typefaces.
Installing new fonts on your PC is a fundamental skill for anyone looking to personalize their digital environment, enhance their creative output, or maintain a consistent brand identity. Whether you’re a designer looking for that perfect heading, a student wanting to make a thesis stand out, a content creator aiming for unique visuals, or a business professional refining your corporate documents, knowing how to properly add fonts is indispensable. This comprehensive guide will walk you through the process on both Windows and macOS, delve into the nuances of font types, and offer tips for managing your growing font collection, ensuring your digital canvas is always equipped with the right tools.

The Power of Personalization: Why Custom Fonts Elevate Your Digital Experience
The choice of typeface goes far beyond mere aesthetics; it’s a strategic decision that impacts everything from user experience to brand perception. In an era where digital presence is paramount, leveraging custom fonts is a simple yet effective way to differentiate your work and enhance productivity.
Boosting Productivity and Professionalism
For professionals and casual users alike, a well-chosen font can dramatically improve readability and visual hierarchy, making documents and presentations more engaging and easier to digest. Imagine crafting a detailed report for work; using a clear, professional font helps convey your message with authority and seriousness. Conversely, for a creative project, a unique, expressive font can instantly capture the intended mood or theme.
Beyond aesthetics, custom fonts can subtly boost productivity. If you’re working on a long-term project that requires specific branding guidelines, having the official fonts installed saves time and ensures consistency across all deliverables. For example, marketing teams often adhere to strict typography rules to maintain a cohesive brand voice across all campaigns, from email newsletters to social media graphics. Ensuring these fonts are readily available on everyone’s PC streamlines the content creation process and minimizes errors, allowing teams to focus on the message rather than the medium.
Furthermore, for those involved in side hustles or online income streams – such as freelance designers, video editors, or content creators – access to a diverse font library is not just a luxury, but a necessity. It empowers them to deliver unique, high-quality work that stands out in a competitive marketplace, directly impacting their ability to attract clients and grow their business. A distinct font can become part of their personal brand, making their output instantly recognizable and professional.
Crafting a Distinct Brand Identity
In the realm of branding and corporate identity, fonts are foundational. A brand’s typography is as much a part of its visual language as its logo or color palette. Think of iconic brands; their font choices are often instantly recognizable and evoke specific feelings or associations. A sophisticated serif might convey tradition and trustworthiness, while a sleek sans-serif could communicate modernity and efficiency.
For businesses and individuals alike, maintaining a consistent brand identity across all touchpoints is crucial for building recognition and trust. Installing specific brand fonts on all company PCs ensures that every document, presentation, and piece of internal or external communication adheres to the established visual guidelines. This uniformity strengthens the brand message, prevents visual dissonance, and reinforces professionalism. For personal branding, especially for influencers, bloggers, or consultants, custom fonts can help carve out a unique niche and make their content visually distinct from competitors. In an increasingly visual online landscape, a memorable and consistent typographical style can be a powerful tool for building a strong, recognizable brand presence that resonates with your target audience.
Understanding Font File Types and Sources
Before you dive into installation, it’s helpful to understand the different types of font files you’ll encounter and where to safely acquire them. Not all font files are created equal, and knowing the distinctions can prevent compatibility issues and ensure optimal performance.
TrueType Fonts (TTF)
TrueType fonts are perhaps the most common and widely recognized font format. Developed by Apple and Microsoft in the late 1980s, TTF files are single files that contain both the screen font and printer font data. This means they are designed to render clearly on both displays and printed pages, making them a versatile choice. They are supported by virtually all operating systems and applications. Most free fonts you’ll download will likely be in TTF format.
OpenType Fonts (OTF)
OpenType is a more advanced and versatile font format, developed jointly by Adobe and Microsoft. OTF fonts are essentially an extension of TrueType, offering greater typographic capabilities. They can include thousands of characters, stylistic alternates, ligatures, small caps, old-style figures, and other advanced layout features that TTF fonts typically don’t support. This makes OTF fonts particularly popular among graphic designers and professionals who require fine control over typography. While they offer more features, they are also widely supported across modern operating systems and applications.
Finding Reputable Font Sources
The internet is teeming with free and paid fonts, but it’s crucial to download from reputable sources to avoid malware or legal issues.
- Google Fonts: An excellent source for high-quality, free, and open-source fonts. All fonts are licensed for commercial and personal use, making it a safe and versatile option.
- DaFont and Font Squirrel: Popular websites offering a vast selection of free fonts. Always check the licensing information for each font, as some are free for personal use only, while others may require a license for commercial projects. Font Squirrel also offers a handy web font generator.
- Adobe Fonts (formerly Typekit): Included with Adobe Creative Cloud subscriptions, Adobe Fonts offers a massive library of high-quality fonts that can be synced directly to your desktop applications. These are typically licensed for commercial use as part of your subscription.
- MyFonts, Fontspring, and Creative Market: These are marketplaces for purchasing professional-grade fonts. They offer extensive collections from various type designers and foundries, often with clear licensing terms for personal, commercial, and web use. Investing in licensed fonts from these sources ensures you have high-quality, legally compliant typefaces for your projects, which is especially important for brand consistency and avoiding potential legal pitfalls.
Always exercise caution when downloading fonts from unfamiliar websites. Stick to well-known platforms, read reviews, and scan downloaded files with antivirus software, especially if you’re installing them on a work PC where digital security is paramount.
Mastering Font Installation on Windows
Installing fonts on a Windows PC is a straightforward process, offering a couple of primary methods depending on your preference and the number of fonts you need to install.
The Quick Right-Click Method
This is often the fastest and most convenient way to install a single font or a small batch of fonts.

- Download Your Font: Navigate to a reputable font source and download the font file(s). Most fonts come in a compressed
.zipfolder. - Extract the Files: If the font is in a
.zipfolder, right-click on the folder and select “Extract All…” or use a decompression tool like 7-Zip or WinRAR. Choose a destination for the extracted files (your Downloads folder is usually fine). - Locate the Font File(s): Inside the extracted folder, you’ll find the actual font file(s). These will typically have a
.ttfor.otfextension, often indicated by an icon resembling a sheet of paper with an “A” on it. - Install the Font:
- Single Font: Right-click directly on the
.ttfor.otffont file. - From the context menu, select “Install” or “Install for all users.” Choosing “Install for all users” ensures the font is available to every user account on that PC, which is generally recommended for shared computers or professional environments. If you only see “Install,” it usually installs it for the current user.
- Windows will display a quick installation dialog box, and the font will be added to your system.
- Single Font: Right-click directly on the
- Verify Installation: Open any application that uses fonts (e.g., Microsoft Word, PowerPoint, Photoshop) and check if the newly installed font appears in the font selection dropdown.
Utilizing Windows Settings (or Control Panel for older versions)
This method provides a centralized way to manage your fonts and is useful for installing multiple fonts or reviewing your existing collection.
- Prepare Your Font Files: As with the right-click method, download and extract your font files (
.ttfor.otf) into an accessible folder. - Open Font Settings:
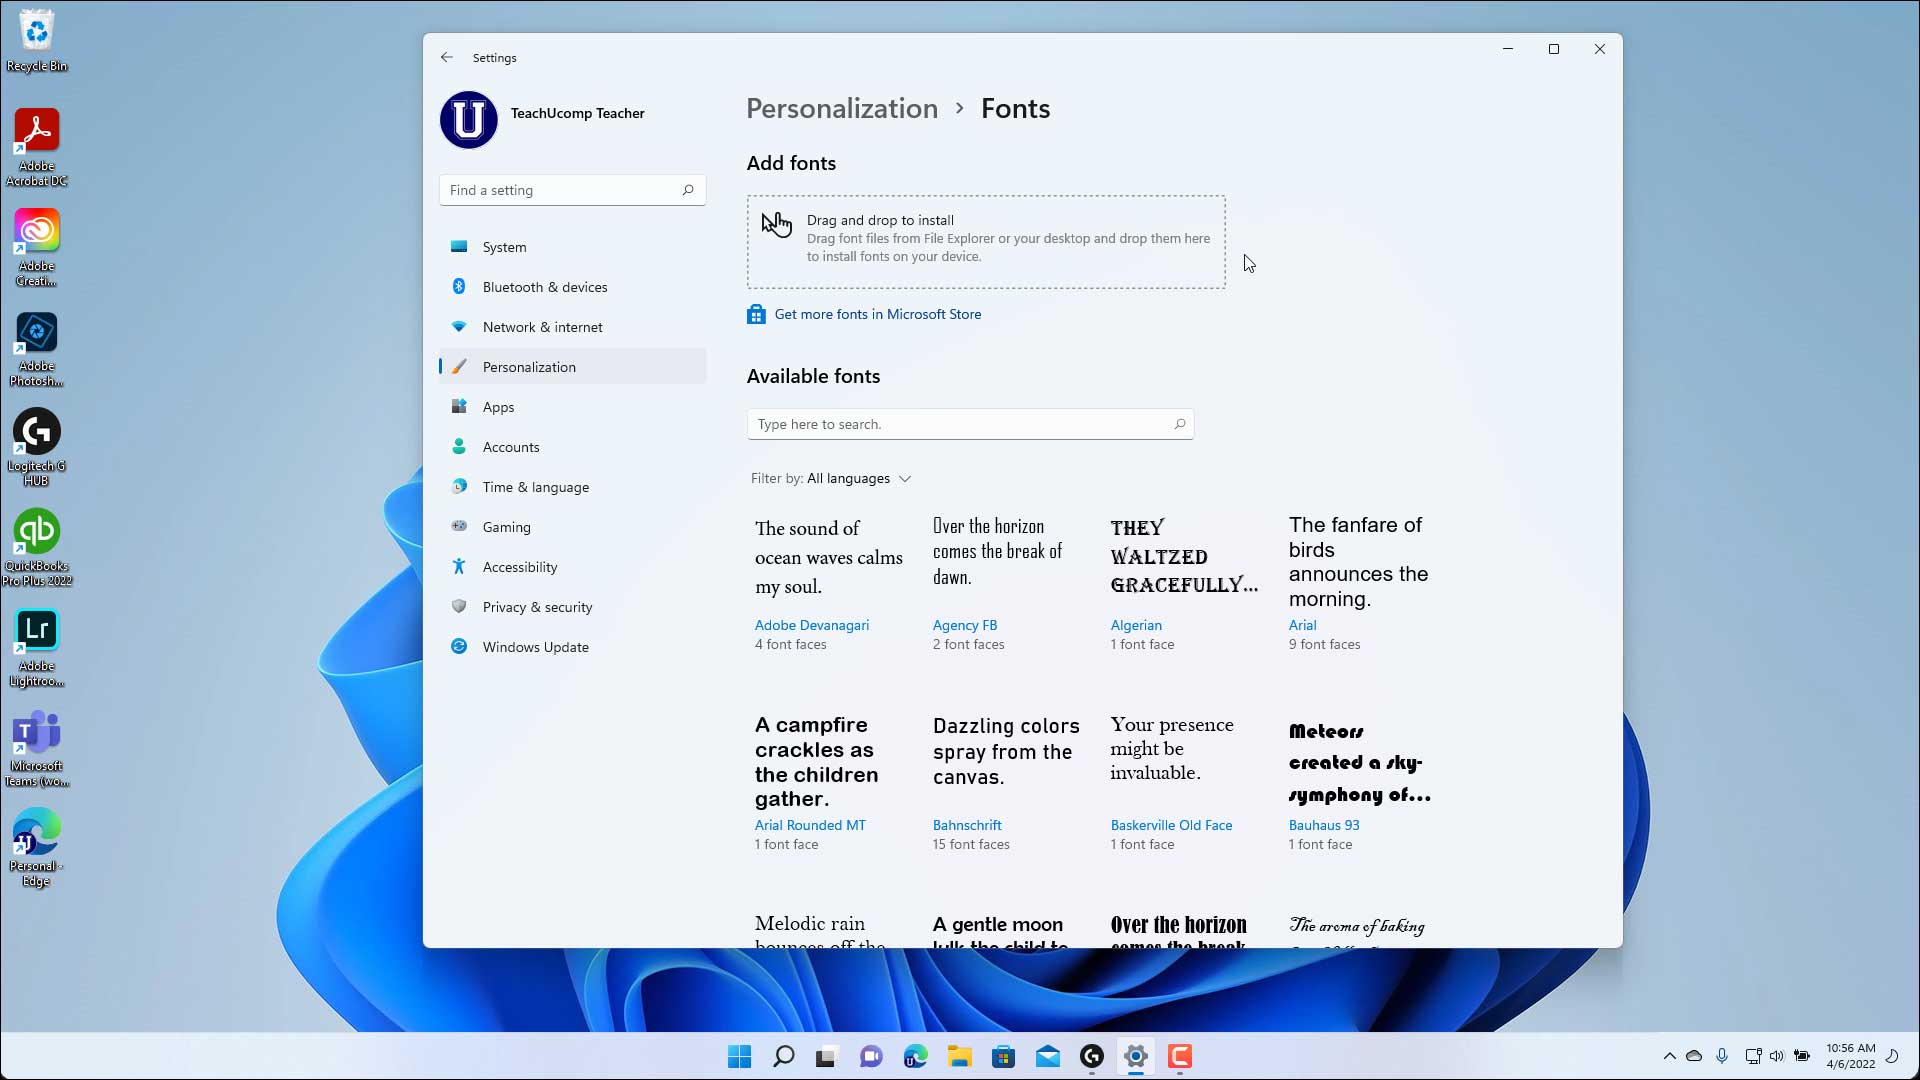
- Windows 10/11: Click the Start button, then go to Settings > Personalization > Fonts.
- Older Windows versions (7/8.1): Click the Start button, then Control Panel > Appearance and Personalization > Fonts.
- Install Fonts:
- In the Fonts settings window, you’ll see an area that says “Drag and drop to install fonts” or “Add a font.”
- Drag and Drop: Locate your extracted font files in File Explorer. Select all the font files you wish to install, then drag and drop them into the “Drag and drop to install fonts” area in the Fonts settings window. Windows will automatically begin the installation process for all selected fonts.
- Browse (Windows 11): In Windows 11, you can also click the “Add a font” button, which will open a file explorer window allowing you to navigate to and select your font files.
- Confirm Installation: After the installation completes, the new fonts will appear in the list of installed fonts within the Settings window. Again, open an application to confirm their availability.
Installing Multiple Fonts at Once
For graphic designers, content creators, or IT professionals who need to install dozens or even hundreds of fonts, the drag-and-drop method within the Windows Fonts settings (or Control Panel) is the most efficient. Simply select all the .ttf and .otf files from your extracted folder and drag them into the designated area. Windows will process them sequentially. Be patient, as installing a large number of fonts can take some time.
Seamlessly Installing Fonts on macOS
Mac users also have a streamlined process for installing fonts, primarily leveraging the built-in Font Book application.
Installing via Font Book
Font Book is macOS’s native font management utility, providing a robust way to install, preview, and organize your fonts.
- Download and Extract: Download your desired font files (typically
.ttfor.otf) from a reputable source. If they are in a.ziparchive, double-click the archive to extract them. The extracted files will appear in the same directory. - Open Font Book:
- Navigate to your Applications folder in Finder and open Font Book.
- Alternatively, you can use Spotlight Search (Command + Spacebar) and type “Font Book.”
- Install the Font:
- Double-Click Method (Recommended for single/few fonts): Locate the
.ttfor.otffont file in Finder and simply double-click it. This will automatically open a preview window in Font Book.- In the preview window, click the “Install Font” button.
- Font Book will validate the font for errors and then add it to your collection. If any issues are found, it will warn you.
- Drag and Drop into Font Book: For multiple fonts, select all your
.ttfor.otffiles in Finder. Drag and drop these files directly into the Font Book application window (into the “All Fonts” or “User” collection section on the left sidebar).- Font Book will prompt you to install them. Click “Install.”
- Double-Click Method (Recommended for single/few fonts): Locate the
- Verify Installation: Once installed, the new fonts will appear in your Font Book library. Open a text editor (like Pages, Microsoft Word, or Adobe Photoshop) to confirm that the fonts are available in the font selection menu.
The Drag-and-Drop Approach (Simplified)
While similar to the Font Book method, this is a slightly quicker way to install, especially for individual fonts, without explicitly opening Font Book first.
- Download and Extract: As before, ensure your font files are downloaded and extracted.
- Locate Font File: Find the
.ttfor.otffile in Finder. - Drag to Fonts Folder:
- Open a new Finder window.
- Go to
~/Library/Fonts(for fonts available only to your user account) or/Library/Fonts(for fonts available to all users on the Mac). You can quickly navigate to your user’s Library by holding the Option key while clicking “Go” in the Finder menu bar, then selecting “Library.” - Drag the font file(s) from their download location directly into the
Fontsfolder you opened.
- Restart Applications: Unlike the Font Book method which often registers fonts immediately, dragging directly into the Fonts folder might require you to quit and restart any open applications (like Word or Photoshop) for the new fonts to appear.
Troubleshooting Common Font Issues and Managing Your Collection
Even with careful installation, you might occasionally encounter issues. Knowing how to troubleshoot and manage your fonts effectively is key to a smooth creative workflow.
When Fonts Don’t Appear
If you’ve installed a font but it’s not showing up in your applications:
- Restart Applications: The most common fix. Most applications only load available fonts when they start up. If an application was open during the font installation, close it completely and reopen it. For persistent issues, a full PC restart might be necessary.
- Check Font Name: Sometimes, the actual font name in the application’s dropdown might differ slightly from the filename. For instance, “MyCoolFont.ttf” might appear as “My Cool Font Regular” in the application.
- Verify Installation Location: On Windows, ensure you selected “Install for all users” if you intended for it to be system-wide. On macOS, check if it’s in your User Library Fonts folder or the main Library Fonts folder, and if it’s visible in Font Book.
- Corrupted File: The font file itself might be corrupted. Try downloading it again from the source, or try a different source.
Dealing with Corrupt or Incompatible Files
Sometimes, a font file might be damaged or incompatible with your system, leading to display issues, application crashes, or refusal to install.
- Font Validation (macOS): Font Book on macOS has a built-in validation feature. If you attempt to install a problematic font, it will usually flag it and explain why. You can also manually validate fonts by selecting them in Font Book and choosing “File > Validate Fonts.”
- Delete and Re-download: If a font is causing problems, delete it from your system (see “Uninstalling Fonts” below) and re-download it.
- Check File Extension: Ensure the file truly is a
.ttfor.otffile. Sometimes, files might be mislabeled or incomplete downloads. - System Overload: While rare for modern PCs, having thousands of active fonts can sometimes slow down system performance or application launch times. If you have an unusually large collection and experience slowdowns, consider deactivating or uninstalling less-used fonts.
Managing Your Font Library: Uninstalling and Organizing
A cluttered font library can be overwhelming. Regular maintenance helps keep your system lean and your creative choices clear.
- Uninstalling Fonts on Windows:
- Go to Settings > Personalization > Fonts (Windows 10/11) or Control Panel > Appearance and Personalization > Fonts (older versions).
- Locate the font you wish to remove in the list.
- Click on the font, then click the “Uninstall” button.
- Uninstalling Fonts on macOS:
- Open Font Book from your Applications folder.
- Select the font(s) you want to remove.
- Right-click (or Control-click) on the selected font(s) and choose “Remove [Font Name/Number] Fonts.”
- Confirm your decision when prompted.
- Font Management Software: For professionals, especially those managing hundreds or thousands of fonts, dedicated font management software can be invaluable. Tools like Adobe Fonts (integrated with Creative Cloud), Suitcase Fusion, or RightFont offer advanced features such as:
- Activation/Deactivation: Easily turn fonts on and off without fully uninstalling them, reducing system load.
- Tagging and Categorization: Organize fonts by project, client, style, or license type.
- Conflict Resolution: Identify and resolve duplicate or problematic fonts.
- Cloud Sync: Sync fonts across multiple devices.
These tools not only streamline your workflow but also ensure compliance with licensing agreements, which is a critical aspect of digital security and brand integrity for creative professionals.
Conclusion
Installing fonts on your PC is a gateway to unlocking greater creativity, enhancing productivity, and crafting a distinct digital identity. Whether you’re a casual user looking to personalize your documents or a professional meticulously building a brand, the ability to select and implement custom typefaces is a fundamental skill in today’s digital landscape. By following the clear steps outlined for both Windows and macOS, understanding the nuances of font file types, and practicing smart font management, you can ensure your PC is always equipped with the perfect typography for any task. Embrace the power of fonts, and let your digital creations truly speak volumes.
aViewFromTheCave is a participant in the Amazon Services LLC Associates Program, an affiliate advertising program designed to provide a means for sites to earn advertising fees by advertising and linking to Amazon.com. Amazon, the Amazon logo, AmazonSupply, and the AmazonSupply logo are trademarks of Amazon.com, Inc. or its affiliates. As an Amazon Associate we earn affiliate commissions from qualifying purchases.