
In the contemporary landscape of digital content creation, gaming, and remote professional collaboration, the ability to capture high-quality screen recordings has transitioned from a niche requirement to a fundamental necessity. For users equipped with NVIDIA hardware, this capability is not merely an afterthought—it is a sophisticated feature integrated directly into the silicon of the Graphics Processing Unit (GPU). NVIDIA’s suite of recording tools, primarily centered around the GeForce Experience overlay and the revolutionary NVENC (NVIDIA Encoder), provides a low-overhead, high-fidelity solution that rivals professional-grade recording software.
Understanding how to leverage this technology requires more than just knowing which buttons to press. It involves a deep dive into hardware acceleration, bitrate optimization, and the technical nuances that ensure your recordings are as smooth as your actual gameplay or workflow.
The Technical Foundation: Why NVIDIA Hardware Encoding Matters
Before diving into the “how-to,” it is essential to understand the “why.” Traditional screen recording software often relies on software encoding (x264), which utilizes the Central Processing Unit (CPU) to process video frames. This can lead to significant performance degradation, especially in CPU-intensive tasks like gaming or 3D rendering.
NVIDIA solves this through NVENC. This is a dedicated physical section of the GPU designed solely for encoding video. Because it is a separate piece of hardware, it allows the rest of the GPU to focus on rendering graphics while the CPU handles system tasks. The result is a recording process that consumes less than 5% of your system’s resources, ensuring that your frame rates remain high while your video remains crisp.
The Evolution of NVENC
With each generation of NVIDIA architecture—from Pascal and Turing to Ampere and the latest Ada Lovelace—the NVENC engine has seen monumental improvements. The most recent iterations, found in the RTX 40-series cards, support AV1 encoding. AV1 is significantly more efficient than the older H.264 standard, providing higher visual quality at much lower bitrates. This guide focuses on utilizing these hardware advantages through the GeForce Experience ecosystem.
Setting Up Your System for Seamless Recording
To begin recording, you must ensure your system is properly configured. The primary interface for NVIDIA’s recording features is the GeForce Experience (GFE) software.
Installation and Driver Optimization
First, verify that you have an NVIDIA GPU that supports the “Share” feature (most GPUs from the GTX 600 series and newer). Download and install the latest Game Ready Drivers from the NVIDIA website or through the GeForce Experience application. These drivers contain the latest optimizations for the hardware encoder, ensuring stability during long recording sessions.
Enabling the In-Game Overlay
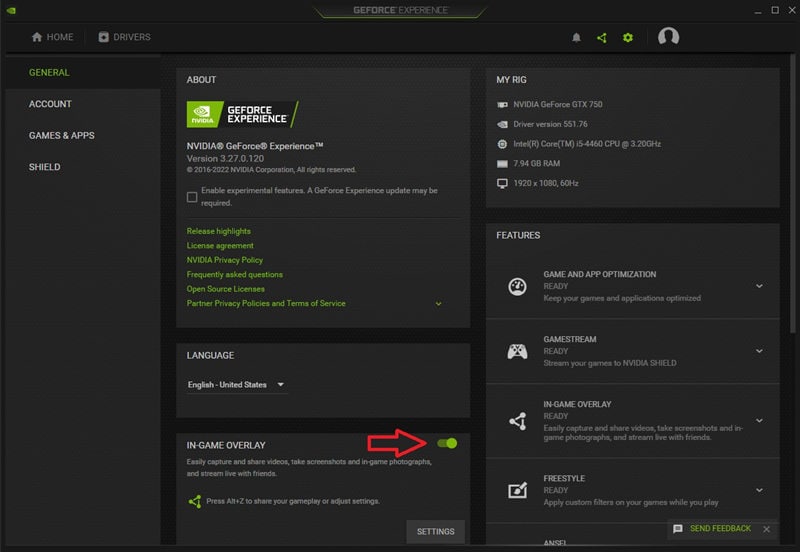
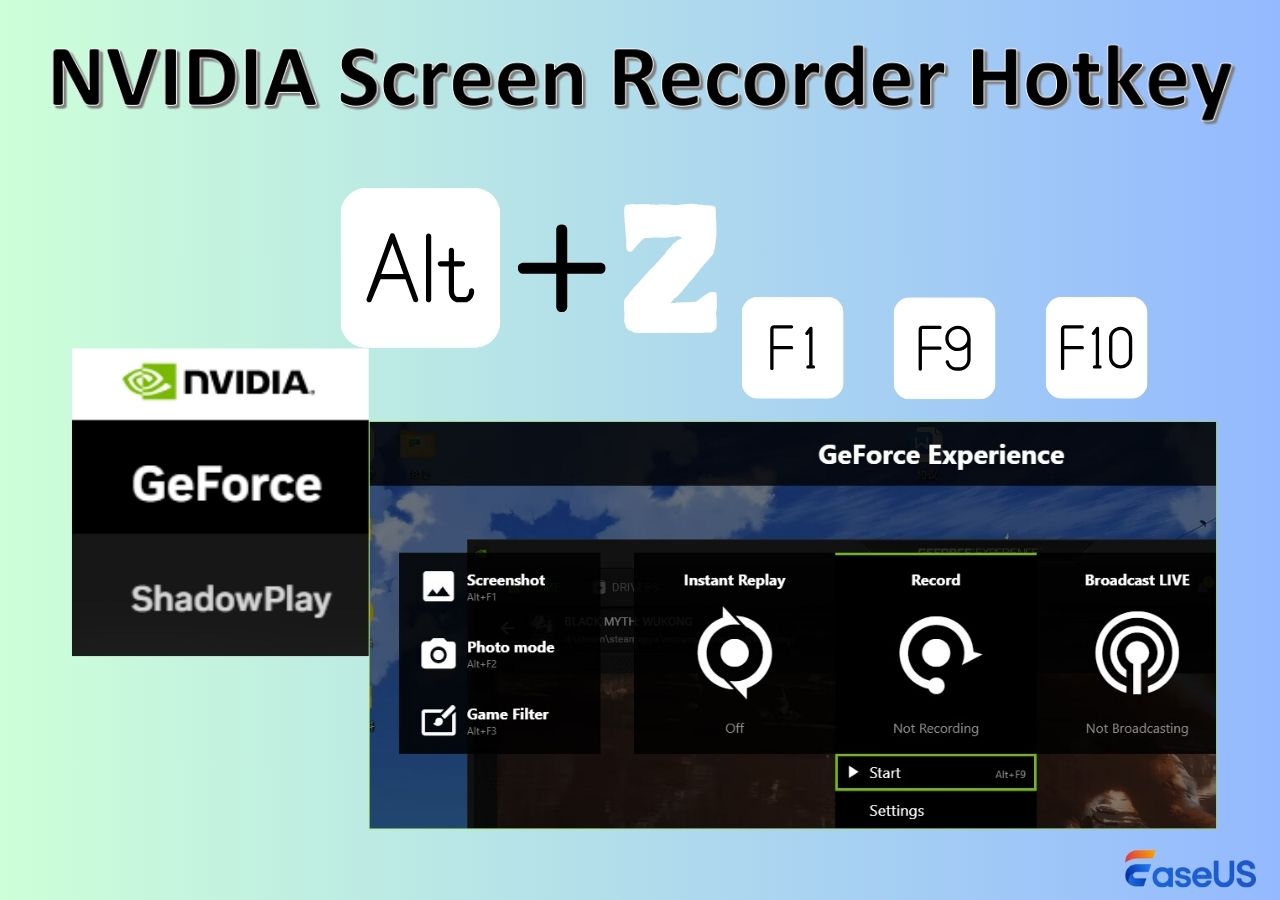
Once GFE is installed, open the application and click on the “Settings” (gear icon). Under the “General” tab, look for the “In-Game Overlay” toggle. Ensure this is turned on. This overlay is the gateway to all recording features and can be summoned at any time—whether you are on the desktop or inside a full-screen application—by pressing the default hotkey, Alt+Z.
Granting Privacy Permissions
A common hurdle for many users is the inability to record the Windows desktop. By default, NVIDIA restricts desktop capture to protect user privacy. To enable this, open the Alt+Z overlay, go to Settings > Privacy Control, and toggle “Desktop Capture” to Yes. This allows you to record software tutorials, web browsers, and any other non-gaming content.
Optimizing Your Recording Settings for Quality and Performance
The secret to professional-looking video lies in the settings. Within the Alt+Z overlay, navigate to Settings > Video Capture. Here, you will find several critical parameters that dictate the final look of your file.
Resolution and Frame Rate
For most modern content, 1080p at 60 Frames Per Second (FPS) is the standard. However, if you have a high-end RTX card and a 4K monitor, you may want to capture at “In-game” resolution to maintain the highest level of detail. High frame rates (60 FPS) are vital for smooth motion, particularly in fast-paced action. If you are recording a static PowerPoint presentation or a coding tutorial, 30 FPS may suffice and will significantly reduce the file size.
Mastering Bitrate
Bitrate is perhaps the most misunderstood setting. It refers to the amount of data processed per second of video.
-
10-15 Mbps: Suitable for 1080p/30 FPS content destined for mobile viewing.
-
30-50 Mbps: The “Sweet Spot” for high-quality 1080p/60 FPS gaming.
-
80-100 Mbps: Recommended for 4K content or if you plan to do heavy color grading and editing in post-production.
Keep in mind that higher bitrates result in larger file sizes. A one-hour recording at 50 Mbps can easily exceed 20GB of storage.
H.264 vs. HEVC (H.265)
If your hardware supports it, you may have the option to choose between H.264 and HEVC. HEVC offers superior compression, meaning you get better quality at the same bitrate as H.264. However, H.264 remains the most widely compatible format for older video editing software and some social media platforms.
Mastering the In-Game Overlay and Instant Replay
NVIDIA provides two primary modes of capture: Manual Recording and Instant Replay. Both serve different professional and creative needs.
Manual Recording
This is the standard “Start” and “Stop” method. You can trigger this by pressing Alt+F9. It is ideal for scripted content, walkthroughs, or long-form presentations where you know exactly when the action begins and ends.
The Power of Instant Replay
Instant Replay is a revolutionary feature for those who don’t want to record hours of footage just to find one highlight. When enabled, NVIDIA constantly records in the background, keeping a buffer of the last few minutes (adjustable from 15 seconds to 20 minutes) in your system’s temporary memory.
If something incredible happens—a software bug you need to document or a spectacular gaming play—you press Alt+F10, and the last few minutes are saved to your hard drive. Because this uses the NVENC engine, the performance impact of having this “always-on” recording is negligible.
Professional Audio and Multi-Track Management
One of the most powerful features within the NVIDIA capture settings is the ability to separate audio tracks. Navigate to Settings > Audio within the overlay. Here, you can choose to “Separate both tracks.”
This feature places your system sounds (game audio, music, system alerts) on one track and your microphone input on another within the same video file. When you import the file into a video editor like Adobe Premiere Pro or DaVinci Resolve, you can adjust the volume of your voice independently of the background noise. This is an essential workflow for anyone looking to produce high-quality, balanced content.
Advanced Features and AI Integration
As NVIDIA continues to lead in AI development, their recording tools have evolved to include features that were previously only possible with a full production studio.
NVIDIA Broadcast Integration
If you are using an RTX-class GPU, you can integrate NVIDIA Broadcast into your recording workflow. This AI-powered tool can remove background noise from your microphone (like mechanical keyboards or air conditioners) and even provide “Auto Frame” or “Background Removal” for your webcam—all processed in real-time on the GPU’s Tensor cores before the video is even encoded by the NVENC engine.
NVIDIA Ansel and Photo Mode
While not strictly a “screen recording” tool in the traditional sense, NVIDIA Ansel (accessible via Alt+F2 in supported games) allows for “super-resolution” screen captures and 360-degree HDR photos. This is a vital tool for digital artists and tech reviewers who need high-fidelity still images to supplement their video content.
Troubleshooting Common NVIDIA Recording Issues
Even with the best hardware, technical hurdles can arise. Understanding how to troubleshoot these issues is key to a professional workflow.
-
Overlay Not Appearing: Often caused by outdated drivers or conflicts with other overlays (like Steam or Discord). Ensure “Experimental Features” are turned on in the GFE settings, or try a clean reinstallation of the drivers using the Display Driver Uninstaller (DDU) utility.
-
Flickering or Black Screen: This usually occurs when trying to record a game in “Windowed” mode when the “Desktop Capture” privacy setting is turned off. Always ensure you are either in “Fullscreen” mode or have enabled desktop permissions.
-
Low Audio Levels: Check the GFE audio settings to ensure your correct microphone is selected and that the “Volume” and “Boost” sliders are appropriately adjusted. Always perform a 10-second test recording before starting a long session.
-
Missing Recordings: Ensure your “Save To” path is set to a drive with ample space. NVIDIA will automatically stop recording if the destination drive falls below a certain storage threshold.

The Future of Screen Capture
As we move toward a future of 8K displays and ultra-high-refresh-rate monitors, the demand for efficient, hardware-accelerated recording will only grow. NVIDIA’s commitment to the NVENC architecture ensures that creators can stay on the cutting edge without needing a secondary “streaming PC” setup. By mastering the settings, understanding the hardware-software synergy, and utilizing AI-driven enhancements, anyone with an NVIDIA GPU can transform their desktop into a professional-grade production studio.
Whether you are documenting a complex software workflow, preserving a cinematic gaming moment, or creating educational content, NVIDIA’s recording suite offers the power and flexibility required for modern digital excellence. The key lies in the balance between bitrate, resolution, and the intelligent use of the hardware already residing in your PC.
aViewFromTheCave is a participant in the Amazon Services LLC Associates Program, an affiliate advertising program designed to provide a means for sites to earn advertising fees by advertising and linking to Amazon.com. Amazon, the Amazon logo, AmazonSupply, and the AmazonSupply logo are trademarks of Amazon.com, Inc. or its affiliates. As an Amazon Associate we earn affiliate commissions from qualifying purchases.