
In the rapidly evolving landscape of digital finance, peer-to-peer payment applications like Venmo have become indispensable tools for managing everyday transactions. Connecting your bank account to Venmo is the foundational step to unlocking its full potential, enabling seamless transfers, payments, and withdrawals. This guide delves into the technical intricacies, practical steps, and underlying mechanisms involved in securely linking your financial institution to your Venmo profile, ensuring you navigate the process with confidence and clarity.
Understanding Venmo and Its Role in Digital Transactions
At its core, Venmo is more than just a payment app; it’s a social financial platform designed to simplify money transfers between individuals. From splitting restaurant bills to paying rent, Venmo facilitates a vast array of digital transactions through its intuitive mobile interface. Understanding its operational framework and the critical role of a linked bank account is essential for any user.
What is Venmo?
Venmo operates as a mobile-first application, primarily facilitating instant peer-to-peer (P2P) payments within the United States. Developed by PayPal, it leverages a sophisticated backend infrastructure to process transactions securely. Unlike traditional banking transfers that can take days, Venmo aims for near-instantaneous transfers between users, drawing funds from a linked bank account, debit card, credit card, or existing Venmo balance. Its social feed, which displays anonymized transactions, adds a unique dimension, fostering engagement while simplifying the act of paying and getting paid. Technically, Venmo acts as an intermediary, utilizing encrypted channels and API integrations to communicate with financial institutions and execute transactions.
Why Connect a Bank Account?
Connecting your bank account to Venmo is paramount for several critical functionalities:
-
Funding Payments: While you can use a debit or credit card, linking a bank account often allows for fee-free transactions (though credit card transactions typically incur a fee). It serves as a primary source for sending money when your Venmo balance is insufficient.
-
Cashing Out: This is perhaps the most crucial reason. Your Venmo balance, once received, needs a destination to become tangible funds in your personal finances. A linked bank account provides the conduit to transfer your Venmo balance into your checking or savings account. Without it, funds remain within the Venmo ecosystem.
-
Increased Limits: Verified bank accounts generally unlock higher transaction limits for sending and receiving money, expanding the utility of the app for larger transfers.
-
Enhanced Security & Verification: Linking a bank account adds a layer of identity verification, contributing to the overall security posture of your Venmo profile and helping to prevent fraud. It demonstrates a legitimate connection to a regulated financial entity.
Venmo’s Technical Infrastructure for Payments
Venmo employs robust security protocols and advanced technical architectures to safeguard user data and transactions. When you link a bank account, Venmo utilizes secure, encrypted connections, often leveraging third-party aggregation services like Plaid, to establish a secure bridge between your bank and your Venmo account. These services use bank-level encryption and do not store your banking credentials after the initial verification. Transaction data is encrypted both in transit and at rest, and Venmo adheres to industry-standard data security practices, including PCI DSS compliance for card data. The seamless integration relies heavily on Application Programming Interfaces (APIs) that allow Venmo to securely communicate with financial institutions, initiating fund transfers and verifying account ownership without direct access to your banking portal.
Step-by-Step Guide: Linking Your Bank Account to Venmo
The process of connecting a bank account to Venmo is designed to be user-friendly, yet it involves critical steps for security and verification. Following these instructions carefully will ensure a smooth setup.
Initial Setup: Downloading the App and Creating Your Profile
Before linking a bank account, ensure you have the Venmo app installed on your smartphone (available for iOS and Android) and have completed the initial profile setup. This includes:
-
Downloading the App: Search “Venmo” in your device’s app store and download the official application.
-
Signing Up: Open the app and choose to “Sign Up.” You’ll need to provide your phone number, email address, password, legal first and last name, and date of birth. This information is crucial for identity verification and compliance with financial regulations.
-
Verifying Information: Venmo will typically send a verification code to your phone number or email to confirm your contact details.
Navigating to the Bank Linking Section
Once your profile is set up, you’ll need to locate the section for adding payment methods:
-
Open the Venmo App: Log in with your credentials.
-
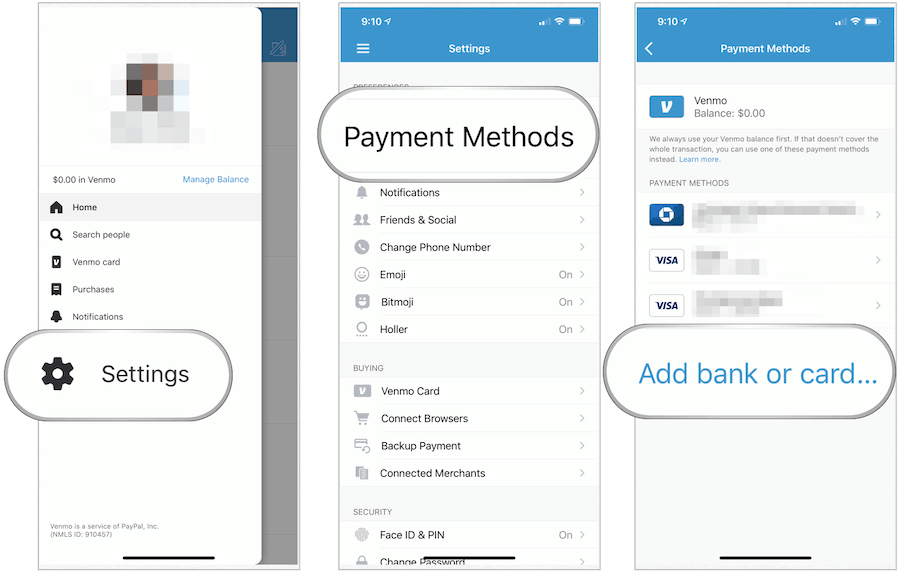
Access the “Me” Tab: Tap the single-person icon (or your profile picture) in the bottom right corner of the screen. This will take you to your personal profile page.
-
Go to Settings: Tap the “Settings” gear icon, usually located in the top right corner.
-
Payment Methods: Within the settings menu, locate and tap “Payment Methods.” Here, you’ll see any existing linked cards or bank accounts, along with an option to add new ones.
-
Add a Bank or Card: Tap on “Add a bank or card” and then select “Bank.”
Choosing Your Verification Method: Instant vs. Manual
Venmo offers two primary methods for bank verification, each with its own technical mechanism and user experience:
-
Instant Verification: This is the faster and more common method, utilizing third-party services like Plaid. It requires you to log in to your bank’s online portal directly through Venmo’s secure interface.
-
Manual Verification (Micro-Deposits): This method involves Venmo sending small, randomized deposits to your bank account, which you then confirm within the app. It’s a slower but equally secure alternative.
Instant Verification via Plaid/Third-Party Services
This method leverages secure aggregation technology:
-
Select Instant Verification: After choosing to add a bank account, opt for the “Instant verification” method.
-
Choose Your Bank: Venmo will present a list of common banks. If your bank is listed, tap on it. If not, you can search for it.
-
Log In to Your Bank: You will be securely redirected to a portal (often powered by Plaid) where you’ll be prompted to enter your online banking username and password. This connection is encrypted and designed to be read-only, meaning Venmo cannot initiate transactions without your explicit approval. The aggregation service securely verifies your account details and ownership.
-
Select Account: If you have multiple accounts with the same bank (e.g., checking and savings), you’ll be asked to select which one you wish to link to Venmo.
-
Confirm: Once successfully logged in and an account is selected, the link is usually established immediately. You’ll receive a confirmation message.
Manual Verification with Micro-Deposits
This method relies on small financial transactions for proof of ownership:
-
Select Manual Verification: If instant verification isn’t an option or you prefer not to share your banking login, choose “Manual verification.”
-
Enter Bank Details: You will be prompted to manually enter your bank’s routing number and your bank account number. Double-check these numbers for accuracy, as an error will cause the verification to fail.
-
Wait for Micro-Deposits: Venmo will initiate two small deposits (typically under $0.10) to your specified bank account. This process usually takes 1-3 business days to appear in your bank statement.
-
Confirm Deposits in Venmo: Once you see these two specific deposit amounts in your bank statement, return to the Venmo app. Go to “Settings” > “Payment Methods,” and tap on the bank account awaiting verification. You will be prompted to enter the exact amounts of the two micro-deposits.
-
Complete Verification: Enter the correct amounts, and your bank account will be successfully linked.
Optimizing Your Venmo Experience: Managing Linked Accounts and Security
Once your bank account is connected, there are several steps you can take to manage your payment methods effectively and enhance the security of your Venmo account.
Adding Multiple Bank Accounts
Venmo allows users to link multiple bank accounts. This can be beneficial for managing funds from different financial institutions or for separating personal and business-related Venmo transactions. The process for adding additional accounts is identical to the initial setup, either through instant or manual verification. Simply navigate back to “Settings” > “Payment Methods” and select “Add a bank or card,” then “Bank.”
Setting a Preferred Payment Method

To streamline your payment process, Venmo allows you to set a default payment method. This means that whenever you initiate a payment, Venmo will attempt to draw funds from your preferred source first.
-
Navigate to Payment Methods: Go to “Settings” > “Payment Methods.”
-
Select a Method: Tap on the bank account or card you wish to set as your default.
-
Set as Preferred: Look for an option like “Set as preferred” or “Make primary” and toggle it on.
You can always manually change the funding source for individual payments before confirming the transaction, overriding your preferred method for a specific instance.
Understanding Transaction Limits and Their Technical Basis
Venmo imposes transaction limits for sending and receiving money, as well as for cashing out to your bank. These limits are technically implemented to comply with financial regulations (like AML/KYC – Anti-Money Laundering/Know Your Customer), manage risk, and prevent fraud.
-
Unverified Accounts: Typically have lower weekly limits.
-
Verified Accounts: Once your identity (name, DOB, SSN/ITIN) and bank account are fully verified, your weekly limits significantly increase.
-
Instant vs. Standard Transfers: Different limits may apply based on the speed of transfer. Instant Transfers, which move money to your bank account within minutes for a small fee, often have their own specific limits.
These limits are dynamically enforced by Venmo’s backend systems based on your verification status and account history. Attempting to exceed a limit will trigger a system rejection or a prompt for further verification.
Enhancing Security: Two-Factor Authentication and PINs
Digital security is paramount for financial apps. Venmo offers several features to protect your account:
-
Two-Factor Authentication (2FA): This is a critical security layer. When enabled, every time you log in from an unrecognized device or perform certain sensitive actions, Venmo sends a verification code to your registered phone number or email address. This ensures that even if someone has your password, they cannot access your account without your second factor. You can typically enable 2FA in “Settings” > “Security.”
-
PIN or Biometric Lock: You can set up a PIN code, fingerprint ID (Touch ID), or facial recognition (Face ID) to open the Venmo app or authorize payments. This protects your account if your phone falls into the wrong hands. This feature can be found in “Settings” > “Security.”
These technical safeguards are essential for protecting your financial data and preventing unauthorized access to your funds.
Troubleshooting Common Connection Issues
Despite Venmo’s robust system, users may occasionally encounter issues when connecting or using their linked bank accounts. Understanding common problems and their technical remedies can save time and frustration.
Error Messages During Instant Verification
-
Incorrect Login Credentials: The most frequent cause. Double-check your online banking username and password. Remember these are your bank’s credentials, not your Venmo login.
-
Temporary Bank Issues: Your bank’s online portal or its integration with the aggregation service (like Plaid) might be experiencing temporary downtime or maintenance. Try again after some time.
-
Security Blocks: Some banks have enhanced security features that might flag third-party logins. You might need to confirm the login attempt through your bank’s app or website directly, or even contact your bank’s support.
-
Internet Connectivity: A poor or unstable internet connection can interrupt the secure login process. Ensure you have a strong Wi-Fi or cellular data signal.
Delays in Micro-Deposits
If you chose manual verification, micro-deposits can sometimes take longer than expected:
-
Business Days: Remember that “1-3 business days” excludes weekends and bank holidays. If you initiated the process on a Friday, you might not see the deposits until Tuesday or Wednesday.
-
Bank Processing Times: Different banks have varying processing speeds. Some show deposits faster than others.
-
Incorrect Account Numbers: If the routing or account number was entered incorrectly, the deposits might fail to reach your account, or might be sent to a non-existent account. Double-check the numbers used.
Account Discrepancies and Mismatches
-
Name Mismatch: Your name on Venmo must exactly match the name on your bank account for verification to succeed. Even minor differences can cause issues.
-
Account Type: Ensure you’re linking a checking or savings account. Certain types of accounts (e.g., business accounts, credit lines) may not be compatible or require specific handling.
-
Previously Linked Account: If the bank account was previously linked to another Venmo profile or encountered issues, there might be system flags preventing a new link.
Contacting Venmo Support for Technical Assistance
If you’ve exhausted all troubleshooting steps and are still facing issues, it’s time to contact Venmo’s technical support team:
-
In-App Support: The easiest way is often through the app itself: “Settings” > “Help” or “Contact Us.” This allows them to tie your query directly to your account.
-
Website Support: Venmo’s website provides a comprehensive help center and options to submit a support ticket.
-
Phone Support: For urgent issues, phone support might be available during specific hours.
When contacting support, be prepared to provide details such as the exact error message, steps you’ve already taken, and the specific bank account in question. This will help their technical team diagnose the problem more efficiently.
The Future of Digital Payments and Venmo’s Evolution
The landscape of digital payments is in constant flux, driven by technological innovation and evolving consumer demands. Venmo, as a significant player, is continually adapting and expanding its capabilities.
Integration with Other Fintech Tools
Venmo’s success hinges on its ability to integrate seamlessly within the broader financial technology ecosystem. Expect to see further integrations with e-commerce platforms, budgeting apps, and other financial management tools. These integrations often leverage secure APIs, allowing Venmo to become a more central hub for users’ digital financial lives, enabling easier tracking of spending, automated bill payments, and potentially even direct investment functionalities. The technical challenge lies in maintaining robust security and user privacy across these interconnected platforms.
Emerging Payment Technologies
The future of payments extends beyond traditional bank accounts. Technologies like Near Field Communication (NFC) for tap-to-pay, QR code payments, and even nascent forms of cryptocurrency integration could become part of Venmo’s offering. The shift towards real-time payment systems (like FedNow in the US) will also push Venmo to enhance its instant transfer capabilities, potentially reducing or eliminating fees for quick bank transfers. Technically, this requires significant backend development, system upgrades, and adherence to new regulatory frameworks.

Data Privacy and User Trust in Digital Transactions
As digital transactions become more ubiquitous, the importance of data privacy and maintaining user trust escalates. Venmo, like all fintech companies, faces the ongoing challenge of balancing convenience with stringent data protection. This involves continuous investment in advanced encryption, fraud detection algorithms (leveraging AI and machine learning), and transparent data handling policies. Users expect their financial and personal data to be safeguarded with the highest technical standards, making robust cybersecurity a perpetual priority for platforms like Venmo.
In conclusion, connecting your bank account to Venmo is a straightforward process powered by sophisticated technical integrations and security protocols. By understanding the underlying mechanisms and adhering to best practices for account management and security, users can leverage Venmo effectively for their digital payment needs, confidently participating in the evolving world of fintech.
aViewFromTheCave is a participant in the Amazon Services LLC Associates Program, an affiliate advertising program designed to provide a means for sites to earn advertising fees by advertising and linking to Amazon.com. Amazon, the Amazon logo, AmazonSupply, and the AmazonSupply logo are trademarks of Amazon.com, Inc. or its affiliates. As an Amazon Associate we earn affiliate commissions from qualifying purchases.