
In an increasingly digital world, the way we exchange money has evolved dramatically. Gone are the days when cash and checks were the sole methods for peer-to-peer transactions. Today, mobile payment applications have revolutionized this landscape, offering unparalleled convenience and speed. Among these, Venmo stands out as a dominant player, known for its user-friendly interface and integrated social features. Whether you’re splitting a dinner bill, collecting money for a group gift, or receiving payment for a side hustle, understanding how to efficiently receive funds through Venmo is an essential skill for modern financial management.

This comprehensive guide will walk you through everything you need to know about receiving Venmo payments. From setting up your account and understanding the core mechanics of transactions to managing your received funds and optimizing your experience for security and efficiency, we’ll ensure you’re well-equipped to navigate the world of digital payments with confidence.
Understanding Venmo: Your Gateway to Seamless Payments
Before diving into the specifics of receiving payments, it’s crucial to have a foundational understanding of what Venmo is and how it functions as a financial tool.
What is Venmo and How Does it Work?
Venmo is a popular peer-to-peer (P2P) mobile payment service owned by PayPal. It allows individuals to send and receive money from friends, family, and even certain businesses quickly and easily using a smartphone app. The core principle of Venmo is to simplify money transfers, making them as effortless as sending a text message.
When you receive money on Venmo, it doesn’t immediately appear in your bank account. Instead, the funds are first deposited into your Venmo balance, which acts like a digital wallet within the app. From this balance, you have several options: you can use the funds to make new payments to others, spend them using a Venmo Debit Card (if you have one), or transfer them to a linked bank account. The service’s appeal lies in its speed – most P2P transactions are instantaneous within the Venmo ecosystem – and its social feed, which displays anonymized or public transaction details (depending on user settings), adding a unique community aspect to personal finance.
Setting Up Your Venmo Account
To receive payments, you must first have an active and properly configured Venmo account. The setup process is straightforward:
-
Download the App: Begin by downloading the Venmo app from your smartphone’s app store (iOS or Android).
-
Create an Account: You’ll be prompted to sign up using your email address, phone number, or Facebook account. Choose a secure password.
-
Verify Your Identity: This is a crucial step for accessing Venmo’s full functionality, especially for higher transaction limits and bank transfers. Venmo may require you to provide personal information such as your full legal name, date of birth, mailing address, and the last four digits of your Social Security Number (SSN). This verification process helps Venmo comply with financial regulations and enhance security.
-
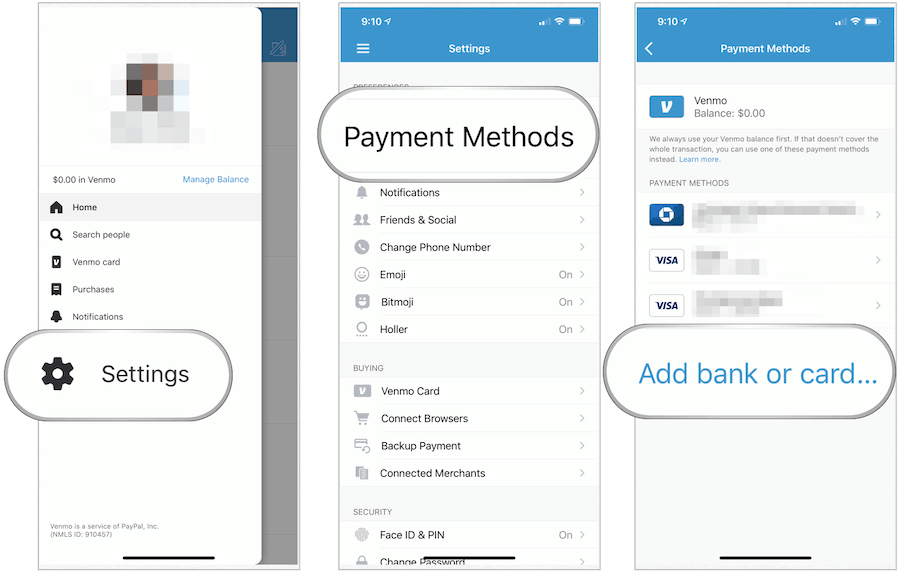
Link a Bank Account or Debit Card: While you don’t need to link a funding source to receive money, you will need one to transfer your Venmo balance to your personal bank account. Go to “Settings” > “Payment Methods” and add your bank account (via instant verification or manual entry) or a debit card. This step is essential for accessing the funds you receive.
The Essentials of Receiving Money on Venmo
Once your account is set up, receiving money is incredibly simple. There are typically two primary ways you’ll receive payments: by sending a request or by someone sending money directly to you.
Requesting Money from Others
If you’re owed money, the most proactive way to receive it is to send a “request” via Venmo. This feature is particularly useful for splitting bills, collecting contributions, or reminding someone of a payment.
-
Tap the Pay/Request Button: In the Venmo app, locate and tap the “Pay/Request” button (usually a blue icon with a pen and paper or a dollar sign).
-
Select “Request”: Toggle to the “Request” option.
-
Enter Sender Details: You can search for the person you want to request money from by their Venmo username, phone number, or email address. You can also select them from your list of Venmo friends.
-
Enter the Amount: Input the exact amount you are requesting.
-
Add a Note: This is important for clarity and record-keeping. Briefly describe the purpose of the payment (e.g., “Dinner last night,” “Share of rent,” “Project payment”). You can also add emojis for a more casual touch.
-
Tap “Request”: Once confirmed, the request will be sent. The recipient will receive a notification and can easily approve the payment from their end.
Being Paid Directly
Often, someone will initiate a payment to you without a prior request. This happens when they owe you money and decide to send it via Venmo.
-
Sender Initiates Payment: The sender uses their Venmo app to “Pay” you by searching for your username, phone number, or email.
-
Automatic Receipt: As soon as they send the payment, the funds will instantly appear in your Venmo balance.
-
Notifications: You’ll receive a push notification from the Venmo app (if enabled), an email, and an in-app alert confirming the incoming payment. The payment will also be visible in your personal Venmo feed and transaction history.
Understanding Transaction Limits and Fees
For most personal use, receiving money on Venmo is free. There are no fees charged to the recipient for standard P2P payments. However, it’s important to be aware of certain limits and fees that might apply in specific scenarios:
-
Weekly Spending/Sending Limits: While Venmo doesn’t typically impose a limit on how much money you can receive, there are limits on how much you can send and spend using your Venmo balance. Unverified accounts have lower limits than verified accounts.
-
Instant Transfer Fees: While standard transfers from your Venmo balance to your bank account are free (but take 1-3 business days), choosing an “Instant Transfer” incurs a fee. This fee is typically 1.75% of the amount transferred, with a minimum fee of $0.25 and a maximum fee of $25.00.
-
Business Profile Fees: If you’re receiving payments for goods or services as a business, or if the sender marks the payment as a “goods and services” transaction, Venmo applies seller transaction fees. It’s crucial for businesses to use a Venmo Business Profile to correctly classify these payments and adhere to Venmo’s terms of service, which help protect both buyers and sellers.
Managing Your Received Funds: Accessing Your Money
Once funds land in your Venmo balance, you have several ways to utilize them. Understanding these options is key to efficient financial management.
Your Venmo Balance: The Digital Wallet
Your Venmo balance serves as your primary holding account for all received funds. When someone pays you, the money immediately shows up here. You can view your current balance at the top of your Venmo app screen.
From your Venmo balance, you can:
-
Make Future Payments: Use the funds to pay other Venmo users or businesses that accept Venmo.
-
Shop Online: Many online retailers now accept Venmo as a payment method at checkout.
-
Use the Venmo Debit Card: If you have opted for a Venmo Debit Card, you can spend your Venmo balance anywhere Mastercard is accepted, essentially treating your Venmo balance like a bank account.
Transferring Funds to Your Bank Account
For many, the ultimate goal after receiving money is to move it into their traditional bank account. Venmo offers two main transfer options:
-
Standard Transfer (Free): This option typically takes 1 to 3 business days for the funds to appear in your linked bank account. It’s free of charge and suitable if you’re not in a hurry to access the money. To initiate:
-
Go to the “Me” tab in the app.
-
Tap “Transfer Money.”
-
Enter the amount you wish to transfer.
-
Select your linked bank account.
-
Choose “Standard Transfer.”
-
Confirm the transfer.
-
-
Instant Transfer (Fee-Based): If you need immediate access to your funds, Venmo offers an instant transfer option. For a fee (1.75%, min $0.25, max $25.00), the money can be transferred to your linked debit card or eligible bank account within minutes, often in under 30 minutes. To initiate:
-
Follow the same steps as a standard transfer.
-
When choosing the transfer method, select “Instant Transfer.”
-
Review the fee and confirm.
-
Understanding Payment Processing Times
It’s important to distinguish between when funds appear in your Venmo balance and when they become available in your bank account.
-
Venmo Balance: Funds appear here instantly upon being sent.
-
Bank Account (Standard Transfer): These transfers are processed during banking hours. If initiated on a weekend or holiday, the 1-3 business day countdown begins on the next business day. Bank processing times can also vary slightly.
-
Bank Account (Instant Transfer): While typically very fast, unforeseen issues with your bank or Venmo’s system could rarely cause delays. Always double-check your bank statement for confirmation.
Optimizing Your Venmo Experience for Security and Efficiency
Receiving payments efficiently also involves ensuring your account is secure and that you’re using Venmo’s features to their fullest potential.
Privacy Settings and Visibility
Venmo has a unique social feed aspect, and by default, many transactions are public. You can adjust your privacy settings for each transaction or set a default privacy level:
-
Public: Anyone on Venmo can see the transaction (amount is always hidden).
-
Friends: Only your Venmo friends can see the transaction.
-
Private: Only you and the sender/recipient can see the transaction.
For personal financial transactions, especially those involving sensitive details or larger sums, setting transactions to “Private” or “Friends” is often a wise choice. You can change your default privacy setting in “Settings” > “Privacy.”
Verifying Your Account for Higher Limits
As mentioned, verifying your identity is crucial. It not only unlocks higher sending and spending limits but also significantly increases your ability to transfer larger sums out of your Venmo balance to your bank account. This verification helps protect you and Venmo from fraud and complies with financial regulations.
Best Practices for Secure Receiving
Even with Venmo’s security measures, users play a vital role in protecting their funds:
-
Double-Check Sender Details: Always ensure the person sending you money is who they claim to be. Verify their username, profile picture, or the last four digits of their phone number.
-
Beware of Scams: Be cautious of payments from unknown individuals or “overpayment” scams where someone sends you more money than owed and asks you to refund the difference. These are often fraudulent, and the original payment can be reversed, leaving you out of pocket.
-
Strong Passwords and 2FA: Use a unique, strong password for your Venmo account and enable two-factor authentication (2FA) for an added layer of security.
-
Monitor Notifications: Pay attention to Venmo’s notifications to stay informed about incoming payments and account activity.
Business Profiles vs. Personal Accounts
If you are receiving payments for goods or services, even on a small scale, it’s highly recommended to set up a Venmo Business Profile. Using a personal profile for commercial transactions violates Venmo’s terms of service and can lead to account limitations or closure. Business Profiles come with seller protection, proper tax documentation, and clear transaction fees, making it a more legitimate and secure way to conduct business.
Troubleshooting and Common Scenarios
Despite its ease of use, you might occasionally encounter situations that require troubleshooting.
What If a Payment Doesn’t Arrive?
If you’re expecting a payment and it hasn’t appeared in your Venmo balance:
-
Check Your Notifications and Transaction History: First, confirm there’s no notification of a received payment or an entry in your transaction history.
-
Contact the Sender: The most common reason is that the sender either hasn’t sent it yet or made a typo in your username, phone number, or email. Ask them to verify the recipient details and check their own transaction history.
-
Confirm Account Status: Ensure your Venmo account is active and not experiencing any limitations.
-
Contact Venmo Support: If you’ve exhausted the above steps, reach out to Venmo’s customer support for assistance.
Dealing with Payment Disputes or Mistakes
Accidental payments or disputes can happen:
-
Accidental Payments: If someone accidentally sends you money, the easiest solution is for them to request it back. You can then approve the request. Venmo’s P2P payments are generally final, meaning Venmo cannot unilaterally reverse a payment unless it’s an unauthorized transaction or fraud.
-
Disputes: For legitimate disputes (e.g., you received payment for something you didn’t deliver), direct communication with the sender is key. If you’re using a Business Profile, Venmo offers some dispute resolution mechanisms, but for personal payments, it’s primarily between the users.
When Your Account is Frozen or Limited
Venmo may freeze or limit accounts for various reasons, including suspected fraudulent activity, unverified identity, or violations of their terms of service. If this happens, you’ll usually receive an email or in-app notification from Venmo explaining the issue and the steps required to resolve it, which often involves providing additional verification documents.

Conclusion
Venmo has undeniably streamlined the process of sending and receiving money, making it an indispensable tool for personal finance in the digital age. By understanding how to properly set up your account, utilize its features for requesting and receiving payments, manage your funds efficiently, and uphold best practices for security, you can harness the full power of Venmo. Embracing these insights ensures that receiving money, whether for personal expenses or small business endeavors, remains a seamless, secure, and stress-free experience, allowing you to manage your digital finances with confidence and ease.
aViewFromTheCave is a participant in the Amazon Services LLC Associates Program, an affiliate advertising program designed to provide a means for sites to earn advertising fees by advertising and linking to Amazon.com. Amazon, the Amazon logo, AmazonSupply, and the AmazonSupply logo are trademarks of Amazon.com, Inc. or its affiliates. As an Amazon Associate we earn affiliate commissions from qualifying purchases.