
In an increasingly digital world, managing personal finances often involves navigating a myriad of online tools and applications designed to simplify transactions, budgeting, and wealth management. Among these, Cash App stands out as a prominent mobile payment service, offering a straightforward platform for sending, receiving, and investing money. For many, the initial hurdle isn’t understanding its potential, but rather the fundamental step: how to efficiently fund, or “upload money,” to their Cash App account. This article delves into the practical aspects of funding your Cash App, anchoring its discussion firmly within the realm of personal finance and the utilization of modern financial tools.

Understanding Cash App and Its Core Functionality
Before diving into the mechanics of uploading funds, it’s essential to grasp what Cash App is and why it has become such a popular financial instrument. Developed by Block, Inc. (formerly Square, Inc.), Cash App provides a seamless way for individuals to manage their money directly from their smartphone. Its user-friendly interface and robust features have made it a go-to choice for millions looking for a convenient alternative to traditional banking services for specific tasks.
What is Cash App?
At its core, Cash App functions as a mobile payment service, enabling peer-to-peer money transfers with remarkable ease. Users can send and receive money to and from friends, family, and even businesses with just a few taps. Beyond its primary P2P function, Cash App has evolved into a comprehensive financial tool, offering features like direct deposit for paychecks, the ability to purchase stocks and Bitcoin, and the Cash Card—a customizable Visa debit card linked directly to your Cash App balance, allowing you to spend funds wherever Visa is accepted. This integration of various financial services into a single app underscores its utility as a modern personal finance manager.
Why Use Cash App for Money Transfers?
The allure of Cash App lies in its unparalleled convenience and speed. Traditional bank transfers can sometimes take days to clear, especially between different institutions. Cash App, however, often facilitates instant transfers, making it ideal for splitting bills with friends, repaying small debts, or even receiving urgent payments. Furthermore, its simplicity reduces the friction typically associated with financial transactions. The absence of monthly fees for basic services, coupled with incentives like “Cash Boosts” (instant discounts at various merchants when using the Cash Card), adds tangible value, making it an attractive option for managing day-to-day liquidity and small-scale investments. For individuals navigating a busy financial landscape, Cash App provides a practical solution for quick, efficient, and often free money movement.
Essential Methods for Uploading Funds to Cash App
Funding your Cash App account is a critical step to unlock its full potential. Whether you’re planning to send money, make a purchase with your Cash Card, or invest, your account needs a positive balance. Cash App offers several flexible methods to add money, catering to different financial situations and preferences. Understanding each method’s nuances is key to choosing the most efficient and cost-effective approach for your personal finance strategy.
Linking a Bank Account (Debit Card)
The primary and most common method for uploading money to Cash App is by linking a debit card associated with your bank account. This direct connection allows for seamless transfers from your traditional bank account to your Cash App balance. The process typically involves entering your debit card details (card number, expiration date, CVV) into the app. Once linked, you can initiate transfers, often referred to as “cashing in,” directly from your bank to your Cash App. This method is generally free for standard transfers, though instant transfers might incur a small fee. From a personal finance perspective, linking a debit card offers the most direct and least costly way to manage your Cash App funds, making it the recommended default for most users.
Using a Credit Card (with caveats)
While Cash App does permit linking a credit card, it’s important to understand the financial implications. Unlike debit card transfers, adding money to your Cash App balance using a linked credit card typically incurs a 3% fee. This fee is standard across many payment apps for credit card transactions, as it covers the processing costs charged by credit card networks. For users focused on optimizing their personal finance, this 3% fee can quickly add up, especially for larger or frequent transfers. Therefore, while credit cards offer a convenient backup option, they are generally not recommended for regular funding due due to the additional cost. It’s crucial to weigh the convenience against the cost, especially if you are on a tight budget or trying to minimize transaction fees.
Direct Deposit
For users who receive regular income, Cash App’s direct deposit feature presents an excellent opportunity to manage finances more holistically through the app. By setting up direct deposit, you can have a portion or your entire paycheck, government benefits, or tax refunds deposited directly into your Cash App account. This feature assigns you a unique account and routing number, similar to a traditional bank account, which you can provide to your employer or benefit provider. Direct deposit is not only free but also often allows access to funds up to two days earlier than many traditional banks. For those seeking to consolidate their financial activities and benefit from quicker access to funds, utilizing direct deposit can be a significant advantage in personal financial management.
Depositing Paper Money at Retailers
Recognizing that not all financial transactions are purely digital, Cash App has also introduced a convenient option for depositing physical cash. Users can deposit paper money directly into their Cash App account at participating retail locations, such as Walgreens, CVS, Dollar General, and Walmart. This process typically involves generating a barcode within the Cash App, presenting it to a cashier, and handing over the cash. The funds are usually reflected in your Cash App balance almost instantly. This method bridges the gap between traditional cash transactions and digital finance, offering flexibility for individuals who primarily deal in cash or wish to convert physical currency into their digital wallet without needing a bank account. It’s a valuable feature for financial inclusivity and expanding access to digital payment systems.
Step-by-Step Guide: Funding Your Cash App Account
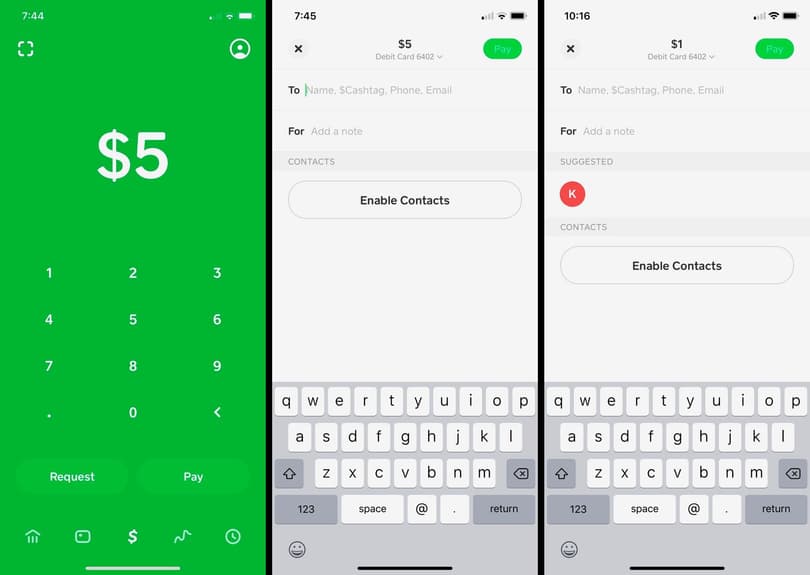
Successfully funding your Cash App account requires a clear understanding of the application’s interface and the specific steps involved for each method. This section provides a practical, step-by-step guide to ensure a smooth and efficient money upload process, empowering you to take full control of your digital wallet.
Adding Funds from a Linked Bank Account
This is the most straightforward and frequently used method for adding money to your Cash App.
-
Open Cash App: Launch the Cash App on your mobile device.
-
Navigate to the Banking Tab: Tap the “Banking” tab, which is usually represented by a house icon or dollar sign icon at the bottom left of the screen.
-
Select “Add Cash”: Under your Cash App balance, you will see an option labeled “Add Cash.” Tap on this.
-
Enter Amount: Input the desired amount of money you wish to add to your Cash App balance. You can choose from preset amounts or enter a custom figure.
-
Confirm Transaction: Review the amount and the linked debit card (or bank account) from which the funds will be drawn. Tap “Add” to confirm.
-
Verify (if prompted): For security purposes, you might be asked to enter your PIN or use Touch ID/Face ID to authorize the transaction.
The funds should appear in your Cash App balance almost instantly, ready for use. This direct linkage and immediate transfer capability highlight Cash App’s efficiency as a personal finance tool.
Initiating Direct Deposit
Setting up direct deposit requires a one-time configuration and then automatic deposits for future paychecks or benefits.
-
Open Cash App: Launch the application.
-
Navigate to the Banking Tab: Go to the “Banking” tab (house or dollar sign icon).
-
Find “Direct Deposit”: Scroll down until you see the “Direct Deposit” option. Tap on it.
-
Get Account & Routing Numbers: Cash App will provide you with unique account and routing numbers. These are the details you’ll need to share with your employer or benefits provider.
-
Share Information with Payer: Provide these Cash App direct deposit details to your employer’s payroll department or the relevant agency. They will typically have a form that requires this information. You can choose to deposit your entire check or a portion of it.
-
Verify Setup: Once your employer processes the change, your next paycheck or benefit payment should be deposited directly into your Cash App account. You will receive a notification when the deposit occurs, often earlier than traditional banking systems.
This method transforms Cash App into a primary account for receiving income, simplifying financial management by centralizing funds within the app.
Depositing Cash at a Store
For those who prefer or need to handle physical currency, Cash App offers a convenient retail deposit option.
-
Open Cash App: Launch the application.
-
Navigate to the Banking Tab: Tap the “Banking” tab (house or dollar sign icon).
-
Select “Paper Money”: Scroll down and look for the “Paper Money” or “Deposit Paper Money” option.
-
Find a Deposit Location: Cash App will display a map or list of nearby participating retailers where you can deposit cash. Select a convenient location.
-
Generate Barcode: Follow the in-app instructions to generate a unique barcode. This barcode is valid for a limited time.
-
Visit Retailer: Go to the selected store and present the barcode to the cashier. Inform them you wish to make a Cash App deposit.
-
Hand Over Cash: Give the cashier the exact amount of cash you wish to deposit. There may be minimum and maximum deposit limits, so check these within the app.
-
Confirm Deposit: The cashier will scan the barcode and process the transaction. You will receive a digital receipt within the app, and the funds should instantly reflect in your Cash App balance.
This method is particularly useful for freelancers, small business owners, or anyone receiving cash payments who wants to convert them into digital funds efficiently.
Managing Your Funds: Best Practices and Security
While the convenience of uploading money to Cash App is undeniable, responsible financial management and robust security practices are paramount. Understanding transaction limits, potential fees, and how to protect your account are crucial components of an insightful personal finance strategy when utilizing digital payment platforms.
Transaction Limits and Fees
Every financial tool comes with its own set of rules, and Cash App is no exception.
-
Adding Funds: While linking a debit card for standard transfers is free, instant transfers from your bank may incur a small fee (typically 0.5% to 1.75%, with a minimum fee). Depositing cash at retailers is generally free, but always confirm with the specific retailer. As previously mentioned, adding funds via a linked credit card carries a 3% fee.
-
Sending Limits: Cash App imposes limits on how much money you can send and receive. Unverified accounts typically have lower limits (e.g., sending $250 per week and receiving $1,000 per month). Verifying your identity (by providing your full name, date of birth, and the last four digits of your Social Security Number) significantly increases these limits, often allowing you to send up to $7,500 per week and receive unlimited amounts. Verifying your account is a smart financial move for regular users.
-
ATM Withdrawals: If you use your Cash Card to withdraw cash from an ATM, fees may apply, both from Cash App (if it’s not a free ATM withdrawal based on direct deposit activity) and from the ATM operator itself. Always be aware of these potential costs when managing your liquidity.
Understanding these limits and fees allows you to budget effectively and avoid unexpected charges, ensuring that Cash App remains a cost-effective part of your financial toolkit.
Security Measures and Fraud Prevention
Digital convenience must always be balanced with robust security. Cash App employs several features to protect your funds, but user vigilance is equally important.
-
PIN/Touch ID/Face ID: Always enable a PIN, Touch ID, or Face ID for transactions within the app. This adds a crucial layer of security, preventing unauthorized access if your phone is lost or stolen.
-
Two-Factor Authentication (2FA): Enable 2FA for your Cash App account. This requires a second verification step (like a code sent to your phone) in addition to your password, significantly enhancing security against unauthorized logins.
-
Beware of Scams: Be highly suspicious of unsolicited requests for money or personal information, especially those promising large returns or asking you to “verify” your account. Cash App will never ask for your login credentials via email, phone, or social media. Always verify the identity of the recipient before sending money, as Cash App transactions are often instant and irreversible. Common scams include “cash flipping,” fake customer support, and romance scams.
-
Phishing Attempts: Be cautious of phishing emails or texts that appear to be from Cash App but ask for your login details or personal information. Always check the sender’s email address and look for inconsistencies.
-
Report Suspicious Activity: If you notice any unauthorized transactions or suspicious activity on your account, immediately contact Cash App support through the official app or website.
Prioritizing these security measures is not just about protecting your Cash App balance; it’s a fundamental principle of modern personal finance in the digital age.

Troubleshooting Common Issues
Even with the best preparation, issues can arise. Knowing how to troubleshoot common funding problems can save time and frustration.
-
“Add Cash” Option Missing or Grayed Out: This often indicates an issue with your linked bank account or debit card. Ensure your card is active, not expired, and has sufficient funds. You might need to re-link your card or try a different one.
-
Transaction Declined: A declined transaction can occur for several reasons: insufficient funds in the linked bank account, incorrect card details, bank’s fraud detection flagging the transaction, or exceeding Cash App’s daily limits. Check your bank statement, verify card details, and contact your bank or Cash App support if the issue persists.
-
Funds Not Appearing: While most Cash App transactions are instant, occasional delays can occur due to network issues or bank processing times. Wait a few minutes and refresh the app. If funds still don’t appear after a reasonable period (e.g., an hour), check your bank statement to see if the money was debited, and then contact Cash App support.
-
Direct Deposit Issues: If your direct deposit isn’t coming through, double-check that you provided the correct Cash App account and routing numbers to your employer. Also, confirm with your employer’s payroll department that the direct deposit has been set up correctly and processed.
Proactive troubleshooting and familiarity with Cash App’s support resources are crucial for maintaining seamless financial operations.
In conclusion, uploading money to Cash App is a straightforward process, offering multiple avenues to suit various financial needs. By understanding the different methods, following step-by-step guides, and adhering to best practices in security and fund management, users can effectively leverage Cash App as a powerful tool in their personal finance arsenal. Whether it’s for daily transactions, receiving income, or managing cash, Cash App simplifies the movement of money, empowering individuals to navigate the digital financial landscape with confidence and control.
aViewFromTheCave is a participant in the Amazon Services LLC Associates Program, an affiliate advertising program designed to provide a means for sites to earn advertising fees by advertising and linking to Amazon.com. Amazon, the Amazon logo, AmazonSupply, and the AmazonSupply logo are trademarks of Amazon.com, Inc. or its affiliates. As an Amazon Associate we earn affiliate commissions from qualifying purchases.