
The world of computing is vast and varied, often leading users down different paths dictated by their operating system choices. While Windows has historically dominated the desktop landscape, Linux distributions like Ubuntu have carved out a significant niche, lauded for their stability, security, and open-source philosophy. However, a common dilemma arises for Ubuntu users: what about those essential Windows-only applications and games? This is where Wine steps in, not as an emulator, but as a compatibility layer that bridges the gap, allowing Windows software to run seamlessly on your Linux machine.
Installing Wine on Ubuntu is a foundational skill for many Linux enthusiasts, opening up a world of possibilities previously confined to proprietary systems. This comprehensive guide will walk you through the process, from understanding Wine’s role to advanced configurations, ensuring a professional, insightful, and engaging journey into cross-platform software utilization.
Understanding Wine and Its Role in Ubuntu
Before diving into the installation specifics, it’s crucial to grasp what Wine is, what it isn’t, and why it holds such significance for Ubuntu users. A clear understanding will demystify the process and highlight the power it brings to your Linux environment.
What is Wine? Dispelling Misconceptions
The name “Wine” is a recursive acronym for “Wine Is Not an Emulator.” This distinction is vital. Unlike an emulator, which simulates an entire operating system (like running a virtual Windows machine), Wine operates as a compatibility layer. It translates Windows API calls into POSIX calls on the fly, allowing Windows applications to “think” they are running on their native OS, while actually executing directly on Linux. This fundamental difference means Wine often provides better performance than full virtualization for many applications, as it doesn’t incur the overhead of running a separate operating system.
Wine’s core function is to provide an open-source implementation of the Windows API on top of X and UNIX. It provides a software library called Winelib, which developers can compile their Windows applications against to port them to Linux, and a program loader that allows unmodified Windows binaries to run directly on many UNIX-like operating systems.
Why Use Wine on Ubuntu? Bridging the Software Gap
The primary motivation for installing Wine on Ubuntu is to access Windows-specific software that lacks native Linux versions. This encompasses a wide array of applications, including:
-
Productivity Suites: While LibreOffice is excellent, some users might still rely on specific features or file formats from Microsoft Office versions not available natively on Linux.
-
Legacy Software: Many older, critical business applications or personal tools might only exist for Windows and are no longer actively developed for other platforms.
-
Gaming: This is perhaps one of the most significant drivers for Wine usage. While Steam and Proton (which uses Wine under the hood) have vastly improved Linux gaming, there are still countless older titles and specific game launchers that require Wine to function.
-
Specialized Software: Niche industry-specific tools, design applications, or scientific software often remain Windows-exclusive due to limited market demand for Linux versions.
By using Wine, Ubuntu users avoid the need for dual-booting, which requires partitioning hard drives and rebooting, or the resource-intensive nature of full virtualization. It offers a convenient, often high-performance, solution for integrating Windows applications into a Linux workflow.
The Evolution of Wine: Stable, Staging, and Development
Wine comes in different versions, each catering to distinct user needs and development phases:
-
Stable: This is the recommended version for most users. It has undergone extensive testing and provides the most reliable experience. While it might not have the absolute latest features, its stability minimizes crashes and compatibility issues.
-
Staging: This version includes backported patches and experimental features that are still undergoing testing. It offers improvements over the stable branch, often with better support for newer applications and games, but might introduce occasional bugs. It’s suitable for users who want to try newer features and are comfortable with potential minor instabilities.
-
Development: This branch represents the bleeding edge of Wine development. It includes the very latest code, often with daily updates. It’s primarily for developers and advanced users who want to contribute to Wine or test new functionalities immediately. It’s generally not recommended for daily use due to potential instability.
Understanding these branches helps you choose the right installation path based on your requirements for stability versus cutting-edge compatibility.
Pre-Installation Preparations for Wine
A smooth Wine installation process begins with proper preparation. Taking a few proactive steps can prevent common issues and ensure that Wine runs optimally on your Ubuntu system. These preparations involve system updates, checking architecture, and considering best practices for a clean setup.
System Requirements and Best Practices
While Wine is relatively lightweight, ensuring your system meets basic requirements and following best practices can significantly enhance your experience:
-
Sufficient Disk Space: Windows applications, especially games, can be large. Ensure you have ample free disk space for Wine itself and the applications you plan to install.
-
RAM: While not a strict requirement, more RAM (8GB or more) will generally lead to better performance, especially when running resource-intensive Windows applications.
-
Graphics Drivers: For gaming and graphics-intensive applications, having up-to-date and correctly configured graphics drivers (NVIDIA, AMD, Intel) is crucial. Outdated or generic drivers are a common source of performance problems in Wine.
-
64-bit Ubuntu: Modern Ubuntu installations are typically 64-bit. Wine on a 64-bit system can run both 64-bit and 32-bit Windows applications. It’s important to enable 32-bit architecture support on a 64-bit system, which we’ll cover in the installation steps.
Following these practices sets a solid foundation for your Wine environment.
Updating Your System: A Crucial First Step
Before installing any new software, especially one as foundational as Wine, it’s paramount to update your Ubuntu system. This ensures you have the latest packages, security patches, and dependencies, which can prevent conflicts and provide a more stable environment for Wine.
Open a terminal (Ctrl+Alt+T) and execute the following commands:
sudo apt update

sudo apt upgrade

sudo apt autoremove
-
sudo apt update: Refreshes the list of available packages from your repositories. -
sudo apt upgrade: Installs the latest versions of all installed packages. -
sudo apt autoremove: Removes any automatically installed packages that are no longer needed by other applications.
Performing these updates ensures that Wine installs against the most current system libraries, minimizing potential compatibility issues.
Enabling 32-bit Architecture Support
Many Windows applications, especially older ones, are 32-bit. Even on a 64-bit Ubuntu system, Wine needs explicit support for 32-bit architecture to run these applications. This is a common step and must be done before adding the Wine repository or installing Wine.
In the terminal, run the following command:
sudo dpkg --add-architecture i386
This command adds the i386 (32-bit) architecture to your system’s dpkg package management system. After adding the architecture, it’s good practice to update your package lists again to incorporate the changes:
sudo apt update
With these preparatory steps completed, your Ubuntu system is now ready for a smooth Wine installation.
Step-by-Step Installation Guide for Wine on Ubuntu
With your system prepped, the next phase involves adding the Wine official repository and installing your preferred Wine version. This section will guide you through the commands necessary to get Wine up and running on your Ubuntu machine.
Adding the Wine Repository to Ubuntu
While Wine is available in Ubuntu’s default repositories, it’s often an older, stable version. For the best compatibility and latest features, it’s highly recommended to install Wine from its official repository. This ensures you get the most up-to-date stable, staging, or development builds.
First, download and add the Wine HQ repository key to your system:
wget -nc https://dl.winehq.org/wine-builds/winehq.key

sudo apt-key add winehq.key
Next, depending on your Ubuntu version, you’ll need to add the correct repository. Replace your_ubuntu_version_name with your actual Ubuntu codename (e.g., focal for 20.04, jammy for 22.04). You can find your codename by running lsb_release -sc.
For example, for Ubuntu 22.04 (Jammy Jellyfish):
sudo add-apt-repository 'deb https://dl.winehq.org/wine-builds/ubuntu/ jammy main'
After adding the repository, update your package lists to include the new Wine packages:
sudo apt update
Installing Wine Stable, Staging, or Development
Now, you can install your desired Wine version. Choose one of the following based on your needs:
1. Install Wine Stable (Recommended for most users):
sudo apt install --install-recommends winehq-stable
This command installs the most stable version of Wine, suitable for general use and maximum reliability.

2. Install Wine Staging (For newer features, moderate stability):
sudo apt install --install-recommends winehq-staging
Choose this if you need better compatibility for more recent applications or games and are willing to accept minor potential instabilities.
3. Install Wine Development (For cutting-edge features, potential instability):
sudo apt install --install-recommends winehq-development
This is for power users or developers who need the very latest features and are comfortable with potential bugs.
During the installation, you might be prompted to confirm the installation and download of additional packages. Type Y and press Enter to proceed.
Configuring Wine for First Use: The Wine Prefix
After installation, the first time you run any Wine command or attempt to open a Windows executable, Wine will perform its initial configuration. This involves creating a .wine directory (known as the Wine prefix) in your home directory (~/.wine). This directory acts as a virtual C: drive for your Windows applications, storing configuration files, registry entries, and installed programs.
To trigger this initial setup, simply run:
winecfg
This command will:
-
Create the
~/.winedirectory (if it doesn’t exist). -
Install necessary components like Gecko (for HTML rendering) and Mono (for .NET applications). You’ll see prompts for these installations; accept them.
-
Open the Wine configuration utility (
winecfg).
The winecfg utility allows you to configure various aspects of Wine, such as:
-
Applications Tab: Set specific Windows versions for individual applications or globally.
-
Libraries Tab: Manage DLL overrides for specific applications.
-
Graphics Tab: Configure screen resolution, vertex shader support, and other display options.
-
Drives Tab: Map network drives or other partitions into your Wine prefix.
For most users, the default settings in winecfg are sufficient to start. You can close the window after it opens. Congratulations! Wine is now successfully installed and configured on your Ubuntu system.
Running Windows Applications with Wine
With Wine installed, the next logical step is to start running your desired Windows applications. This process is generally straightforward, but understanding a few nuances and common practices can significantly improve your success rate and overall experience.
Installing Applications via Wine
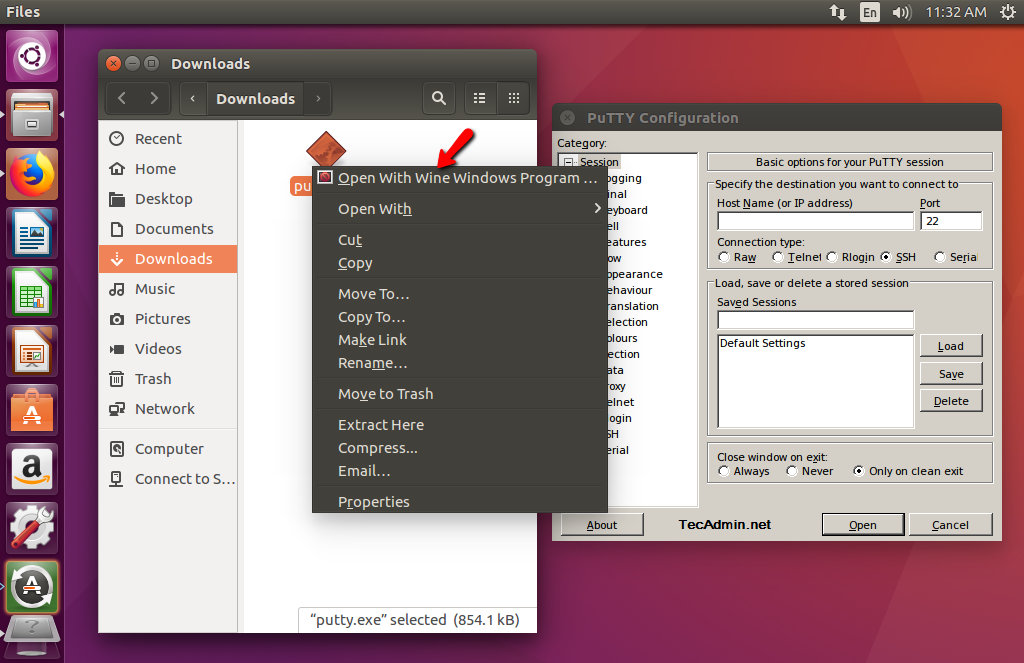
Running a Windows executable (.exe or .msi) with Wine is typically as simple as double-clicking it in your file manager. Ubuntu is usually configured to open these files with Wine by default after installation.
If double-clicking doesn’t work, or you prefer the command line:
-
Navigate to the directory where your Windows executable is located using the terminal. For example, if it’s in your Downloads folder:
cd ~/Downloads -
Run the executable with Wine:
wine YourProgramInstaller.exe
Wine will then launch the installer, and you can proceed through the Windows-style installation wizard as you normally would on a Windows machine. The application will typically install into your Wine prefix (~/.wine/drive_c/Program Files or ~/.wine/drive_c/Program Files (x86)).
After installation, a shortcut to the application might appear in your Ubuntu applications menu, or you can launch it directly from the terminal by navigating to its installation path within the Wine prefix and executing it. For example:
wine "~/.wine/drive_c/Program Files/YourProgram/YourProgram.exe"
Tips for Optimal Performance and Compatibility
While Wine does an excellent job, some applications might require a bit of tweaking for optimal performance or compatibility:
-
Specify Windows Version: For older applications, explicitly setting an older Windows version (e.g., Windows XP, Windows 7) in
winecfg(Applications tab) can often resolve compatibility issues. -
Graphics Settings: In
winecfg‘s Graphics tab, experimenting with options like “Allow the window manager to decorate the windows” or “Allow DWM” can sometimes improve display or performance, especially for games. -
Virtual Desktop: For applications that struggle with full-screen mode or resolution changes, enabling a “Virtual Desktop” in
winecfg‘s Graphics tab can provide a stable environment by running the application within a fixed-size window. -
Dedicated Wine Prefixes: For complex applications or games, creating separate Wine prefixes for each can prevent conflicts between different software’s dependencies. You can do this by setting the
WINEPREFIXenvironment variable before running Wine:WINEPREFIX=~/.wine/my_game_prefix winecfgThis creates a new prefix at
~/.wine/my_game_prefix.
Common Issues and Troubleshooting
Even with the best preparation, you might encounter issues. Here are some common problems and their solutions:
-
Missing DLLs: Some applications require specific Windows DLLs that Wine doesn’t provide by default. This often manifests as an error message about a missing
.dllfile.- Solution: Use
winetricks(discussed later) to install the necessary DLLs or components (e.g.,vcrun2015,d3dx9).
- Solution: Use
-
Graphics Glitches or Crashes: This is often related to graphics drivers or Wine’s graphics settings.
- Solution: Ensure your graphics drivers are up-to-date. Experiment with
winecfg‘s Graphics tab settings (e.g., enable/disable CSMT, change renderer).
- Solution: Ensure your graphics drivers are up-to-date. Experiment with
-
Application Not Starting: Check the terminal output when running the application via
wine. Error messages can provide clues.- Solution: Consult the Wine AppDB (App Database) website. It’s a community-maintained database with compatibility ratings and troubleshooting tips for thousands of Windows applications on Wine.
-
Slow Performance:
- Solution: Ensure you’re not running too many applications concurrently. Consider a dedicated Wine prefix. For games, make sure your graphics drivers are optimized.
Troubleshooting Wine often involves a bit of trial and error, but the Wine AppDB is an invaluable resource for community-tested solutions.
Beyond Basic Installation: Advanced Tips and Alternatives
While the basic Wine installation allows you to run many Windows applications, there are tools and alternative solutions that can significantly enhance compatibility, simplify management, and offer specialized environments for specific needs.
Utilizing Winetricks for Enhanced Compatibility
Winetricks is an indispensable helper script that simplifies the installation of various components (DLLs, fonts, runtimes) that some Windows applications require. It can install things like DirectX versions, .NET Frameworks, Visual C++ runtimes, and various core fonts, all of which are common dependencies for many Windows programs and games.
To install Winetricks:
sudo apt install winetricks
Once installed, you can launch it from the terminal:
winetricks
Winetricks provides a graphical interface where you can:
-
Select the default wineprefix or choose a specific one.
-
Install a Windows DLL or component (e.g.,
d3dx9,vcrun2019,dotnet48). -
Install a font.
-
Change settings for a particular Wine prefix.
For instance, if a game requires DirectX 9, you can open winetricks, select “Select the default wineprefix,” then “Install a Windows DLL or component,” and choose d3dx9. This automates the complex process of obtaining and installing these dependencies.
Exploring PlayOnLinux and Lutris: Frontends for Wine
Managing multiple Wine prefixes and specific configurations for different applications can become cumbersome. This is where Wine frontends come into play, offering a more user-friendly interface for managing your Windows software on Linux.
-
PlayOnLinux: This tool simplifies the installation and management of various Windows games and applications. It uses custom scripts to automatically download and configure specific Wine versions and dependencies for hundreds of popular programs, ensuring optimal compatibility. It creates separate Wine prefixes for each installed application, keeping them isolated. PlayOnLinux is excellent for those who want a “set it and forget it” approach for many common titles.
To install:
sudo apt install playonlinux -
Lutris: A more modern and powerful gaming platform for Linux, Lutris supports Wine extensively. Like PlayOnLinux, it provides automated installers (called “scripts”) for thousands of games, often sourcing them from various launchers (Steam, GOG, Epic Games Store). Lutris goes beyond Wine, also managing games from native Linux versions, emulators, and other platforms, offering a unified gaming library. It provides excellent control over Wine versions, runners, and game-specific settings.
To install (usually from an official PPA for the latest version):
sudo add-apt-repository ppa:lutris-team/lutris

sudo apt update

sudo apt install lutris
Both PlayOnLinux and Lutris significantly streamline the Wine experience, especially for gamers, by abstracting away much of the manual configuration.

Maintaining Your Wine Installation
Like any software, Wine benefits from regular maintenance:
-
Keep Wine Updated: Regularly update your Wine installation to benefit from bug fixes, performance improvements, and enhanced compatibility.
sudo apt update sudo apt upgrade -
Backup Wine Prefixes: For critical applications, consider backing up your Wine prefixes (the
~/.winedirectory or specificWINEPREFIXdirectories). This can save you from having to reinstall everything if a configuration gets corrupted. -
Clean Up Old Prefixes: If you stop using an application, you can delete its dedicated Wine prefix to free up disk space. Be cautious when deleting the default
~/.wineprefix, as it might contain data for other applications.
By understanding how to install, configure, troubleshoot, and enhance Wine on Ubuntu, you unlock a powerful capability that dramatically expands the utility of your Linux desktop. This bridge to Windows software not only makes the transition to open-source smoother for many but also empowers users to choose their operating system without sacrificing access to essential tools and entertainment. The journey from a basic installation to a finely tuned, application-rich Wine environment is a testament to the flexibility and power of the Linux ecosystem.
aViewFromTheCave is a participant in the Amazon Services LLC Associates Program, an affiliate advertising program designed to provide a means for sites to earn advertising fees by advertising and linking to Amazon.com. Amazon, the Amazon logo, AmazonSupply, and the AmazonSupply logo are trademarks of Amazon.com, Inc. or its affiliates. As an Amazon Associate we earn affiliate commissions from qualifying purchases.