
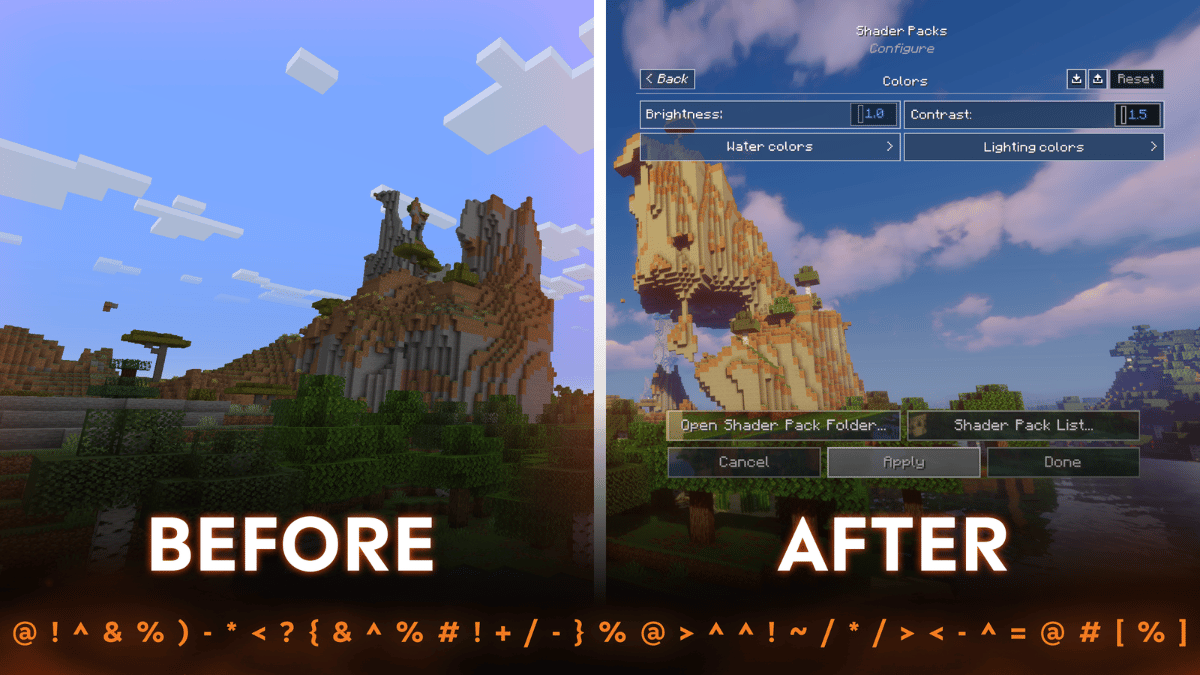
Minecraft, in its vanilla form, offers a charmingly blocky aesthetic that has captivated millions worldwide. Yet, for many players, the desire to push the boundaries of visual fidelity and immerse themselves in a more realistic or stylized world is ever-present. This is where shaders come in—transformative graphical enhancements that breathe new life into the game, introducing dynamic lighting, realistic water reflections, swaying foliage, volumetric clouds, and much more. Installing these shaders might seem like a daunting task, especially when navigating the intricate world of Minecraft modding. This comprehensive guide will demystify the process, walking you through every step of installing shaders using CurseForge, one of the most popular and user-friendly platforms for managing Minecraft mods.

Introduction: Elevating Your Minecraft Experience
Minecraft’s enduring appeal lies not just in its gameplay but also in its boundless potential for customization. While the base game is iconic, shaders offer an unparalleled upgrade, transforming your blocky landscapes into breathtaking vistas. Imagine sunbeams filtering through dense forest canopies, or the shimmering reflections of a sunset on a vast ocean—these are the experiences shaders unlock.
What Are Shaders and Why Do You Need Them?
At their core, shaders are advanced rendering programs that alter how the game’s graphics are processed. They manipulate light, shadows, reflections, and other visual elements to create a more immersive and visually stunning environment. Unlike simple texture packs that only change the appearance of blocks, shaders introduce complex real-time lighting calculations and effects that profoundly impact the game’s atmosphere.
For players seeking a fresh perspective on their familiar worlds, or those who crave a more cinematic and realistic gaming experience, shaders are an indispensable addition. They can drastically improve immersion, make exploration more rewarding, and even enhance the aesthetic appeal of your builds. Whether you’re a builder, an explorer, or just someone who appreciates beautiful graphics, shaders offer a significant upgrade that’s hard to go back from once experienced.
The Role of CurseForge in Modding
CurseForge has established itself as a cornerstone of the Minecraft modding community. It’s a platform that simplifies the often-complex process of finding, downloading, and managing mods, modpacks, and custom content for various games, including Minecraft. Before CurseForge, installing mods often involved manual file manipulation, compatibility headaches, and a steep learning curve. The CurseForge desktop app streamlines this, providing a centralized hub where users can browse an extensive library of content, install it with a few clicks, and manage multiple modded profiles without conflicts.
For shaders, while CurseForge doesn’t directly host shader packs (which are typically downloaded externally), it plays a crucial role in preparing your Minecraft client by managing the necessary “shader loader” mods like OptiFine or Iris. These loaders are essential prerequisites that allow Minecraft to interpret and display shader effects. By leveraging CurseForge for your base modded installation, you ensure a stable and organized environment for your visual enhancements.
Essential Preparations: Setting the Stage for Visual Brilliance
Before diving into the world of stunning graphics, a few fundamental steps are necessary to prepare your Minecraft client. These prerequisites ensure that your system is ready to handle shaders and that the installation process runs smoothly.
Ensuring You Have Minecraft Java Edition
It’s critical to understand that shaders, as discussed in this guide, are primarily designed for Minecraft Java Edition. The Bedrock Edition (available on consoles, Windows 10, and mobile) uses a different modding infrastructure and does not natively support the same type of shader packs or loaders. While Bedrock has its own forms of visual enhancements (like RTX support on compatible hardware), this tutorial focuses exclusively on the Java Edition. If you only own the Bedrock Edition, you’ll need to purchase the Java Edition to follow this guide.
Installing the CurseForge Desktop App
The CurseForge desktop app is your gateway to simplified modding. If you haven’t already, download and install it from the official CurseForge website. Once installed, open the application and ensure you’ve linked it to your Minecraft game. This typically involves selecting Minecraft from the list of supported games and allowing CurseForge to locate your Minecraft installation. The app will then display your existing Minecraft profiles and provide options to create new ones.
Understanding Shader Loaders: OptiFine vs. Iris
Shader loaders are special mods that bridge the gap between Minecraft and shader packs. They optimize the game’s rendering engine and provide the necessary framework for shaders to function. The two most prominent shader loaders are OptiFine and Iris.
-
OptiFine: Historically the most popular choice, OptiFine not only enables shaders but also offers a vast array of performance optimizations and graphical settings. It’s compatible with most Minecraft versions and has been the go-to for many years.
-
Iris Shaders (with Fabric): Iris is a newer, high-performance shader loader built on top of the Fabric mod loader. It often boasts better performance with certain shader packs and offers a more modern approach to modding, particularly for newer Minecraft versions.
For simplicity and broader compatibility with most tutorials, OptiFine is often recommended for first-time shader users. However, if you’re already using Fabric mods, Iris might be a more integrated solution. For this guide, we’ll primarily focus on integrating with a CurseForge profile that uses OptiFine, as it’s often included in popular modpacks or can be easily added.
Creating a Modded Minecraft Profile
To maintain a clean and organized setup, it’s highly recommended to create a dedicated Minecraft profile within CurseForge for your shader-enhanced gameplay. This prevents conflicts with your vanilla game or other modded instances.
-
Open CurseForge: Launch the CurseForge desktop app.
-
Select Minecraft: Ensure Minecraft is selected from your games list.
-
Create Custom Profile: Click the “Create Custom Profile” button.
-
Name and Version: Give your profile a descriptive name (e.g., “Minecraft Shaders”). Select your desired Minecraft version (e.g., 1.20.1) and, crucially, choose the correct Modloader. If you plan to use OptiFine, you can often select “Forge” (and later add OptiFine as a mod), or for Iris, select “Fabric.” For convenience, some modpacks on CurseForge already come with OptiFine integrated, which can be an even easier starting point. If you select Forge, you’ll add OptiFine as a standard mod later.
-
Install OptiFine (if not part of a modpack): Once your profile is created, click on it, then go to the “Mods” tab. Search for “OptiFine” and install the version compatible with your selected Minecraft version. Make sure it’s the official OptiFine if downloaded directly, or ensure it’s compatible if added via CurseForge. Note: CurseForge has started to host OptiFine directly or via “OptiForge” type mods that bridge OptiFine with Forge.
-
Launch Once: Launch this new profile at least once to ensure all necessary files are generated.
Discovering and Acquiring Your Preferred Shaders
With your modded Minecraft profile ready, the next exciting step is to choose and download your desired shader pack.
Navigating CurseForge for Shaders Packs (Indirectly)
As mentioned, CurseForge itself does not directly host shader packs as downloadable files in the same way it hosts mods. Instead, shader packs are usually external downloads. However, CurseForge still plays a role indirectly:
-
Modpacks with Shaders: Many popular modpacks on CurseForge are designed with shaders in mind and might even recommend specific ones. Some might even include a pre-configured shader loader.
-
Community Recommendations: The CurseForge community forums or descriptions of texture packs/modpacks often recommend compatible shader packs.
Alternative Sources for Shader Downloads
The primary way to acquire shader packs is from dedicated shader websites or the official pages of shader developers. Reputable sources include:
-
Shader Websites: Websites like
shadersmod.com(for OptiFine related content), or official developer pages for popular shaders like SEUS (Sonic Ether’s Unbelievable Shaders), BSL Shaders, Complementary Shaders, Sildur’s Vibrant Shaders, and many others. -
Minecraft Forums: The official Minecraft Forum and other community hubs often have dedicated sections for shader pack releases.
-
Direct Developer Links: Many shader creators have their own websites or Patreon pages where you can download the latest versions of their work.
Important: Always download shader packs from trusted sources to avoid malware. Shader packs are typically distributed as .zip files. Do not extract these files; they should remain in their .zip format for installation.
Key Considerations When Choosing a Shader Pack
Selecting the right shader pack involves balancing visual appeal with performance.
-
Performance Impact: Shaders are graphically intensive. High-end shaders like SEUS PTGI (Path Tracing Global Illumination) require powerful GPUs, while lighter options like Sildur’s Enhanced Default or Chocapic13’s Shaders (Lite versions) are more accessible. Check the shader’s description for system requirements.
-
Aesthetic Preference: Shaders offer diverse aesthetics. Some aim for hyper-realism (e.g., SEUS, Continuum), others for vibrant fantasy (e.g., BSL, Complementary), and some for a specific mood (e.g., Nostalgia Shaders for a retro feel). Browse screenshots and videos to find one that matches your taste.
-
Compatibility: Ensure the shader pack is compatible with your Minecraft version and, if specified, your chosen shader loader (OptiFine or Iris). Most modern shaders are designed to work with both.
Step-by-Step Installation: Integrating Shaders into Your Game
With your shader pack downloaded and your CurseForge profile ready, it’s time to put it all together.
Placing the Shader Pack Files
This is the core of the installation process.
-
Locate Your Profile Folder: In the CurseForge app, select your modded Minecraft profile. Click the three dots next to “Play” and choose “Open Folder.” This will open the root directory of your specific modded instance.
-
Find the
shaderpacksFolder: Inside this root directory, you should see a folder namedshaderpacks. If this folder does not exist (which can happen if you haven’t launched OptiFine/Iris once or if it’s a very fresh installation), simply create a new folder and name itshaderpacks(all lowercase). -
Move the Shader Pack: Drag and drop the downloaded
.zipfile of your chosen shader pack directly into theshaderpacksfolder. Remember, do not extract the.zipfile.
Launching Minecraft with Shaders Enabled
Now that the shader pack is in place, you need to tell Minecraft to use it.
-
Launch from CurseForge: Go back to the CurseForge app and click “Play” on your modded profile. This will launch the Minecraft Launcher.
-
Select Profile and Play: In the Minecraft Launcher, ensure the correct profile (your shader-ready profile) is selected from the dropdown menu, then click “Play.”
-
Navigate In-Game Options: Once Minecraft loads to the main menu:
-
Go to Options…
-
Click on Video Settings…
-
Click on Shaders… (This option will only appear if OptiFine or Iris is correctly installed and functioning).
-
-
Select Your Shader Pack: In the Shaders menu, you should see a list of available shader packs, including the one you just moved into the
shaderpacksfolder. Click on your desired shader pack to select it. -
Apply and Done: Minecraft will take a moment to load the shader. Once loaded, click “Done” to exit the menus. You should now see your world transformed with the new shader effects!
In-Game Configuration and Optimization
Most shader packs come with extensive configuration options, allowing you to fine-tune the visuals and performance to your liking.
-
Access Shader Options: From the Shaders menu (
Options > Video Settings > Shaders), select your active shader pack and then click on “Shader Options…” (or “Shader Pack Settings” depending on the shader). -
Experiment with Settings: Here, you’ll find various parameters to adjust, such as shadow quality, water reflections, volumetric clouds, anti-aliasing, and more.
-
Performance vs. Quality: Lowering settings like shadow resolution, render quality, or disabling certain effects (like godrays or motion blur) can significantly improve performance if you’re experiencing lag.
-
Visual Preference: Adjust settings to match your desired aesthetic. Want darker nights? Look for night brightness settings. Prefer less vibrant colors? Look for color saturation options.
-
-
Apply Changes: After making adjustments, ensure you apply them. Some changes might require a game restart or reloading the chunk.
Troubleshooting and Maximizing Your Shader Experience
Even with a streamlined process like CurseForge, minor hitches can occur. Knowing how to troubleshoot common issues and optimize your setup will ensure a smooth, visually stunning experience.
Common Issues and Quick Fixes
-
Game Crashing on Launch/Shader Activation:
-
Out of Memory: Shaders require significant RAM. Allocate more RAM to your Minecraft profile in the CurseForge settings (usually 4-8GB is a good start, depending on your system and other mods).
-
Incompatible Shader/OptiFine Version: Ensure your shader pack, OptiFine/Iris, and Minecraft version are all compatible.
-
Corrupted Download: Redownload the shader pack.
-
Driver Issues: Ensure your graphics card drivers are up to date.
-
-
Low FPS / Lag:
-
Lower Shader Settings: As discussed, reduce quality settings within the shader options.
-
Reduce Render Distance: In Minecraft’s video settings, lower your render distance.
-
Allocate More RAM: Increase RAM allocation.
-
Monitor GPU Usage: Use tools like MSI Afterburner or your GPU manufacturer’s software to monitor GPU utilization and temperature.
-
-
Visual Glitches / Artifacts:
-
Incompatible Hardware/Drivers: Update drivers.
-
Shader Bug: Try a different shader pack or report the issue to the shader developer.
-
Mod Conflicts: If you have many other mods, one might be conflicting. Test with only OptiFine/Iris and the shader pack enabled.
-
-
Shaders Option Not Appearing:
-
OptiFine/Iris Not Installed Correctly: Double-check that OptiFine (or Iris) is in your mod folder and enabled in your CurseForge profile. Ensure you’ve launched the game at least once with the loader installed.
-
Wrong Minecraft Version: Make sure your OptiFine/Iris matches your Minecraft version.
-
Performance Tips for Smooth Gameplay
-
Update Graphics Drivers: Always keep your GPU drivers updated to the latest stable version.
-
Allocate Sufficient RAM: Modern modded Minecraft with shaders can be RAM-hungry. Allocate at least 6-8GB of RAM to your CurseForge profile for optimal performance, assuming your system has enough available.
-
Adjust Minecraft Video Settings: Besides shader options, fine-tune Minecraft’s own video settings. Lowering render distance, disabling fancy graphics for certain elements, and adjusting mipmap levels can help.
-
Use a Lighter Shader Pack: If your hardware struggles, switch to a less demanding shader pack. Many shader developers offer “Lite” or “Low” versions specifically for performance.
-
Overclocking (Advanced): For experienced users, carefully overclocking your GPU and CPU can yield performance gains, but this carries risks and should only be attempted by those who understand the process.
Experimenting with Different Shaders and Settings
The beauty of shaders lies in their diversity. Don’t settle for the first one you try.
-
Collect a Library: Download a few different shader packs (e.g., BSL, Sildur’s, Complementary, Nostalgia) and keep them in your
shaderpacksfolder. You can switch between them easily from the in-game Shaders menu. -
Personalize Settings: Each shader pack offers unique customization options. Spend time in the “Shader Options” menu for each pack, adjusting values to create your ideal visual experience. Many settings can be tweaked dynamically, allowing you to see the changes in real-time.
-
Read Documentation: Many shader packs come with readme files or have online documentation detailing their features and recommended settings.
Conclusion: A New Era of Minecraft Visuals
Installing shaders on CurseForge is a journey that transforms your Minecraft experience from charmingly blocky to breathtakingly beautiful. By understanding the roles of shader loaders like OptiFine or Iris, carefully selecting compatible shader packs, and leveraging the convenience of the CurseForge app, you unlock a new dimension of visual immersion. While the initial setup might seem involved, the step-by-step process outlined in this guide ensures a smooth transition to a world of dynamic lighting, realistic reflections, and vibrant environments. Take the plunge, experiment with different packs, and rediscover the endless possibilities of Minecraft through a stunning new lens. Your adventures await, rendered in unparalleled visual glory.
aViewFromTheCave is a participant in the Amazon Services LLC Associates Program, an affiliate advertising program designed to provide a means for sites to earn advertising fees by advertising and linking to Amazon.com. Amazon, the Amazon logo, AmazonSupply, and the AmazonSupply logo are trademarks of Amazon.com, Inc. or its affiliates. As an Amazon Associate we earn affiliate commissions from qualifying purchases.