
Data is the lifeblood of any successful website. Without a clear understanding of who your visitors are, where they come from, and how they interact with your content, you are essentially flying blind. Google Analytics (GA4) remains the industry standard for tracking website performance, providing actionable insights that can help you optimize your user experience and refine your content strategy. For WordPress users, integrating this powerful tool is a straightforward process, though there are several ways to approach it depending on your technical comfort level.
Understanding the Importance of GA4 for WordPress
Google Analytics 4 (GA4) is more than just a counter for your page views. It is a comprehensive event-based tracking engine designed to map the entire customer journey across devices and platforms. For a WordPress site owner, GA4 provides critical data that drives decision-making.
Why Data-Driven Decisions Matter
When you know which pages have the highest bounce rates, you can identify content that isn’t resonating with your audience. When you see which traffic sources—organic search, social media, or email marketing—bring the most engaged users, you can reallocate your resources to focus on those high-performing channels. Furthermore, GA4 allows you to track specific “events,” such as button clicks, file downloads, or video plays, giving you a granular look at how users interact with your call-to-action buttons.
Key Metrics to Monitor
While the dashboard can be overwhelming, start by focusing on a few core metrics:
- Engagement Rate: Unlike the old “bounce rate,” engagement rate measures how many sessions lasted longer than 10 seconds, resulted in a conversion, or had at least two pageviews.
- Acquisition Channels: Understanding whether your traffic is coming from Google, social media, or direct typing reveals the effectiveness of your branding and SEO efforts.
- Conversion Paths: Knowing the sequence of pages a user visits before they make a purchase or sign up for a newsletter allows you to optimize your sales funnel.
Setting Up Your Google Analytics Property
Before touching your WordPress dashboard, you must establish your property in the Google Analytics interface.
Creating a New Account
Navigate to analytics.google.com and sign in with your Google account. If you do not have an existing account, click on “Start measuring.” You will be prompted to create an account name and set your data-sharing preferences.
Creating a Data Stream
Once your account is active, you need to create a “Property.” During this process, you will select “Web” as your platform. Enter your website URL and a name for your stream. Google will then provide you with a “Measurement ID”—an alphanumeric string that typically looks like G-XXXXXXXXXX. This ID is the unique identifier that links your specific website to your analytics dashboard. Keep this window open; you will need this ID shortly.
Method 1: Installing via a WordPress Plugin (Recommended for Beginners)
For most WordPress users, using a plugin is the most efficient and error-proof method. Plugins handle the insertion of the tracking code automatically, ensuring it is placed in the correct location (the <head> of your site) without requiring you to edit theme files manually.
Using Site Kit by Google
The “Site Kit by Google” plugin is the official solution provided by Google. It is highly recommended because it not only installs the tracking code but also brings your GA4 data directly into your WordPress dashboard, saving you from toggling between browser tabs.
- Navigate to your WordPress Admin dashboard.
- Go to Plugins > Add New and search for “Site Kit by Google.”
- Install and activate the plugin.
- Click the “Start Setup” button. The plugin will walk you through a verification process to prove you own the domain.
- Once verified, connect your Google Analytics account. The plugin will automatically detect your property and start sending data.
Using Insert Headers and Footers Plugins
If you prefer not to use the official Google plugin, you can use a lightweight alternative like “WPCode” (formerly Insert Headers and Footers).
- Install and activate the WPCode plugin.
- Go to Code Snippets > Header & Footer.
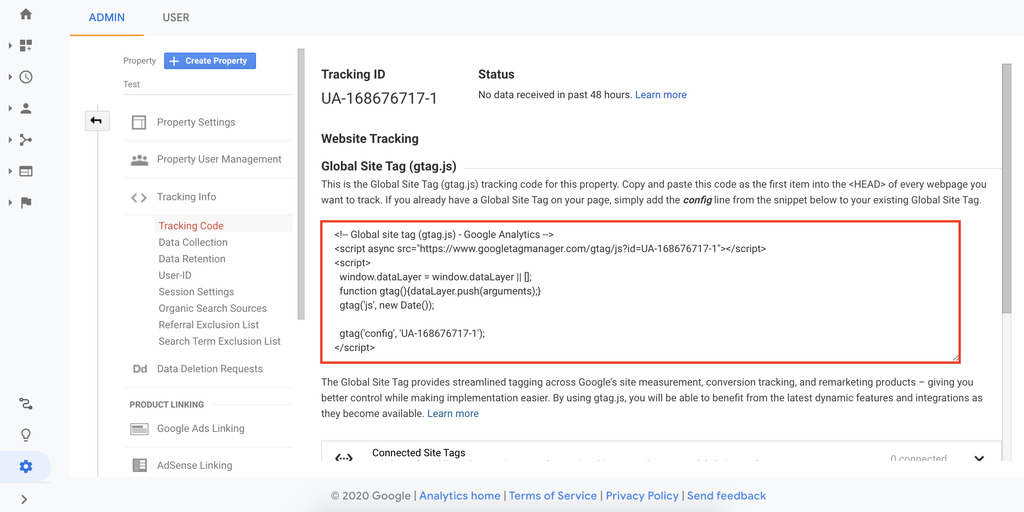
- Paste the Global Site Tag (Gtag.js) provided by Google into the “Header” box.
- Save your changes. This plugin will now inject the script into every page of your site, allowing GA4 to record traffic immediately.
Method 2: Manual Installation (For Advanced Users)
If you are confident in your coding skills or want to minimize the number of plugins installed on your site, you can add the tracking code manually. However, proceed with caution: if you use a theme that doesn’t provide an easy way to edit headers, you risk breaking your site or losing your code during theme updates.
Editing the Theme Header.php File
The best practice is to use a Child Theme, which prevents your modifications from being overwritten when you update your main theme.
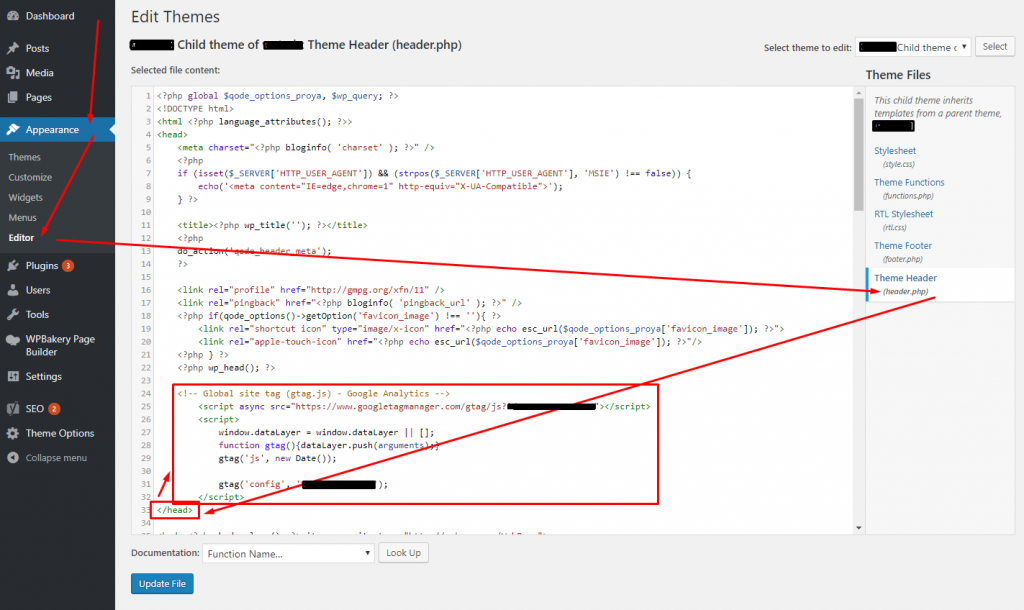
- Navigate to Appearance > Theme File Editor.
- Locate the
header.phpfile in your theme files. - Paste your Google Analytics tracking code immediately after the opening
<head>tag. - Click “Update File.”
Note: If you are using a premium theme like Divi, Astra, or GeneratePress, they often have a dedicated “Hooks” or “Integration” section where you can paste scripts into the head of your site without editing core PHP files. Always prioritize these built-in theme options over manual file editing.

Verifying Your Installation
Regardless of the method you chose, you must verify that the installation is successful. Google Analytics usually takes between 24 to 48 hours to start showing data, but you can verify the connection in real-time.
Using Realtime Reports
Open your Google Analytics dashboard and click on the “Reports” tab, then select “Realtime.” Open your WordPress website in an incognito window or a different browser. If the installation was successful, you should see at least one active user (yourself) appear on the map or in the user count within a minute.
The Tag Assistant Browser Extension
For a more technical check, install the “Tag Assistant Companion” extension for Chrome. When you navigate to your website with the extension active, it will tell you exactly which tags are firing. If you see your Measurement ID (the G-XXXXXXXXXX tag) listed as firing correctly, your integration is complete and verified.
Troubleshooting Common Issues
If data is not appearing after 48 hours, consider these potential roadblocks:
- Caching Plugins: If you use plugins like WP Rocket or W3 Total Cache, clear your site cache after installing the tracking code. Often, the old version of the site without the code is still being served to visitors.
- Privacy Plugins: If you have an aggressive GDPR or cookie consent plugin active, it may be blocking GA4 scripts until the user clicks “Accept.” Test your site without these plugins temporarily to confirm if they are the source of the data gap.
- Ad Blockers: Most ad blockers automatically strip Google Analytics scripts from the browser. Always use an incognito window without ad blockers enabled when testing your connection.
By following these steps, you have successfully integrated a professional-grade analytics engine into your WordPress site. This infrastructure now allows you to track, analyze, and pivot your strategy based on real user behavior rather than guesswork. Keep in mind that as Google continues to evolve the GA4 platform, you should periodically check for new features or privacy compliance updates to ensure your data collection remains both accurate and ethical. Your journey toward a more optimized, high-performing website has officially begun.
aViewFromTheCave is a participant in the Amazon Services LLC Associates Program, an affiliate advertising program designed to provide a means for sites to earn advertising fees by advertising and linking to Amazon.com. Amazon, the Amazon logo, AmazonSupply, and the AmazonSupply logo are trademarks of Amazon.com, Inc. or its affiliates. As an Amazon Associate we earn affiliate commissions from qualifying purchases.