
Towing a trailer, whether for recreation, work, or transport, is a common practice across the globe. However, the safety and efficiency of this operation hinge significantly on one critical component: the braking system. Properly installed and maintained trailer brakes are not merely a convenience; they are a fundamental safety imperative, often mandated by law, designed to prevent accidents, reduce stopping distances, and ensure controlled handling of your tow vehicle and its load. This comprehensive guide delves into the technical intricacies and practical steps involved in installing brakes on a trailer, transforming a potentially daunting task into an empowering DIY project for those looking to enhance their towing capabilities and ensure peace of mind on the road.

Installing trailer brakes is a technical undertaking that demands precision, a good understanding of mechanical and electrical systems, and adherence to safety protocols. It’s a prime example of a practical “tech” tutorial, empowering users with the knowledge to upgrade their equipment for enhanced performance and safety. We’ll explore the various systems, walk through the installation process, and provide insights into calibration and maintenance, ensuring your trailer is not just road-legal, but also road-safe and highly responsive.
The Critical Role of Trailer Brakes in Modern Towing
Before diving into the nuts and bolts of installation, it’s crucial to understand why trailer brakes are indispensable. The combined weight of a tow vehicle and a loaded trailer creates immense kinetic energy, which must be effectively dissipated during deceleration. Without dedicated trailer brakes, the tow vehicle’s braking system would be overwhelmed, leading to longer stopping distances, accelerated wear on vehicle brakes, and a significant risk of jackknifing or loss of control, especially under emergency braking conditions or on challenging terrain.
Understanding Legal and Safety Imperatives
The necessity of trailer brakes is not just a recommendation; it’s often a legal requirement. Most jurisdictions mandate trailer brakes for trailers exceeding a certain gross vehicle weight rating (GVWR) – typically ranging from 1,500 to 3,000 pounds, though this can vary. Failure to comply can result in hefty fines, insurance complications, and, more critically, catastrophic accidents. From a safety perspective, proper braking distributes the stopping force across all axles, preventing the trailer from pushing the tow vehicle and maintaining stability. This is particularly vital when traversing downhill grades or navigating sudden stops, where the momentum of an unbraked trailer can easily overcome the tow vehicle’s control. An effective trailer braking system is an active safety technology, directly contributing to collision avoidance and overall road safety.
Types of Trailer Braking Systems: An Overview
The world of trailer brakes offers several technological solutions, each with its own operational principles and ideal applications. Understanding these systems is the first step in selecting and installing the right setup for your trailer.
-
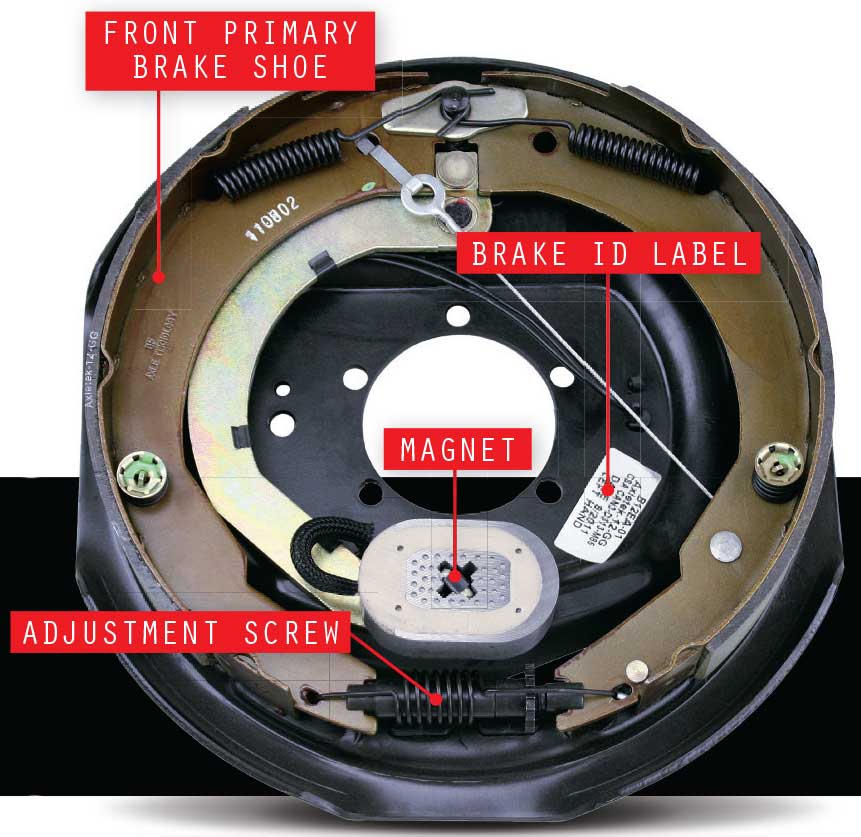
Electric Brakes: These are the most common type for travel trailers, utility trailers, and boat trailers. They operate via an electromagnet inside each brake drum (or caliper for disc setups) which, when activated by an electric signal from a brake controller in the tow vehicle, presses brake shoes against the drum or pads against the rotor. Electric brakes offer proportional braking, meaning the braking force can be adjusted to match the tow vehicle’s deceleration, providing smooth and controlled stops. Their installation involves wiring the brake assemblies to a central junction box and then to the tow vehicle’s electrical system, specifically linking to a brake controller.
-
Hydraulic (Surge) Brakes: Predominantly found on boat trailers and some utility trailers, hydraulic surge brakes operate independently of the tow vehicle’s electrical system. Instead, they activate when the trailer pushes against the tow vehicle during deceleration. This “surge” action compresses a master cylinder integrated into the trailer’s hitch coupler, which then sends hydraulic fluid through lines to slave cylinders at each wheel, applying the brakes. While effective, surge brakes are not proportional in the same way electric brakes are, and can sometimes feel less synchronized with the tow vehicle’s braking.
-
Hydraulic (Electric over Hydraulic) Brakes: This advanced system combines aspects of both electric and hydraulic brakes. An electric signal from the tow vehicle’s brake controller activates an electric pump on the trailer, which then pressurizes a hydraulic system to apply the brakes. This offers the best of both worlds: the smooth, proportional braking of electric systems with the powerful, consistent stopping force of hydraulic brakes, often found on heavier trailers or those requiring premium performance.
-
Drum vs. Disc Brakes: Within electric and hydraulic systems, you’ll encounter drum brakes (more common and cost-effective) and disc brakes (offering superior stopping power and heat dissipation, often preferred for heavier loads or frequent braking). The installation process shares many similarities, though disc brake systems have calipers and rotors instead of drums and shoes.
Choosing the right system depends on your trailer’s GVWR, the type of tow vehicle, your towing habits, and local regulations. For a DIY installation, electric drum brakes are often the most straightforward and cost-effective starting point, offering a robust blend of performance and manageability.
Essential Preparations and Tools for a Seamless Installation
Successful brake installation hinges on thorough preparation. This isn’t just about gathering tools; it’s about understanding the components, assessing your trailer’s current state, and planning each step meticulously. Skipping this phase can lead to frustrating setbacks, safety compromises, and unnecessary costs.
Gathering Your Arsenal: Tools and Components
A well-equipped workspace is non-negotiable. You’ll need:
-
Safety Gear: Gloves, safety glasses, and sturdy footwear are paramount.
-
Basic Hand Tools: Socket wrenches (metric and imperial), open-end wrenches, screwdrivers, pliers (including locking pliers and wire strippers/crimpers).
-
Torque Wrench: Crucial for tightening fasteners to manufacturer specifications, preventing over-tightening or loosening.
-
Jack and Jack Stands: To safely lift and support the trailer. Never work under a trailer supported only by a jack.
-
Wheel Chocks: To prevent unintended movement.
-
Grease Gun and High-Temperature Grease: For proper bearing lubrication.
-
Multimeter/Test Light: Essential for diagnosing electrical connections.
-
Wire Cutters, Strippers, and Crimpers: For electric brake wiring.
-
Hydraulic Line Tools (if applicable): Flare wrench, tubing bender, and bleeding kit.
-
Drill and Drill Bits: For mounting components or routing wires.
-
Cleaning Supplies: Brake cleaner, rags, wire brush.
Key Components to Source:
-
Brake Assemblies: Typically pre-assembled backing plates with shoes/pads, magnets (for electric), and springs. Ensure they match your axle’s bolt pattern and capacity.
-
Drums or Rotors: If not already present or needing replacement.
-
Bearings and Seals: Always replace these when installing new brakes or servicing axles.
-
Brake Controller (for electric/EOH systems): An in-cab device that modulates brake power.
-
Breakaway Kit: A legally required safety device that applies trailer brakes if it separates from the tow vehicle.
-
Wiring Harness/Junction Box (for electric): To connect the brake assemblies to the tow vehicle’s electrical system.
-
Hydraulic Lines and Fittings (for hydraulic/EOH): High-pressure steel or flexible lines.
-
Master Cylinder/Actuator (for hydraulic/EOH): For surge brakes, this is integrated into the coupler.
Pre-Installation Inspection: Assessing Your Trailer’s Readiness
Before unbolting anything, conduct a thorough inspection.
-
Axle Compatibility: Ensure your axles are “brake-ready” – they should have a mounting flange for the backing plates. If not, you may need to weld flanges on (professional help recommended) or replace the axles.
-
Suspension and Frame: Check for any signs of damage, rust, or weakness that could compromise the brake installation.
-
Wheel Bearings: Inspect for play or roughness. If you’re replacing brakes, it’s often a good time to service or replace bearings as well.
-
Tires and Wheels: Ensure they are in good condition and correctly sized.
-
Tow Vehicle Compatibility: Confirm your tow vehicle has a suitable seven-pin connector and is capable of accepting a brake controller installation.
This preparatory phase ensures that once you begin the mechanical work, you’re not held back by missing parts or unexpected compatibility issues. It’s an investment in efficiency and, ultimately, in the reliability of your new braking system.
Step-by-Step Installation: From Axle to Controller
With preparations complete, we move to the core of the project: the physical installation. This process involves precise mechanical work, meticulous electrical wiring (or hydraulic plumbing), and careful integration with the tow vehicle.
Mounting Brake Assemblies and Backing Plates
-
Lift and Secure: Use your jack to lift the trailer, then place jack stands securely under the frame. Chock the wheels on the opposite side.
-
Remove Wheels and Hubs: Take off the wheels, then carefully remove the dust cap, cotter pin, castle nut, and washers. Slide off the old hub/drum assembly. Remove the inner bearing and seal.
-
Clean Axle Spindle: Thoroughly clean the spindle where the bearings sit, removing old grease and debris. Inspect the spindle for wear.
-
Install Backing Plates: Position the new brake backing plate onto the axle flange, aligning the bolt holes. Secure it with the appropriate bolts and nuts, tightening them to the manufacturer’s specified torque. Ensure the backing plate is oriented correctly (e.g., the magnet for electric brakes typically faces downwards, or the brake adjuster faces the rear of the trailer).
-
Install New Bearings and Seals: Pack the new inner and outer bearings with high-temperature grease. Install the inner bearing and a new grease seal into the back of the new drum/rotor.
-
Mount Drums/Rotors: Carefully slide the new drum/rotor assembly onto the axle spindle. Install the outer bearing, washer, and castle nut. Tighten the castle nut by hand until snug, then back off slightly, allowing minimal play to ensure bearings are not over-tightened. Insert a new cotter pin. Install the dust cap.
Repeat this process for all axles receiving brakes.
Wiring Electric Brakes or Plumbing Hydraulic Lines
For Electric Brakes:
-
Run Wires: Each electric brake assembly will have two wires (usually black and white). Route these wires along the axle and up the trailer frame, securing them with zip ties or wire clamps to prevent snagging. Ensure sufficient slack to allow for axle movement.
-
Connect to Junction Box: Connect the wires from each brake assembly to a central junction box. Typically, all “positive” wires (often black or blue) from the brakes connect to one terminal, and all “ground” wires (often white) connect to another.
-
Connect to Main Trailer Harness: From the junction box, connect the main trailer brake wire (usually blue) to the positive brake terminal, and a main ground wire (usually white) to the ground terminal. The main trailer brake wire will run to the trailer’s 7-way connector.
-
Grounding: Ensure a robust ground connection from the trailer frame to the tow vehicle’s ground. A poor ground is a common cause of electric brake issues.
For Hydraulic (Surge) Brakes:
-
Mount Master Cylinder/Actuator: If using a surge coupler, mount it securely to the trailer tongue according to the manufacturer’s instructions.
-
Run Hydraulic Lines: Route the hydraulic lines (steel lines are best for rigidity, with flexible lines for axle movement) from the master cylinder to each brake assembly. Use proper fittings and ensure lines are protected from damage and heat. Avoid sharp bends that could restrict fluid flow.
-
Connect to Slave Cylinders: Connect the hydraulic lines to the slave cylinders on each brake assembly.
-
Bleed the System: Once all lines are connected, you must bleed the hydraulic system to remove air, ensuring firm pedal feel and effective braking. This typically requires two people, similar to bleeding automotive brakes.
Integrating the Brake Controller and Breakaway System
Brake Controller (for Electric/EOH):
-
Mount Controller: Install the brake controller inside the tow vehicle, usually under the dash, within easy reach of the driver. Ensure it’s mounted level and securely.
-
Wiring the Controller: Connect the brake controller to the tow vehicle’s electrical system:
-
12V Power: Connect to a fused 12V constant power source.
-
Ground: Connect to a solid chassis ground.
-
Stoplight Switch: Connect to the cold side of the tow vehicle’s brake light switch (activates trailer brakes when tow vehicle brakes are applied).
-
Trailer Brake Wire: Connect to the wire that runs to the 7-way trailer connector.
-
-
Route Trailer Wiring: Ensure the 7-way connector wiring is properly run from the tow vehicle’s electrical system to the rear hitch, with all connections secure and weather-proofed.
Breakaway Kit:
-
Mount Battery and Switch: Mount the breakaway battery box and switch on the trailer tongue, accessible but protected.
-
Wire Breakaway System: Connect the breakaway battery to the brake circuit, typically wired through the breakaway switch. The switch itself is connected via a cable to the tow vehicle; if the trailer disconnects, the cable pulls the pin from the switch, sending full battery power to the trailer brakes, locking them up. This is a critical safety feature and usually required by law.
Calibration, Testing, and Ongoing Maintenance for Optimal Performance
The physical installation is only half the battle. To truly leverage the capabilities of your new braking system, proper calibration and rigorous testing are essential. This fine-tuning ensures that the brakes operate harmoniously with your tow vehicle and respond predictably in all conditions.
Initial Setup and Calibration of the Brake Controller
With everything wired, the first step is to calibrate the brake controller. Most modern controllers offer proportional braking and sensitivity adjustments.
-
Gain Setting: This is the most critical adjustment, determining how much braking power is applied to the trailer. Start with a low setting (e.g., 50% or 6 out of 10).
-
Test Drive: Find a safe, level area with no traffic. Drive the tow vehicle and trailer at around 25 mph and apply the manual override on the brake controller. The trailer brakes should engage firmly but not lock up.
-
Adjust Gain:
-
If the trailer brakes are too weak, increase the gain.
-
If the trailer wheels lock up, decrease the gain.
-
The goal is to feel the trailer brakes engaging smoothly and significantly, without excessive jerk or tire skidding. You should feel the trailer pulling back slightly, not pushing the tow vehicle.
-
-
Sensitivity/Aggressiveness: Some controllers allow adjustment of how aggressively the brakes engage. Adjust this for smoother stops, especially for lighter loads.
Proper calibration is paramount. An under-calibrated system provides insufficient braking, while an over-calibrated system can lead to tire skidding, flat spots, and unstable towing.
Road Testing and Fine-Tuning Your New System
Once the initial gain is set, a more extensive road test is necessary.
-
Varying Speeds: Test the brakes at different speeds, from low-speed maneuvering to highway speeds.
-
Different Braking Intensities: Perform gentle stops, moderate stops, and simulated emergency stops (safely). Observe how the trailer reacts.
-
Empty vs. Loaded: Ideally, test the system with the trailer both empty and loaded, as the braking dynamics change significantly with weight. You may need slight gain adjustments depending on the load.
-
Hill Testing (if safe): On a gentle incline, test the brakes to ensure they hold the trailer effectively without rollback.
-
Check for Uneven Braking: After several stops, carefully feel the temperature of each brake drum/rotor. Unequal heat could indicate a problem with one brake assembly (e.g., wiring issue, maladjusted shoes, or air in hydraulic lines).
Listen for unusual noises, feel for vibrations, and continually fine-tune the controller until braking is smooth, predictable, and effective in all typical towing scenarios.
Proactive Maintenance for Longevity and Reliability
Installation is a one-time event, but maintenance is ongoing. Regular checks ensure your investment in safety continues to pay off.
-
Annual Inspection: At least once a year, or every 10,000-12,000 miles, remove the wheels and drums.
-
Inspect brake shoes/pads for wear. Replace if worn.
-
Check drums/rotors for scoring, cracking, or excessive wear. Resurface or replace as needed.
-
Inspect magnets (for electric brakes) for wear and proper operation.
-
Check all wiring for chafing, corrosion, or loose connections.
-
Inspect hydraulic lines for leaks, bulges, or cracks.
-
Ensure all moving parts are properly lubricated.
-
Repack wheel bearings with fresh grease.
-
-
Post-Trip Checks: After each significant trip, do a quick visual inspection: check tire pressure, lug nut tightness, and look for any obvious damage to wiring or brake components.
-
Brake Adjustment (for drum brakes): Drum brakes require periodic adjustment to maintain optimal performance as the shoes wear. This is typically done through an access slot on the back of the backing plate using a brake spoon.
Consistent maintenance not only prolongs the life of your braking system but more importantly, ensures its readiness for any situation on the road.
Troubleshooting Common Issues and Advanced Considerations
Even with meticulous installation and maintenance, issues can arise. Knowing how to diagnose and address common problems is part of being a savvy tech-informed trailer owner. Furthermore, understanding opportunities for system upgrades can future-proof your setup.
Diagnosing and Resolving Performance Glitches
-
No Trailer Brakes / Weak Brakes:
-
Electric: Check for a blown fuse in the tow vehicle or trailer, loose wiring connections, a faulty ground, or a malfunctioning brake controller. Use a multimeter to trace power. Ensure the breakaway switch is not activated.
-
Hydraulic: Check for low fluid level in the master cylinder, air in the lines (requiring bleeding), or a faulty master cylinder.
-
-
Brakes Lock Up / Dragging:
-
Electric: Gain setting too high, short circuit in wiring applying constant power, or seized brake components.
-
Hydraulic: Overfilled master cylinder, pinched line, or sticky slave cylinders.
-
-
Uneven Braking:
-
Electric: One brake assembly may have a wiring issue, worn shoes, or a faulty magnet. Inspect each wheel individually.
-
Hydraulic: Air in one line, a blockage, or a faulty slave cylinder.
-
-
Grinding or Squealing Noises: Typically indicates worn brake shoes/pads, scoring on drums/rotors, or foreign debris. Requires immediate inspection and potential replacement of components.
-
Trailer Pushing Tow Vehicle: Primarily indicates insufficient braking power from the trailer, requiring gain adjustment or diagnosis of underlying brake issues.
Many issues can be resolved with basic electrical troubleshooting (for electric brakes) or visual inspection. For complex hydraulic problems or persistent electrical faults, professional diagnosis may be warranted.

Upgrading and Customizing Your Braking System
As your towing needs evolve, so too might your braking system requirements.
-
Disc Brake Conversion: For heavy-duty trailers, frequent braking, or performance enthusiasts, converting from drum to disc brakes offers superior stopping power, better heat dissipation, and often simpler maintenance. This is a significant upgrade requiring new backing plates, calipers, rotors, and potentially master cylinders (for hydraulic systems).
-
Electric over Hydraulic (EOH) Upgrade: If you have a heavy trailer with hydraulic brakes but desire the proportional control of an electric controller, an EOH actuator is an excellent solution. It converts the electric signal from your in-cab controller into hydraulic pressure, marrying the benefits of both systems.
-
Self-Adjusting Brakes: Many modern drum brake assemblies are self-adjusting, automatically compensating for shoe wear. If your current brakes are manual adjust, an upgrade to self-adjusting assemblies can reduce maintenance frequency and ensure consistent performance.
-
Advanced Brake Controllers: Modern brake controllers offer features like proportional braking, pre-set memory for multiple trailers, diagnostic capabilities, and even app integration. Upgrading to a more sophisticated controller can significantly enhance user experience and safety.
By understanding the technical aspects of installation, embracing regular maintenance, and knowing how to troubleshoot, you empower yourself with the knowledge to maintain a safer, more efficient, and more enjoyable towing experience. The “how-to” aspect of installing brakes on a trailer isn’t just a guide; it’s a pathway to greater confidence and control on every journey.
aViewFromTheCave is a participant in the Amazon Services LLC Associates Program, an affiliate advertising program designed to provide a means for sites to earn advertising fees by advertising and linking to Amazon.com. Amazon, the Amazon logo, AmazonSupply, and the AmazonSupply logo are trademarks of Amazon.com, Inc. or its affiliates. As an Amazon Associate we earn affiliate commissions from qualifying purchases.