
In an increasingly digital financial landscape, where online transactions and electronic payments dominate, the traditional paper check might seem like an anachronism. Yet, when it comes to fulfilling your tax obligations with the Internal Revenue Service (IRS), sending a physical check remains a perfectly valid, and often preferred, method for many taxpayers. Whether due to personal preference, a lack of access to digital tools, or the need to pay a substantial sum, understanding the precise procedure for mailing a check to the IRS is crucial for ensuring your payment is processed accurately and on time.

Navigating the complexities of tax payments requires precision. An improperly filled-out check or an incorrectly addressed envelope can lead to delays, penalties, or even the misapplication of your payment, creating unnecessary financial headaches. This comprehensive guide aims to demystify the process, providing clear, actionable steps and essential insights into making your tax payment via check, ensuring financial compliance and peace of mind. From understanding your obligations to meticulous record-keeping, we’ll cover every facet of this fundamental financial transaction.
Understanding Your Tax Obligation and Payment Options
Before you even consider writing a check, it’s imperative to have a clear understanding of your tax obligation and the various avenues available for payment. The IRS offers multiple methods, each with its own advantages, and choosing the right one can significantly impact your financial management.
Why You Might Owe the IRS
Tax liabilities can arise from various scenarios. The most common reason individuals send a check to the IRS is when they have a balance due after filing their annual income tax return (Form 1040). This typically occurs if your employer didn’t withhold enough tax from your paychecks throughout the year, or if you have income from sources not subject to withholding, such as self-employment income, investments, or rental properties. Similarly, self-employed individuals and those with significant non-wage income are often required to make estimated tax payments quarterly throughout the year to cover their tax liability, preventing a large bill and potential penalties at tax time. Estate taxes, business taxes, and various excise taxes can also necessitate direct payments to the Treasury. Accurately determining your tax liability is the first and most critical step in this entire process.
Overview of IRS Payment Methods
While this article focuses on check payments, it’s beneficial to be aware of the broader spectrum of payment options offered by the IRS. This context helps you understand where checks fit into the financial ecosystem of tax compliance.
-
IRS Direct Pay: This is a free, secure web service that allows you to pay your tax bill directly from your checking or savings account. It’s often the quickest and most convenient electronic option.
-
Debit Card, Credit Card, or Digital Wallet: You can pay your taxes using a third-party payment processor via your debit card, credit card, or digital wallet. Be aware that these processors typically charge a small fee for their service, which can add to your overall payment cost.
-
Electronic Federal Tax Payment System (EFTPS): This free service is primarily for businesses and individuals who need to make federal tax payments electronically. It requires enrollment and is ideal for those making regular, recurring payments.
-
Electronic Funds Withdrawal (EFW): If you e-file your tax return, you can authorize an electronic funds withdrawal from your bank account to cover any balance due. This is a convenient option integrated directly with the e-filing process.
-
Payment Plans: If you can’t pay your full tax bill, the IRS offers options like short-term payment plans or installment agreements. These are formal arrangements to pay over time, usually with interest and penalties.
-
Checks or Money Orders: This is our focus. Sending a check or money order is a reliable option, especially for those who prefer a physical record, don’t have internet access, or are uncomfortable with online financial transactions. It’s also suitable for larger payments where credit card fees might be prohibitive.
Understanding these options allows taxpayers to make an informed decision based on their financial circumstances, comfort with technology, and the specific tax situation at hand.
The Essential Steps for Preparing Your Check Payment
Once you’ve decided that mailing a check is your preferred method, the next critical phase involves preparing the check itself with meticulous attention to detail. Errors here can cause significant delays or even prevent your payment from being correctly applied to your account.
Whom to Make the Check Payable To
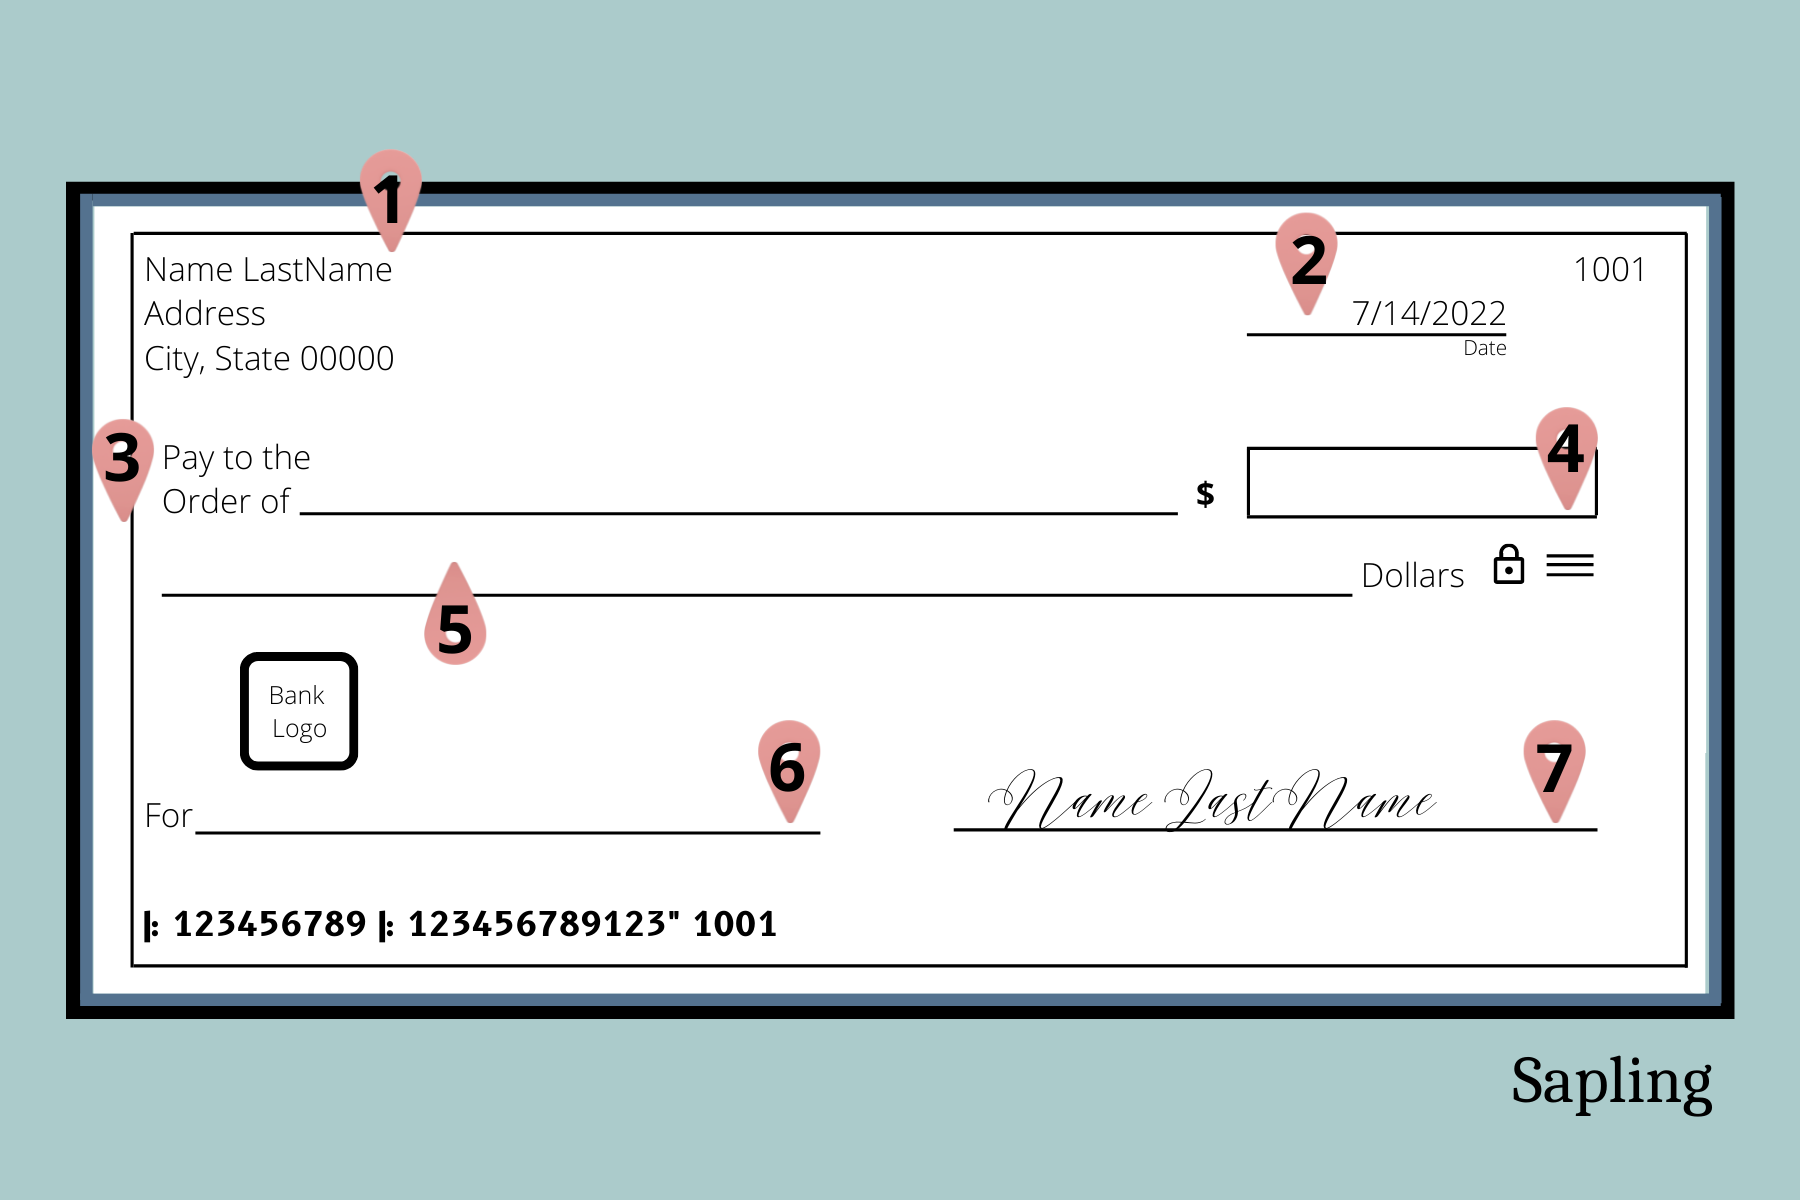
This is arguably the most crucial detail on your check. All checks or money orders for federal taxes must be made payable to the “United States Treasury.” Do not write “IRS,” “Internal Revenue Service,” or any other variation. Using the correct payee name ensures that your payment is routed properly within the federal financial system. If the payee line is incorrect, your bank might not honor the check, or the IRS might return it, leading to a late payment and potential penalties.
Information to Include on Your Check
Beyond the payee, there are specific pieces of information you must include on the memo line of your check to ensure it is accurately credited to your account. This acts as a vital cross-reference for the IRS processing centers.
You should include:
-
Your Social Security Number (SSN) or Employer Identification Number (EIN): For individual returns, use the SSN of the primary taxpayer listed on the return (or the first SSN if it’s a joint return). For business returns, use the EIN. This links the payment directly to your tax account.
-
The Tax Year: Clearly indicate the tax year for which the payment is being made (e.g., “2023 Tax”). This is particularly important if you are making estimated payments for the current year while also paying a balance due for a previous year.
-
The Form Number: Specify the associated tax form number (e.g., “Form 1040,” “Form 941,” “Form 1040-ES”). This helps the IRS categorize the payment correctly, especially if you file multiple types of returns.
Example Memo Line: “2023 Form 1040, SSN: XXX-XX-XXXX”
Double-check all these details before mailing. It’s a small effort that prevents major financial headaches.
Detaching the Payment Voucher (Form 1040-V)
When sending a check for your annual income tax payment (Form 1040), the IRS strongly recommends, and often requires, that you include a payment voucher. This is typically Form 1040-V, Payment Voucher.
-
Purpose: The 1040-V is a scannable document that helps the IRS process your check payment quickly and accurately. It contains fields for your name, address, Social Security number, the tax year, and the amount you are paying.
-
How to Use: If you are filing a paper return, the 1040-V is usually included in the instruction booklet for Form 1040. If you are e-filing but paying by check, you can print a standalone 1040-V from the IRS website.
-
Completing the Voucher: Fill out all required fields on the 1040-V clearly and accurately. Do not staple or attach your check to the voucher; simply send them together in the same envelope.
Including the payment voucher significantly streamlines the IRS’s ability to correctly apply your payment, reducing the risk of errors or delays.
When to Use a Check vs. Other Methods
While electronic payments are often faster, there are specific financial scenarios where sending a check remains a pragmatic choice:
-
Preference for Paper Trail: Some individuals prefer a physical canceled check as a tangible record of payment. While bank statements suffice for electronic payments, a canceled check provides an undeniable proof of funds transfer.
-
No Internet Access or Digital Banking: For taxpayers without reliable internet access or those who do not use online banking, a check is a straightforward way to fulfill their tax obligations.
-
Large Payment Amounts: For very substantial tax bills, the convenience fees associated with credit card payments can become significant. A check avoids these additional costs, representing a direct transfer of funds without intermediary charges.
-
Security Concerns: While IRS online portals are secure, some individuals may have a general distrust of online financial transactions and prefer the traditional security of mailing a check directly to the Treasury.
-
Estimated Tax Payments: While EFTPS is ideal for recurring estimated payments, a check can be used for occasional or one-off estimated tax payments when you print and include Form 1040-ES payment vouchers.
Carefully weigh these factors to determine if a check payment aligns best with your financial habits and specific tax situation.
Addressing and Mailing Your Payment Correctly
Once your check is perfectly prepared, the final physical step is ensuring it reaches the IRS. Incorrect addressing is a common mistake that can lead to delayed processing, missed deadlines, and potential penalties.
Finding the Correct IRS Mailing Address
Unlike sending a letter to a friend, there isn’t one universal mailing address for the IRS. The correct address depends on several factors:
-
The Type of Tax Form You Are Filing: Different forms (e.g., Form 1040 for individuals, Form 941 for employer’s quarterly tax) often have different mailing addresses.
-
Your Geographic Location: The IRS uses regional processing centers, so the address can vary based on the state or U.S. territory you reside in.
-
Whether You Are Sending a Payment With or Without a Return: Sometimes, if you’re only sending a payment (e.g., estimated tax), the address might differ from sending a payment attached to a full tax return.
Where to Find the Correct Address:
-
IRS Website: The most reliable source is always IRS.gov. Navigate to the “Where to File” section for the specific form you are using. For example, search “Where to file Form 1040 with payment.” The IRS publishes detailed tables outlining addresses for various forms and states.
-
Form Instructions: The instruction booklet for each tax form will contain the correct mailing address for that specific form, often broken down by state.
-
Tax Software: If you use tax preparation software, it will typically provide the correct mailing address as part of your printed return instructions.
Crucial Advice: Always verify the address immediately before mailing, as they can occasionally change. Sending your payment to the wrong address will cause significant delays and could result in penalties for late payment.
Packaging and Postage Requirements
Proper packaging ensures your check and voucher arrive safely and are handled efficiently by the mail system.
-
Envelope: Use a standard business-size envelope. Do not use an oversized or undersized envelope, as this can cause issues with mail sorting equipment.
-
Contents: Place your check (and Form 1040-V, if applicable) loosely in the envelope. Do not staple them together, as this makes them difficult to separate during processing.
-
Return Address: Always include your full return address in the upper-left corner of the envelope.
-
Postage: Ensure you affix sufficient postage. A standard first-class stamp usually suffices for a letter with a few pages. However, if your return is bulky, consider taking it to the post office to have it weighed and stamped correctly. Insufficient postage will result in your envelope being returned to you, potentially causing a late payment.
-
Mail by the Due Date: For mailed payments, the IRS uses the “postmark date” as the payment date. Ensure your envelope is postmarked on or before the payment deadline. If the due date falls on a weekend or holiday, the deadline shifts to the next business day.
Importance of Proof of Mailing
For any significant financial transaction with the IRS, especially tax payments, it is highly recommended to obtain proof of mailing. This financial safeguard can be invaluable if there’s ever a dispute about whether your payment was sent or received.
-
Certified Mail with Return Receipt Requested: This is the gold standard for proof of mailing. For an additional fee, the U.S. Postal Service will provide you with proof that your letter was mailed and a separate receipt confirming when it was delivered and who signed for it. This physical documentation can protect you against penalties if the IRS claims non-receipt.
-
Certificate of Mailing: A less expensive option, a Certificate of Mailing simply provides proof that an item was mailed on a specific date. It does not track delivery.
-
Date Stamping at the Post Office: Even if you don’t opt for certified mail, asking the post office to hand-stamp the envelope with the date can serve as basic proof of mailing, especially near a deadline.
-
Keep Records: Always keep a copy of your signed check, the filled-out Form 1040-V, and any proof of mailing receipts with your tax records.
These precautions are essential elements of sound financial management when dealing with tax authorities, ensuring that you have an undeniable record of your compliance.
Post-Payment Best Practices and Financial Safeguards
Sending your check to the IRS isn’t the final step in responsible tax management. Prudent financial practices dictate that you should monitor your payment and maintain thorough records. This post-payment vigilance can prevent future complications and provide peace of mind.
Record Keeping and Documentation
Maintaining meticulous records is a cornerstone of personal finance and tax compliance. After mailing your check payment, ensure you have the following readily accessible:
-
Copy of the Check: Make a photocopy of the front and back of your signed and dated check before mailing it. This includes the amount, payee, date, check number, and all information written in the memo line.
-
Copy of Form 1040-V (or other payment voucher): If you included a payment voucher, keep a copy of the completed voucher.
-
Proof of Mailing: Store any certified mail receipts, tracking numbers, or certificates of mailing you obtained from the post office.
-
Copy of Your Tax Return: Keep a complete copy of the tax return you filed (or that your payment is associated with).
-
Bank Statements: Monitor your bank statements for the check to clear. The cleared check, visible on your statement or as an image from your bank, serves as excellent proof of payment.
Keep these documents together in a safe place, ideally with other tax-related records, for at least three to seven years, as recommended by the IRS. This documentation is your primary defense against any future IRS inquiries or audits regarding your payment.
How to Verify Your Payment Was Received
While certified mail provides delivery confirmation, you can take additional steps to verify your payment was successfully processed by the IRS:
-
Bank Account Monitoring: The simplest method is to monitor your bank account to see when the check clears. This usually happens within a few weeks of mailing, but processing times can vary, especially during peak tax season.
-
IRS Online Account: If you have an IRS online account, you can log in to view your payment history. Payments are typically reflected within a few weeks after processing.
-
IRS Tax Transcripts: You can request a tax transcript from the IRS, which will show payments posted to your account for a specific tax year.
-
Wait Times: Be patient. The IRS processes millions of payments, and it can take several weeks, particularly during busy periods (April, June, September, January), for a mailed payment to be fully processed and reflected on your account. Avoid contacting the IRS too soon unless you have a specific concern, as this can tie up their phone lines.
What to Do If Your Payment Isn’t Processed
Despite your best efforts, sometimes issues arise. If your check hasn’t cleared your bank account after a reasonable amount of time (e.g., 4-6 weeks after mailing), or if you receive a notice from the IRS stating they haven’t received your payment, take the following steps:
-
Re-verify Records: Double-check your copies of the check, voucher, and mailing receipt for any discrepancies.
-
Contact Your Bank: Confirm the check hasn’t cleared your account and ask if there’s any record of it being presented for payment. You might need to issue a stop payment if you plan to send another check.
-
Check IRS Online Account: Again, verify your payment history online.
-
Respond to IRS Notices: If you receive a notice, respond promptly. Provide copies of your canceled check (if available) or other proof of payment.
-
Call the IRS: If you’ve exhausted other options, contact the IRS directly. Be prepared with all your documentation (tax return, check copies, mailing proof). Be aware that wait times can be long.
Remember, acting quickly and providing clear documentation can help resolve payment issues and potentially mitigate penalties.
Avoiding Common Pitfalls
Several common errors can turn a simple check payment into a financial headache:
-
Incorrect Payee: Writing “IRS” instead of “United States Treasury.”
-
Missing or Incorrect Information on Memo Line: Forgetting SSN/EIN, tax year, or form number.
-
Wrong Mailing Address: Sending the payment to an outdated or incorrect IRS facility.
-
Insufficient Postage: Causing the envelope to be returned, leading to late payment.
-
Late Mailing: Not allowing enough time for delivery, resulting in a postmark after the due date.
-
Bounced Checks: Ensuring sufficient funds are in your account to cover the check amount. A bounced check incurs bank fees and IRS penalties.
-
Stapling: Attaching the check to the voucher or return. This can damage the documents and delay processing.
By being mindful of these pitfalls, you can ensure a smoother and more efficient tax payment experience.

Conclusion
Sending a check to the IRS, while a traditional method, requires an acute attention to detail and a disciplined approach to financial record-keeping. It’s more than just writing a number on a piece of paper; it’s a process fraught with specific requirements designed to ensure your payment is accurately attributed and your tax obligations are properly discharged.
From correctly addressing the check to the “United States Treasury” and including all necessary identifying information, to utilizing payment vouchers and obtaining proof of mailing, each step is a critical safeguard in your personal financial management. In an era where digital tools promise instant solutions, the reliability of a carefully executed paper transaction still holds significant value, especially when it comes to governmental compliance. By following the guidelines outlined in this article, you can confidently navigate the process of mailing your tax payment, secure in the knowledge that you’ve done your part to remain financially compliant and protected. Always refer to the official IRS website or consult a tax professional for the most current and personalized guidance regarding your specific tax situation.
aViewFromTheCave is a participant in the Amazon Services LLC Associates Program, an affiliate advertising program designed to provide a means for sites to earn advertising fees by advertising and linking to Amazon.com. Amazon, the Amazon logo, AmazonSupply, and the AmazonSupply logo are trademarks of Amazon.com, Inc. or its affiliates. As an Amazon Associate we earn affiliate commissions from qualifying purchases.