
Amazon Prime Video has evolved into a comprehensive digital library for millions of users worldwide, offering a vast array of movies, TV shows, and original content. Beyond the included Prime streaming catalog, users often purchase or rent titles, building a personal collection of digital entertainment. Keeping track of these acquisitions, whether for budgeting, re-watching, or simply confirming a transaction, is a fundamental aspect of managing your digital life. This guide delves into the precise methods for locating and reviewing your Prime Video purchases, ensuring you maintain full oversight of your digital media assets across various devices.
Navigating the Prime Video Interface for Purchase History
Understanding the layout and terminology of the Prime Video platform is the first step in efficiently managing your digital purchases. Amazon’s ecosystem, while integrated, sometimes uses specific nomenclature that can be a bit confusing if you’re not familiar with it. Your purchase history is typically housed within your account settings, but the path to get there can vary slightly between web browsers, dedicated smart TV apps, and mobile applications. The core principle, however, remains consistent: your account is the central hub for all your transactions.
Understanding Your Digital Library
When you purchase a movie or TV season on Prime Video, it’s added to your “digital library.” Unlike rentals, which have an expiration period, purchased content remains available to you indefinitely, accessible for streaming or download whenever you choose. This library is distinct from the general Prime Video catalog (which includes content available with your Prime subscription or ad-supported content). Knowing this distinction helps in filtering your searches; you’re looking for your owned content, not just what’s currently available for streaming. Each item in this library represents a transaction, and the platform provides a detailed record of these, including the date of purchase, the price paid, and the payment method used.
Key Account Sections
Across all platforms, the key sections you’ll typically interact with to find your purchases are:
-
Account & Settings: This is the most comprehensive area, usually accessible via a profile icon or a drop-down menu. It contains billing information, payment methods, parental controls, and, crucially, your transaction history.
-
My Stuff/Library: On mobile apps and some smart TV interfaces, there’s often a direct “My Stuff” or “Library” tab. This section is specifically designed to house content you have either purchased, rented, added to your watchlist, or downloaded. While it primarily shows the content, many versions allow you to drill down into transaction details from here.
-
Order History: While not always directly within Prime Video’s specific interface, your general Amazon Order History is the ultimate ledger for all Amazon transactions, including digital media. If Prime Video’s specific interface proves difficult, this is a reliable fallback.
Familiarizing yourself with these general areas will significantly speed up your search, no matter which device you are using.
Step-by-Step Guide: Desktop Browser
Accessing your Prime Video purchase history through a desktop web browser offers the most detailed view and the easiest navigation due to a larger screen and direct access to Amazon’s broader account management tools.
Accessing Your Account
-
Open your web browser: Navigate to
primevideo.com. -
Sign In: If you’re not already signed in, click “Sign In” usually located in the top-right corner. Enter your Amazon account credentials (email or phone number and password). Ensure you are signing in with the exact Amazon account used for the purchases. Many users have multiple Amazon accounts, which can lead to confusion if they’re checking the wrong one.
-
Navigate to Account & Settings: Once signed in, hover over your profile name or icon (often represented by a person silhouette) in the top-right corner. A drop-down menu will appear.
-
Select “Account & Settings”: Click on this option. This will take you to a dedicated page where you can manage various aspects of your Prime Video experience.
Locating “Purchases & Rentals”
-
Find the “Your Orders” or “Purchases & Rentals” Tab: On the “Account & Settings” page, you will see several tabs or sections. Look for one explicitly labeled “Your Orders,” “Purchases & Rentals,” or sometimes simply “Purchases.” This tab is specifically designed to list your digital video transactions.
-
Review the List: Once you click on this tab, you will be presented with a chronological list of all movies and TV show episodes or seasons you have purchased or rented through Prime Video. The list typically shows:
-
Title: The name of the movie or show.
-
Date of Purchase/Rental: When the transaction occurred.
-
Price: The amount you paid.
-
Order Number: A unique identifier for the transaction.
-
Status: For rentals, it might show the remaining viewing window. For purchases, it generally indicates “Purchased.”
-
Reviewing Transaction Details
Clicking on a specific title in the “Purchases & Rentals” list usually provides more granular details about that particular transaction. This might include:
-
Payment Method: Which credit card or other payment method was charged.
-
Resolution/Format: Details about the quality (SD, HD, UHD) you purchased.
-
Associated Account Information: Confirming the purchase is linked to your current Amazon account.
-
Options to Watch: A direct link to stream the content.
This desktop interface provides the most comprehensive and filterable view of your purchase history, making it ideal for detailed financial tracking or reconciliation.
Step-by-Step Guide: Mobile App (iOS/Android)
The Prime Video mobile app offers a streamlined experience tailored for on-the-go viewing. While compact, it still provides full access to your purchase history, though the navigation path differs slightly from the desktop version.
App Navigation Fundamentals
-
Open the Prime Video App: Launch the Prime Video app on your smartphone or tablet.
-
Sign In: Ensure you are signed into the correct Amazon account associated with your purchases.
-
Locate “My Stuff” or “Library”: At the bottom of the app screen, you’ll typically see a navigation bar with icons like “Home,” “Store,” “Live TV,” and “My Stuff” or “Library.” Tap on “My Stuff” or “Library.” This section is your personal hub for content.
Finding Your “My Stuff” or “Library”
-
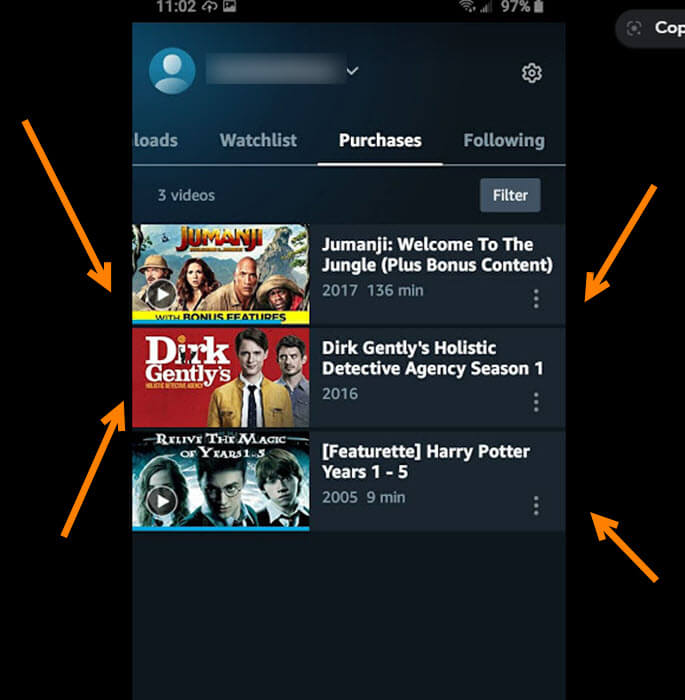
Browse Purchased Content: Within “My Stuff” or “Library,” you will see various categories such as “Watchlist,” “Rentals,” and “Purchases.” Tap on “Purchases” to see all the titles you own.
-
Accessing Purchase Details: Unlike the desktop browser which has a dedicated transaction tab, the mobile app often integrates transaction details directly with the content itself.
-
Tap on a Purchased Title: Select any movie or TV show episode/season you have purchased from the “Purchases” list.
-
Look for Details: On the content detail page, you might find an “Order Details” or “Purchase Information” section. This will confirm the date of purchase and sometimes the price.
-

Filtering and Sorting Your Content
The mobile app typically allows some basic filtering and sorting within the “Purchases” section. You might be able to:
-
Sort by Date: View your purchases from newest to oldest, or vice-versa.
-
Filter by Type: Differentiate between movies and TV shows if the app doesn’t do so automatically.
-
Search: Use a search bar within “My Stuff” to find a specific title quickly.
While the mobile app may not show the full financial ledger with payment methods directly within the purchase section, it excels at quickly showing you what you own and providing instant access to stream it. For comprehensive financial details, the desktop browser or general Amazon order history remains the primary resource.
Troubleshooting and Common Queries
Even with clear instructions, users sometimes encounter issues finding their Prime Video purchases. Understanding common pitfalls and how to address them can save time and frustration.
Missing Purchases
If you believe a purchase is missing, consider these possibilities:
-
Incorrect Amazon Account: The most common reason. Double-check that you are signed into the exact Amazon account used to make the purchase. Family members often use different accounts, or you might have an older account you forgot about.
-
Different Purchase Type: Ensure you actually purchased the item, not rented it. Rentals expire and disappear from your active rentals list after their viewing window.
-
Prime Subscription vs. Purchase: Content available through your Prime subscription is not a purchase. If your Prime membership lapses, you lose access to included content but retain access to purchases.
-
Content Rights: In rare cases, content rights can change, making a previously purchased item temporarily or permanently unavailable. Amazon usually notifies users in such instances and offers refunds or alternative access.
-
Platform Discrepancy: While purchases are generally universal, ensure the purchase wasn’t made on a different platform (e.g., Apple TV, Google Play) that only links to Prime Video for streaming, not for ownership management. Always verify the initial purchase source.
Understanding Different Purchase Types (Buy vs. Rent)
It’s crucial to distinguish between buying and renting:
-
Buy: You acquire a permanent digital license to stream or download the content as many times as you like. It appears in your “Purchases” section indefinitely.
-
Rent: You acquire a temporary license to watch the content within a specific window (e.g., 30 days to start watching, 48 hours to finish once started). After the rental period, the content is no longer accessible unless you rent or buy it again. Rentals typically appear in a separate “Rentals” section and disappear once expired. Always confirm the button you click (e.g., “Buy for $X.XX” vs. “Rent for $Y.YY”) before confirming a transaction.
Managing Payment Methods
Your Prime Video purchases are tied to the payment methods stored in your general Amazon account. To manage or review these:
-
Go to Amazon.com: Navigate to the main Amazon website.
-
Your Account: Hover over “Account & Lists” and click “Your Account.”
-
Payment Options: Under “Ordering and shopping preferences,” click on “Your Payments.”
-
Review/Update: Here you can see all your linked payment methods, add new ones, or delete old ones. This is important for understanding which card was charged for a specific purchase.
Contacting Amazon Support
If you’ve exhausted all troubleshooting steps and still can’t locate a purchase or have billing discrepancies, contacting Amazon Customer Service is the next logical step. Be prepared with:
-
Amazon Account Email: The email associated with your account.
-
Order Number (if available): If you found the purchase in your email confirmation but not in your account, provide the order number.
-
Title of Content and Date of Purchase: Specific details about the missing item.
Amazon’s support team can access your detailed account history and provide specific guidance.
Maximizing Your Prime Video Experience
Beyond just finding your purchases, understanding how to manage them effectively enhances your overall Prime Video experience. This includes financial awareness and family management.
Parental Controls for Purchases
For households with children, setting up parental controls is vital to prevent unauthorized purchases. Prime Video allows you to:
-
Set a PIN: Create a PIN that must be entered before any purchase can be made.
-
Restrict Viewing by Rating: Control the content accessible based on age ratings.
-
Enable Purchase Restrictions: Specifically restrict the ability to buy or rent content without the PIN.
These settings are typically found under “Account & Settings” in the “Parental Controls” or “Restrictions” section. Implementing these controls safeguards against accidental or unauthorized spending on your account.
Monitoring Spending
Regularly reviewing your Prime Video purchases, perhaps monthly or quarterly, can be a useful personal finance practice. Since digital purchases can accumulate quickly, a periodic check can:
-
Identify Unrecognized Transactions: Spot any unauthorized activity immediately.
-
Track Entertainment Budget: Help you stick to a budget for digital media consumption.
-
Avoid Duplicate Purchases: Prevent buying the same content twice if you forget you already own it.
The desktop “Purchases & Rentals” section, with its chronological listing and pricing details, is the most effective tool for this financial oversight.

Discovering New Content
While this guide focuses on finding existing purchases, understanding your purchase history can also inform future content discovery. By reviewing what you’ve bought in the past, you can identify patterns in your preferences (e.g., a specific genre, director, or actor) that can guide your choices for new movies or shows. Amazon’s recommendation algorithms often leverage your purchase history to suggest similar content, making your past choices a roadmap for future entertainment.
In conclusion, knowing how to efficiently access your Prime Video purchase history is more than just a technical skill; it’s a fundamental aspect of digital media management. By utilizing the steps outlined for both desktop and mobile platforms, and understanding the nuances of Amazon’s system, you ensure complete control and insight into your digital entertainment library.
aViewFromTheCave is a participant in the Amazon Services LLC Associates Program, an affiliate advertising program designed to provide a means for sites to earn advertising fees by advertising and linking to Amazon.com. Amazon, the Amazon logo, AmazonSupply, and the AmazonSupply logo are trademarks of Amazon.com, Inc. or its affiliates. As an Amazon Associate we earn affiliate commissions from qualifying purchases.